
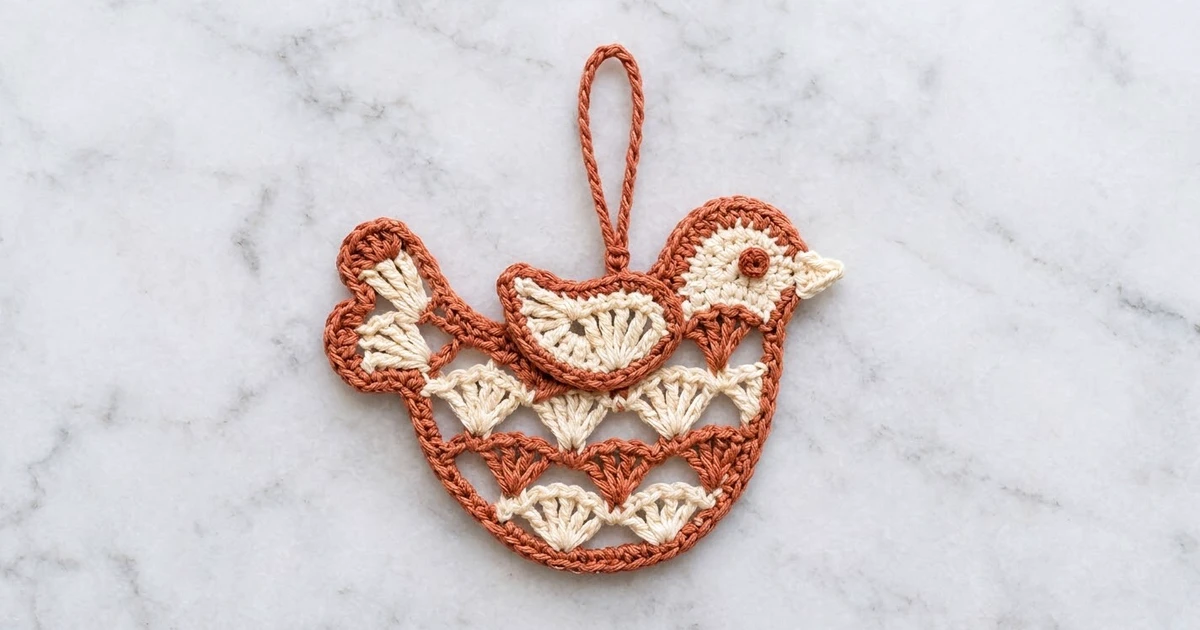
The Hearthside Bird is a small, lacy ornament with a cozy Scandinavian feel. Cream fan rows sit against rust bridges and valley fans, and a firm rust outline around the whole shape makes the bird easy to recognize from across the room.
This pattern uses two colors: a warm rust and a soft natural cream. The wing appliqué adds depth over the back. A tiny cream beak and a round rust eye give the bird its character. A slip-stitch cord loop makes it ready to hang.
The pattern uses US crochet terms. The finished ornament measures 6 in (15.2 cm) wide and 4 in (10.2 cm) tall, not counting the hanging loop.
Here’s how it’s built. You start with a short foundation row at the belly and work the body upward in rows of alternating colors, cutting the yarn after each color row. The head is worked in rows off the top right corner, and the tail is a single fan worked off the top left corner. A two-round rust outline frames everything. Last, you sew on the wing, beak and eye and add the loop.
Finished Size and Construction
- Finished size: 6 in (15.2 cm) wide × 4 in (10.2 cm) tall, plus a 2.75 in (7.0 cm) loop
- Skill level: Advanced beginner / intermediate
- Terminology: US crochet terms
- Yarn weight: DK / light (#3) cotton
- Hook: 3.25 mm (US D/3)
- Number of pieces: 1 body + 3 small appliqués (wing, beak, eye)
- Layout: Single ornament; no motifs are joined
- Body size before border: 5.5 in (14.0 cm) × 3.5 in (8.9 cm)
- Border depth: 0.25 in (0.6 cm) on each edge
Materials
Use a smooth, mercerized or combed cotton in DK weight. Cotton holds the fan shapes crisply and blocks flat. Acrylic will work, but the ornament will be softer and less defined.
- Rust (Color A): 12 g, about 30 m
- Cream (Color B): 6 g, about 15 m
These quantities include a margin for joining tails and a test swatch.
Tools:
– 3.25 mm (US D/3) crochet hook
– Tapestry needle
– Scissors
– Stitch markers (2–3)
– Rust-proof pins and a blocking mat or folded towel
– Spray bottle with water
Abbreviations (US Terms)
- ch – chain
- sl st – slip stitch
- sc – single crochet
- sc2tog – single crochet 2 together
- dc – double crochet
- tr – treble crochet
- st(s) – stitch(es)
- sp – space
- RS – right side
Special stitches:
– Fan: 7 dc worked in the same stitch.
– Half fan: 4 dc worked in the same stitch, used at row edges.
Gauge and Checkpoints
Gauge: 10 sc × 11 rows = 2 in (5.1 cm). One fan measures about 1.2 in (3.0 cm) across and 0.5 in (1.3 cm) tall.
Make one complete body first and measure it before making more ornaments. These checkpoints keep you on track:
- After Row 1: 3.8 in (9.7 cm) wide
- After Row 3: about 4.5 in (11.4 cm) wide across the fan tips and 1.25 in (3.2 cm) tall
- After Row 7: 5 in (12.7 cm) wide and 2.4 in (6.1 cm) tall
- After the head and tail: 5.5 in (14.0 cm) × 3.5 in (8.9 cm)
- After the border: 6 in (15.2 cm) × 4 in (10.2 cm)
If your body is more than 0.25 in (0.6 cm) too large, go down half a hook size. If it is too small, go up half a hook size. Fans that ruffle usually mean your dc are too tall, so pull up a little less yarn before each yarn over.

Body
The body is worked in rows. Unless noted otherwise, work every row with the RS facing you. Join each new color at the right-hand edge and fasten off at the end of the row. Leave 6 in (15.2 cm) tails.
Row 1 (Rust): Ch 20. Sc in 2nd ch from hook and in each ch across. (19 sc) Fasten off.
Row 2 (Cream): Join Cream with a sc in the first sc. Sk 2 sts, fan in next st, sk 2 sts, sc in next st; repeat from * 2 more times. (3 fans + 4 sc = 25 sts) Fasten off.
Row 3 (Rust): Join Rust in the first sc. Ch 3 (counts as dc) and work 6 dc in the same sc (edge fan). Ch 2, sc in the 4th dc of the next fan, ch 2, fan in the next sc; repeat from * 2 more times. (4 fans = 28 dc, + 3 sc = 31 sts; 6 ch-2 sps) Fasten off.
The rust fans now sit in the valleys between the cream fans, and the chain bridges cross over the cream fan tops.
Row 4 (Cream): Join Cream in the top of the beginning ch-3 of Row 3. Ch 3 (counts as dc) and work 3 dc in the same st (half fan). Sc in the 4th dc of the same fan. Fan in the next sc, sc in the 4th dc of the next fan; repeat from * 2 more times. Work a half fan (4 dc) in the last dc of the row. Skip all ch-2 sps. (2 half fans = 8 dc + 3 fans = 21 dc + 4 sc = 33 sts) Fasten off.
The half fans are what widen the belly into its rounded boat shape.
Row 5 (Rust): Join Rust with a sc in the top of the beginning ch-3. Ch 2, fan in the next sc. Ch 2, sc in the 4th dc of the next fan, ch 2, fan in the next sc; repeat from * 2 more times. Ch 2, sc in the last dc. (4 fans = 28 dc + 5 sc = 33 sts; 8 ch-2 sps) Fasten off.
Row 6 (Cream): Join Cream in the first sc. Ch 3 and work 3 dc in the same sc (half fan). Sc in the 4th dc of the next fan. Fan in the next sc, sc in the 4th dc of the next fan; repeat from * 2 more times. Work a half fan in the last sc. Skip all ch-2 sps. (2 half fans + 3 fans + 4 sc = 33 sts) Fasten off.
Row 7 (Rust, leveling row): Join Rust in the top of the beginning ch-3. Ch 1. Sc in each dc and dc in each sc across. (29 sc + 4 dc = 33 sts) Don’t fasten off yet if you like a tidy edge. Otherwise, fasten off.
The dc in the valleys bring the top edge level. Checkpoint: 5 in (12.7 cm) wide, 2.4 in (6.1 cm) tall.
Head
Number the Row 7 stitches 1–33 from left to right. The head is worked in Cream on sts 26–33.
Row H1: With the RS facing, join Cream in st 26. Ch 1, sc in the same st and in the next 7 sts. Turn. (8 sc)
Row H2: Ch 1, 2 sc in the first st, sc in the next 6, 2 sc in the last st. Turn. (10 sc)
Row H3: Ch 1, sc in each st. Turn. (10 sc)
Row H4: Ch 1, sc2tog, sc in the next 6, sc2tog. Turn. (8 sc)
Row H5: Ch 1, sc2tog, sc in the next 4, sc2tog. Turn. (6 sc)
Row H6: Ch 1, sc2tog 3 times. (3 sc) Fasten off.
The head should be about 2 in (5.1 cm) wide at its widest and 1.1 in (2.8 cm) tall.
Tail
Tail fan (Cream): Join Cream in st 1 of Row 7. Ch 4 (counts as tr). Ch 1, tr in the same st; repeat from * 3 more times. (5 tr, 4 ch-1 sps) Fasten off.
The tail fans upward and out to the left, extending the body width by about 0.5 in (1.3 cm). Checkpoint: 5.5 in (14.0 cm) × 3.5 in (8.9 cm).
Border
Border gauge: 5 sc per 1 in (2.5 cm) along the edges.
Weave in all the body tails before you start, so the outline covers them.
Rnd 1 (Rust, sc): Join Rust at the left end of the foundation chain. Work the sections below in order, then join with a sl st to the first sc.
- Bottom: 2 sc in the first foundation loop, sc in the next 17 loops, 2 sc in the last loop. (21 sc)
- Left side (row ends of Rows 2–6): 2 sc in each row end. (10 sc)
- Tail: Work 3 sc along the beginning ch-4. Then work (sc in tr, sc in ch-1 sp) twice, sl st in the center tr to form the notch, and (sc in ch-1 sp, sc in tr) twice. Finish with 3 sc down the post of the last tr. (14 sc + 1 sl st = 15 sts)
- Back (Row 7, sts 2–25): Sc in each st. (24 sc)
- Head: 1 sc in each row end of H1–H6 (6), then 2 sc in the first st of H6, sc in the next st, 2 sc in the last st (5), then 1 sc in each row end down H6–H1 (6). (17 sc)
- Right side (row ends of Row 7, then Rows 6–2): 1 sc in the Row 7 end and 2 sc in each of the others. (11 sc)
Round total: 21 + 10 + 15 + 24 + 17 + 11 = 98 sts
Rnd 2 (Rust, sl st): Sl st loosely in each st around. (98 sl st) Join and fasten off.
This round gives the raised, corded rust frame.
Why the math works: The bordered outline measures about 19.6 in (49.8 cm) around. At 5 sc per inch, that is 98 stitches. The 2-sc increases at the bottom corners and head corners let the outline turn without cupping. The 2-sc-per-dc-row-end ratio matches the 0.5 in (1.3 cm) height of each fan row at border gauge. With 0.25 in (0.6 cm) of border on every edge, the bird grows from 5.5 × 3.5 in to 6 × 4 in (15.2 × 10.2 cm).
Wing Appliqué
Row 1 (Cream): Make a magic ring. Ch 3 (counts as dc) and work 8 dc in the ring. Pull the ring closed, leaving it as a half circle, and don’t join. Turn. (9 dc)
Row 2 (Cream): Ch 3 (counts as dc), dc in the same st, 2 dc in each remaining st. (18 dc) Fasten off.
Row 3 (Rust edging): Join Rust in the first dc. Ch 1, 2 sc in the same st, sc in the next 16, 2 sc in the last st. (20 sc)
Without turning, continue along the straight edge: 2 sc in the Row 2 end, 2 sc in the Row 1 end, 1 sc over the ring center, 2 sc in the other Row 1 end, and 2 sc in the other Row 2 end. (9 sc) Join with a sl st. (29 sts total)
Leave a 12 in (30.5 cm) tail for sewing. The wing measures about 2.4 in (6.1 cm) × 1.2 in (3.0 cm).
Beak
Row 1 (Cream): Ch 4. Sc in the 2nd ch from hook and the next 2 ch. Turn. (3 sc)
Row 2: Ch 1, sc2tog, sc. Turn. (2 sc)
Row 3: Ch 1, sc2tog. (1 sc)
Fasten off, leaving an 8 in (20.3 cm) tail. The beak is about 0.6 in (1.5 cm) long.
Eye
Rnd 1 (Rust): Make a magic ring and work 6 sc in the ring. Join with a sl st. (6 sc)
Leave an 8 in (20.3 cm) tail. The eye is about 0.4 in (1.0 cm) across.
Assembly and Hanging Loop
- Pin the wing over Row 7 sts 9–20 with its straight edge along the back outline. The cream fan should radiate downward over Rows 6–5. Whipstitch all the way around through the rust edging only.
- Pin the beak so its wide end covers the head’s right edge at Rows H3–H5, with the point facing outward. Sew the base securely.
- Sew the eye centered on Row H4, about 0.4 in (1.0 cm) in from the beak.
- Loop: Join Rust in the Rnd 2 st where the back meets the head. Ch 36, then sl st in the same st. Turn, and sl st in each ch back along the loop. Fasten off. The loop stands 2.75 in (7.0 cm) tall.
Final Blocking
- Weave in all the remaining ends through stitches of the same color.
- Lightly mist the ornament until it is damp, not soaked.
- Lay it RS up on the blocking mat.
- Pin the bottom, tail tip, head top and beak to 6 in (15.2 cm) × 4 in (10.2 cm).
- Open each fan by gently pressing the dc apart with your fingertips.
- Pin the tail notch and the wing edge flat.
- Leave it to dry completely, at least 6 hours, before unpinning.
- For extra stiffness, mist with a light starch solution and dry again.
Final Quality-Control Checklist
- Body rows have 19, 25, 31, 33, 33, 33 and 33 sts
- The fans are evenly spaced, with no twisted chain bridges
- The border totals 98 sts on both rounds
- The tail notch is visible at the center tr
- The wing is centered over the back and lies flat
- The beak and eye are secure and level
- The loop is centered and strong
- Finished size: 6 in × 4 in (15.2 cm × 10.2 cm)
Troubleshooting
- Body cups upward: Your fans are too tight. Loosen the dc, or go up a hook size.
- Edges ruffle: You have too many sts in the border. Check that you worked 2 sc per row end, not 3.
- Top edge wavy after Row 7: Make sure you worked dc, not sc, into the 4 valley sc.
- Wing puckers the body: Sew more loosely, through the edging only.
- Uneven fan tops: Count 7 dc per fan, and anchor each sc in the exact 4th dc.
Care
Hand wash in cool water, press out the moisture in a towel, and reblock flat to dry. Store the ornament flat or hanging, away from crushing weight.

Final Notes
The measurement chain is simple. Your 19-st foundation row should measure 3.8 in (9.7 cm). The body grows to 5 in (12.7 cm) by Row 7, and the head and tail bring it to 5.5 in × 3.5 in (14.0 cm × 8.9 cm). The 98-stitch border then finishes it at 6 in × 4 in (15.2 cm × 10.2 cm). Check each stage and your bird will come out true to shape every time.
Happy crocheting!