

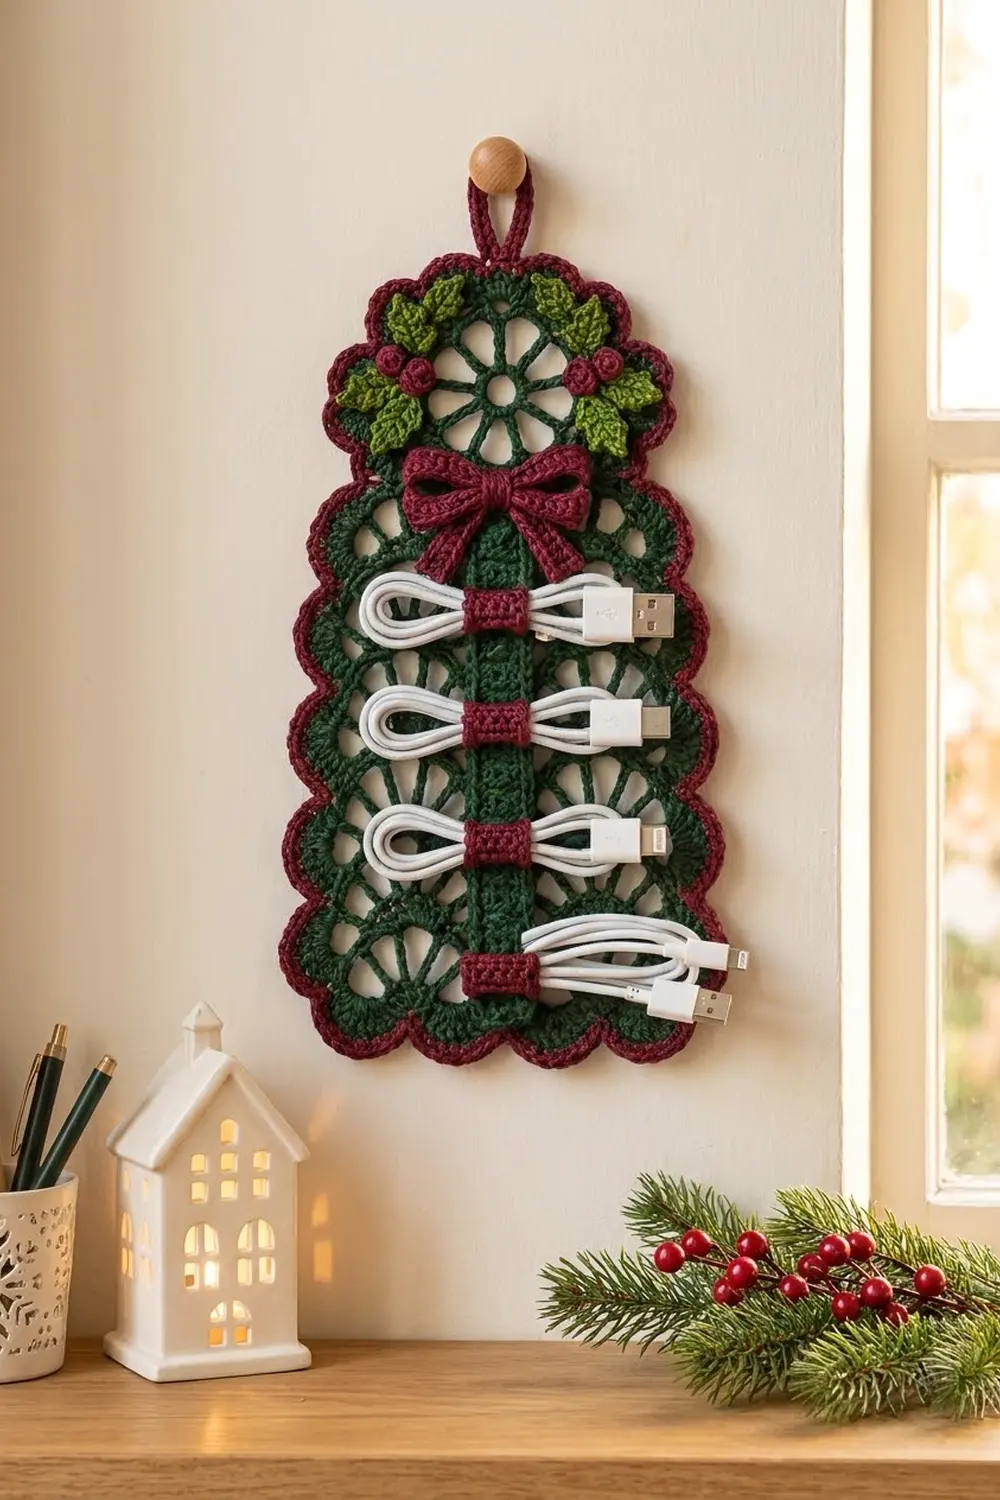
This holly cable organizer hangs on the wall and keeps charging cables tidy. It is one lacy panel with a scalloped outline and an arched top. Open fans are stacked up both sides of a straight center spine, and a round wheel medallion sits at the top.
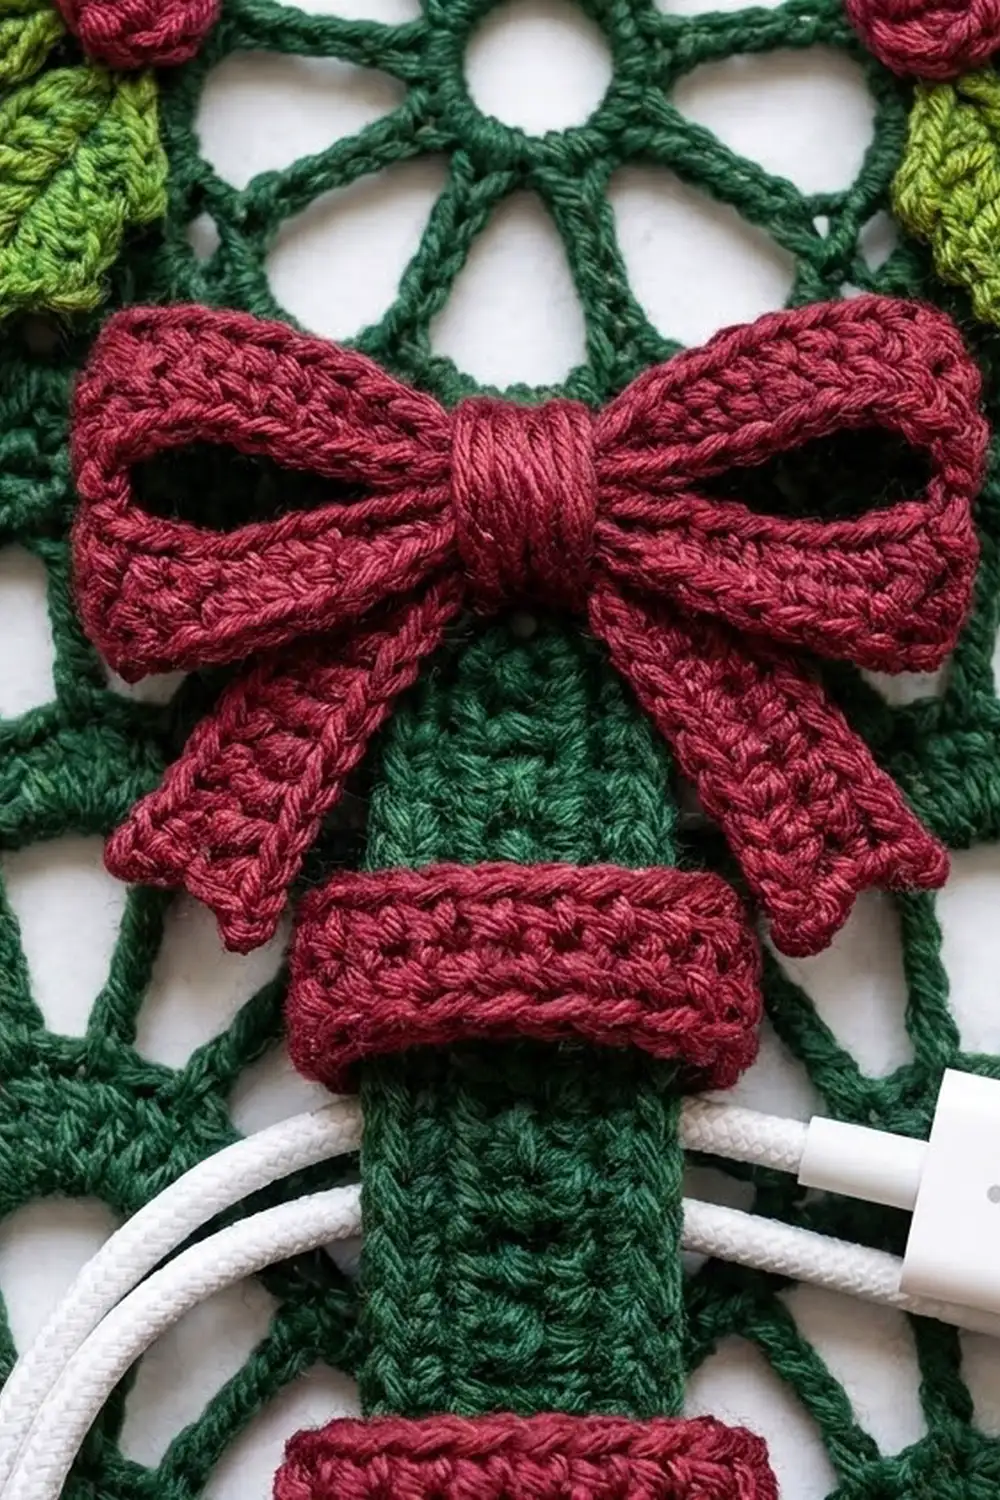
Burgundy berries, bright green holly leaves, and a ribbed burgundy bow decorate the top. Down the center, a green strap with four burgundy bands holds coiled cables. The colors are Forest Green, Burgundy, and Leaf Green, so it looks festive but is still useful all year.
The pattern uses US crochet terms. The finished panel measures 8.6 in (21.8 cm) wide and 11.9 in (30.2 cm) tall, plus a 1.25 in (3.2 cm) hanging loop.
You work the fan body flat in rows from the bottom up. Then you make the wheel medallion in rounds and join it to the top of the body in its last round. A three-round border goes all the way around the panel. Last, you make the strap, bands, bow, leaves, and berries and sew them on.
Finished Size and Construction
- Finished size: 8.6 x 11.9 in (21.8 x 30.2 cm), plus a 1.25 in (3.2 cm) loop
- Skill level: Intermediate
- Terminology: US
- Yarn weight: DK / light worsted (#3), cotton or cotton blend
- Hook: 4.0 mm (G-6)
- Number of pieces: 1 main panel (fan body and medallion, joined as you go). The sewn-on extras are 1 strap, 4 bands, 1 bow in 3 parts, 8 leaves, and 6 berries.
- Layout: one vertical panel with the medallion centered on top
- Body size: 7.4 x 6.8 in (18.8 x 17.3 cm)
- Size before border: 7.4 x 10.9 in (18.8 x 27.7 cm)
- Border depth: 0.6 in (1.5 cm) at the sides and bottom, 0.4 in (1.0 cm) at the top
Materials
Use a smooth DK cotton or cotton blend. Cotton shows the fan spokes clearly, blocks flat, and won’t stretch out under the weight of the cables.
- Forest Green (A): 60 g / about 145 m (body, medallion, border Round 1, strap)
- Burgundy (B): 25 g / about 60 m (border Rounds 2-3, bands, bow, berries)
- Leaf Green (C): 8 g / about 19 m (holly leaves)
These quantities include a margin of roughly 15%.
Tools:
– 4.0 mm (G-6) hook
– 3.5 mm (E-4) hook (optional, for firmer appliqués)
– Tapestry needle
– 6 locking stitch markers
– Rust-proof pins, a blocking mat, and a spray bottle
– Tape measure
Abbreviations (US Terms)
- ch – chain
- sl st – slip stitch
- sc – single crochet
- hdc – half double crochet
- dc – double crochet
- tr – treble crochet
- sc2tog – single crochet 2 together
- BLO – back loop only
- rev sc – reverse single crochet (crab stitch)
- sp(s) – space(s)
- st(s) – stitch(es)
- RS – right side
Special stitches:
– Fan: (dc, ch 1) 5 times, dc, all in the same space. This makes 6 dc and 5 ch-1 sps.
– Picot: ch 3, sl st in 3rd ch from hook.
– Rev sc: Working from left to right, insert the hook in the next st to the right, pull up a loop, yo, and draw through both loops.
Gauge and Checkpoints
Base gauge: 20 sc = 4 in (10.2 cm) with the 4.0 mm hook.
Use the start of the body as your gauge test. Work Rows 1-4 and measure: they should be 7.4 in (18.8 cm) wide and 1.8 in (4.6 cm) tall.
Checkpoints:
– After Row 4: 7.4 x 1.8 in (18.8 x 4.6 cm)
– After Row 13: 7.4 x 6.8 in (18.8 x 17.3 cm)
– Medallion after Round 3: 3.0 in (7.6 cm) across
– Medallion after Round 5: 4.5 in (11.4 cm) across
– Before border: 7.4 x 10.9 in (18.8 x 27.7 cm)
– After border and blocking: 8.6 x 11.9 in (21.8 x 30.2 cm)
If your piece is too big, go down 0.5 mm in hook size. If it is too small, go up 0.5 mm. Being off by up to 0.2 in (0.5 cm) is fine, because blocking will correct it. Width matters most, since the medallion’s join points have to line up with the fans.
Part 1: Fan Body
Using A, ch 38.
Row 1 (RS): Sc in 2nd ch from hook and in each ch across, turn. (37 sc)
Row 2 (set-up arch row): Ch 3 (counts as dc), *ch 2, skip 2 sts, sc in next st, ch 3, skip 2 sts, sc in next st, ch 2, skip 2 sts, dc in next st; repeat from * 3 more times, turn. (5 dc, 8 sc, 4 ch-3 sps, 8 ch-2 sps)
The 3rd dc of this row sits in st 19, the exact center of the 37 sts. This dc is the spine, so mark it.
Row 3 (fan row): Ch 1, sc in first dc, *Fan in next ch-3 sp, skipping the sc and ch-2 sps on each side; work sc in next dc, or dc if it is the marked spine dc; repeat from * 3 more times, working the last sc in the top of the turning ch, turn. (4 Fans = 24 dc and 20 ch-1 sps; plus 4 sc and 1 spine dc)
Row 4 (arch row): Ch 3 (counts as dc), *ch 2, sc in 1st ch-1 sp of next Fan, ch 3, sc in 5th ch-1 sp of same Fan, ch 2, dc in next st (the sc, or the spine dc); repeat from * 3 more times, turn. (5 dc, 8 sc, 4 ch-3 sps, 8 ch-2 sps)
Each ch-3 sits over the center three sps of a Fan, so every new Fan stacks straight on top of the one below. Move the spine marker up as you go.
Rows 5-13: Repeat Rows 3-4 four more times, then work Row 3 once more. Fasten off. (6 tiers of Fans)
The body now measures 7.4 x 6.8 in (18.8 x 17.3 cm). The outer Fans flare slightly past the edges, which starts the side scallops.
Part 2: Wheel Medallion (Joined in Round 5)
Using A, make a magic ring.
Round 1: Ch 1, 12 sc in ring, join with sl st to first sc. (12 sc)
Round 2: Ch 6 (counts as tr + ch 2), *tr in next sc, ch 2; repeat from * 10 more times, join with sl st to 4th ch of beginning ch-6. (12 tr spokes, 12 ch-2 sps)
Round 3: Sl st into first ch-2 sp, ch 1, 3 sc in each ch-2 sp around, join. (36 sc; 3.0 in / 7.6 cm across)
Round 4: Ch 1, sc in first sc, *ch 5, skip 2 sc, sc in next sc; repeat from * 10 more times, ch 5, skip 2 sc, join. (12 sc, 12 ch-5 loops)
Round 5 (petals and join): Hold the body RS facing with Row 13 at the top. Mark these 5 join points, from left to right:
1. The innermost dc of the left outer Fan
2. The center (3rd) ch-1 sp of the left inner Fan
3. The top of the spine dc
4. The center ch-1 sp of the right inner Fan
5. The innermost dc of the right outer Fan
Sl st into the next ch-5 loop. Work 7 free petals by making (sc, hdc, 3 dc, hdc, sc) in each of the next 7 loops.
Then work a joined petal in each of the last 5 loops, in join-point order: (sc, hdc, 2 dc) in the loop, sl st in the join point, then (dc, hdc, sc) in the same loop.
Join with sl st to first sc. Fasten off. (12 petals, 84 sts)
The 7 free petals form the scalloped dome, and the 4th free petal is at the top center. The panel is now 7.4 x 10.9 in (18.8 x 27.7 cm).
Part 3: Strap and Bands
Strap (A): Ch 6.
– Row 1: Sc in 2nd ch from hook and across, turn. (5 sc)
– Rows 2-38: Ch 1, sc in each st, turn. (5 sc)
Fasten off. The strap is 1 x 7 in (2.5 x 17.8 cm).
Band (make 4, B): Ch 5.
– Row 1: Sc in 2nd ch from hook and across, turn. (4 sc)
– Rows 2-20: Ch 1, sc BLO in each st, turn. (4 sc)
Fasten off and leave a 10 in (25.4 cm) tail. Each ribbed band is 0.8 x 3.5 in (2.0 x 8.9 cm).
Part 4: Bow
Loop strip (B): Ch 7.
– Row 1: Sc in 2nd ch from hook and across. (6 sc)
– Rows 2-30: Ch 1, sc BLO across. (6 sc)
Whipstitch Row 30 to the foundation edge to make a ring. Flatten the ring with the seam at center back, then wrap yarn tightly 5 times around the middle. The two loops should be about 2.6 in (6.6 cm) wide.
Tails (make 2, B): Ch 5.
– Row 1: 4 sc.
– Rows 2-11: Ch 1, sc BLO across. (4 sc)
– Row 12: Ch 1, sl st in first st, sc, hdc, dc. (4 sts, which makes an angled end)
Knot (B): Ch 5.
– Row 1: 4 sc.
– Rows 2-8: Ch 1, sc BLO across. (4 sc)
Set the tails behind the loops in an upside-down V. Wrap the knot around the middle of the bow, over the tops of the tails, and sew its ends together at the back. The finished bow is 2.6 x 2.4 in (6.6 x 6.1 cm).
Part 5: Holly Leaves and Berries
Leaf (make 8, C): Ch 8.
– Side 1: Sl st in 2nd ch from hook, sc in next ch, hdc in next ch, picot, dc in next 2 ch, picot, hdc in next ch. In the last ch, work (sc, ch 3, sl st in 3rd ch from hook, sc) to make the tip.
– Side 2: Working along the other side of the chain: hdc in next ch, picot, dc in next 2 ch, picot, hdc in next ch, sc in next ch, sl st in last ch.
Fasten off. (14 sts and 5 points; 1.3 in / 3.3 cm long)
Berry (make 6, B):
– Round 1: 6 sc in a magic ring. (6 sc)
– Round 2: Sc2tog 3 times. (3 sts)
Stuff the tails inside and close. Each berry is 0.4 in (1.0 cm) across.
Border
Border gauge:
– Round 1 adds 0.35 in (0.9 cm) at the bottom and sides, and 0.15 in (0.4 cm) at the top.
– Rounds 2-3 together add 0.25 in (0.6 cm) all around.
Round 1 (A, scallops): With RS facing, join A with sc in the first free loop of the foundation ch at the bottom left corner. Work around the panel as follows.
- Bottom (49 sts): *Skip 2 loops, 7 dc in next loop, skip 2 loops, sc in next loop; repeat from * 5 more times. This makes 6 shells and 7 sc, with the last sc in loop 37.
- Right side (36 sts): Skip the end of Row 1. *Work 5 dc around the end st of the next arch row, then sc in the edge sc of the next fan row; repeat from * 5 more times. This uses arch Rows 2-12 and fan Rows 3-13, for 6 shells and 6 sc.
- Top (75 sts):
- 10 sc across the right outer Fan (one in each dc and ch-1 sp), stopping before the joined dc
- 3 sc along the exposed sts of the joined petal
- 1 sc in each st of the 7 free petals (49 sc)
- 3 sc along the next joined petal
- 10 sc across the left outer Fan
- Left side (36 sts): Work the same as the right side in reverse, ending with 5 dc around the end of Row 2. Join to first sc.
(196 sts)
Round 2 (B): Join B and work sc in each st around, with these changes:
– 3 sc in the 4th dc of each bottom shell (+12)
– 3 sc in the 3rd dc of each side shell (+24)
– 2 sc in the center sc of each free petal (+7). At the top-center petal, work (sc, ch 16, sc) instead to make the hanging loop.
Join. (239 sc + ch-16 loop)
Round 3 (B): Ch 1, rev sc in each sc around, working 22 rev sc over the ch-16 loop when you reach it. Join and fasten off. (239 rev sc + 22 on the loop)
Why the math works:
– The bottom has 37 = 1 + (6 x 6) loops, so the six 6-st repeats start and end on a sc, with the center sc right under the spine.
– Each side gets one shell for each arch row (6) and one sc for each fan row (6), so there is a scallop at every tier.
– The top adds up as 10 + 3 + 49 + 3 + 10 = 75.
– Round 1 totals 49 + 36 + 75 + 36 = 196.
– Round 2 adds 43 sts, only at the convex tips, so the edge curves without ruffling: 196 + 12 + 24 + 7 = 239.
Final Blocking
- Weave in all ends except the band tails.
- Mist the panel until it is evenly damp.
- Pin it to 8.6 x 11.9 in (21.8 x 30.2 cm), keeping the spine perfectly straight.
- Pin out every side scallop, bottom shell, and dome petal. Then open each Fan so its spokes are evenly spaced.
- Block the strap flat to 1 x 7 in (2.5 x 17.8 cm). Pin out the leaf points.
- Let everything dry completely.
- Add the bands. Wrap each band around the strap and seam its ends at the back. Place the band centers 1.25, 3.0, 4.75, and 6.5 in (3.2, 7.6, 12.1, and 16.5 cm) from the top of the strap. Tack each band to the strap with 2 stitches.
- Attach the strap. Center it over the spine, with the top 0.5 in (1.3 cm) above Row 13 and the bottom 0.3 in (0.8 cm) above the foundation edge. Sew both long edges, keeping the front of each band loose.
- Add the trims. Sew the bow over the top of the strap. On each shoulder, sew 4 leaves and 3 berries.
Final Quality-Control Checklist
- The spine is straight from Row 1 to the medallion.
- Every fan row has 4 Fans and 1 spine dc.
- The medallion has 12 petals: 5 joined and 7 free.
- Border Round 1 has 196 sts, and Round 2 has 239.
- There are 6 scallops along the bottom and 6 on each side.
- The loop is centered on the top petal.
- A cable slides easily under each band.
- The panel is 8.6 x 11.9 in (21.8 x 30.2 cm).
Troubleshooting
- The Fans ruffle: Go down a hook size or tighten your ch-1 sps.
- The Fans drift sideways: Make sure the arch-row sc go into the 1st and 5th ch-1 sps.
- The medallion puckers the body: Recheck the 5 join points.
- The border cups: Add 1 sc at each shell tip in Round 2.
- The bands are too tight: Add 2 rows to each band.
Care
Hand wash in cool water and lay flat to dry, reshaping the scallops while the piece is damp. Don’t put cables back in the bands until it is fully dry.
Final Notes
Here is the measurement chain from start to finish:
– Gauge: 20 sc = 4 in (10.2 cm)
– 37 sts = 7.4 in (18.8 cm)
– Body: 7.4 x 6.8 in (18.8 x 17.3 cm)
– Medallion: 4.5 in (11.4 cm), joined at 5 points
– Before border: 7.4 x 10.9 in (18.8 x 27.7 cm)
– Border: 0.6 in (1.5 cm) at the sides and bottom, 0.4 in (1.0 cm) at the top
– Finished: 8.6 x 11.9 in (21.8 x 30.2 cm)
If every checkpoint matches, the strap, bow, and holly will sit exactly where they should.
Happy crocheting!