
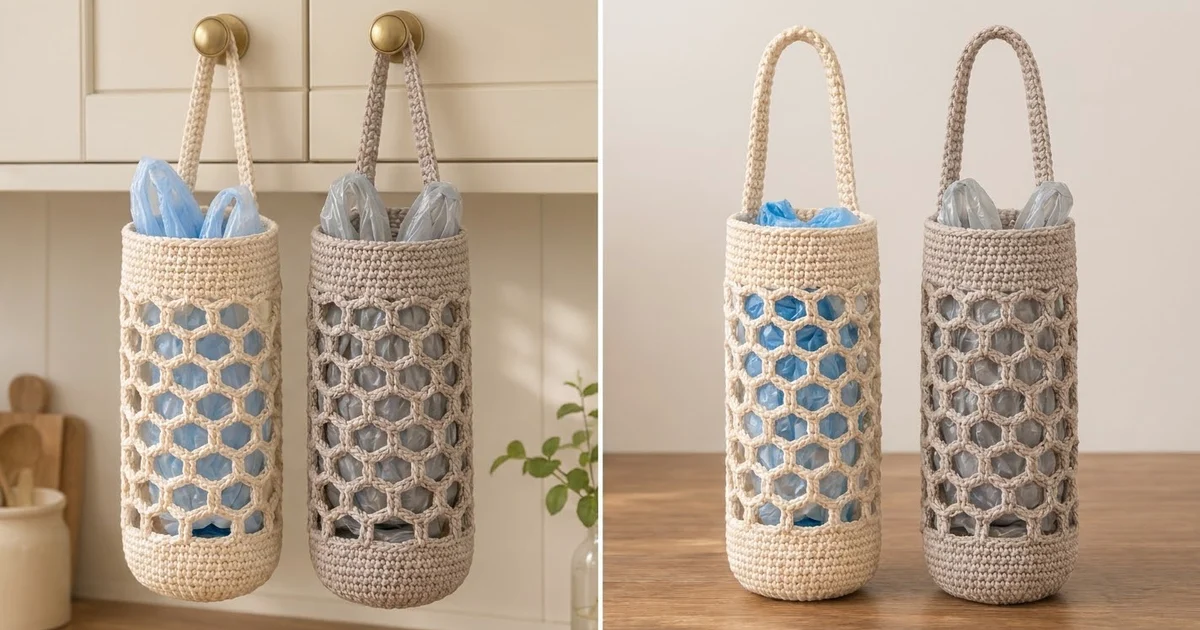
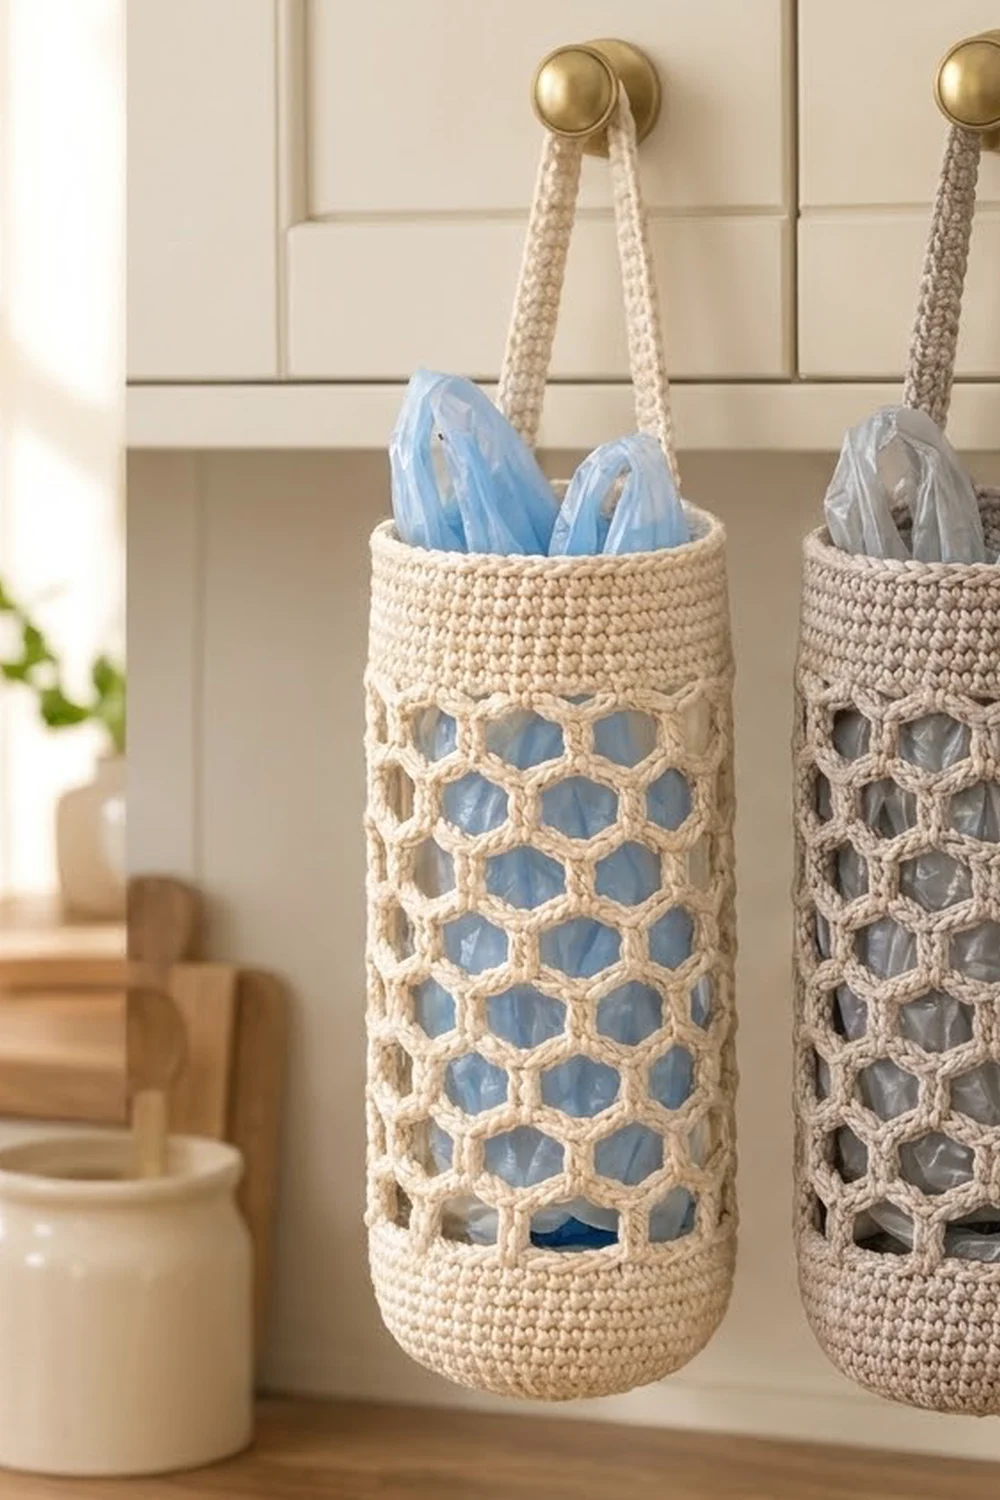
This hanging bag holder is a simple cylinder with a honeycomb mesh around the middle. The base is solid, there’s a low solid wall at the bottom, a deep solid band at the top, and a narrow strap for hanging it on a cabinet knob or hook. Stuff plastic grocery bags in at the top. The open hexagons let you see how many are left.
The sample is made in soft cream cotton. A light greige also works well, and two holders in different neutrals look good side by side. It suits a farmhouse or Scandinavian kitchen. All terms are US crochet terms.
The finished body measures about 4.25 in (10.8 cm) across and 10.3 in (26.2 cm) tall. The strap adds a loop about 4.9 in (12.4 cm) high, so the holder hangs about 15.2 in (38.6 cm) from top of strap to base.
You work everything in one piece. Start with a flat circle base and turn up the wall with a back-loop round. Then work the honeycomb mesh, convert back to solid single crochet for the top band, and crochet the strap straight off the rim. You attach its end on the opposite side.
Finished Size and Construction
- Finished size: 4.25 in (10.8 cm) diameter x 10.3 in (26.2 cm) tall body; strap loop about 4.9 in (12.4 cm) high
- Skill level: Easy / advanced beginner
- Terminology: US crochet terms
- Yarn weight: Worsted (#4), cotton
- Hook: 4.0 mm (US G-6)
- Number of pieces: 1 (the strap is worked directly from the rim)
- Layout: Single upright tube, worked in joined rounds from the base up
- Piece size: Base 4.25 in (10.8 cm) across, 13.3 in (33.8 cm) around
- Size before border: 7.7 in (19.6 cm) tall (lower wall plus mesh)
- Border depth: Top band 2.6 in (6.6 cm), plus a slip-stitch rim
Materials
Yarn: Use a worsted-weight cotton or cotton blend with a matte, rounded twist. Cotton holds the hexagons open and keeps the tube upright. Acrylic gives a softer holder that slumps more.
- Cream (main and only color): 110 g, about 190 m (208 yd)
- Optional colorway: Greige or light taupe, same amount, to make a second holder
The yarn quantity includes a margin of about 20% for your gauge swatch and small tension differences.
Tools:
- 4.0 mm (US G-6) crochet hook
- Stitch markers (2)
- Tapestry needle
- Scissors
- Measuring tape
- Pins and a spray bottle for blocking
- A 4 in (10.2 cm) wide jar, bottle or rolled towel to use as a blocking form
Abbreviations (US Terms)
- ch – chain
- sc – single crochet
- sl st – slip stitch
- st(s) – stitch(es)
- sp – space
- sk – skip
- inc – 2 sc in the same st
- BLO – back loop only
- MR – magic ring
- rep – repeat
- Rnd(s) – round(s)
Special stitch – V-join: (sc, ch 2, sc) all in the same st or space. The two sc and the ch-2 between them make the short vertical bar between neighboring hexagons.
Gauge and Checkpoints
Gauge: 18 sc and 20 rounds = 4 in (10.2 cm) in sc, worked in the round. That’s 4.5 sts and 5 rounds per inch (2.54 cm).
You’ll be working the base anyway, so use it as your gauge test. Work Rnds 1–10 and measure.
Checkpoints:
- After base Rnd 10 (60 sts): 4.25 in (10.8 cm) across, lying flat.
- After lower wall Rnd 16: Wall 1.2 in (3.0 cm) tall, measured from the BLO ridge.
- After Mesh Rnd 9: Mesh section about 6.5 in (16.5 cm) tall when lightly stretched downward.
- After Band Rnd 13: Band 2.6 in (6.6 cm) tall. Body 10.3 in (26.2 cm) total.
- Strap: 14 in (35.6 cm) long and 0.9 in (2.3 cm) wide before you attach it.
If your base is too big (more than 4.5 in / 11.4 cm), go down to a 3.75 mm hook. If too small (less than 4 in / 10.2 cm), go up to a 4.5 mm hook. Don’t change the stitch counts. The mesh needs exactly 60 sts.
If the base cups up into a bowl, your tension is tight. Go up a hook size. If it ruffles, go down a size.
Pattern
Work in joined rounds. Don’t turn. Ch 1 at the start of a round does not count as a stitch. Join each round with sl st to the first sc unless told otherwise.
Base
Rnd 1: MR, ch 1, 6 sc in ring, join. (6 sts)
Rnd 2: Ch 1, inc in each st around, join. (12 sts)
Rnd 3: Ch 1, *sc in next st, inc; rep from * 5 more times, join. (18 sts)
Rnd 4: Ch 1, *sc in next 2 sts, inc; rep from * 5 more times, join. (24 sts)
Rnd 5: Ch 1, *sc in next 3 sts, inc; rep from * 5 more times, join. (30 sts)
Rnd 6: Ch 1, *sc in next 4 sts, inc; rep from * 5 more times, join. (36 sts)
Rnd 7: Ch 1, *sc in next 5 sts, inc; rep from * 5 more times, join. (42 sts)
Rnd 8: Ch 1, *sc in next 6 sts, inc; rep from * 5 more times, join. (48 sts)
Rnd 9: Ch 1, *sc in next 7 sts, inc; rep from * 5 more times, join. (54 sts)
Rnd 10: Ch 1, *sc in next 8 sts, inc; rep from * 5 more times, join. (60 sts)
For a rounder circle, move the increase to the middle of the repeat on even rounds. For example, on Rnd 10 work (sc in next 4 sts, inc, sc in next 4 sts) six times.
Checkpoint: 4.25 in (10.8 cm) across.
Lower Wall
Rnd 11: Ch 1, sc in BLO of each st around, join. (60 sts) The unused front loops make a crisp ridge, and the wall turns straight up.
Rnds 12–16: Ch 1, sc in each st around, join. (60 sts)
Checkpoint: Wall 1.2 in (3.0 cm) tall from the ridge.
Honeycomb Mesh
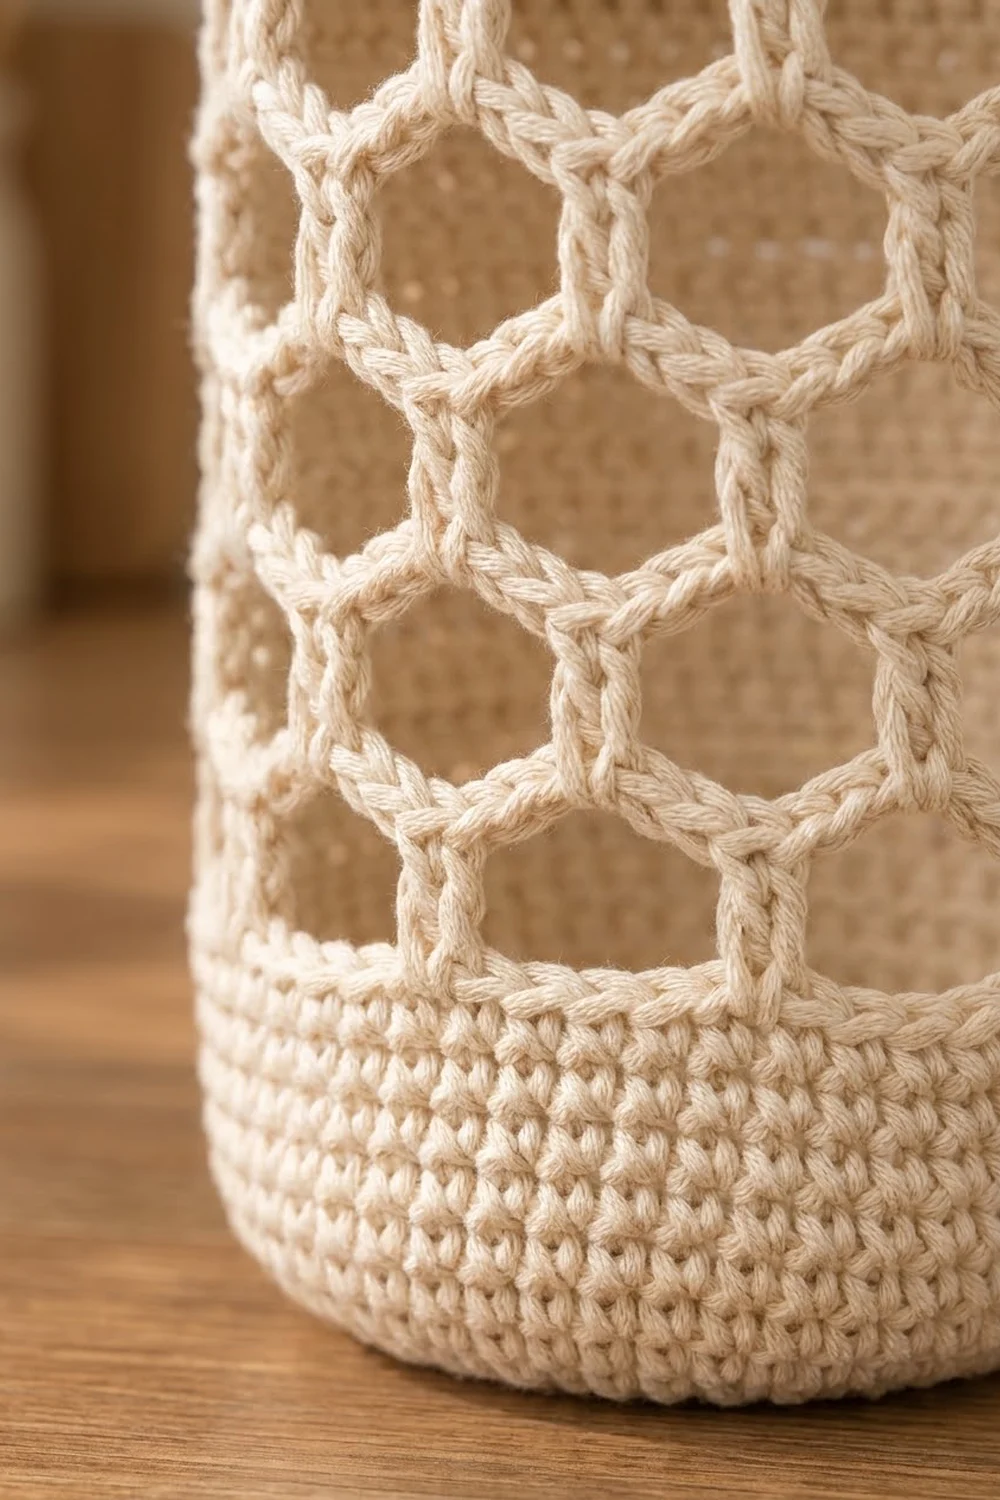
The mesh uses 12 repeats of 5 sts each (12 x 5 = 60). Each repeat is one ch-5 loop and one V-join. The ch-5 loops make the slanted sides of each hexagon, and the V-joins make the short vertical sides. Each round sits halfway over the round below, so the hexagons stagger like a honeycomb.
Mesh Rnd 1: Ch 1, *V-join in next st, ch 5, sk next 4 sts; rep from * 11 more times, join with sl st to first sc. (12 V-joins, 12 ch-5 loops)
Mesh Rnd 2: Sl st in next ch-2 sp, sl st in next sc, 2 sl st in next ch-5 loop. Ch 3 (counts as sc + ch 2), sc in same loop (first V-join made), ch 5, *V-join in next ch-5 loop, ch 5; rep from * 10 more times, join with sl st to first ch of beginning ch-3. (12 V-joins, 12 ch-5 loops)
Mesh Rnds 3–9: Rep Mesh Rnd 2. (12 V-joins, 12 ch-5 loops in each round)
Each round puts its V-joins in the centers of the loops below. Don’t add or skip repeats. Before each join, count 12 V-joins.
Checkpoint: Pull the mesh gently downward. It should measure about 6.5 in (16.5 cm) from the top of the lower wall. Body so far: 7.7 in (19.6 cm).
Top Band (Border)
Here the band acts as the border. It stabilizes the open mesh, gives the rim its shape, and anchors the strap.
Border gauge: Same as the main gauge, 4.5 sc per inch (2.54 cm) and 5 rounds per inch. 60 sc measure 13.3 in (33.8 cm) around, the same as the base, so the tube stays straight instead of flaring or pulling in.
The band has no corners, so the “sides” are four equal quarters of 15 sts each (4 x 15 = 60). After Band Rnd 1, place markers in st 1 and st 31. These mark the two strap attachment points on opposite sides.
Band Rnd 1 (conversion round): Ch 1, *sc in next ch-2 sp, 4 sc in next ch-5 loop; rep from * 11 more times, join. (60 sts = 12 sc in ch-2 sps + 48 sc in ch-5 loops; 15 sts per quarter) Don’t work into the sc of the V-joins.
Band Rnds 2–13: Ch 1, sc in each st around, join. (60 sts; 15 per quarter)
Rim Rnd 14: Ch 1, sl st loosely in each st around, join. (60 sl sts; 15 per quarter) Don’t fasten off.
Why the math works: The base finishes at 60 sts, and the lower wall keeps 60. The mesh uses those 60 as 12 repeats of 5. The conversion round puts back exactly 5 sts per repeat (1 + 4), so the band starts at 60 again. Every section has the same circumference. Only the texture changes.
Checkpoint: Band 2.6 in (6.6 cm) tall. Body 10.3 in (26.2 cm) total.
Strap
Your loop should be at the join, next to the st 1 marker.
Row 1: Ch 1, sc in sts 1–4, turn. (4 sts)
Rows 2–70: Ch 1, sc in each st across, turn. (4 sts)
Checkpoint: Strap 14 in (35.6 cm) long, 0.9 in (2.3 cm) wide. Make sure it’s not twisted.
Attach: Hold the strap end against the inside of the band at sts 31–34, starting at the st 31 marker. Sl st through both layers across all 4 sts. Fasten off and leave a 10 in (25.4 cm) tail. Use it to whipstitch the strap edges to the band for 0.5 in (1.3 cm) below the rim on both sides for strength. Weave in all ends.
The strap’s two ends are 30 sts apart (half of 60), so they sit exactly opposite each other. The arch rises about (14 − 4.25) ÷ 2 ≈ 4.9 in (12.4 cm) above the rim.
Final Blocking
- Spray the whole holder lightly with water until damp. Cotton can also be soaked and rolled in a towel.
- Slide it over a 4 in (10.2 cm) wide jar or bottle, or a rolled towel of that width.
- Pull the mesh gently downward until it reaches 6.5 in (16.5 cm). The hexagons should be open and even.
- Line up the V-joins in neat vertical columns.
- Press the BLO ridge at the base into a sharp edge.
- Lay the strap flat, pin it straight, and stretch it slightly to 14 in (35.6 cm).
- Let it dry completely, at least 24 hours for cotton, before you load it with bags.
Final Quality-Control Checklist
- Base is flat and about 4.25 in (10.8 cm) across
- Base edge has a clear ridge from the BLO round
- Lower wall is 1.2 in (3.0 cm) tall with 60 sts
- Every mesh round has 12 V-joins and 12 ch-5 loops
- Hexagons are even and line up around the tube
- Band starts with exactly 60 sts
- Band is 2.6 in (6.6 cm) tall and sits straight
- Strap is 4 sts wide, 14 in (35.6 cm) long, not twisted
- Strap ends sit opposite each other, at sts 1–4 and 31–34
- All ends woven in securely, with none showing through the mesh
Troubleshooting
Base cups like a bowl: Tension is tight, or an increase was missed. Count the stitches at Rnd 10. If you have 60, go up a hook size.
Base ruffles: Too many increases or loose tension. Recount, then try a smaller hook.
Mesh twists in a spiral: You probably placed a V-join outside the center of a loop. Each V-join belongs in the middle of a ch-5 loop.
Hexagons look like diamonds: The V-joins are too short. Keep the ch-2 relaxed, and block by stretching the mesh downward.
Band flares or pinches: Check the conversion round. It needs exactly 1 sc per ch-2 sp and 4 sc per ch-5 loop, for 60 sts total.
Strap stretches too much: Work it with a hook 0.5 mm smaller. You can also sl st along both long edges.
Holder leans when hanging: The strap ends aren’t opposite each other. Re-attach the end at sts 31–34.
Care
Hand wash or machine wash on a gentle cool cycle in a mesh bag. Reshape while damp and dry flat or over a jar.
Final Notes
The measurements build in order:
- Base: 60 sts and 4.25 in (10.8 cm) across
- Lower wall: 60 sts and 1.2 in (3.0 cm)
- Mesh: 12 repeats of 5 sts, about 6.5 in (16.5 cm)
- Conversion round: back to 60 sts
- Top band: 2.6 in (6.6 cm), bringing the body to 10.3 in (26.2 cm)
- Strap: 14 in (35.6 cm), set on opposite sides for a 4.9 in (12.4 cm) arch
If your base hits its checkpoint, everything above it will fit. Make one in cream, then try a second in greige to hang beside it.
Happy crocheting!