
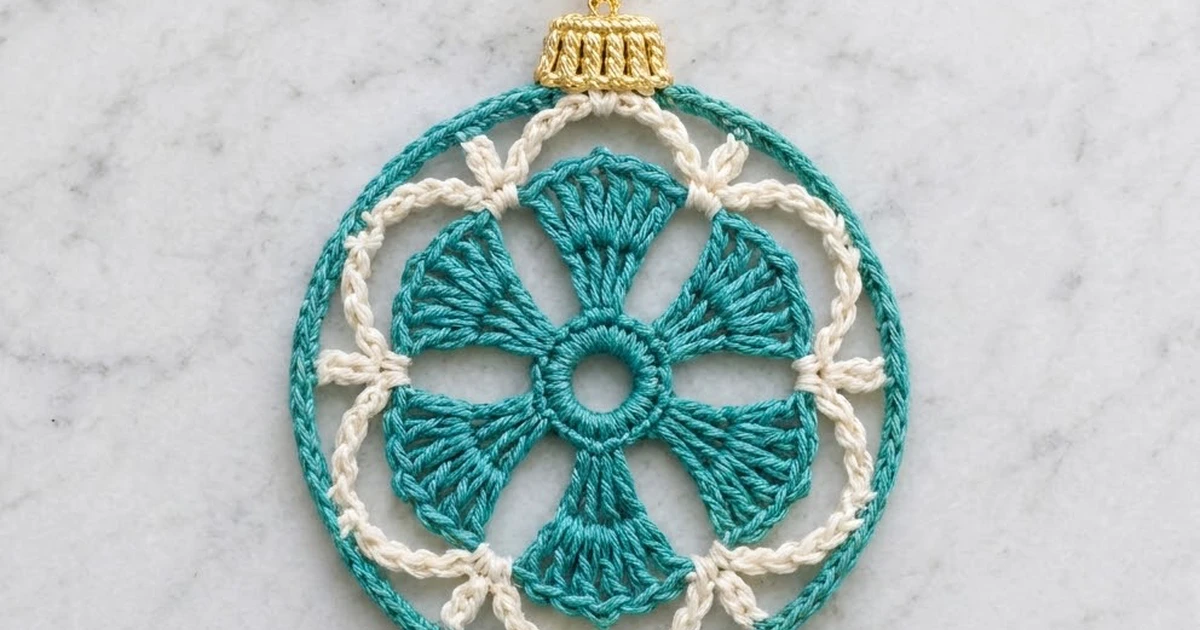
This little bauble brings vintage lace into your tree decorations. A teal flower with four flared petals sits inside a cream chain lattice. A smooth teal rim frames it, and a ridged gold cap with a hanging loop sits on top, like the metal top of a glass ornament.
The colors are teal, cream, and gold, which gives the ornament a fresh, wintry look that is a bit different from traditional red and green. It looks light and lacy on the branch, but the rim is firm enough to keep it flat and round.
The pattern uses US crochet terms. The finished ornament measures about 3.6 in (9.1 cm) across the circle. With the cap and loop, it is about 5.0 in (12.7 cm) tall.
The construction is simple. You work the teal center and petals in the round, add two cream lattice rounds, finish with two teal rim rounds, and then crochet the gold cap in short rows directly onto the top of the rim. There is no sewing apart from weaving in ends.
Finished Size and Construction
- Finished size: 3.6 in (9.1 cm) in diameter; 5.0 in (12.7 cm) tall including cap and loop
- Skill level: Intermediate (simple stitches, careful counting)
- Terminology: US crochet terms
- Yarn weight: Size 3 crochet cotton thread
- Hook: 1.75 mm (US steel 5)
- Number of pieces: 1 (the cap is worked directly onto the rim)
- Layout: Single circular motif with the cap centered at the top
- Piece size before rim: 3.2 in (8.1 cm) across after Round 7
- Rim depth: about 0.2 in (0.5 cm), made of 2 rounds
- Cap: 0.9 in (2.3 cm) wide x 0.4 in (1.0 cm) tall; loop about 1.0 in (2.5 cm)
Materials
Use mercerized cotton thread in size 3. It gives crisp stitch definition, holds a block well, and won’t fuzz on the tree. For the cap, a gold metallic thread of similar thickness works well, or you can use a mustard or gold cotton.
- Teal (Color A): 8 g / 35 m
- Cream (Color B): 3 g / 13 m
- Gold (Color C): 1 g / 5 m
These quantities are for one ornament and include a margin of about 20%. To make a set, multiply by the number of ornaments you want.
Tools:
– 1.75 mm (US steel 5) crochet hook
– Tapestry needle with a small eye
– Small scissors
– Stitch marker
– Blocking mat and rustproof pins
– Spray bottle of water, or diluted fabric stiffener (optional)
Abbreviations (US Terms)
- ch – chain
- sl st – slip stitch
- sc – single crochet
- hdc – half double crochet
- dc – double crochet
- tr – treble crochet
- sc2tog – single crochet 2 together
- BLO – back loop only
- sp – space
- sk – skip
- st(s) – stitch(es)
- rep – repeat
Special stitch – Picot junction: (sc, ch 3, sc) worked into the same stitch. It forms the small cream point where two lattice arches meet.
Gauge and Checkpoints
Gauge is 10 sc = 1 in (2.5 cm) with size 3 thread and a 1.75 mm hook. Exact gauge matters less for an ornament than for a garment, but it controls whether the rim lies flat.
Make one test ornament first and measure it at each checkpoint, laying it flat without stretching:
- After Round 1: ring is 0.6 in (1.5 cm) across
- After Round 2: 1.1 in (2.8 cm)
- After Round 3: 1.6 in (4.1 cm)
- After Round 4: 2.0 in (5.1 cm)
- After Round 5: 2.6 in (6.6 cm), tip to tip of opposite petals
- After Round 7: 3.2 in (8.1 cm)
- After Round 9: 3.6 in (9.1 cm)
If your piece is too big at Round 5, go down to a 1.5 mm hook. If it is too small, or the petals cup upward, go up to a 2.0 mm hook. If only the rim ruffles or cups, see Troubleshooting. You don’t need to change the hook for that.
Center and Petals (Color A, Teal)
Round 1: Ch 8, sl st in first ch to form a ring. Ch 1, work 16 sc into the ring. Join with sl st to first sc. (16 sc)
The ring should leave a visible open hole in the middle, about 0.25 in (0.6 cm) across.
Round 2: Ch 3 (counts as dc), dc in next 3 sts, ch 3, dc in next 4 sts, ch 3; rep from * 2 more times. Join with sl st to top of beginning ch-3. (16 dc in 4 groups of 4; 4 ch-3 sps)*
Each group of 4 dc is the base of one petal.
Round 3: Ch 3 (counts as dc), dc in same st, dc in next 2 sts, 2 dc in next st, ch 3, sk ch-3 sp, 2 dc in next st, dc in next 2 sts, 2 dc in next st, ch 3, sk ch-3 sp; rep from * 2 more times. Join to top of beginning ch-3. (24 dc in 4 groups of 6; 4 ch-3 sps)*
Round 4: Ch 3 (counts as dc), dc in same st, dc in next 4 sts, 2 dc in next st, ch 4, sk ch-3 sp, 2 dc in next st, dc in next 4 sts, 2 dc in next st, ch 4, sk ch-3 sp; rep from * 2 more times. Join. (32 dc in 4 groups of 8; 4 ch-4 sps)*
Round 5: Ch 4 (counts as tr), tr in same st, tr in next 6 sts, 2 tr in next st, ch 5, sk ch-4 sp, 2 tr in next st, tr in next 6 sts, 2 tr in next st, ch 5, sk ch-4 sp; rep from * 2 more times. Join to top of beginning ch-4. Fasten off. (40 tr in 4 groups of 10; 4 ch-5 sps)*
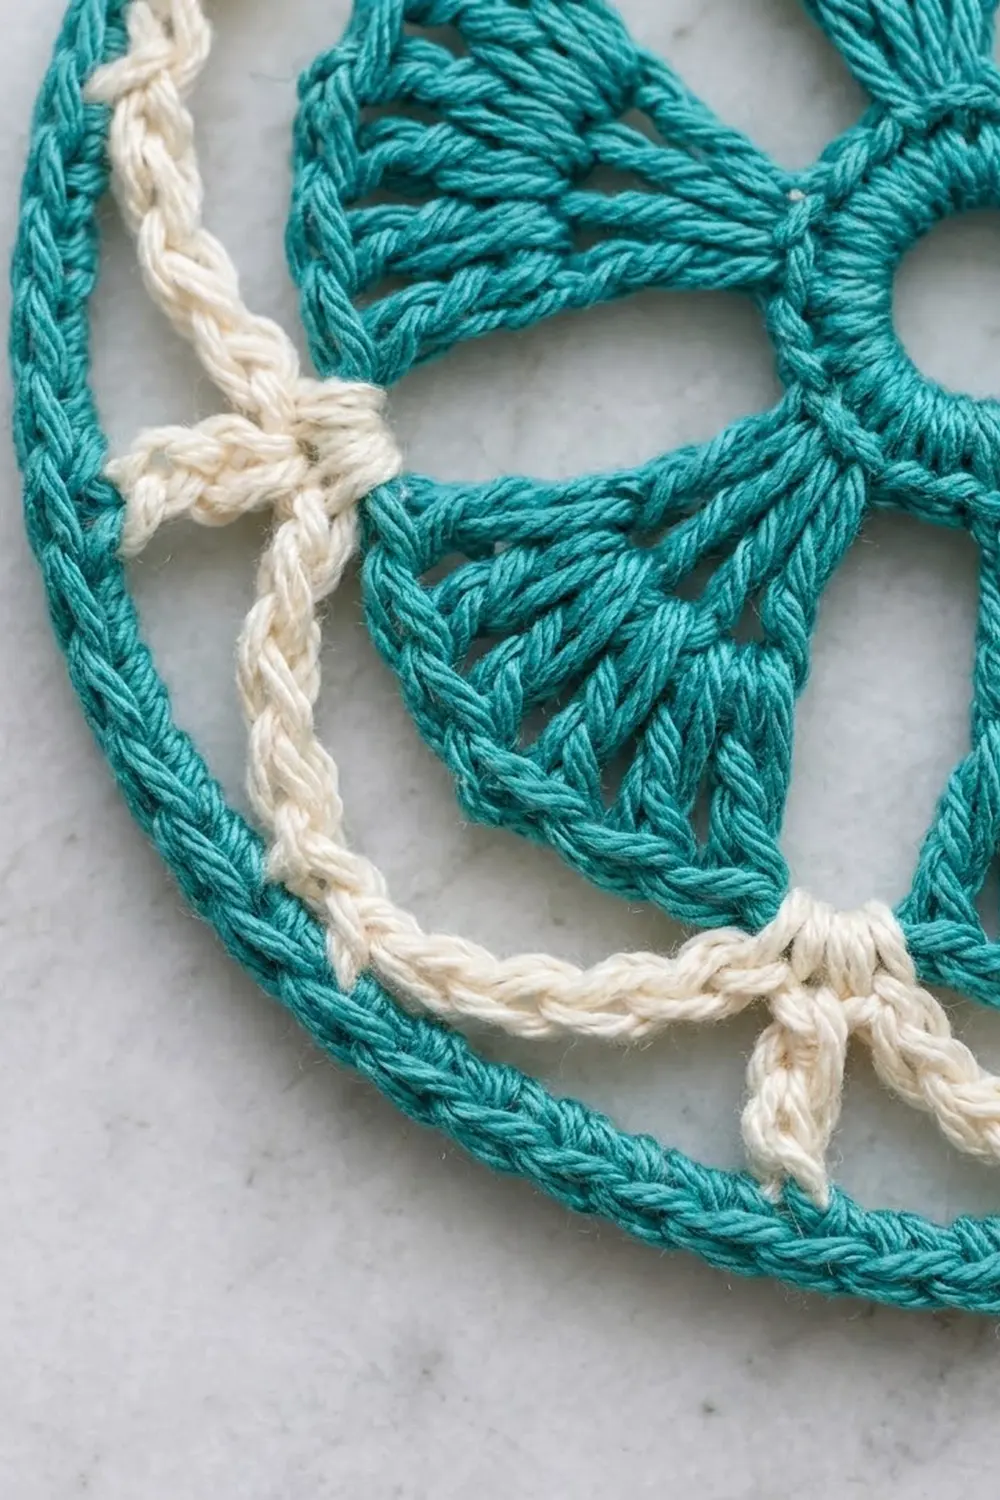
The petals are now fan-shaped, narrow at the ring and wide at the tips. Because the chains between them are skipped each round, the gaps open up into the shape you see in the photo. Check the 2.6 in (6.6 cm) measurement now.
Cream Lattice (Color B, Cream)
Round 6: Join Color B with sc in the 3rd tr of any petal. Ch 5, sk next 4 tr, sc in next tr (the 8th tr of the petal), ch 7, sk the last 2 tr of this petal, the ch-5 sp, and the first 2 tr of the next petal, sc in the 3rd tr of the next petal; rep from * around, ending with ch 7 and a sl st to the first sc instead of the last sc. (8 sc; 4 ch-5 loops over the petal tips; 4 ch-7 loops across the gaps)*
The short ch-5 arches hug the petal tips. The longer ch-7 arches bridge the open gaps. Each sc sits at the outer corner of a petal, which gives 8 anchor points.
Round 7: Sl st in next 3 ch to reach the center of the first ch-5 loop. Ch 1, sc around the loop. Ch 4, picot junction (sc, ch 3, sc) in next sc of Round 6, ch 4, sc around next loop; rep from * around, ending with ch 4 and a sl st to the first sc instead of the last sc. Fasten off. (8 loop sc; 8 picot junctions; 16 ch-4 sps)*
This round makes the second layer of arches. The 8 picot junctions are the cream points on the finished ornament, one at each side of every petal. Check the 3.2 in (8.1 cm) measurement now.
Rim (Color A, Teal)
The rim acts as the border on this single-piece ornament. Its gauge is the main gauge of 10 sc per 1 in (2.5 cm).
Since the ornament is a circle, it has no sides or corners. Instead, think of it as 8 equal segments. Each segment runs from one picot junction to the next: picot, ch-4 sp, loop sc, ch-4 sp.
Round 8: Join Color A in any ch-3 picot. Ch 1. 3 sc in the ch-3 picot, sk the sc after the picot, 5 sc in the next ch-4 sp, sc in the loop sc, 5 sc in the next ch-4 sp, sk the sc before the next picot; rep from * 7 more times. Join to the first sc. (112 sc)*
Per segment: 3 + 5 + 1 + 5 = 14 sc. With 8 segments, 8 × 14 = 112 sc. You skip the two sc on either side of each picot so that the picot alone sets the point and the rim stays smooth.
Round 9: Ch 1, sl st in BLO of each st around. Join to the first sl st. (112 sl st) Fasten off.
The slip-stitch round makes the corded outer edge and firms the rim.
Why the math works: 112 stitches at 10 sts per inch gives a circumference of 11.2 in (28.4 cm). Divided by pi, that is a diameter of about 3.6 in (9.1 cm). This matches the target, so the rim neither pulls the lattice tight nor ruffles. Round 7 measured 3.2 in (8.1 cm), and the two rim rounds add about 0.2 in (0.5 cm) all around.
Cap and Hanging Loop (Color C, Gold)
Lay the ornament flat with one petal pointing straight up. The top of the rim is the loop sc of Round 8 directly above that petal tip. Mark it.
Row 1: Count 4 sts to the right of the marked st. Working into the front loops of Round 8 (behind the Round 9 sl sts), join Color C with sc in that st. Sc in next 8 sts, so that the marked st is the 5th, center stitch. Turn. (9 sc)
Row 2: Ch 1, sc in each st across. Turn. (9 sc)
Row 3: Ch 1, sc in BLO of each st across. Turn. (9 sc)
The BLO row creates the horizontal ridge that makes the cap look like a metal ornament top.
Row 4: Ch 1, sc2tog, sc in next 5 sts, sc2tog. (7 sts) Fasten off.
The cap should measure 0.9 in (2.3 cm) wide at its base and 0.4 in (1.0 cm) tall.
Hanging loop: Join Color C with a sl st in the center (4th) st of Row 4. Ch 22. Sl st into the back bump of each ch back toward the cap, then sl st into the same center st. Fasten off.
Folded, the loop stands about 1.0 in (2.5 cm) above the cap. Slip-stitching back along the chain gives it the firm, twisted look shown in the photo.
Final Blocking
- Weave in all ends along stitches of the same color. Hide teal ends inside the rim and cream ends along the chain arches.
- Spray the ornament until it is damp, or dip it in diluted fabric stiffener and gently squeeze out the excess.
- Lay it face up on the blocking mat. Pin the rim into a true 3.6 in (9.1 cm) circle, using one pin at each of the 8 picot junctions.
- Pin the tip of each petal so the four fans sit at 12, 3, 6, and 9 o’clock.
- Gently open each cream arch with a pin so the lattice is evenly spaced.
- Pin the cap straight and lay the hanging loop flat.
- Let it dry completely, at least 6 hours, before removing the pins.
Final Quality-Control Checklist
- The center ring has a clear open hole.
- Each petal has exactly 10 tr at its tip.
- There are 8 cream picot junctions, evenly spaced.
- The rim has 112 sts and lies completely flat.
- The diameter is 3.6 in (9.1 cm).
- The cap is centered above one petal and is 9 sts wide at its base.
- The hanging loop is firmly secured at the center of the cap.
- All ends are woven in invisibly and trimmed.
Troubleshooting
Petals cup or curl. Your tension is too tight on the tr rounds. Try a 2.0 mm hook for Rounds 4–5 only.
Cream arches sag. Your chains are too loose. Chain more firmly, or use ch 4 and ch 6 in Round 6.
Rim ruffles. Work 4 sc instead of 5 into each ch-4 sp. That gives 12 sc per segment and 96 sc total.
Rim cups or pulls the lattice tight. Work 6 sc into each ch-4 sp. That gives 16 sc per segment and 128 sc total.
Cap is off-center. Pull out Row 1 and recount 4 sts on each side of the marked st.
Ornament won’t hang straight. Re-block it, and make sure the loop is anchored in the exact center st of Row 4.
Care
Hand wash in cool water with mild soap, press out the water in a towel, and re-block flat to dry. Store the ornament flat between sheets of tissue paper so the rim keeps its round shape.

Final Notes
Here is the measurement chain for this ornament:
- A 16-sc ring 0.6 in (1.5 cm) across
- Four 10-tr petals reaching 2.6 in (6.6 cm)
- A cream lattice with 8 junctions at 3.2 in (8.1 cm)
- A 112-st rim at 10 sts per inch, finishing at 3.6 in (9.1 cm)
- A 9-st gold cap plus a 22-ch loop, bringing the total height to 5.0 in (12.7 cm)
If every checkpoint matches, the ornament will lie flat and hang straight every time. Make a handful in the same three colors and your tree will have a matching set.
Happy crocheting!