
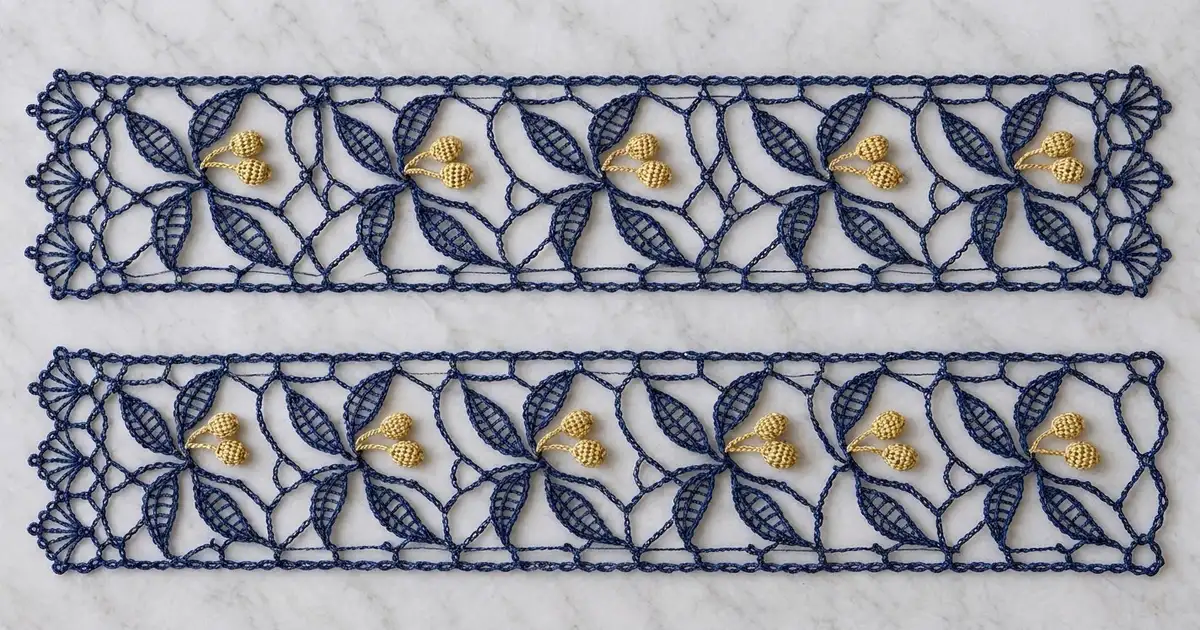
The Indigo Berry Sprig Lace Strip is a slim, airy panel of navy chain mesh with five leafy sprigs down its length. Each sprig has four openwork leaves and a pair of plump gold berries. Three fan scallops with picot tips crown the top edge, and a row of small picot arches finishes the bottom.
The palette is just two colors: deep navy for the mesh, leaves and border, and warm mustard gold for the berries. The look sits between Irish crochet and vintage filet lace. It is delicate, but the structure is simple.
This pattern uses US crochet terms. The finished strip measures 4.5 in × 19.75 in (11.4 cm × 50.2 cm) after blocking. Use it as a bookmark-style runner or a shelf edging, or hang it at a window.
Construction happens in three stages. First you work a rectangular trellis mesh body in rows. Next you make 20 leaves, 5 stems and 10 berries, and assemble them into 5 sprigs. Finally you sew the sprigs onto the mesh and add a two-round border with fans and arches.
Finished Size and Construction
- Finished size: 4.5 in × 19.75 in (11.4 cm × 50.2 cm)
- Skill level: Intermediate
- Terminology: US crochet terms
- Yarn weight: Size 3 mercerized cotton crochet thread (CYC 1, Super Fine)
- Hook: 2.25 mm (US B-1)
- Number of pieces: 1 mesh panel, plus 5 appliqué sprigs sewn on
- Layout: 5 sprigs stacked vertically, centered every 3.6 in (9.1 cm)
- Sprig size: about 3.25 in wide × 3 in tall (8.3 cm × 7.6 cm)
- Size before border: 4 in × 18.25 in (10.2 cm × 46.4 cm)
- Border depth: 0.25 in (0.6 cm) on each long side; 0.875 in (2.2 cm) at the top (0.125 in / 0.3 cm of Rnd 1 plus 0.75 in / 1.9 cm of fans); 0.625 in (1.6 cm) at the bottom (0.125 in / 0.3 cm plus 0.5 in / 1.3 cm of arches)
Materials
Choose a tightly twisted, mercerized cotton thread in size 3. The sheen shows off the leaf veins, and the firm twist helps the mesh hold its shape after blocking. Avoid fuzzy or splitty threads, because they blur the open spaces.
- Navy (Color A): 45 g, about 135 m (148 yd)
- Gold (Color B): 8 g, about 24 m (26 yd)
Both quantities include a margin of about 15% for gauge differences and swatching.
Tools:
– 2.25 mm (US B-1) crochet hook
– Small-eye tapestry needle
– Sharp scissors
– 6–8 locking stitch markers
– Rust-proof pins and a blocking mat
– Spray bottle
– A small pinch of fiberfill, or gold thread scraps, for stuffing the berries
Abbreviations (US Terms)
- ch – chain
- sl st – slip stitch
- sc – single crochet
- hdc – half double crochet
- dc – double crochet
- sc2tog – single crochet 2 together
- sk – skip
- sp – space
- st(s) – stitch(es)
- Rnd – round
- RS / WS – right side / wrong side
Special stitches:
– Picot: Ch 3, sl st in 3rd ch from hook.
– Fan: Work ([dc, ch 1] 3 times, dc, picot, [ch 1, dc] 3 times) all in the same stitch. Each fan has 7 dc, 6 ch-1 sps and 1 picot.
Gauge and Checkpoints
Gauge: 31 sc = 4 in (10.2 cm). In the trellis mesh, 5 rows = 2 in (5.1 cm), so each mesh row is 0.4 in (1.0 cm) tall.
Test before committing: work the foundation row and 5 mesh rows, then measure. Your swatch can become the start of the real strip.
Checkpoints:
1. After Row 1, the strip is 4 in (10.2 cm) wide.
2. After Row 11 (10 mesh rows), the mesh measures 4 in (10.2 cm) tall.
3. After Row 26 (25 mesh rows), the mesh measures 10 in (25.4 cm) tall.
4. After Row 47, the body measures 4 in × 18.25 in (10.2 cm × 46.4 cm), gently pinned flat.
5. Each leaf is 1.75 in (4.4 cm) long, and each berry is about 0.5 in × 0.6 in (1.3 cm × 1.5 cm).
If your strip is too big: go down to a 2.0 mm hook, or tighten your ch-5 loops. If it’s too small: go up to a 2.5 mm hook. Width matters more than length. Fix width first, then check row height.
Mesh Body
With Color A, ch 32.
Row 1 (RS): Sc in 2nd ch from hook and in each ch across, turn. (31 sc)
Row 2 (Row A): Ch 5 (counts as dc + ch 2), sk next 2 sc, sc in next sc, [ch 5, sk next 3 sc, sc in next sc] 6 times, ch 2, sk next 2 sc, dc in last sc, turn. (7 sc, 6 ch-5 loops, 2 ch-2 half-loops)
Row 3 (Row B): Ch 1, sc in first dc, [ch 5, sc in next ch-5 sp] 6 times, ch 5, sc in 3rd ch of turning ch, turn. (8 sc, 7 ch-5 loops)
Row 4 (Row A): Ch 5 (counts as dc + ch 2), sc in first ch-5 loop, [ch 5, sc in next ch-5 loop] 6 times, ch 2, dc in last sc, turn. (7 sc, 6 ch-5 loops, 2 ch-2 half-loops)
Rows 5–46: Repeat Rows 3 and 4 alternately: odd rows follow Row 3, even rows follow Row 4. Row 46 is a Row A. That gives 45 mesh rows in total (Rows 2–46).
Row 47: Ch 1, sc in first dc, 2 sc in ch-2 sp, sc in next sc, [3 sc in next ch-5 loop, sc in next sc] 6 times, 2 sc in last ch-2 sp, sc in 3rd ch of turning ch. (31 sc: 1 + 2 + 1 + 24 + 2 + 1)
Do not fasten off. Set the body aside with a stitch marker in the live loop.
Sprig placement markers: Place a marker at the center of Rows 6, 15, 24, 33 and 42. These are mesh rows 5, 14, 23, 32 and 41. They sit 9 rows apart (3.6 in / 9.1 cm), and the first and last are each the 5th mesh row in from their end, so the layout is symmetrical.
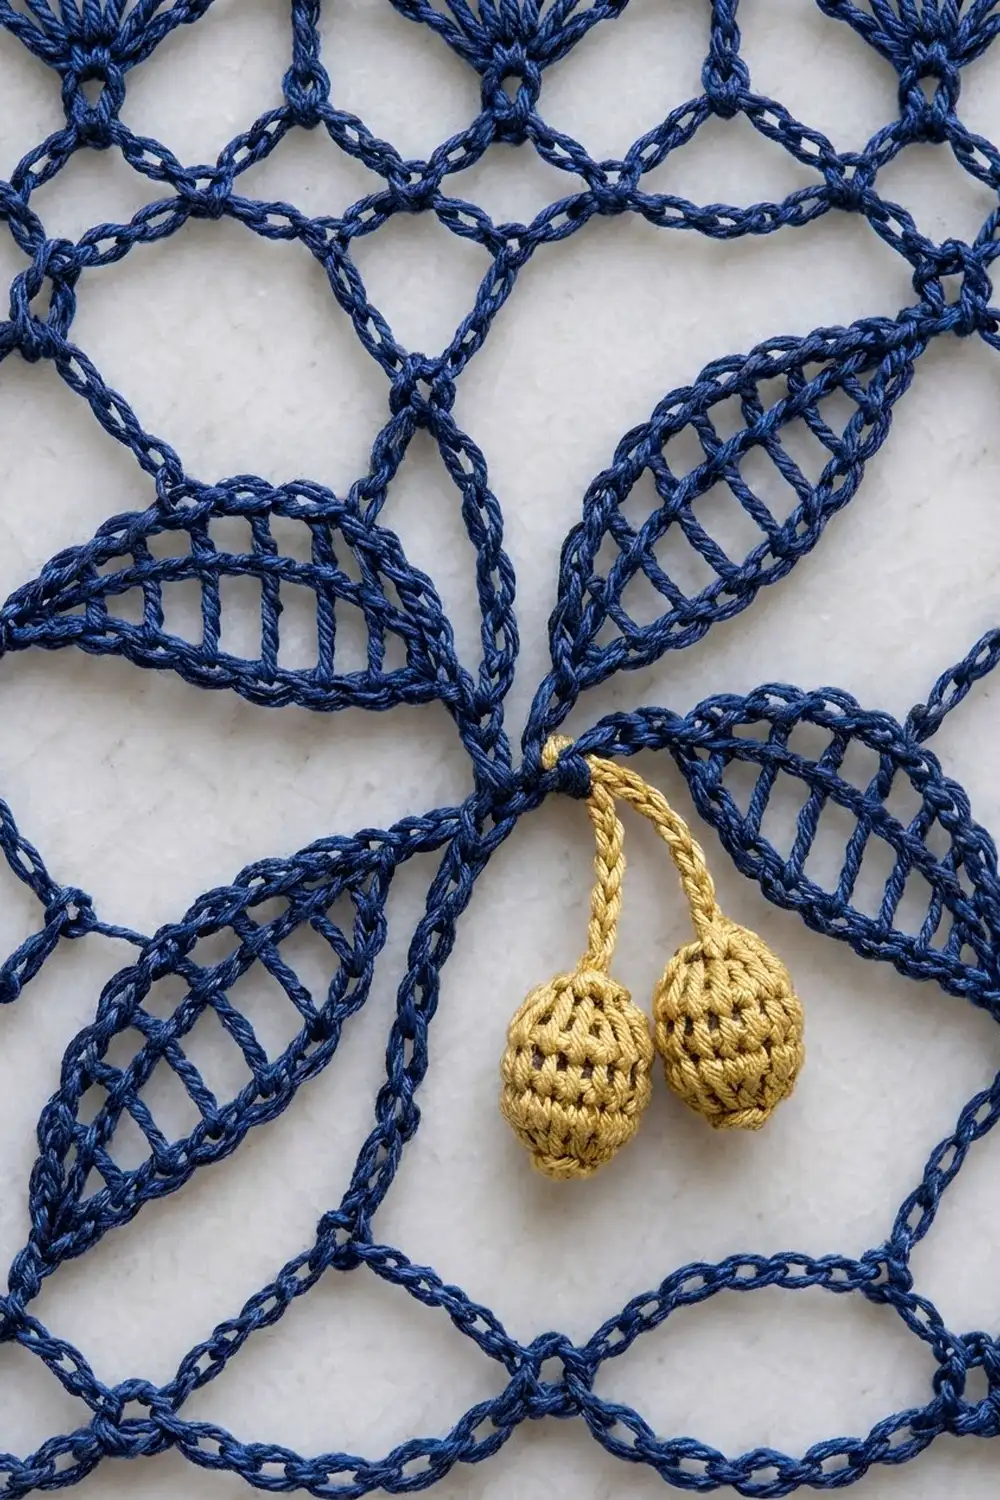
Leaves (make 20)
With Color A, ch 15.
Side 1: Sc in 2nd ch from hook, hdc in next ch, dc in next ch, [ch 1, sk next ch, dc in next ch] 4 times, ch 1, sk next ch, hdc in next ch, (sc, ch 2, sc) in last ch. (10 sts, 5 ch-1 sps, 1 ch-2 sp: 14 chains used)
Side 2: Rotate the work and continue along the opposite side of the foundation ch. Hdc in next ch, [ch 1, sk next ch, dc in next ch] 5 times, hdc in next ch, sc in last ch. (8 sts, 5 ch-1 sps)
Tip: Picot, sl st in first sc of Side 1. Fasten off, leaving a 6 in (15.2 cm) tail.
Leaf total: 18 sts, 10 ch-1 sps, 1 ch-2 sp at the base and 1 picot tip.
The dc posts stand like ladder rungs across the center chain, which creates the openwork veins. The sc and hdc at each end taper the leaf to a point. The ch-2 end is the base.
Berries (make 10)
With Color B, make a magic ring.
Rnd 1: 6 sc in ring, sl st to first sc. (6)
Rnd 2: Ch 1, 2 sc in each st around, sl st to first sc. (12)
Rnd 3: Ch 1, [sc in next st, dc in next st] 6 times, sl st to first sc. (12: 6 sc + 6 dc)
Rnd 4: Ch 1, [dc in next st, sc in next st] 6 times, sl st to first dc. (12: 6 dc + 6 sc)
Rnd 5: Repeat Rnd 3. (12)
Each dc lands on a sc, so the bumps stagger into the basket-like texture.
Stuff lightly with a pinch of fiberfill or gold scraps.
Rnd 6: Ch 1, sc2tog 6 times, sl st to first st. (6)
Rnd 7: Ch 1, sc2tog 3 times. (3)
Stem: Ch 8 on 5 berries (about 1 in / 2.5 cm), or ch 12 on the other 5 berries (about 1.5 in / 3.8 cm). Fasten off, leaving a 6 in (15.2 cm) tail.
Stems and Sprig Assembly (make 5)
With Color A, ch 26. Sl st in 2nd ch from hook and in each ch across. (25 sl st, about 3 in / 7.6 cm) Fasten off with tails at both ends.
For each sprig:
1. Hold the stem vertically, with the top at sl st 1.
2. Sew one leaf base on each side of sl st 6, angling the tips up and outward.
3. Sew a second pair of leaves at sl st 14, angled out and slightly down.
4. Sew one short-stem berry and one long-stem berry to sl st 15 so they hang side by side below the lower leaves.
Attaching the Sprigs
Lay the body RS up. Center each sprig on its placement marker, with the stem in a gentle diagonal curve. Pin it in place.
With the Color A tails, whipstitch the stem and each leaf’s center chain to the mesh strands underneath. Leave the leaf edges free for dimension. Tack each berry once at its widest point so it doesn’t swing.
Check: every sprig fits within the 4 in (10.2 cm) mesh width with at least 0.25 in (0.6 cm) clear at each side.
Border
Border gauge: Along the short edges, sc follow the body gauge of 31 sc per 4 in, about 7.75 sc per inch. Along the long edges, work 3 sc per mesh row. That is 7.5 sc per inch on 0.4 in rows. The two rates are within 3% of each other, and the open mesh absorbs that difference when blocked, so the edges lie flat without rippling or pulling in.
Rnd 1: Pick up the live loop at the end of Row 47.
- Top edge: Ch 1, (sc, ch 2, sc) in first st, sc in next 29 sts, (sc, ch 2, sc) in last st.
- First long side: Work 3 sc around the end of each mesh row (Rows 46 down to 2). That is 135 sc. The row ends of Rows 47 and 1 are covered by the corner groups.
- Bottom edge: Work into the underside of the foundation ch. (Sc, ch 2, sc) in first ch, sc in next 29 ch, (sc, ch 2, sc) in last ch.
- Second long side: 3 sc around each mesh row end. (135 sc)
- Sl st to first sc.
Rnd 1 counts per side, including each side’s own corner sc:
– Top: 1 + 29 + 1 = 31 sc
– Each long side: 1 + 135 + 1 = 137 sc
– Bottom: 31 sc
– Total: 31 + 137 + 31 + 137 = 336 sc, plus 4 ch-2 corner sps
Rnd 2: Number the 31 top-edge sc from 1 to 31.
- Top edge (fans): Sl st into the top-left corner ch-2 sp, ch 1, sc in the same sp. Sc in sc 1, sk next 4 sc, Fan in sc 6, sk next 4 sc, (sc, picot) in sc 11, sk next 4 sc, Fan in sc 16, sk next 4 sc, (sc, picot) in sc 21, sk next 4 sc, Fan in sc 26, sk next 4 sc, sc in sc 31.
- Corner: (Sc, ch 2, sc) in corner ch-2 sp.
- Long side: Sc in each sc along the side. (137 sc)
- Corner: (Sc, ch 2, sc) in corner ch-2 sp.
- Bottom edge (arches): Sc in sc 1, [ch 2, picot, ch 2, sk next 4 sc, sc in next sc] 6 times, ending at sc 31.
- Corner: (Sc, ch 2, sc) in corner ch-2 sp.
- Second long side: Sc in each sc. (137 sc)
- In the starting corner, work (ch 2, sc) in the same sp, then sl st to the first sc.
Fasten off.
Rnd 2 counts:
– Top edge: 3 fans, 4 sc and 2 picots between corners.
– Bottom edge: 7 sc and 6 picot arches between corners.
– Long sides: 139 sc each, including their corner sc.
Why the math works: The fans and arches both use a 10-stitch repeat. Three repeats plus one closing stitch is 3 × 10 + 1 = 31, which is exactly the top count from Rnd 1. Each fan or arch spans 9 stitches, centered between anchor sc. Nothing is added at the seams of the repeat, so the edge stays square.
Final Blocking
- Weave in all ends, running each tail along a solid strand of matching color.
- Soak the strip in cool water for 10 minutes, then press out the water in a towel. Don’t wring it.
- Pin it to 4.5 in × 19.75 in (11.4 cm × 50.2 cm), pinning the long rails first.
- Pin the top of each fan and the center picot of each bottom arch.
- Open the ch-5 mesh loops evenly with your fingertips so they line up.
- Shape each leaf flat, and pin its picot tip outward.
- Leave the berries unpinned so they stay round.
- Let it dry completely, at least 24 hours.
Final Quality-Control Checklist
- [ ] The body has 47 rows: 45 mesh rows plus 2 sc rows.
- [ ] Rnd 1 has 336 sc and 4 ch-2 corners.
- [ ] There are 3 fans on top and 6 arches on the bottom.
- [ ] All 5 sprigs are evenly spaced 3.6 in (9.1 cm) apart.
- [ ] Each sprig has 4 leaves and 2 berries on different stem lengths.
- [ ] The strip measures 4.5 in × 19.75 in (11.4 cm × 50.2 cm), ±0.25 in (0.6 cm).
- [ ] No ends are visible from the RS.
Troubleshooting
- Mesh slants to one side: You probably skipped the final sc into the turning ch on a Row B. Count 7 loops on every Row B.
- Long sides ripple: Work 2 sc into a few row ends, then block firmly.
- Long sides pull in: Check that you worked 3 sc per mesh row, not 2.
- Fans cup upward: Your dc are too tight. Go up 0.25 mm for Rnd 2 only.
- Leaves curl: Wet-block them flat before sewing them on.
- Berry texture is hidden: Make sure the dc land on the sc of the previous round.
- Berries look lumpy: Use less stuffing. A few thread scraps are enough.
Care
Hand wash in cool water with a mild detergent, then lay flat and re-pin to your blocked measurements. Avoid hanging the strip wet, because the mesh will stretch lengthwise.

Final Notes
The measurement chain is short and checkable at every stage:
- Width: 31 sc gives 4 in (10.2 cm). The two border rounds bring the width to 4.5 in (11.4 cm).
- Length: 45 mesh rows at 0.4 in (1.0 cm) each give 18 in (45.7 cm). The two sc rows bring the body to 18.25 in (46.4 cm). Rnd 1 adds 0.125 in (0.3 cm) at each end, and the fans and arches add 0.75 in (1.9 cm) and 0.5 in (1.3 cm), for a finished length of 19.75 in (50.2 cm).
If each checkpoint matches, the five sprigs space evenly and the border closes square. Several strips can hang side by side at a window.
Happy crocheting!