

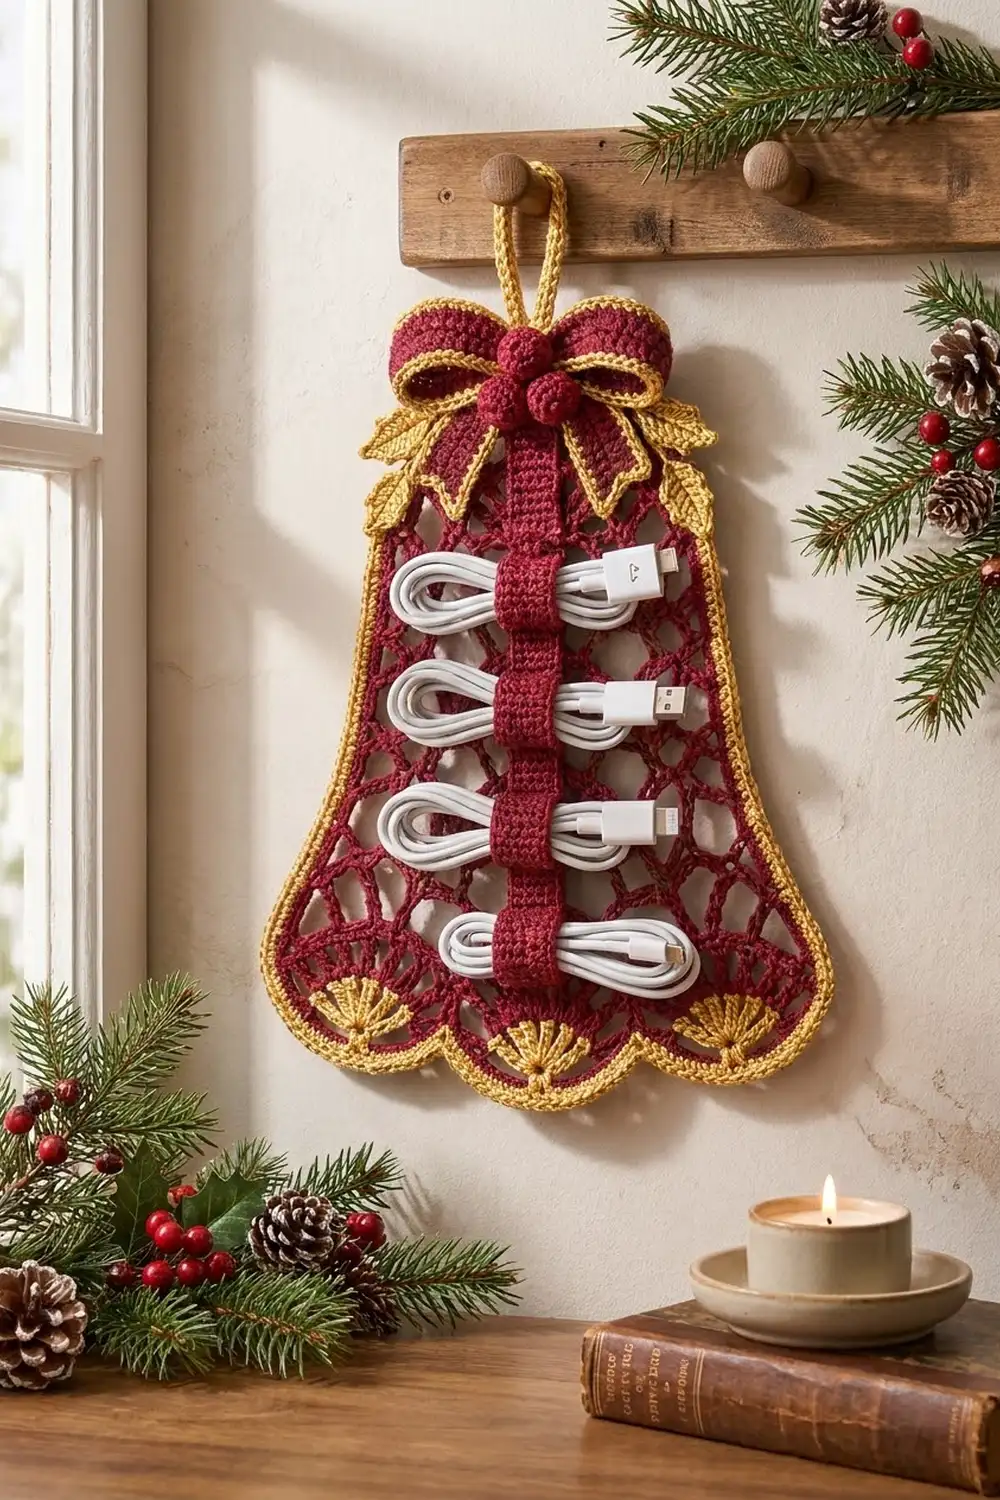
This bell-shaped lace hanging keeps charging cables tidy and looks festive while it does. The body is an open fan-and-net lace in deep burgundy. Three gold fans sit along the scalloped hem, and a corded gold border runs around the outline.
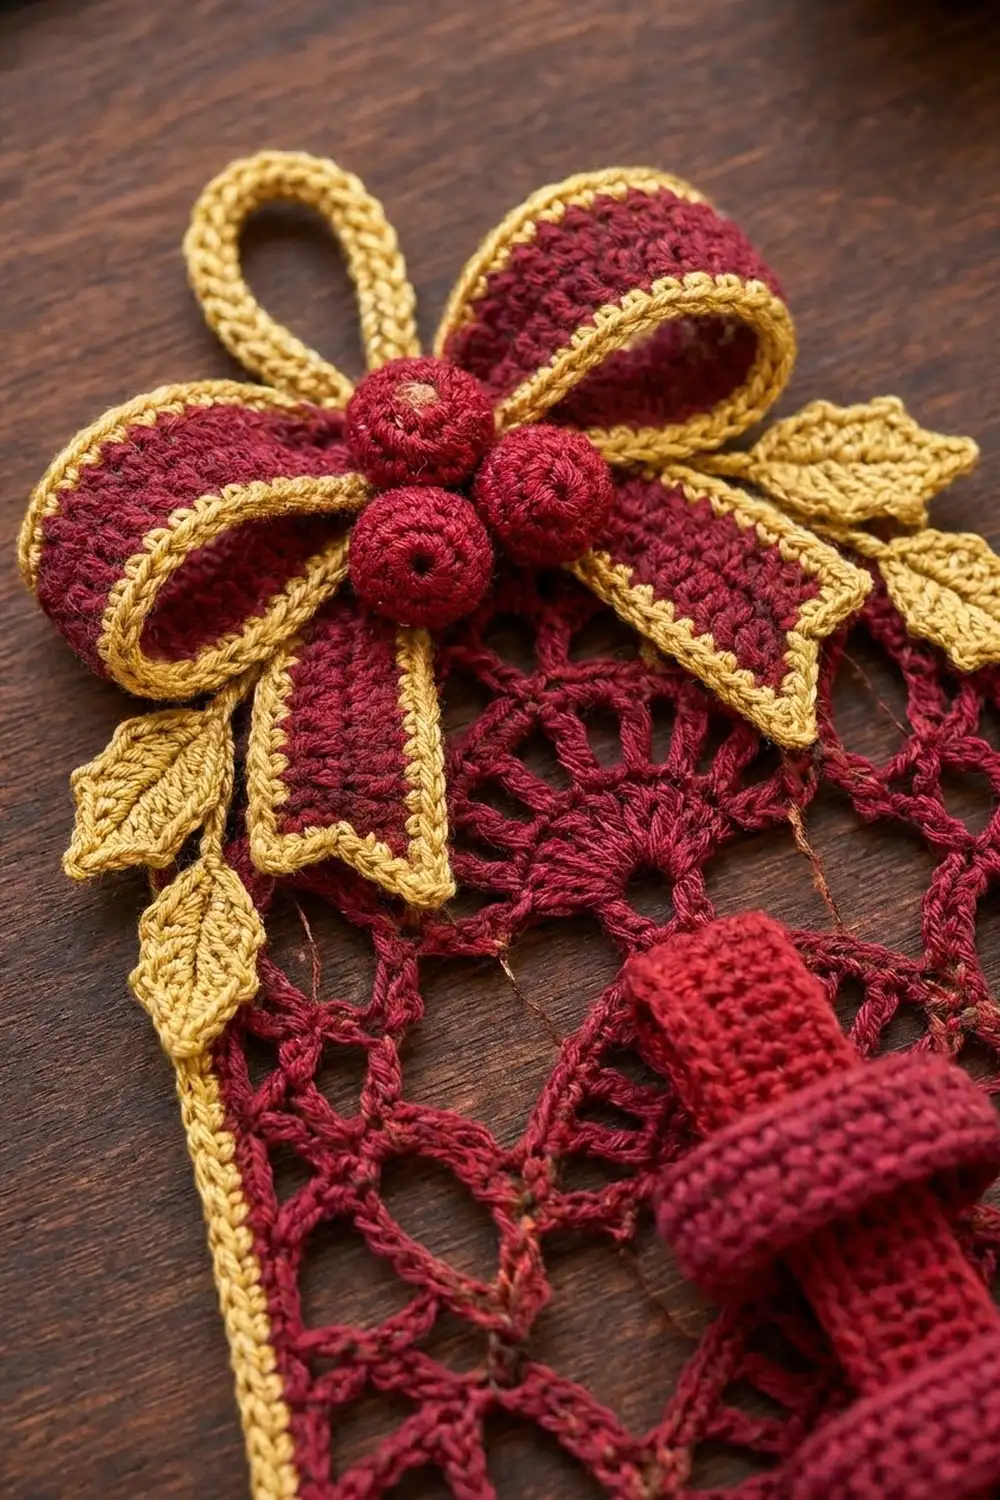
At the top are a gold-edged bow, three red berry bobbles, four gold holly leaves and a hanging loop. A narrow red strap runs down the center, and four wrapped bands on it hold coiled cables. The style is classic Christmas lace with a practical job.
The pattern uses US crochet terms. The finished bell measures 8.3 in (21.1 cm) wide by 8.4 in (21.3 cm) tall, or 9.9 in (25.1 cm) tall including the loop.
You work the bell bottom-up in rows, so each fan opens upward from its base. The fans and nets get smaller toward the top, and that creates the flare. A red edging round forms the scallops, and then you add two gold border rounds. The small appliqués are sewn on after blocking.
Finished Size and Construction
- Finished size: 8.3 in (21.1 cm) wide × 8.4 in (21.3 cm) tall; 9.9 in (25.1 cm) tall with the loop
- Skill level: Intermediate
- Terminology: US
- Yarn weight: Sport (#2) cotton
- Hook: 3.5 mm (US E-4)
- Number of pieces: 1 lace bell panel plus sewn appliqués (bow, 2 tails, center wrap, 3 berries, 4 leaves, hanging loop, strap, 4 bands)
- Layout: Single panel; no motif joining
- Lace body after Row 11: 7.4 in (18.8 cm) wide at the hem × 7.3 in (18.5 cm) tall
- Size before border (after red edging): 7.8 in (19.8 cm) × 7.9 in (20.1 cm)
- Border depth: 0.25 in (0.6 cm) on every side
Materials
Use a smooth, mercerized sport-weight cotton. It shows the stitches clearly, blocks crisply and is firm enough to carry the weight of the cables.
- Burgundy red: 55 g, about 180 m (body, edging, bow, tails, wrap, berries, strap, bands)
- Mustard gold: 20 g, about 66 m (hem fans, border, bow edging, leaves, loop)
These quantities include about a 20 percent margin.
Tools:
– 3.5 mm (US E-4) hook
– Tapestry needle
– 4 stitch markers
– Rust-proof pins and a blocking board
– Spray bottle
– Ruler or tape measure
– A small amount of fiberfill or red scrap yarn for the berries
Abbreviations (US Terms)
- ch – chain
- sl st – slip stitch
- sc – single crochet
- hdc – half double crochet
- dc – double crochet
- tr – treble crochet
- sc2tog – single crochet 2 together
- rev sc – reverse single crochet (crab stitch)
- sp(s) – space(s)
- RS / WS – right side / wrong side
Reverse sc: Work from left to right (if you’re right-handed). Insert the hook into the next stitch to the right, yarn over and pull up a loop, then yarn over and draw through both loops. This makes the corded edge.
Picot: Ch 2, then sl st in the top of the stitch you just made.
Gauge and Checkpoints
Gauge is 20 dc and 10 rows = 4 in (10.2 cm), and 20 sc and 24 rows = 4 in (10.2 cm).
Work Rows 1–3 as a test piece before starting the bell. Row 1 should measure 7.4 in (18.8 cm) along the foundation. If it’s within 0.2 in (0.5 cm) of that, keep going.
Measure at each of these checkpoints:
- After Row 1: 7.4 in (18.8 cm) wide; fans 1.1 in (2.8 cm) tall
- After Row 2: 6.2 in (15.7 cm) wide across the net
- After Row 5: 5.0 in (12.7 cm) wide; 3.8 in (9.7 cm) tall
- After Row 11: 7.3 in (18.5 cm) tall; 3.8 in (9.7 cm) wide across Rows 8–10
- After the edging round: 7.8 in (19.8 cm) × 7.9 in (20.1 cm)
- After the border: 8.3 in (21.1 cm) × 8.4 in (21.3 cm)
If your piece is too big, go down 0.25 mm in hook size. If it’s too small, go up 0.25 mm. Most of the width comes from the chain loops, so if the top looks narrow, check your chain tension first.
Bell Body
The fans stack in three vertical columns. In fan rows, the sc go into the edge and anchor stitches, and each fan goes into the center sc of the net below.
Row 1 (RS, gold): Ch 38. Sc in 2nd ch from hook. Skip 5 ch, 11 tr in next ch, skip 5 ch, sc in next ch; rep from * 2 more times. (3 fans, 4 sc = 37 sts.) Fasten off.
The sc go into foundation loops 1, 13, 25 and 37, and the fans into loops 7, 19 and 31. You’ll work the hem scallops into these loops later.
Row 2 (WS, red): Turn and join red in the last sc. Ch 8 (counts as tr + ch 4). Sc in 6th tr of first fan, ch 4, tr in next sc. Ch 4, sc in 6th tr of next fan, ch 4, tr in next sc; rep from * once more. (4 tr, 3 sc, 6 ch-4 sps = 31 sts.)
Row 3 (RS): Ch 1, turn. Sc in first tr. 9 dc in next sc, sc in next tr; rep from * 2 more times, working the last sc in the 4th ch of the turning ch-8. (3 fans, 4 sc = 31 sts.)
Row 4 (WS): Ch 6 (counts as dc + ch 3), turn. Sc in 5th dc of first fan, ch 3, dc in next sc. Ch 3, sc in 5th dc of next fan, ch 3, dc in next sc; rep from * once more. (4 dc, 3 sc, 6 ch-3 sps = 25 sts.)
Row 5 (RS): Ch 1, turn. Sc in first dc. 7 dc in next sc, sc in next dc; rep from * 2 more times, working the last sc in the 3rd ch of the turning ch-6. (3 fans, 4 sc = 25 sts.)
Row 6 (WS): Work as Row 4, but put each sc in the 4th dc of the fan. (25 sts.)
Row 7 (RS): Work as Row 5. (25 sts.)
Row 8 (WS): Ch 5 (counts as dc + ch 2), turn. Sc in 4th dc of first fan, ch 2, dc in next sc. Ch 2, sc in 4th dc of next fan, ch 2, dc in next sc; rep from * once more. (4 dc, 3 sc, 6 ch-2 sps = 19 sts.)
Row 9 (RS): Ch 1, turn. Sc in first dc. 5 dc in next sc, sc in next dc; rep from * 2 more times, working the last sc in the 3rd ch of the turning ch-5. (3 fans, 4 sc = 19 sts.)
Row 10 (WS): Work as Row 8, but put each sc in the 3rd dc of the fan. (19 sts.)
Row 11 (RS, crown): Ch 1, turn. Sc in first dc, 4 dc in next sc, sc in next dc, 9 dc in next sc, sc in next dc, 4 dc in next sc, sc in last dc. (4 sc, 17 dc = 21 sts.)
The large center fan and the two smaller side fans make the dome.
Red Edging Round
Rnd 1 (RS): Ch 1. Don’t turn. Rotate the piece and work down the side.
- Side 1: Sc evenly across the row ends: 4 sc over Row 11, 5 over Rows 9–10, 6 over Rows 7–8, 6 over Rows 5–6, 7 over Rows 3–4 and 9 over Rows 1–2. (37 sc)
- Bottom (foundation free loops): Sc in loop 1 (corner). Work a scallop over the next 11 loops: hdc, dc, dc, 2 dc in next, 2 tr in next, 3 tr in next (fan base), 2 tr in next, 2 dc in next, dc, dc, hdc. Sc in next loop (a dip, or the corner after the last scallop). Rep from * 2 more times. (37 loops worked 1 per loop + 18 extra = 55 sts: 2 corner sc, 3 scallops of 17 sts, 2 dip sc)
- Side 2: Work as Side 1 in reverse order: 9, 7, 6, 6, 5, 4. (37 sc)
- Top (across Row 11): Sc in sc, sc in each of 4 dc, sc in sc, 2 sc in each of 9 dc, sc in sc, sc in each of 4 dc, sc in last sc. (21 sts worked 1 per st + 9 extra = 30 sc)
Join with sl st to first sc. (159 sts.) Fasten off.
Checkpoint: 7.8 in (19.8 cm) × 7.9 in (20.1 cm).
Appliqués
Make all the appliqué pieces now and set them aside. You’ll attach them after blocking.
Bow loop strip (red): Ch 51. Row 1: Sc in 2nd ch from hook and across. (50 sc.) Rows 2–7: Ch 1, turn, sc across. (50 sc.) The strip should measure 10 in (25.4 cm) × 1.2 in (3.0 cm). Fasten off.
With gold, work 50 sc along each long edge. Fold both short ends to the center, overlapping them by 0.5 in (1.3 cm), so the bow is 5 in (12.7 cm) wide. Tack the ends in place.
Tails (make 2, red): Ch 5. Row 1: Sc in 2nd ch from hook and across. (4 sc.) Rows 2–14: Ch 1, turn, sc across. (4 sc.)
For the notched end, work Row 15 as ch 1, turn, sc in 2 sts. Work Row 16 as ch 1, turn, sc2tog. Fasten off. Rejoin in the remaining 2 sts and repeat Rows 15–16.
Each tail is about 2.7 in (6.9 cm) long. Edge it in gold: 4 sc across the top, 16 sc down the side, 3 sc in the tip, 2 sc along the inner edge, sl st in the notch, 2 sc up the next inner edge, 3 sc in the second tip and 16 sc up the other side. Join. (47 sts.)
Center wrap (red): Ch 7. Work 6 sc for 6 rows. Wrap it around the pinched bow center and sew it closed at the back.
Berries (make 3, red): Rnd 1: 6 sc in a magic ring. Rnd 2: 2 sc in each st. (12 sts.) Rnd 3: Sc around. (12 sts.) Stuff the berry. Rnd 4: Sc2tog 6 times. (6 sts.) Close the hole. Each berry is 0.75 in (1.9 cm) across.
Holly leaves (make 4, gold): Ch 10. Starting in the 2nd ch from hook, work: sc, hdc, dc + picot, dc, dc + picot, dc, hdc + picot, sc. Work 3 sc in the last ch for the tip.
Then work along the free loops: sc, hdc + picot, dc, dc + picot, dc, dc + picot, hdc, sc. Sl st to first sc. Each leaf is 1.8 in (4.6 cm) × 0.8 in (2.0 cm).
Hanging loop (gold): Ch 25. Sc in 2nd ch from hook and across. (24 sc, 4.8 in / 12.2 cm.)
Strap (red): Ch 6. Row 1: Sc in 2nd ch from hook and across. (5 sc, 1 in / 2.5 cm wide.) Ch 1, turn and sc across until you have 33 rows, or the strap measures 5.5 in (14.0 cm).
Bands (make 4, red): Ch 17. Work 16 sc for 4 rows. Each band is 3.2 in (8.1 cm) × 0.7 in (1.8 cm).
Border
Border gauge: 5 sc per inch (20 sc = 4 in / 10.2 cm) along straight edges.
You start with the 159 sts of the red edging: 30 across the top, 37 down each side and 55 across the bottom.
Border Rnd 1 (RS, gold): Join gold at the start of the top section. Work 1 sc in each st, except as follows:
- Top: Sc in 12, 2 sc in each of next 6, sc in 12. (30 worked + 6 extra = 36)
- Side 1: Sc in each st. (37)
- Bottom: 3 sc in corner sc. On each scallop, sc in 8, 3 sc in center tr, sc in 8 (19). Skip each dip sc. Work 3 sc in the last corner. (53 worked + 10 extra = 63)
- Side 2: Sc in each st. (37)
Join. (157 sts worked 1 per existing st + 16 extra = 173 sts.)
Border Rnd 2 (gold): Ch 1. Work rev sc in each st around. (173 rev sc: 36 top, 37 per side, 63 bottom.) Join and fasten off.
Why the math works: You add stitches only where the edge curves outward: 6 over the dome, 2 at each scallop center and 2 at each bottom corner. You lose 1 at each of the two inward dips. That’s 6 + 6 + 4 − 2 = +14, and 159 + 14 = 173.
The sides keep 37 sts. At 5 sc per inch, that matches the 7.4 in (18.8 cm) sloped side, so the edges stay flat. The two rounds add 0.25 in (0.6 cm) all around, so the bell grows from 7.8 in × 7.9 in (19.8 cm × 20.1 cm) to 8.3 in × 8.4 in (21.1 cm × 21.3 cm).
Final Blocking
- Weave in ends along the solid edges, away from the lace.
- Wet the bell and press out the water in a towel.
- Pin it to 8.3 in (21.1 cm) × 8.4 in (21.3 cm), pinning each scallop center and each dip.
- Open every fan and pin each chain loop into a clear oval.
- Let it dry completely. Spray-block the bow, tails and leaves flat.
- Sew the strap down the center, starting 1 in (2.5 cm) below the top edge. Tack it at both ends and at every net row.
- Space the bands 1.3 in (3.3 cm) apart center to center, with the first one 0.9 in (2.3 cm) below the top of the strap. Sew each band’s ends to the back edges of the strap so a loose loop forms in front.
- Fold the hanging loop in half and sew both ends to the back, 0.9 in (2.3 cm) down from the top. That leaves 1.5 in (3.8 cm) showing above the bell.
- Sew the bow over the top of the strap and the tails underneath it, angled outward.
- Place 2 leaves at each shoulder, then sew the 3 berries in a cluster over the center wrap.
Final Quality-Control Checklist
- Row counts are 37, 31, 31, 25, 25, 25, 25, 19, 19, 19 and 21.
- The three fan columns stack straight.
- The edging round has 159 sts and the border has 173.
- The three scallops are even, with the gold fans centered above them.
- The bell lies flat and the sides don’t ruffle.
- The strap is centered and the bands are evenly spaced.
- The loop holds the bell’s weight with cables in place.
Troubleshooting
- Fans lean: You worked into a chain instead of the center sc. Rework the row.
- Top is too wide: The net chains are loose. Use a smaller hook for Rows 8–11.
- Sides ruffle: There are too many row-end sc. Recheck the group counts.
- Sides pull in: There are too few row-end sc, or the border is tight. Use a larger hook for the border.
- Scallops look flat: Pin them during blocking, and check that each center has 3 tr.
- Bell sags: Tack the strap at more net rows.
Care
Hand wash in cool water, press out the water in a towel and dry flat, pinned to shape. Take the cables out first.
Final Notes
Each measurement builds on the one before it. The 37-stitch foundation sets the 7.4 in (18.8 cm) hem. The nets narrow to 31, 25 and then 19 stitches to create the flare. The red edging brings the piece to 7.8 in × 7.9 in (19.8 cm × 20.1 cm), and the gold border finishes it at 8.3 in × 8.4 in (21.1 cm × 21.3 cm).
If you check your size at each checkpoint, every appliqué will fit as planned. Happy crocheting!