

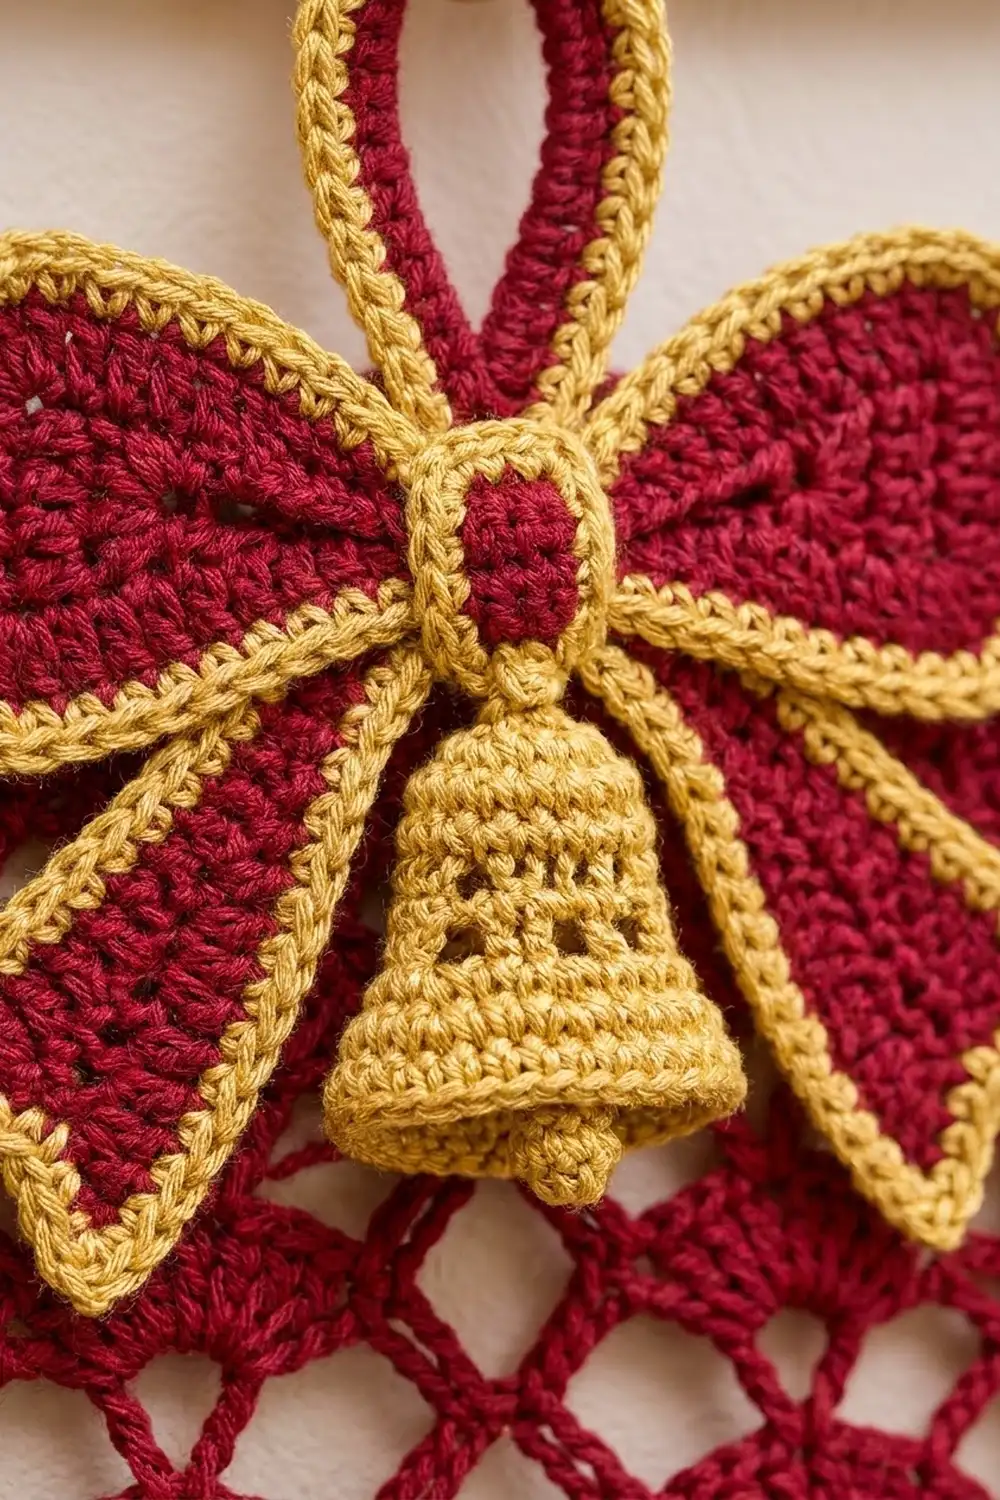
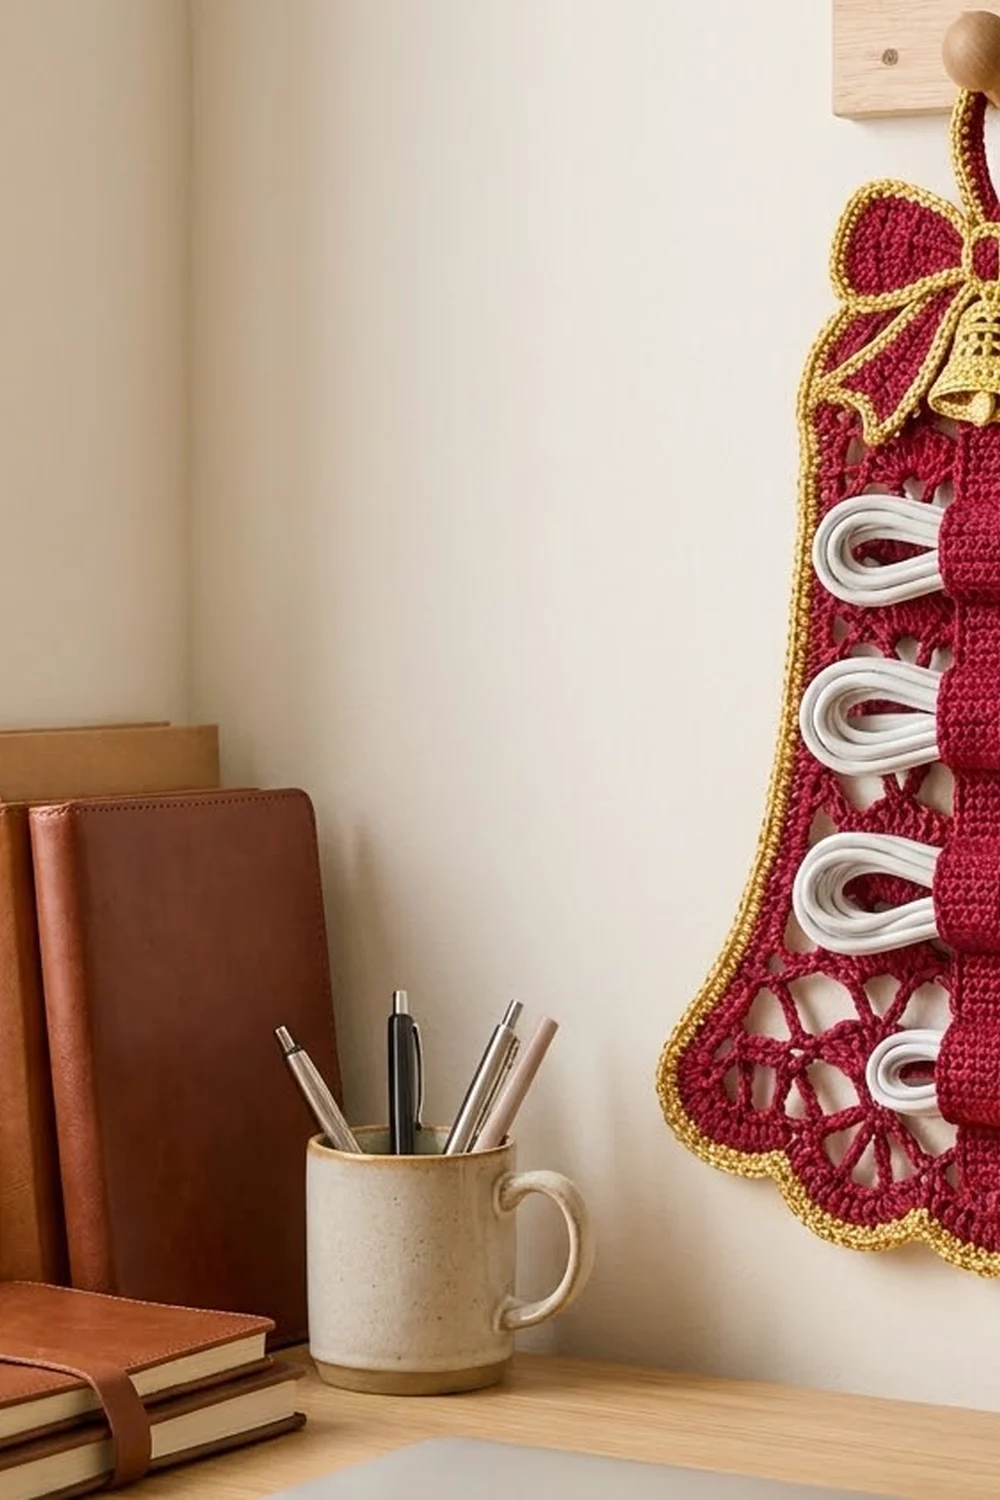
This wall organizer is a Christmas bell in open fan lace. A strap runs down the center, and its four loops hold coiled charging cables. A gold rope edge, a red bow and a tiny gold bell finish the top.
The lace, bow and strap are deep cranberry red. The outer edge, bow outlines and little bell are gold. The style is traditional holiday lace, made for everyday use.
All instructions use US crochet terms. The finished piece measures 7.4 in (18.8 cm) across the top, 11.8 in (30.0 cm) across the hem and 10.3 in (26.2 cm) tall. With the hanging loop it is 11.8 in (30.0 cm) tall.
You work the panel top-down in rows, and the chain loops get longer as you go so the sides flare. Then you make the small parts, add a two-round border, block, and sew everything on.
Finished Size and Construction
- Finished size: 7.4 in (18.8 cm) top × 11.8 in (30.0 cm) hem × 10.3 in (26.2 cm) tall; 11.8 in (30.0 cm) with loop
- Skill level: Intermediate
- Terminology: US
- Yarn weight: DK (#3) cotton
- Hook: 3.5 mm (E-4)
- Number of pieces: 1 lace panel plus 12 sewn-on parts (2 bow wings, 2 tails, 1 knot, 1 bell, 1 strap, 4 cord loops)
- Layout: single panel; bow at top center, strap centered vertically
- Panel size before border: 6.6 in (16.8 cm) top × 11 in (27.9 cm) hem × 9.5 in (24.1 cm) tall
- Border depth: 0.4 in (1.0 cm) per edge (2 rounds)
Materials
Choose a smooth mercerized DK cotton so the lace looks crisp and keeps its blocked shape. The amounts assume about 120 m per 50 g.
- Red: 65 g (156 m)
- Gold: 15 g (36 m)
- 3.5 mm (E-4) hook, tapestry needle, stitch markers
- Rust-proof pins, blocking mat, spray bottle, measuring tape
The quantities include about 15% extra for swatching and sewing tails.
Abbreviations (US Terms)
- ch – chain
- sl st – slip stitch
- sc – single crochet
- dc – double crochet
- tr – treble crochet
- sc2tog – single crochet 2 together
- BLO – back loop only
- rev sc – reverse single crochet (crab stitch)
- sp – space; st(s) – stitch(es)
Special stitches
- Fan: the stated number of dc (or tr), all worked in one sc.
- Half fan: the stated number of dc, worked in an edge sc.
- Bridge: sc in next ch sp, ch 3, sc in next ch sp.
- Bobble: [yarn over, insert hook, pull up a loop, yarn over, draw through 2] 3 times in the same st, then yarn over and draw through all 4 loops.
Gauge and Checkpoints
Base gauge: 20 sc and 20 rows = 4 in (10.2 cm) in sc.
Make the strap first and use it as your test piece. Its 5 sc should measure 1 in (2.5 cm) across, and 10 rows should measure 2 in (5.1 cm).
Lace checkpoints, measured flat:
- After Row 1: 6.6 in (16.8 cm) wide.
- After Row 5: about 7 in (17.8 cm) wide, 2.4 in (6.1 cm) tall.
- After Row 9: about 8 in (20.3 cm) wide, 4.9 in (12.4 cm) tall.
- After Row 13: about 9.5 in (24.1 cm) wide, 7.7 in (19.6 cm) tall.
- After Row 15: 11 in (27.9 cm) wide, 9.5 in (24.1 cm) tall.
If the strap is too wide, go down a hook size. If it is too narrow, go up one. If only the lace comes out too large, work your chain loops more tightly.
Lace Panel
The panel alternates Mesh rows and Fan rows. Fan Row A has 4 fans. Fan Row B has 3 fans plus a half fan at each edge, which staggers the fans across the lattice. Every Mesh row has exactly 8 ch loops and 9 sc.
Fan Row A (fan size F): Ch 4 (counts as dc + ch 1), sc in first ch sp, Fan in next sc, Bridge; repeat from * 2 more times. Fan in next sc, sc in last ch sp, ch 1, dc in last sc. Turn. (4 fans, 3 bridges, 8 sc, 2 edge dc)
Fan Row B (fan size F, half fan H): Ch 3 (counts as dc), (H − 1) dc in first sc, Bridge, Fan in next sc, Bridge; repeat from * 2 more times. H dc in last sc. Turn. (3 fans, 2 half fans, 4 bridges, 8 sc)
Mesh Row after A (loop length N): Ch 1, sc in first dc, ch N, sc in center st of next fan, ch N, sc in next ch-3 sp; repeat from * 2 more times. Ch N, sc in center st of last fan, ch N, sc in 3rd ch of turning ch. Turn.
Mesh Row after B (loop length N): Ch 1, sc in first dc, ch N, sc in next ch-3 sp, ch N, sc in center st of next fan; repeat from * 2 more times. Ch N, sc in last ch-3 sp, ch N, sc in top of turning ch. Turn.
The center st is the 4th dc of a 7-dc fan, the 5th dc of a 9-dc fan and the 6th tr of an 11-tr fan.
With red:
- Row 1 (RS): Ch 34, sc in 2nd ch from hook and each ch across. Turn. (33 sc)
- Row 2: Ch 1, sc in first sc, ch 5, skip 3 sc, sc in next sc; repeat from * 7 more times. Turn. (8 loops, 9 sc)
- Row 3: Fan Row A, 7-dc fans. (30 dc: 28 + 2 edge dc)
- Row 4: Mesh Row after A, N = 5.
- Row 5: Fan Row B, 7-dc fans, H = 4. (29 dc: 21 + 8)
- Row 6: Mesh Row after B, N = 6.
- Row 7: Fan Row A, 7-dc fans. (30 dc)
- Row 8: Mesh Row after A, N = 6.
- Row 9: Fan Row B, 9-dc fans, H = 5. (37 dc: 27 + 10)
- Row 10: Mesh Row after B, N = 7.
- Row 11: Fan Row A, 9-dc fans. (38 dc: 36 + 2)
- Row 12: Mesh Row after A, N = 8.
- Row 13: Fan Row B, 9-dc fans, H = 5. (37 dc)
- Row 14: Mesh Row after B, N = 9.
- Row 15: Fan Row A, 11-tr fans. Begin with ch 5 (counts as tr + ch 1) and end with ch 1, tr in last sc. (46 tr: 44 + 2)
Fasten off. The four fans of Row 15 form the scalloped hem. The loops lengthen from ch 5 to ch 9, which makes the bell sides flare.
Bow and Bell Appliqués
Bow wing (make 2, red):
- Row 1: Ch 2, 3 sc in 2nd ch from hook. Turn. (3)
- Row 2: Ch 1, 2 sc in first st, sc in each st to last st, 2 sc in last st. Turn. (5)
- Row 3: Ch 1, sc in each st. Turn. (5)
- Rows 4–9: Repeat Rows 2–3 three times. (7, 7, 9, 9, 11, 11)
- Row 10: Ch 1, sc in each st. (11) Fasten off.
Each wing is 2.2 in (5.6 cm) across the flared end and 2 in (5.1 cm) long.
Wing outline: With gold, work 34 sc around: 11 across Row 10, 10 down one side, 3 in the tip and 10 up the other side. Sl st to join.
Tail (make 2, red):
- Row 1: Ch 5, sc in 2nd ch from hook and across. Turn. (4)
- Rows 2–10: Ch 1, sc in each st. Turn. (4)
- First point: Ch 1, sc in next 2 sts, turn; ch 1, sc2tog. (1) Fasten off.
- Second point: Rejoin in 3rd st of Row 10, ch 1, sc in same st and last st, turn; ch 1, sc2tog. (1) Fasten off.
Tail outline: With gold, work 38 sc:
- 4 across the foundation
- 12 down the outer side
- 3 in the first tip
- 2 up the inner edge of the first point
- 2 down the inner edge of the second point
- 3 in the second tip
- 12 up the other outer side
Each tail is 0.8 in (2.0 cm) × 2.4 in (6.1 cm).
Knot (red): Ch 5, sc in 2nd ch from hook and across (4). Work 3 more rows of 4 sc for a 0.8 in (2.0 cm) square.
Knot outline: With gold, work 3 sc in each corner and 2 sc along each side (20 sc). Sl st to join.
Bell (gold):
- Row 1: Ch 9, sc in 2nd ch from hook and across. Turn. (8)
- Row 2: Ch 1, sc in BLO of each st. Turn. (8; rim ridge)
- Row 3: Ch 1, sc2tog, sc in next 4, sc2tog. Turn. (6)
- Row 4: Ch 1, sc in BLO of each st. Turn. (6)
- Row 5: Ch 1, sc in each st. Turn. (6)
- Row 6: Ch 1, sc2tog, sc in next 2, sc2tog. Turn. (4)
- Row 7: Ch 1, sc in BLO of each st. Turn. (4)
- Row 8: Ch 1, sc2tog twice. Turn. (2)
- Row 9: Ch 1, sc2tog (1), ch 4, sl st in same st for the crown loop. Fasten off.
Clapper: Join gold between the 4th and 5th foundation sts, work 1 Bobble and fasten off. The bell is 1.6 in (4.1 cm) wide and 2 in (5.1 cm) tall.
Cord Strap and Loops
Strap (red): Ch 6, sc in 2nd ch from hook and across (5). Work 35 rows in total. The strap measures 1 in (2.5 cm) × 7 in (17.8 cm).
Loop band (make 4, red): Ch 21, sc in 2nd ch from hook and across (20). Work 4 rows in total. Each band measures 4 in (10.2 cm) × 0.8 in (2.0 cm).
Wrap each band around the strap and overlap the ends by 0.5 in (1.3 cm) at the back. Sew the ends together, leaving about 1.1 in (2.8 cm) of slack at the front for a cable coil.
Center the bands 0.75 in (1.9 cm), 2.5 in (6.4 cm), 4.25 in (10.8 cm) and 6 in (15.2 cm) from the top of the strap. Tack each overlap to the strap.
Border
Border gauge: 5 sc per 1 in (2.5 cm).
Round 1 (red, RS facing): Join in the first foundation ch at the top right corner.
- Top edge (37 sc): 3 sc in first st, sc in next 15 sts, sc in center st. Ch 24, sl st in the same center sc, and work 32 sc over the ch-24 to make the hanging loop (these 32 are not counted in the 37). Sc in next 15 sts, 3 sc in last st.
- First side (46 sc): Working in row ends, 3 sc in each of Rows 2–9, 11 and 13 (30), and 4 sc in each of Rows 10, 12, 14 and 15 (16).
- Bottom edge (65 sc): 3 sc in edge tr, sc in ch-1 sp. For each fan: skip sc, sc in 5 tr, 2 sc in center tr, sc in 5 tr, skip sc (12 per fan). Work 3 sc in each ch-3 sp between fans. Finish with sc in last ch-1 sp and 3 sc in edge tr. (3 + 1 + 48 + 9 + 1 + 3)
- Second side (46 sc): Mirror the first side.
Sl st to first sc. (194 sc plus 32 loop sc) Fasten off.
Round 2 (gold): Rev sc in each sc around, including the loop. (226 rev sc) Join and fasten off.
Why the math works:
- Top: 37 sc over 6.6 in (16.8 cm) matches 5 sc per inch, with a little ease for the rounded corners.
- Sides: 46 sc over about 9.8 in (24.9 cm) of slanted edge is about 4.7 per inch, so the edges lie flat without ruffling.
- Hem: the curves run about 13 in (33.0 cm), so 65 sc gives 5 per inch.
- Depth: the two rounds together add 0.4 in (1.0 cm) per edge.
Final Blocking
Block the panel before sewing anything onto it.
- Weave in all ends except the sewing tails.
- Pin the panel face up to 7.4 in (18.8 cm) at the top, 11.8 in (30.0 cm) at the hem and 10.3 in (26.2 cm) tall.
- Pin each fan tip on the hem so the scallops are even, and pin the lattice diamonds open.
- Mist until damp and let dry completely.
- Sew the strap down the vertical center. Start 2.5 in (6.4 cm) below the top edge so it ends 0.8 in (2.0 cm) above the hem. Stitch along both long edges, catching the backs of the loops.
- Place the wings with their tips meeting at top center, 1 in (2.5 cm) below the top edge. Tuck the tails under at a downward angle and sew the knot over all the tips.
- Hang the bell by its crown loop under the knot and tack it over the top of the strap.
Final Quality-Control Checklist
- Every Mesh row has 8 loops and 9 sc.
- The hem has 4 even scallops.
- Border Round 1 counts 37 / 46 / 65 / 46, and Round 2 has 226 rev sc.
- Hanging loop, strap, bow and bell are centered.
- Cord loops sit 1.75 in (4.4 cm) apart.
Troubleshooting
- Sides ruffle: Work 1 fewer sc in the row ends of the ch-8 and ch-9 rows.
- Sides cup: Add 1 sc to each fan-row end.
- Fans lean: Work each fan into the sc, not into a loop.
- Hem won’t flare: Chain more loosely in Rows 10–15.
- Loops grip cables too tightly: Overlap the band ends by only 0.25 in (0.6 cm).
Care
Hand wash in cool water with mild soap, then dry flat and re-pin the scallops. Do not tumble dry.
Final Notes
The measurements build on each other in one chain:
- Gauge of 20 sc to 4 in (10.2 cm) sets the 6.6 in (16.8 cm) top.
- Loops growing from ch 5 to ch 9 take the panel to 11 in (27.9 cm) wide and 9.5 in (24.1 cm) tall.
- The 0.4 in (1.0 cm) border brings it to 7.4 in (18.8 cm) at the top, 11.8 in (30.0 cm) at the hem and 10.3 in (26.2 cm) tall.
- The hanging loop adds 1.5 in (3.8 cm).
Check each stage against these numbers and every part will fit as planned.
Happy crocheting!