

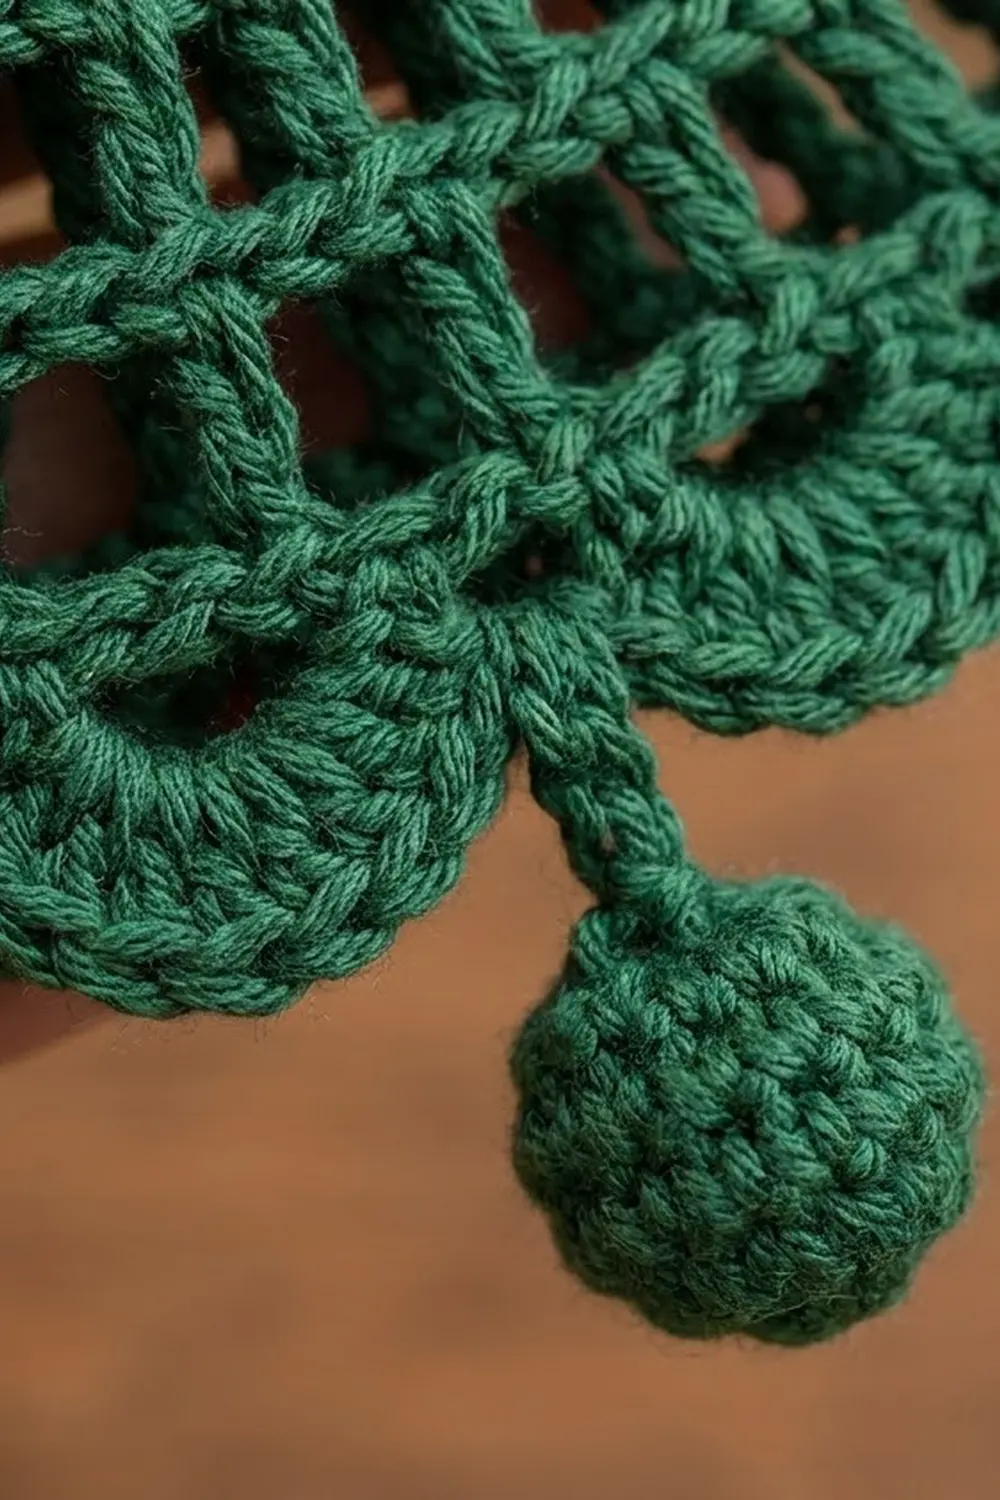
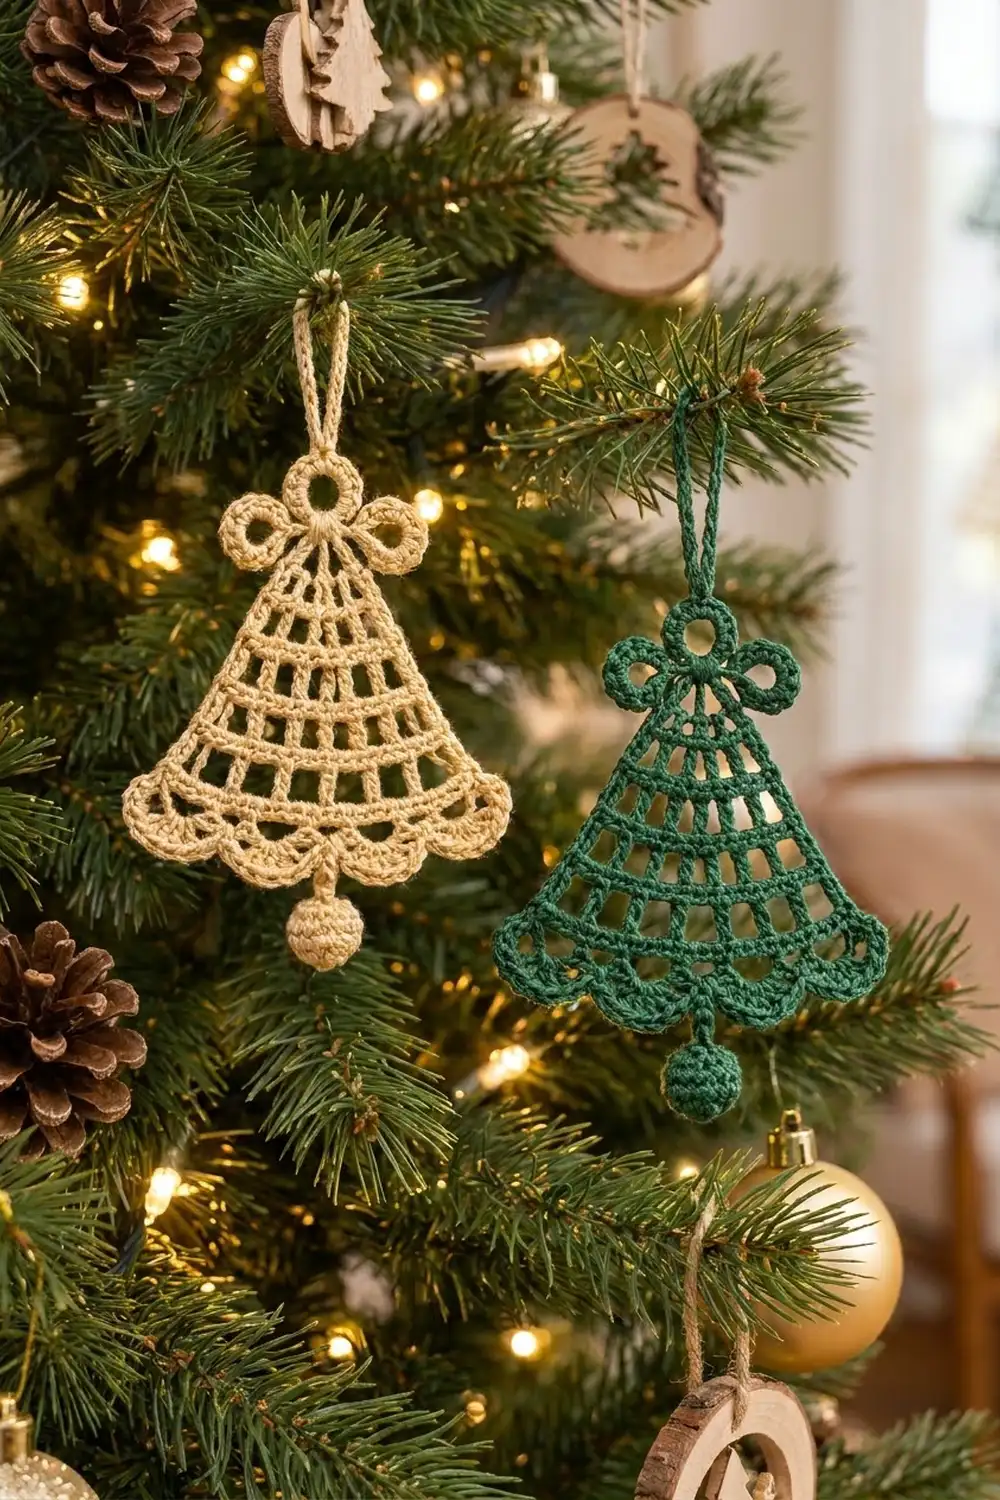
This little bell is a classic lace ornament made in one piece. It has a filet-style body of solid double crochet bands and open windows, a scalloped hem, a ring at the top with two small bow loops, and a round bead clapper hanging from the center. It looks delicate, but the structure is simple and repeats easily.
The sample is a warm gold-cream cotton, and the same pattern works just as well in deep forest green. Choose a mercerized cotton: it gives crisp stitches and a slight shine that catches the tree lights.
The pattern uses US crochet terms. The bell body with scallops measures about 5.2 in (13.2 cm) wide and 3.5 in (8.9 cm) tall. The whole ornament is about 5 in (12.7 cm) from the top of the ring to the bottom of the clapper, or about 6.25 in (15.9 cm) including the hanging loop.
How it’s made:
– The bell body is worked flat in rows from the narrow top down to the wide hem, alternating solid rows and mesh rows.
– A two-row scallop edging finishes the hem.
– The ring, bow loops and hanging loop are worked as one small unit, then slip-stitched to the top of the bell.
– The bead clapper is worked in the round and attached to the center of the hem.
Finished Size and Construction
- Finished size: about 5.2 in (13.2 cm) wide x 3.5 in (8.9 cm) tall (body plus scallops)
- Overall height: about 5 in (12.7 cm) from ring to clapper; about 6.25 in (15.9 cm) with the hanging loop
- Skill level: Easy to Intermediate
- Terminology: US crochet terms
- Yarn weight: Super fine (CYC 1), fingering-weight mercerized cotton
- Hook: 2.5 mm
- Number of pieces: 1 bell (the ring unit and bead clapper are attached as you go)
- Layout: single ornament, no joining
- Piece size before border: 5.2 in (13.2 cm) wide x 3.0 in (7.6 cm) tall after Row 9
- Border depth: about 0.5 in (1.3 cm) of scallops
Materials
Use a smooth, firmly twisted mercerized cotton in fingering weight, around 170 m per 50 g. Cotton holds its shape after starching, which matters for a lace ornament that hangs. Avoid fuzzy or very soft yarns, because they blur the mesh windows and the scallops won’t stand out.
- Gold-cream (sample color): 10 g / 34 m for one bell
- Forest green (alternate colorway): 10 g / 34 m for one bell
- A small pinch of the same yarn (or polyester fiberfill) to stuff the clapper
Tools:
- 2.5 mm crochet hook
- Tapestry needle
- Scissors
- Rustproof pins and a foam blocking board
- Spray starch or fabric stiffener (optional, recommended)
Quantities include a margin of about 30 percent for your test rows and yarn tails.
Abbreviations (US Terms)
- ch: chain
- sl st: slip stitch
- sc: single crochet
- hdc: half double crochet
- dc: double crochet
- sk: skip
- sp: space
- sc2tog: single crochet 2 together
- st(s): stitch(es)
- RS / WS: right side / wrong side
Special technique – covered loop: Make a chain loop as stated. Then work the given number of sc around the chain, inserting the hook into the loop rather than into individual chains, until the chain is fully hidden. This makes the thick, rounded loops at the top of the bell.
Gauge and Checkpoints
Gauge: 24 dc and 12 rows of dc = 4 in (10.2 cm). That works out to 6 dc per inch and 3 rows per inch.
Make one bell as your test. Rows 1 to 3 work as your gauge swatch: if Row 3 measures correctly, the rest of the bell will come out right.
Checkpoints, measured flat without stretching:
- After Row 3 (13 sts): about 2.2 in (5.6 cm) wide, 1.0 in (2.5 cm) tall
- After Row 5 (19 sts): about 3.2 in (8.1 cm) wide, 1.7 in (4.3 cm) tall
- After Row 7 (25 sts): about 4.2 in (10.7 cm) wide, 2.3 in (5.8 cm) tall
- After Row 9 (31 sts): about 5.2 in (13.2 cm) wide, 3.0 in (7.6 cm) tall
If your piece is too big, use a hook 0.25 mm smaller. If it is too small, use one 0.25 mm larger.
Row height matters too. If the windows look tall and narrow, your dc are too tall: pull up a slightly shorter loop on the first yarn-over. The stitch counts never change, only the hook.
Bell Body
The body is worked flat in rows from the top down. The ch 3 at the start of each row counts as 1 dc throughout.
The body alternates two kinds of rows:
- Mesh rows (even rows) turn a solid row into open windows and add 1 st at each edge.
- Solid rows (odd rows, from Row 3) fill each window with 2 dc and add 2 sts at each edge.
Every solid row has (3 x windows) + 1 sts, so the next mesh row always ends exactly on the last st.
Row 1 (RS): Ch 9, dc in 4th ch from hook and in each ch across. Turn. (7 sts)
Row 2 (mesh): Ch 3, dc in first st, [ch 2, sk 2 sts, dc in next st] twice, dc again in same last st. Turn. (9 sts: 5 dc + 4 ch; 2 ch-2 sps)
Row 3 (solid): Ch 3, 2 dc in first st, dc in each dc and 2 dc in each ch-2 sp across to last st, 3 dc in last st. Turn. (9 worked one per existing st + 4 added = 13 sts)
Row 4 (mesh): Ch 3, dc in first st, [ch 2, sk 2 sts, dc in next st] 4 times, dc again in same last st. Turn. (15 sts: 7 dc + 8 ch; 4 ch-2 sps)
Row 5 (solid): Work as Row 3. (15 worked one per existing st + 4 added = 19 sts)
Row 6 (mesh): Ch 3, dc in first st, [ch 2, sk 2 sts, dc in next st] 6 times, dc again in same last st. Turn. (21 sts: 9 dc + 12 ch; 6 ch-2 sps)
Row 7 (solid): Work as Row 3. (21 worked one per existing st + 4 added = 25 sts)
Row 8 (mesh): Ch 3, dc in first st, [ch 2, sk 2 sts, dc in next st] 8 times, dc again in same last st. Turn. (27 sts: 11 dc + 16 ch; 8 ch-2 sps)
Row 9 (solid): Work as Row 3. (27 worked one per existing st + 4 added = 31 sts) Do not fasten off. Turn.
You now have five solid bands and four mesh bands with 2, 4, 6 and 8 windows. The edges step outward evenly, which gives the bell its flared shape. Check the Row 9 measurement before moving on.
Edge tip: The doubled dc at each end of a mesh row forms a slightly thicker post. Keep these posts at the same tension as the inside posts so both slanted sides stay straight. Count the windows after every mesh row; that is the quickest way to catch a missed skip.
Scallop Hem (Border)
Border gauge: each finished scallop covers 5 sts of Row 9, is about 0.8 in (2.0 cm) wide, and hangs about 0.5 in (1.3 cm) below Row 9.
Row 10 (WS): Ch 1, sc in first st, [ch 7, sk 4 sts, sc in next st] 6 times. Turn. (7 sc + 6 ch-7 arches = 49 sts)
Row 11 (RS): Ch 1, sc in first sc, [(2 sc, hdc, 5 dc, hdc, 2 sc) in next ch-7 arch, sc in next sc] 6 times. Fasten off. (7 sc + 6 scallops of 11 sts = 73 sts)
Why the math works:
– Row 9 has 31 sts, which is 1 + (6 x 5). Each repeat uses 5 sts (4 skipped + 1 sc), and the extra 1 is the first sc.
– The edging runs along the hem only. The slanted sides stay plain, so there are no corners to calculate.
– The 4th of the 7 separating sc lands on st 16 of Row 9. That is the exact center, with 15 sts on each side, and it’s where the clapper hangs, between scallops 3 and 4.
Top Ring, Bow Loops, and Hanging Loop
Rnd 1: Ch 10, sl st in first ch to form a ring. Ch 1, work 18 sc into the ring, sl st in first sc. (18 sc) The first sc is the top of the ring.
Hanging loop: Ch 18, sl st in same sc. Work 24 sc around the ch-18 loop, sl st in same sc. The covered loop measures about 1.25 in (3.2 cm).
Sl st in each of the next 5 sc (you are now in sc 6).
First bow loop: Ch 9, sl st in same sc. Work 12 sc around the ch-9 loop, sl st in same sc.
Sl st in each of the next 4 sc (you are now in sc 10, the bottom of the ring).
Join to bell: Hold the bell RS facing you, top edge up. Insert the hook through the foundation ch at the base of the 4th (center) st of Row 1 and sl st. Then sl st in sc 10 of the ring again.
Sl st in each of the next 4 sc (you are now in sc 14).
Second bow loop: Work as first bow loop.
Sl st in each of the remaining 4 sc and in the first sc. Fasten off.
With 18 sc, the sc are spaced 20 degrees apart around the ring. Sc 6 and sc 14 are both 100 degrees from the top, so the bow loops sit at matching heights, just below the middle of the ring. The ring measures about 0.7 in (1.8 cm) across.
Bead Clapper
Leave a 6 in (15.2 cm) starting tail.
Rnd 1: 6 sc in a magic ring. (6 sts)
Rnd 2: 2 sc in each st. (12 sts)
Rnds 3–4: Sc in each st. (12 sts)
Rnd 5: Sc2tog 6 times. (6 sts) Stuff firmly with yarn scraps or fiberfill.
Rnd 6: Sc2tog 3 times. (3 sts)
Stem: Ch 4, then sl st into the center sc of Row 11 (the 4th of the 7 separating sc). Fasten off and weave in. Pull the starting tail to close the magic ring tightly and weave it inside the bead.
The bead measures about 0.6 in (1.5 cm) across and hangs just below the scallop tips.
Final Blocking
- Weave in all tails along the solid rows so they stay hidden inside the dc bands.
- Soak the bell in cool water for 10 minutes, then press out the water in a towel. Do not wring.
- Draw a bell outline on paper: 1.2 in (3.0 cm) wide at the top, 5.2 in (13.2 cm) wide at Row 9, and 3.0 in (7.6 cm) tall to Row 9. Lay it on your board under clear plastic.
- Pin the top corners, then the Row 9 corners, then pin each side edge in a straight line.
- Pin each scallop at its lowest point so all six hang to the same depth of 0.5 in (1.3 cm).
- Open every mesh window into a square with a pin tip.
- Shape the ring and the three loops into neat circles.
- Spray with starch and let dry completely, usually overnight. Repeat once for a firmer ornament.
Final Quality-Control Checklist
- Row 9 has 31 sts and measures 5.2 in (13.2 cm) wide
- The mesh bands have 2, 4, 6 and 8 windows from top to bottom
- Both slanted sides are straight and the same length
- There are six scallops, all the same size and depth
- The clapper hangs from the exact center sc, between scallops 3 and 4
- The ring is centered on the top edge, and both bow loops sit at the same height
- The hanging loop is fully covered, with no chain showing
- All tails are woven in and trimmed
Troubleshooting
A mesh row ends one st short or long. Recount the previous solid row. It must be 7, 13, 19 or 25 sts. Most errors come from forgetting the 3rd dc in the last st.
The bell edges curl inward. Your edge increases are too tight. Work the 3-dc edge groups a little looser, then block firmly.
The scallops ruffle. Your dc are too tall. Replace the 5 dc in each arch with (hdc, 3 dc, hdc).
The scallops pull the hem in. Add 1 ch to each arch (ch 8) and keep the Row 11 stitch counts the same.
The ring tilts forward. Steady it with a tiny sl st from the tip of each bow loop into the top corner of the bell.
The clapper spins or sags. Shorten the stem to ch 3, or stuff the bead more firmly.
Care
Hand wash in cool water with mild soap, press dry in a towel and reshape. Starch again after washing, and store flat in a box between seasons.
Final Notes
The measurements build on each other and are easy to check. At 6 dc per inch, the solid rows grow through 7, 13, 19, 25 and 31 sts, ending at 5.2 in (13.2 cm) wide and 3.0 in (7.6 cm) tall. The 31-stitch hem divides evenly into six scallops that add 0.5 in (1.3 cm). The center sc anchors a 0.6 in (1.5 cm) clapper, and the ring unit sits on the center of Row 1. Check Row 3 and Row 9, and the rest will come out right.
Make one in gold and one in green, and hang them side by side on the tree.
Happy crocheting!