

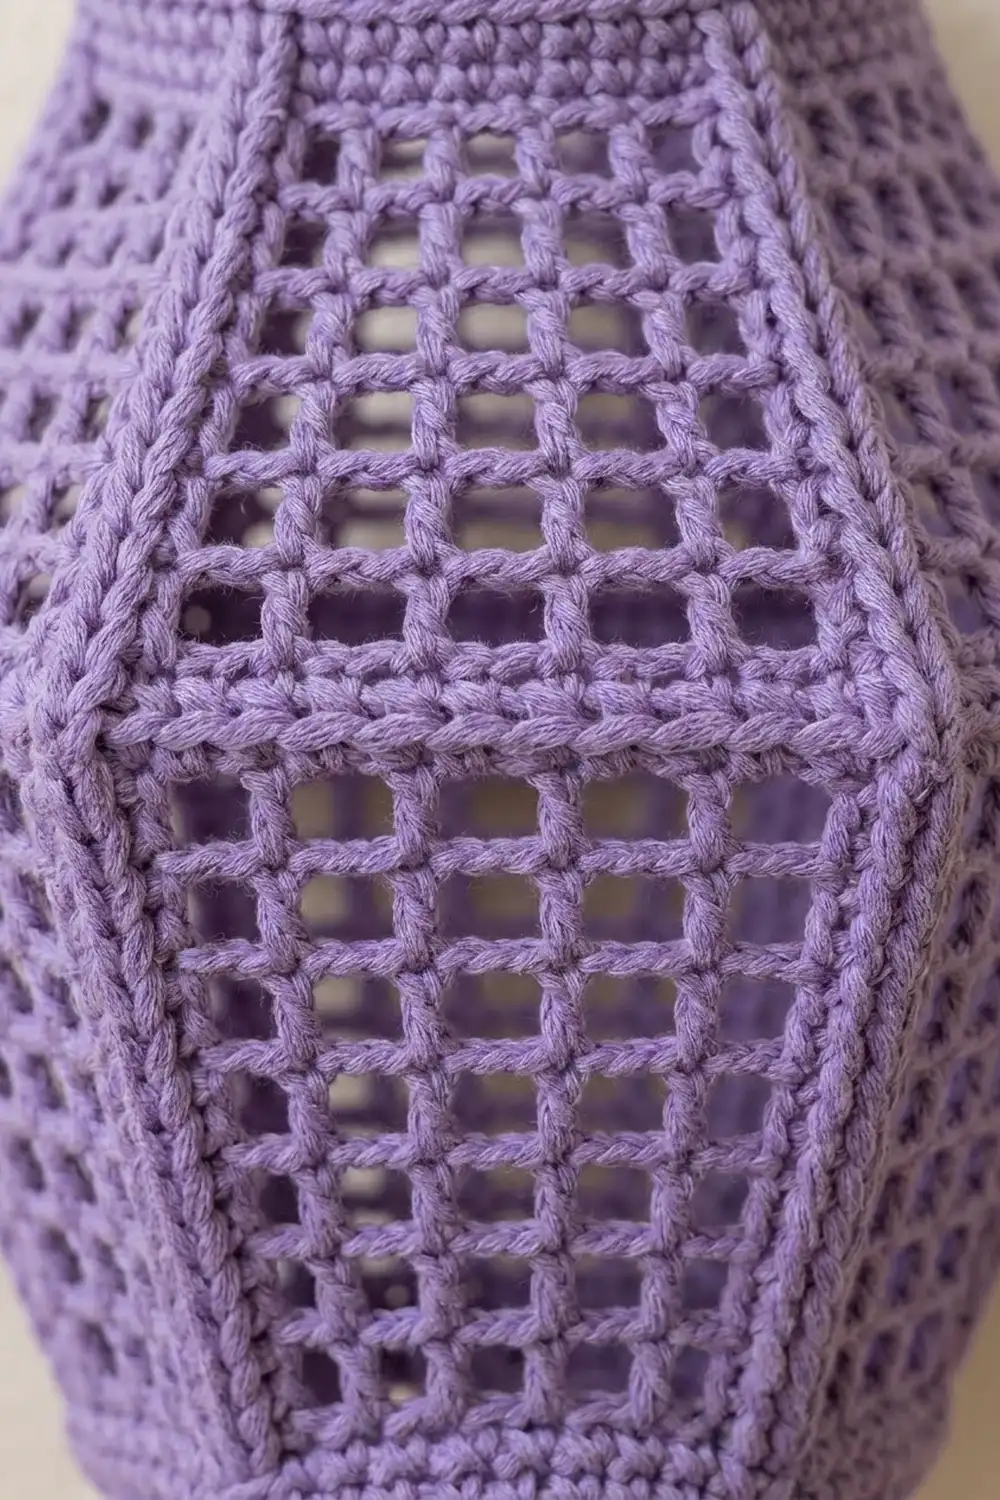
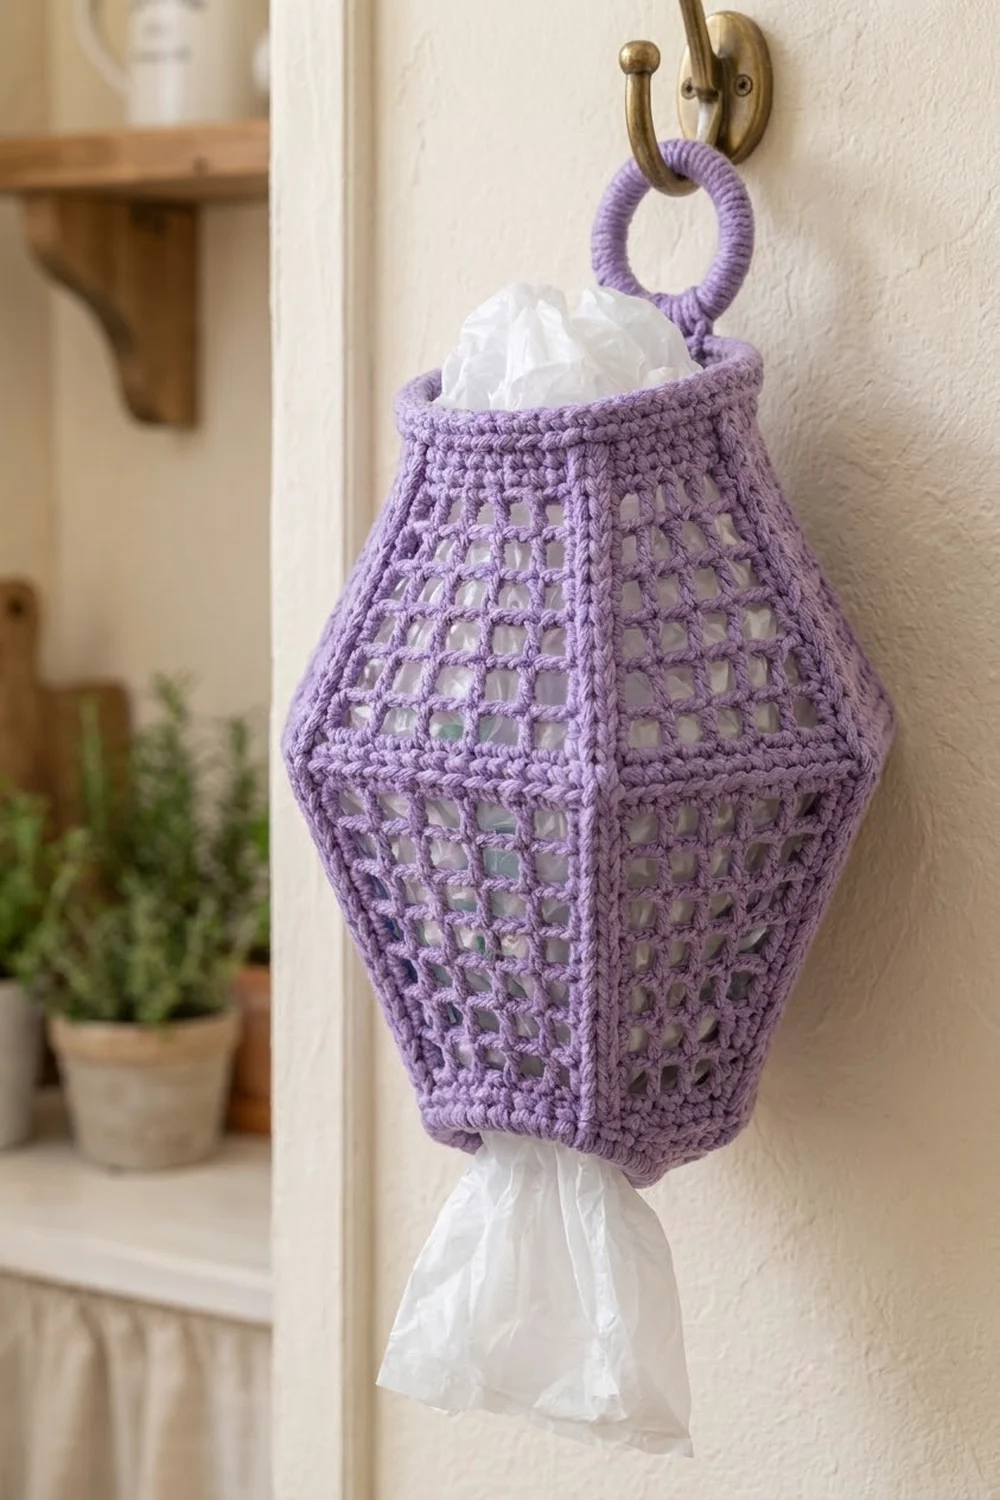
The Lavender Lantern is a hanging plastic bag holder shaped like a six-sided paper lantern. You can see the bags through the open filet mesh, and raised solid ribs outline each face for a clean geometric look.
The sample uses a soft lavender cotton. It works just as well in mustard or any solid color that suits your kitchen or laundry room. Stuff bags in through the top and pull them out one at a time through the smaller bottom opening. A ring covered in crochet at the top hangs from a wall hook.
This pattern uses US crochet terms. The finished body is about 9 in (22.9 cm) across from one rib to the opposite rib and 10.25 in (26.0 cm) tall, not counting the hanging ring.
The body is one piece worked from the bottom up in joined rounds. You start with a short sc base, set up six mesh panels separated by 3-dc ribs, increase to a wide waist, work straight, then decrease to the top. Both openings get a sc rim. Surface slip stitches raise the ribs and waist lines, and a short tab attaches the covered ring.
Finished Size and Construction
- Finished size: 9 in (22.9 cm) wide at the waist, rib to rib; 10.25 in (26.0 cm) tall
- Skill level: Intermediate
- Terminology: US
- Yarn weight: Worsted (#4) cotton
- Hook: 5 mm (H-8)
- Number of pieces: 1 body plus 1 covered hanging ring (no joining of multiple pieces)
- Layout: Six identical mesh panels around a six-sided tube
- Panel width at waist: 18 sts, 4.5 in (11.4 cm)
- Size before border: 8.75 in (22.2 cm) tall
- Border depth: 1 in (2.5 cm) at the top; 0.5 in (1.3 cm) added at the bottom
- Openings: bottom 9 in (22.9 cm) around, about 2.9 in (7.4 cm) across; top 15 in (38.1 cm) around, about 4.8 in (12.2 cm) across
Materials
Choose a smooth, firm worsted cotton or cotton blend. Cotton holds the lantern shape and won’t stretch out under the weight of the bags. Avoid fuzzy or very drapey yarns, which blur the mesh.
- Lavender (main color): about 120 g, approx. 185 m
- 2 in (5.1 cm) metal or plastic ring
- 5 mm (H-8) hook
- Yarn needle
- 6 stitch markers
- Scissors and measuring tape
- Pins, a spray bottle, and a balloon or rolled towel for blocking
The yarn amount includes about 15% extra for the swatch, the surface slip stitches, and the ring.
Abbreviations (US Terms)
- ch – chain
- sl st – slip stitch
- sc – single crochet
- dc – double crochet
- sk – skip
- sp – space
- st(s) – stitch(es)
- rib dc – one of the 3 solid dc that form a rib
- mesh dc – a dc that sits between two ch-1 spaces
Special stitch – bridge dc2tog (bdc2tog): Yo, insert hook in next dc, pull up a loop, yo and draw through 2 loops. Skip the ch-1 sp. Yo, insert hook in the following dc, pull up a loop, yo and draw through 2 loops. Yo and draw through all 3 loops. This uses up dc, ch-sp, dc and makes 1 stitch.
Surface sl st: Hold the yarn on the wrong side. Insert the hook from the right side through the fabric, pull up a loop, and draw it through the loop on the hook. Repeat along a line to make a raised chain.
Gauge and Checkpoints
Gauge: 16 sts and 8 dc rows = 4 in (10.2 cm) in mesh pattern. In sc, 16 sts and 16 rows = 4 in (10.2 cm). One mesh square is about 0.5 in (1.3 cm).
Test first: Ch 22. Row 1: Dc in 4th ch from hook and in each ch across (20 sts). Row 2: Ch 3, dc in next 2 dc, ch 1, sk 1, dc in next dc, repeat to last 3 sts, dc in last 3 sts. Repeat Row 2 seven more times. The center should measure 4 in (10.2 cm) over 16 sts and 8 rows.
If your swatch is too big, go down 0.5 mm. If it’s too small, go up 0.5 mm. Every count below depends on 4 sts per inch.
Checkpoints:
– After Round 1: 9 in (22.9 cm) around, unstretched.
– After Round 6: 27 in (68.6 cm) around; each panel 4.5 in (11.4 cm) wide.
– Rounds 7–13 (waist band): 3.5 in (8.9 cm) tall.
– After Round 18: 8.75 in (22.2 cm) from the foundation; top edge 15 in (38.1 cm) around.
– After the border: 10.25 in (26.0 cm) tall.
Body
Every round begins with ch 3 (counts as dc) worked in the center rib dc of Rib 1. Every round ends with a sl st to the top of that ch-3. Do not turn. On Round 2, place a marker in the center dc of each rib, and move the markers up as you go.
Each panel is 3 rib dc, then ch-1 spaces alternating with mesh dc, ending with a ch-1 space before the next rib. A panel with S spaces has 2S + 2 sts.
Foundation: Ch 36, sl st to first ch to form a ring, taking care not to twist.
Round 1: Ch 1, sc in each ch around, sl st to first sc. (36 sc)
Round 2 (set-up): Ch 3, dc in next sc, ch 1, sk next sc, dc in next sc, ch 1, sk next sc, dc in next 3 sc, ch 1, sk next sc, dc in next sc, ch 1, sk next sc; repeat from * 4 more times, dc in next sc, sl st to top of ch-3. (36 sts: 6 panels of 6 sts, 2 spaces each)
Round 3 (increase): Ch 3, (dc, ch 1, dc) in next dc, ch 1, sk ch-sp, dc in next dc, ch 1, sk ch-sp, (dc, ch 1, dc) in next dc, dc in next dc, (dc, ch 1, dc) in next dc, ch 1, sk ch-sp, dc in next dc, ch 1, sk ch-sp; repeat from * 4 more times, (dc, ch 1, dc) in next dc, sl st to top of ch-3. (60 sts: 6 panels of 10 sts, 4 spaces each)
Working (dc, ch 1, dc) into each outer rib stitch adds one new space on each side of every rib. The rib stays 3 dc wide and centered, which forms the diagonal fold lines of the lantern.
Round 4 (increase): Work as Round 3, but in each panel repeat [ch 1, sk ch-sp, dc in next dc] 3 times before the final ch 1, sk ch-sp. (84 sts: 6 panels of 14 sts, 6 spaces each)
Round 5 (straight): Ch 3, dc in next dc, [ch 1, sk ch-sp, dc in next dc] 5 times, ch 1, sk ch-sp, dc in next 3 dc, [ch 1, sk ch-sp, dc in next dc] 5 times, ch 1, sk ch-sp; repeat from * 4 more times, dc in next dc, sl st to top of ch-3. (84 sts)
Round 6 (increase): Work as Round 3, repeating [ch 1, sk ch-sp, dc in next dc] 5 times in each panel. (108 sts: 6 panels of 18 sts, 8 spaces each)
Check: 27 in (68.6 cm) around.
Rounds 7–13 (waist band): Work as Round 5, repeating [ch 1, sk ch-sp, dc in next dc] 7 times in each panel. (108 sts each round)
These 7 straight rounds form the vertical sides of the lantern, 3.5 in (8.9 cm) tall.
Round 14 (decrease): Ch 3, bdc2tog over next rib dc and next mesh dc, [ch 1, sk ch-sp, dc in next dc] 5 times, ch 1, sk ch-sp, bdc2tog over next mesh dc and next rib dc, dc in next dc, bdc2tog over next rib dc and next mesh dc, [ch 1, sk ch-sp, dc in next dc] 5 times, ch 1, sk ch-sp; repeat from * 4 more times, bdc2tog over next mesh dc and next rib dc, sl st to top of ch-3. (84 sts: 6 panels of 14 sts, 6 spaces each)
Each bdc2tog absorbs the mesh dc next to the rib. Every panel loses one space on each side, and the rib angles inward.
Round 15 (straight): Work as Round 5. (84 sts)
Round 16 (decrease): Work as Round 14, repeating [ch 1, sk ch-sp, dc in next dc] 3 times in each panel. (60 sts: 6 panels of 10 sts, 4 spaces each)
Rounds 17–18 (straight): Ch 3, dc in next dc, [ch 1, sk ch-sp, dc in next dc] 3 times, ch 1, sk ch-sp, dc in next 3 dc, [ch 1, sk ch-sp, dc in next dc] 3 times, ch 1, sk ch-sp; repeat from * 4 more times, dc in next dc, sl st to top of ch-3. (60 sts each round)
The upper slope (Rounds 14–18) has two more straight rounds than the lower slope, so it rises more steeply and gives the lantern its slightly taller top.
Check: 8.75 in (22.2 cm) tall. Do not fasten off.
Border
Border gauge: 16 sc = 4 in (10.2 cm); 4 sc rounds = 1 in (2.5 cm).
Top Rim
Round 1: Ch 1, sc in each dc and in each ch-1 sp around, sl st to first sc. (60 sc: 10 per panel)
Rounds 2–4: Ch 1, sc in each sc around, sl st to first sc. (60 sc each round)
Fasten off and weave in.
Bottom Rim
Round 1: Turn the holder upside down. Join yarn in any free loop of the foundation chain, directly below a rib. Ch 1, sc in each free loop around, sl st to first sc. (36 sc: 6 per panel)
Round 2: Ch 1, sc in each sc around, sl st to first sc. (36 sc)
Fasten off and weave in. With Round 1 of the body, the bottom rim is 3 sc rounds, 0.75 in (1.9 cm) deep.
Why the math works: Each rim uses exactly 1 sc per existing stitch: 10 per panel × 6 = 60 at the top and 6 per panel × 6 = 36 at the bottom. The sc gauge matches the mesh gauge (4 sts per inch), so each rim keeps the same circumference as the edge it sits on: 15 in (38.1 cm) at the top and 9 in (22.9 cm) at the bottom. Nothing flares or pulls in.
Surface Ribs and Waist Lines
Vertical ribs: Join yarn at the base of the center rib dc on Round 2. Work surface sl sts straight up the center of the rib to Round 18, 2 sl sts per dc round (34 sl sts). Fasten off. Repeat on all 6 ribs.
Waist lines: Work a round of surface sl sts along the line between Rounds 6 and 7, 1 sl st per st (108 sl sts). Repeat between Rounds 13 and 14 (108 sl sts). Keep these loose so the waist stays 27 in (68.6 cm) around.
Hanging Ring and Tab
Ring: Join yarn to the 2 in (5.1 cm) ring. Work sc tightly around the ring until it is completely covered, about 56 sc. Sl st to first sc and fasten off.
Tab: Choose the panel that will face the wall. Join yarn in the 3rd sc of that panel on Top Rim Round 4. Row 1: Ch 1, sc in same st and next 4 sts, turn. (5 sc) Rows 2–8: Ch 1, sc in each sc across, turn. (5 sc)
The tab is 2 in (5.1 cm) long. Slip it through the covered ring, fold it to the inside, and whipstitch Row 8 to the inside of Top Rim Round 1.
Final Blocking
- Weave in all ends along the rib columns, where they won’t show through the mesh.
- Spray the holder evenly until damp, or soak it and press the water out in a towel.
- Insert a balloon inflated to about 27 in (68.6 cm) around at the waist, or a firmly rolled towel.
- Pull each rib straight so all six run vertically through the waist band.
- Square up the mesh spaces with your fingers so each is about 0.5 in (1.3 cm).
- Shape the top and bottom rims so they sit round and even.
- Let it dry completely before removing the form.
Final Quality-Control Checklist
- Body is 10.25 in (26.0 cm) tall and 9 in (22.9 cm) across, rib to rib.
- All six panels have the same number of spaces in every round.
- Ribs are 3 dc wide from Round 2 to Round 18 and line up vertically.
- Waist band is 7 rounds, 3.5 in (8.9 cm) tall.
- Top rim is 60 sc; bottom rim is 36 sc.
- You can pull a bag through the bottom opening, but bags don’t fall out by themselves.
- Ring is fully covered and the tab is stitched securely inside the rim.
Troubleshooting
Ribs drift to one side: You started a round in the wrong stitch. Every round must begin in the center rib dc of Rib 1.
Stitch count is off by 4: You skipped an increase or a bdc2tog at one rib. Count the spaces in each panel.
Waist is too wide or too narrow: Your gauge has changed. Measure after Round 6 against 27 in (68.6 cm) and change hook size if needed.
Bags fall out the bottom: Work one more sc round on the bottom rim, making 6 sc2tog evenly spaced (30 sc).
Mesh looks slanted: Pull each ch-1 snug and keep your dc heights even.
Ring tab sags: Add a second row of whipstitches through Top Rim Round 2.
Care
Hand wash, or machine wash on gentle in cool water. Reshape while damp, then lay flat or hang to dry.
Final Notes
The measurement chain is simple. The 36-sc base is 9 in (22.9 cm) around. Each increase round adds 24 sts, reaching 108 sts and 27 in (68.6 cm) at the waist. The waist band is 7 straight rounds, 3.5 in (8.9 cm) tall, then the body decreases to 60 sts and 15 in (38.1 cm) around. The body is 8.75 in (22.2 cm) tall before the border and 10.25 in (26.0 cm) after it. Check each stage as you go and the lantern will come out balanced.
Happy crocheting!