

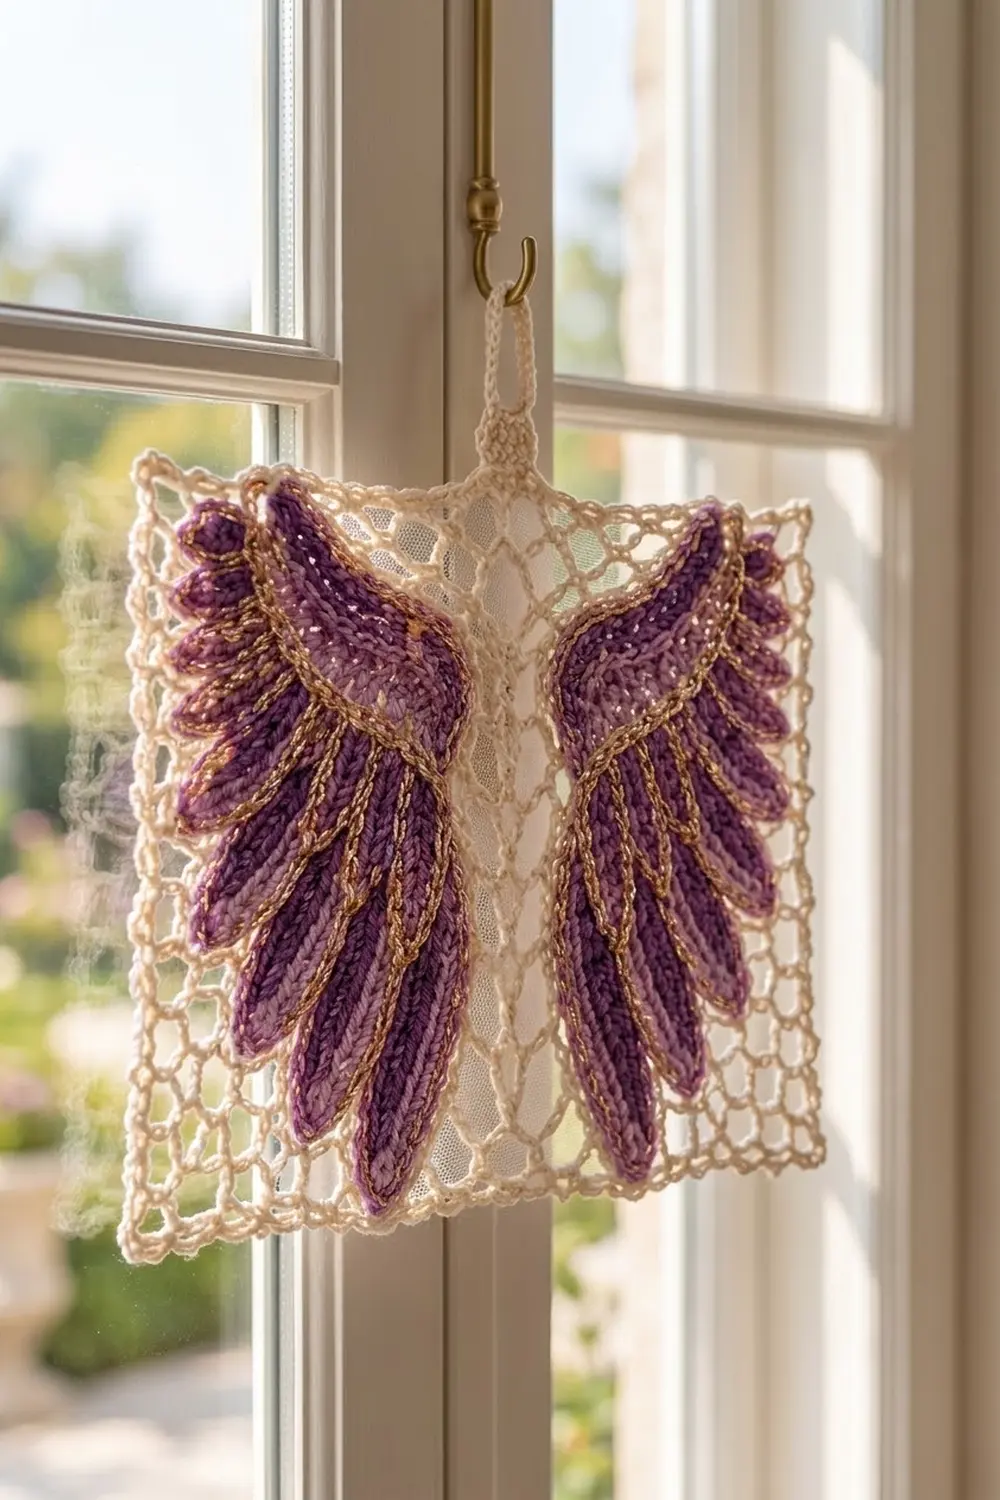
The Lilac Seraph Angel Wings Panel is a single rectangular block of open cream net mesh with a pair of layered angel wings sewn on. The wings mirror each other on either side of a clear center line. Each wing has a curved shoulder arc at the top, with three tiers of long oval feathers hanging below it.
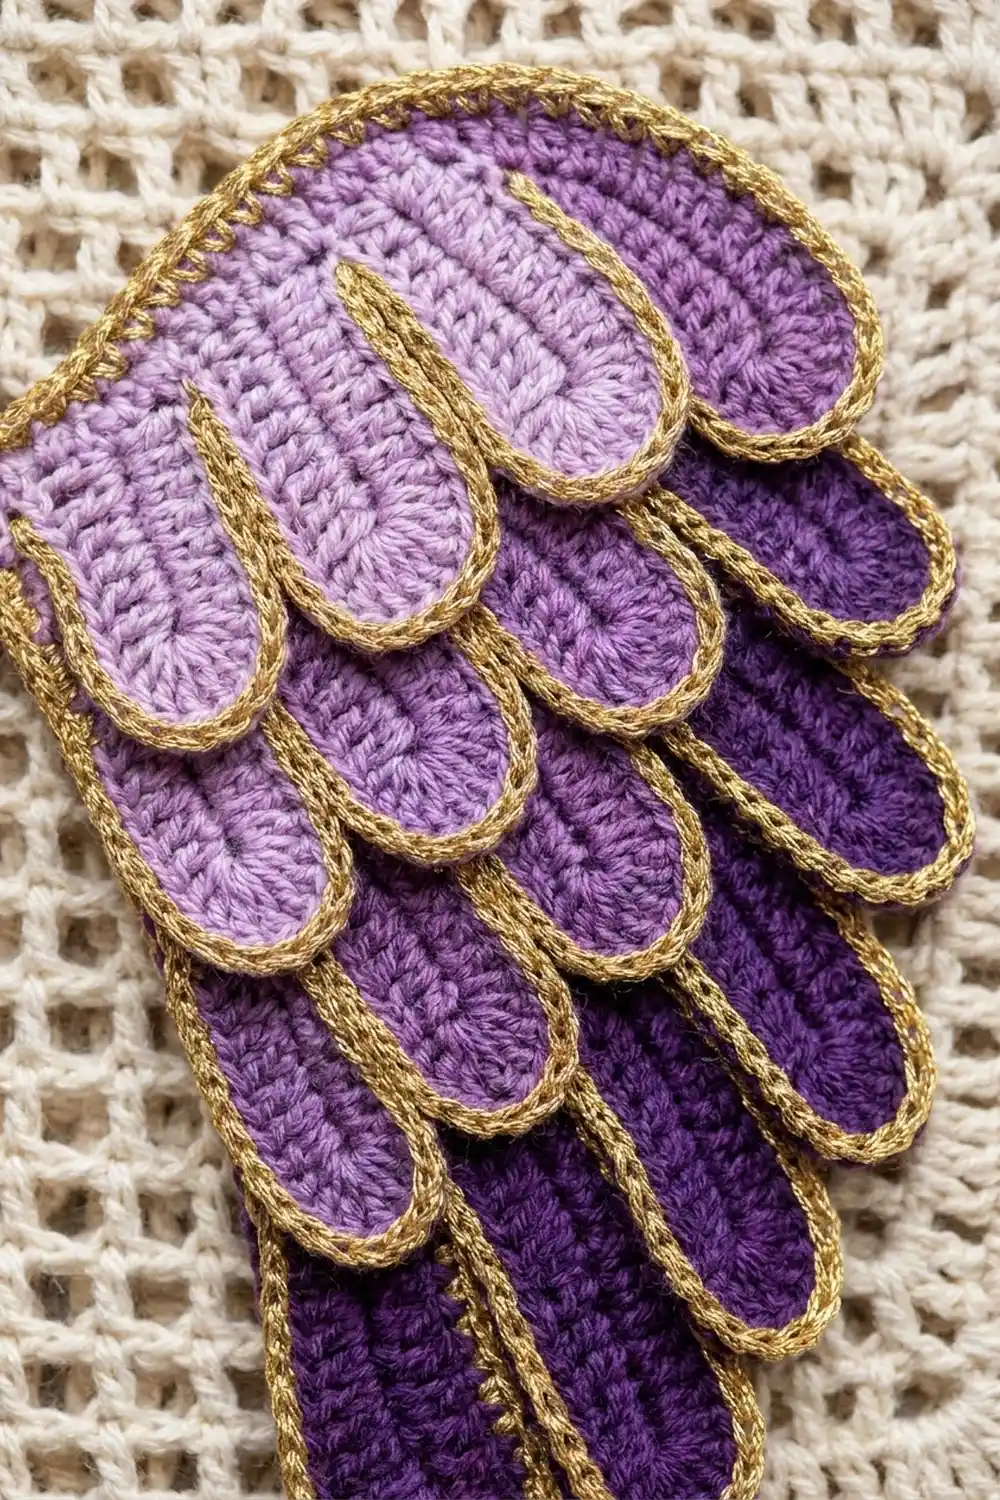
The feathers shade from deep purple at the bottom, through medium purple, to soft lilac at the top. Every feather and both arcs have a loose gold metallic slip-stitch outline, so the wings catch the light against the airy cream mesh. The look is romantic and lacy, and the panel works as a wall hanging, a framed piece, or a statement square.
This pattern uses US crochet terms. The finished panel measures 9 in wide x 8 in tall (22.9 cm x 20.3 cm) after blocking.
Construction stays simple. You work the mesh in rows and add a two-round picot border. Then you make 13 feathers and 1 arc for each wing, outline each piece in gold, stack the pieces in layers, and sew them to the mesh.
Finished Size and Construction
- Finished size: 9 in x 8 in (22.9 cm x 20.3 cm)
- Skill level: Intermediate
- Terminology: US crochet terms
- Yarn weight: Sport (#2) cotton, plus a sport or fingering gold metallic yarn
- Hook: 3.0 mm (US C/2 or D/3)
- Number of pieces: 1 mesh panel with 2 wing appliqués sewn on (each wing = 13 feathers + 1 arc)
- Layout: 1 single block, one wing on each side of center
- Mesh size before border: 8 in x 7 in (20.3 cm x 17.8 cm); 12 loops wide x 21 rows tall
- Each wing: about 3 in x 6 in (7.6 cm x 15.2 cm)
- Border depth: 0.5 in (1.3 cm) per side, 2 rounds
Materials
Use a smooth, mercerized sport-weight cotton, about 150 m per 50 g. It gives you clear mesh loops and crisp feather edges. For the outline, choose a soft gold metallic yarn no thicker than your cotton, so it sits on top of the stitches without making them stiff.
- Cream (mesh and border): 25 g, 75 m (82 yd)
- Deep purple (long feathers): 10 g, 30 m (33 yd)
- Medium purple (medium feathers and arcs): 10 g, 30 m (33 yd)
- Lilac (short feathers): 5 g, 15 m (16 yd)
- Gold metallic (outlines): 5 g, 25 m (27 yd)
All quantities include a margin of about 20% for the test feather and sewing tails.
Tools:
- 3.0 mm crochet hook
- Tapestry needle
- Sewing needle and cream thread (optional, for invisible tacking)
- Rust-proof pins and a blocking mat
- Ruler or tape measure
- Spray bottle
Abbreviations (US Terms)
- ch – chain
- sl st – slip stitch
- sc – single crochet
- hdc – half double crochet
- dc – double crochet
- sp – space
- st(s) – stitch(es)
- rep – repeat
- Rnd – round
Picot: Ch 3, sl st in the 3rd ch from the hook.
Gold outline: With gold, sl st loosely in each st around the edge of a finished piece, working under both loops. This makes a raised chain line along the edge. Keep the slip stitches loose, or the piece will cup.
Gauge and Checkpoints
Mesh gauge: 3 ch-5 loops = 2 in (5.1 cm) wide; 6 rows = 2 in (5.1 cm) tall.
Border gauge: 6 sc = 1 in (2.5 cm).
Feather gauge: 1 long feather, outlined, measures 2.75 in x 0.75 in (7.0 cm x 1.9 cm).
Test one long feather before you start. If it is longer than 3 in (7.6 cm), go down half a hook size. If it is shorter than 2.5 in (6.4 cm), go up half a size.
Mesh checkpoints:
- After Row 6: 2 in (5.1 cm) tall
- After Row 12: 4 in (10.2 cm) tall
- After Row 21: 7 in (17.8 cm) tall and 8 in (20.3 cm) wide
- After the border: 9 in x 8 in (22.9 cm x 20.3 cm)
If the mesh is too wide, chain more firmly or use a smaller hook. Never drop loops, because the border counts depend on exactly 12. If it is too narrow, use a larger hook. If the height comes out a little short, keep all 21 rows and stretch the panel to size when you block it.
Mesh Panel
With cream, ch 50.
Row 1: Sc in the 6th ch from the hook. *Ch 5, skip 3 ch, sc in the next ch; rep from * across. (12 ch-5 loops: the 5 skipped ch form the first loop, plus 11 repeats.)
Row 2: Ch 5, turn. Sc in the first ch-5 sp. *Ch 5, sc in the next ch-5 sp; rep from * across. (12 ch-5 loops: the turning ch-5 plus 11.)
Rows 3–21: Rep Row 2. (12 ch-5 loops in every row.)
Each row shifts half a loop, which forms the diamond net. The side edges will look uneven, and the border straightens them. Do not fasten off.
Checkpoint: 8 in x 7 in (20.3 cm x 17.8 cm), lightly stretched.
Border
The border is worked at 6 sc per inch (6 sc per 2.5 cm). The corners are ch-2 sps and are not included in the side counts.
Rnd 1 (cream): Ch 1, turn so the last row runs along the top. Work 4 sc in each of the 12 ch-5 loops across the top (48 sc), then ch 2. Down the side, work 2 sc in each row-end, around the turning ch-5 or the end sc post (42 sc), then ch 2. Along the foundation edge, work 4 sc around the first 5-ch loop and 4 sc in each of the 11 skipped ch-3 groups (48 sc), then ch 2. Up the last side, work 2 sc in each row-end (42 sc), then ch 2. Sl st to the first sc.
Rnd 1 total: 48 + 42 + 48 + 42 = 180 sc, plus 4 corner ch-2 sps.
Rnd 2 (cream): Ch 1. *Sc in the next 2 sc, picot, sc in the next sc; rep from * to the corner. In the corner ch-2 sp, work (sc, picot, sc). Continue around the same way and sl st to the first sc. Fasten off.
Rnd 2 per side:
- Top and bottom: 48 sc and 16 picots each
- Left and right sides: 42 sc and 14 picots each
- Each corner: 2 sc and 1 picot
Rnd 2 total: 180 sc (1 per existing sc) + 8 corner sc = 188 sc. Picots: 60 along the sides + 4 at the corners = 64.
Why the math works: 12 loops x 4 sc = 48 sc over 8 in, and 21 rows x 2 sc = 42 sc over 7 in. Both equal 6 sc per inch, so the border lies flat without ruffling or pulling in. Both 48 and 42 divide by 3, so the 3-st picot repeat ends cleanly at every corner. Each round adds 0.25 in (0.6 cm), for 0.5 in (1.3 cm) per side. That brings the panel to 8 + 1 = 9 in wide and 7 + 1 = 8 in tall.
Feathers
Each feather is one round worked around a foundation chain: first into the back bumps, then into the free loops on the other side. The sc end becomes the narrow base and the 5-hdc end becomes the rounded tip.
Long feather (deep purple, make 10): Ch 16. Sc in the 2nd ch from the hook, hdc in the next 2 ch, dc in the next 10 ch, hdc in the next ch, 5 hdc in the last ch. Rotate to work along the other side of the chain: hdc in the next ch, dc in the next 10 ch, hdc in the next 2 ch, sc in the same ch as the first sc. Sl st to the first sc. (33 sts: 14 + 5 + 14.) Fasten off.
Medium feather (medium purple, make 8): Ch 13. Sc in the 2nd ch from the hook, hdc in the next 2, dc in the next 7, hdc in the next, 5 hdc in the last ch. Along the other side: hdc in the next, dc in the next 7, hdc in the next 2, sc in the same ch as the first sc. Sl st to the first sc. (27 sts: 11 + 5 + 11.) About 2.25 in (5.7 cm) long.
Short feather (lilac, make 8): Ch 9. Sc in the 2nd ch from the hook, hdc in the next 2, dc in the next 3, hdc in the next, 5 hdc in the last ch. Along the other side: hdc in the next, dc in the next 3, hdc in the next 2, sc in the same ch as the first sc. Sl st to the first sc. (19 sts: 7 + 5 + 7.) About 1.5 in (3.8 cm) long.
Gold outline (every feather): Join gold with a sl st in any st. Sl st loosely in each st around and join. That is 33 sl st on a long feather, 27 on a medium, and 19 on a short. Leave a 6 in (15.2 cm) tail for sewing.
Per wing: 5 long, 4 medium, and 4 short feathers (13 total).
Shoulder Arc
Make 2 in medium purple.
Row 1: Ch 21. Sc in the 2nd ch from the hook and in each ch across. (20 sc)
Row 2: Ch 1, turn. Sc in the first 2 sc, hdc in the next 4 sc, (2 dc in the next sc, dc in the next sc) 5 times, hdc in the next 2 sc, sc in the last 2 sc. (25 sts: 20 worked 1 per sc + 5 extra from the increases.) The increases flare the top edge so the strip curves into an arc. Fasten off.
Gold outline: Sl st loosely across the 25 sts of Row 2 only (25 sl st).
The arc measures about 3.25 in (8.3 cm) along its straight edge and 0.5 in (1.3 cm) deep.
Assembling the Wings
Lay the bordered panel flat, right side up. Leave a bare strip 1 in (2.5 cm) wide down the center. Each wing fills a space 3 in (7.6 cm) wide, 0.5 in (1.3 cm) in from the border and 0.5 in (1.3 cm) down from the top of the mesh.
Build the right wing in layers, starting with the bottom layer:
- Long feathers: Fan the 5 feathers with their bases grouped 1.25 in (3.2 cm) below the top of the mesh and the tips pointing down. Overlap each one by half a feather width. Put the longest drop on the inner side, so the lowest tip sits 0.5 in (1.3 cm) above the bottom of the mesh.
- Medium feathers: Lay the 4 medium feathers over the upper halves of the long ones, staggered into the gaps.
- Short feathers: Lay the 4 lilac feathers over the tops of the medium feathers, offset the same way.
- Arc: Place the arc across the top with the gold edge up, covering all the feather bases. Tilt it so the outer end rises toward the outer top corner.
Pin everything in place. Use the tails to whipstitch each feather base to the mesh strands. Then tack each feather at 2 or 3 points just inside its gold line. Sew the arc down along its straight edge and at both ends.
Build the left wing as a mirror image, with the arc rising toward the left corner. Each wing measures about 3 in x 6 in (7.6 cm x 15.2 cm).
Final Blocking
- Weave in all the remaining ends, hiding them under the appliqué where you can.
- Mist the panel evenly until it is damp, not wet.
- Pin the corners to a 9 in x 8 in (22.9 cm x 20.3 cm) rectangle.
- Pin the picots every 1 in (2.5 cm) so the edges run straight.
- Open the mesh diamonds gently with your fingertips.
- Press the feathers flat with your palm without stretching them.
- Let the panel dry completely before you unpin it.
Final Quality-Control Checklist
- The mesh has 12 loops in every row and 21 rows in total.
- Border Rnd 1 has 48 / 42 / 48 / 42 sc.
- The picots are 16 / 14 / 16 / 14, with 1 at each corner.
- The panel measures 9 in x 8 in (22.9 cm x 20.3 cm).
- Each wing has 5 long, 4 medium, and 4 short feathers, plus 1 arc.
- The gold outlines lie flat with no cupping.
- The wings mirror each other with a clear 1 in (2.5 cm) center line.
- No feather bases show below the arcs.
Troubleshooting
The border ruffles: There are too many sc on the sides. Recount to 42.
The border pulls in: Your sc are too tight. Use a hook half a size larger for the border.
The feathers cup: The gold slip stitches are too tight. Redo them with a hook 0.5 mm larger.
The arc stays straight: Check that Row 2 has 25 sts.
The mesh is lopsided: A loop is missing. Count to 12 after every row.
The appliqué sags: Add tacking points at the feather tips.
Care
Hand wash in cool water with mild soap and roll in a towel to remove the water. Dry flat, pinned back to 9 in x 8 in (22.9 cm x 20.3 cm), and never tumble dry, because heat can damage the metallic outline.
Final Notes
The measurement chain is short. Twelve loops by 21 rows make a mesh of 8 in x 7 in (20.3 cm x 17.8 cm). Rnd 1 places 48 and 42 sc at 6 sc per inch, and the two border rounds add 0.5 in (1.3 cm) per side, for a finished panel of 9 in x 8 in (22.9 cm x 20.3 cm). Each wing is 5 long, 4 medium, and 4 short feathers under one curved arc, all outlined in gold. Check your long feather and your mesh width early, and the rest will fall into place.
Happy crocheting!