

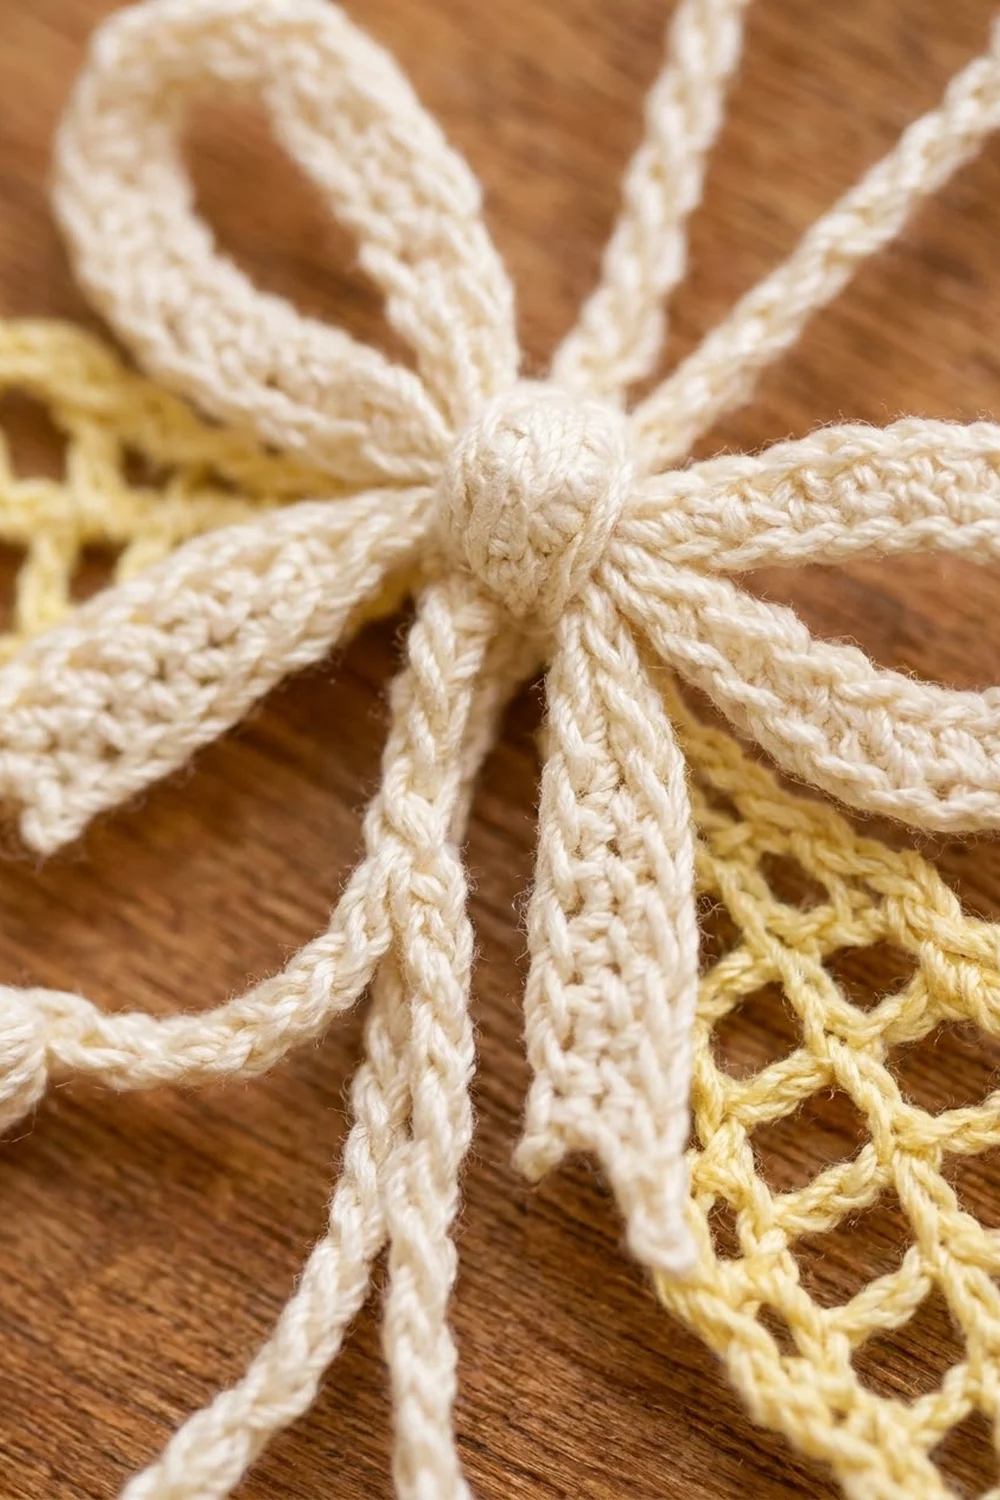
The Lily Bell Cascade is a delicate hanging ornament inspired by lily of the valley. Five small cream bells with open lattice sides and scalloped hems hang from slender corded stems. At the top, a cream ribbon bow with a round center bead sits over two pale yellow mesh leaves. A corded loop finishes the piece for hanging.
The palette is soft: cream for the bells, stems, bow, and loop, and pale buttery yellow for the leaves. The style is vintage thread lace, light enough for a tree branch, a wreath, or a gift bag.
This pattern uses US crochet terms. The finished ornament measures about 5 in (12.7 cm) wide across the leaves and 7 in (17.8 cm) tall from the top of the loop to the hem of the lowest bell.
Construction is modular. Each bell is worked top-down in the round, starting from the end of its own stem cord. The leaves are worked in mesh rounds around a foundation chain and finished with one sc edging round. The bow, tails, bead, and loop are small separate pieces, and everything is stitched together at the bow center.
Finished Size and Construction
- Finished size: about 5 in (12.7 cm) wide x 7 in (17.8 cm) tall, including the loop
- Skill level: Intermediate (thread work, ch-space rounds)
- Terminology: US crochet terms
- Yarn weight: #1 super fine (fingering-weight mercerized cotton)
- Hook: 2.25 mm (US B-1)
- Number of pieces: 11 (5 bells with stems, 2 leaves, 1 bow ribbon, 1 tail ribbon, 1 center bead, 1 hanging loop)
- Layout: bow cluster at the top; bells cascading below, alternating left and right
- Piece size: bell 1 in (2.5 cm) tall x 1.2 in (3.0 cm) across the hem; leaf 2.75 in (7.0 cm) x 1.2 in (3.0 cm)
- Size before border: leaf after Rnd 3 is 2.4 in (6.1 cm) x 1 in (2.5 cm)
- Border depth: 1 round of sc on each leaf, about 0.1 in (0.3 cm)
Materials
Choose a smooth mercerized cotton in fingering weight. It gives the lattice crisp definition and holds its shape after blocking.
- Cream: 20 g, about 68 m (bells, stems, bow, tails, bead, loop)
- Pale yellow: 5 g, about 17 m (leaves)
These quantities assume a cotton of about 170 m per 50 g. They include a comfortable margin for your test bell and sewing tails.
Tools:
- 2.25 mm (US B-1) crochet hook
- Tapestry needle with a small eye
- 2 locking stitch markers
- Scissors
- Rustproof pins and a blocking mat or folded towel
- Spray starch or fabric stiffener (optional)
- A small pinch of fiberfill or yarn scraps for the bead
Abbreviations (US Terms)
- ch: chain
- sl st: slip stitch
- sc: single crochet
- hdc: half double crochet
- dc: double crochet
- sc2tog: single crochet 2 together
- MR: magic ring
- sp(s): space(s)
- st(s): stitch(es)
- Rnd: round
Special stitches:
- Cord: Make a chain, then sl st into the back bump of the 2nd ch from the hook and of each ch across. This makes a firm, rounded stem that does not stretch.
- Scallop: (sc, hdc, 3 dc, hdc, sc) all in the same ch-sp. One Scallop = 7 sts.
Gauge and Checkpoints
Gauge: 7 sc = 1 in (2.5 cm); 10 ch = 1 in (2.5 cm) with a 2.25 mm hook.
Make one complete bell before anything else. It works as your gauge swatch.
- After bell Rnd 4, the flattened cap measures 0.8 in (2.0 cm) across.
- The finished bell is 1 in (2.5 cm) tall and 1.2 in (3.0 cm) across the hem.
- A cord made from 10 ch measures 1 in (2.5 cm).
- After leaf Rnd 3, the leaf measures 2.4 in (6.1 cm) x 1 in (2.5 cm).
If your cap is wider than 0.9 in (2.3 cm), switch to a 2.0 mm hook. If it is narrower than 0.7 in (1.8 cm), switch to a 2.5 mm hook. Every stem length and the bow size depend on this gauge.
Bells (make 5, cream)
Each bell starts with its stem. Use these chain counts:
| Bell | Position | Foundation ch | Cord length |
|---|---|---|---|
| A | top left | 13 | 1.2 in (3.0 cm) |
| B | upper right | 21 | 2 in (5.1 cm) |
| C | middle left | 29 | 2.8 in (7.1 cm) |
| D | lower right | 37 | 3.6 in (9.1 cm) |
| E | bottom center | 46 | 4.5 in (11.4 cm) |
Stem: Leave an 8 in (20.3 cm) tail and make the number of ch shown. Work as a Cord. You will have 1 sl st fewer than your foundation ch (12 sl sts for Bell A). Do not fasten off.
Rnd 1: Ch 2, 6 sc in 2nd ch from hook, sl st to first sc. (6 sts) The cord now comes out of the center top of the bell.
Rnd 2: Ch 1, sc in each st around, sl st to first sc. (6 sts) This round forms the small rounded knob.
Rnd 3: Ch 1, 2 sc in each st around, sl st to first sc. (12 sts)
Rnd 4: Ch 1, [sc in next st, 2 sc in next st] 6 times, sl st to first sc. (18 sts)
Checkpoint: the flattened cap is 0.8 in (2.0 cm) across.
Rnd 5: Ch 1, sc in first st, [ch 3, sk 2 sts, sc in next st] 5 times, ch 3, sk 2 sts, sl st to first sc. (6 sc, 6 ch-3 sps)
Rnd 6: Sl st into next ch-3 sp, ch 1, sc in same sp, [ch 4, sc in next ch-3 sp] 5 times, ch 4, sl st to first sc. (6 sc, 6 ch-4 sps)
Rnd 7: Sl st into next ch-4 sp, ch 1, sc in same sp, [ch 5, sc in next ch-4 sp] 5 times, ch 5, sl st to first sc. (6 sc, 6 ch-5 sps)
Rnds 5–7 form the lattice. Each sc sits in the center of the space below it, so the mesh offsets into diamonds. The longer chains in each round make the bell flare.
Rnd 8: Sl st into next ch-5 sp, work 1 Scallop in each ch-5 sp around, sl st to first sc. (42 sts, 6 scallops)
Fasten off and weave in the hem end. Keep the stem tail for assembly. Pinch the bell into a tulip shape with your fingers.
Leaves (make 2, pale yellow)
Foundation: Leave a 10 in (25.4 cm) tail and ch 20.
Rnd 1: Sc in 2nd ch from hook, [ch 3, sk 2 ch, sc in next ch] 6 times. The last sc lands in the first ch you made. For the tip, ch 3. Rotate the piece so you can work along the free loops of the foundation. Sc in the free loop of the same ch, [ch 3, sk 2 ch, sc in next free loop] 6 times, ch 3, sl st to first sc. (14 sc, 14 ch-3 sps: 6 on each side, 1 at the tip, 1 at the base)
Rnd 2: Sl st into next ch-3 sp, ch 1, sc in same sp, [ch 4, sc in next ch-3 sp] 13 times, ch 4, sl st to first sc. (14 sc, 14 ch-4 sps) As you go, put one marker in the sc worked into the tip sp and another in the sc worked into the base sp.
Rnd 3: Sl st into next ch-4 sp, ch 1, sc in same sp, [ch 5, sc in next ch-4 sp] 13 times, ch 5, sl st to first sc. (14 sc, 14 ch-5 sps)
Two ch-5 sps now arch directly over the marked sc. Move one marker into the ch-5 sp over the tip and the other into the ch-5 sp over the base. That leaves 6 side sps on each side.
Checkpoint: the leaf is 2.4 in (6.1 cm) x 1 in (2.5 cm), and each curved side is about 2.6 in (6.6 cm). Finish the leaf with the edging in the Border section.
Bow, Tails, Bead, and Loop (cream)
Bow ribbon: Ch 51.
Row 1: Sc in 2nd ch from hook and in each ch across. (50 sts)
Row 2: Ch 1, turn, sc in each st across. (50 sts)
Fasten off, leaving a 10 in (25.4 cm) tail. The ribbon is about 7.1 in (18.0 cm) long and 0.25 in (0.6 cm) wide.
Tail ribbon: Ch 25. Work Rows 1–2 as for the bow ribbon. (24 sts) Fasten off. The ribbon is about 3.4 in (8.6 cm) long.
Center bead:
Rnd 1: MR, 6 sc in ring. (6 sts)
Rnd 2: 2 sc in each st. (12 sts)
Rnd 3: Sc in each st. (12 sts)
Rnd 4: Sc2tog 6 times. (6 sts)
Fill with fiberfill or scraps, close the opening, and leave an 8 in (20.3 cm) tail. The bead is about 0.4 in (1.0 cm) across.
Hanging loop: Ch 31 and work as a Cord. (30 sl sts) Fasten off, leaving an 8 in (20.3 cm) tail. The cord is 3 in (7.6 cm) long.
Make All Pieces
- Cream: 5 bells with stems, 1 bow ribbon, 1 tail ribbon, 1 center bead, 1 hanging loop (9 pieces)
- Pale yellow: 2 leaves (2 pieces)
Layout, front view:
            [ LOOP ]
   [LEAF] [BOW + BEAD] [LEAF]
   A
                    B
   C
                    D
              E
Joining
Sew everything with matching thread and a tapestry needle. Use small whipstitches through the back layers only, so no stitches show on the front.
- Bow: Fold both ends of the bow ribbon to the center back, so st 1 and st 50 overlap behind sts 25–26. This makes two loops of 25 sts each. Wrap the ribbon’s tail twice around the center to pinch it, then sew through all layers. The bow is 2.75 in (7.0 cm) wide.
- Tails: Fold the tail ribbon between sts 12 and 13 to make an upside-down V. Sew the fold behind the bow center. Each tail hangs about 1.7 in (4.3 cm).
- Leaves: Set each leaf’s base ch-2 point behind the bow center, with the leaves angled about 30 degrees below horizontal. Whipstitch the 4 base sc (2 on each side of the point) to the back of the bow. The leaf tips should be 5 in (12.7 cm) apart.
- Loop: Fold the cord in half and sew both ends behind the bow center. Leave 1.5 in (3.8 cm) of loop showing above the bow.
- Stems: Bring the five stem tails up behind the bow, in order from A to E, and sew each cord end through the back layers. Where stems touch in the top 1 in (2.5 cm), tack them together with 1–2 stitches so they look like one branching stem.
- Bead: Sew the bead to the front of the bow center so it covers all the seams.
Keep each sewing stitch snug but not tight. Pulling too hard puckers the ribbon and twists the leaves.
Size checkpoint: hang the ornament by its loop. It should be 5 in (12.7 cm) across the leaf tips and 7 in (17.8 cm) from the top of the loop to the hem of Bell E.
Border (Leaf Edging)
Border gauge: 3 sc fill one ch-5 sp, and 7 sc = 1 in (2.5 cm). Work this round on each leaf in pale yellow, after Rnd 3.
Rnd 4: Sl st into next ch-5 sp, ch 1. Work 3 sc in each side sp and (2 sc, ch 2, 2 sc) in each of the 2 marked sps. Sl st to first sc.
- Side 1: 6 sps x 3 sc = 18 sc
- Tip: 4 sc + 1 ch-2 point
- Side 2: 6 sps x 3 sc = 18 sc
- Base: 4 sc + 1 ch-2 point
Total: 18 + 4 + 18 + 4 = 44 sc, plus 2 ch-2 points. Fasten off and weave in the ends.
Why the math works: After Rnd 3, each curved side measures 2.6 in (6.6 cm). At 7 sc per inch, 18 sc cover about 2.6 in (6.6 cm), so the edge lies flat without ruffling or cupping. The ch-2 points add length at each end. They bring the leaf from 2.4 in (6.1 cm) to 2.75 in (7.0 cm) and give it a pointed shape.
Final Blocking
- Soak the ornament briefly in cool water, then roll it in a towel to remove the extra water.
- Lay it face up on the blocking mat in the finished layout.
- Pin each leaf to 2.75 in (7.0 cm) x 1.2 in (3.0 cm). Pin both points first, then open each mesh space.
- Shape each bell over a fingertip, or fill it with a rolled scrap of plastic wrap, so the hem flares to 1.2 in (3.0 cm).
- Pin out each scallop so the hem is even.
- Straighten the stems and pin them into the cascade.
- If you like, mist the piece with starch or apply stiffener. Let it dry completely before you unpin it.
Final Quality-Control Checklist
- Each bell has 6 even scallops and 42 sts in Rnd 8.
- Each bell is 1 in (2.5 cm) tall and 1.2 in (3.0 cm) across the hem.
- Each leaf has 44 sc and 2 ch-2 points.
- Both leaves are 2.75 in (7.0 cm) long and match within 1/8 in (0.3 cm).
- The two bow loops are the same size.
- The bead covers every center seam.
- The stems hang in order from A to E without twisting.
- The ornament is 5 in (12.7 cm) x 7 in (17.8 cm).
- All ends are woven in and trimmed.
Troubleshooting
The bell is flat instead of bell-shaped: Your chains are too loose. Go down a hook size, then block the bell over a fingertip.
The bell hem ruffles: Check that each ch-5 sp holds exactly 7 sts.
The leaf curls: The edging is too tight. Work Rnd 4 again a little more loosely, with exactly 3 sc in each side sp.
The leaf is not pointed: Make sure the (2 sc, ch 2, 2 sc) goes into the marked sp directly over the tip, not the sp next to it.
The stems twist: You worked into the front loops instead of the back bumps. Make the cord again, or pin it straight while it dries.
Care
Hand wash in cool water with mild soap. Lay flat to dry, reshaping the bells and leaves, and store the ornament where heavier items won’t crush the bells.

Final Notes
The whole design follows one chain of measurements. A 0.8 in (2.0 cm) cap leads to a 1 in (2.5 cm) bell with a 1.2 in (3.0 cm) hem. A 2.4 in (6.1 cm) leaf grows to 2.75 in (7.0 cm) with its 44-sc edging. Stems from 1.2 in (3.0 cm) to 4.5 in (11.4 cm) set the cascade. The 2.75 in (7.0 cm) bow and 1.5 in (3.8 cm) loop complete an ornament of 5 in (12.7 cm) x 7 in (17.8 cm). Check your gauge on the first bell and the rest will fall into place.
Happy crocheting!