

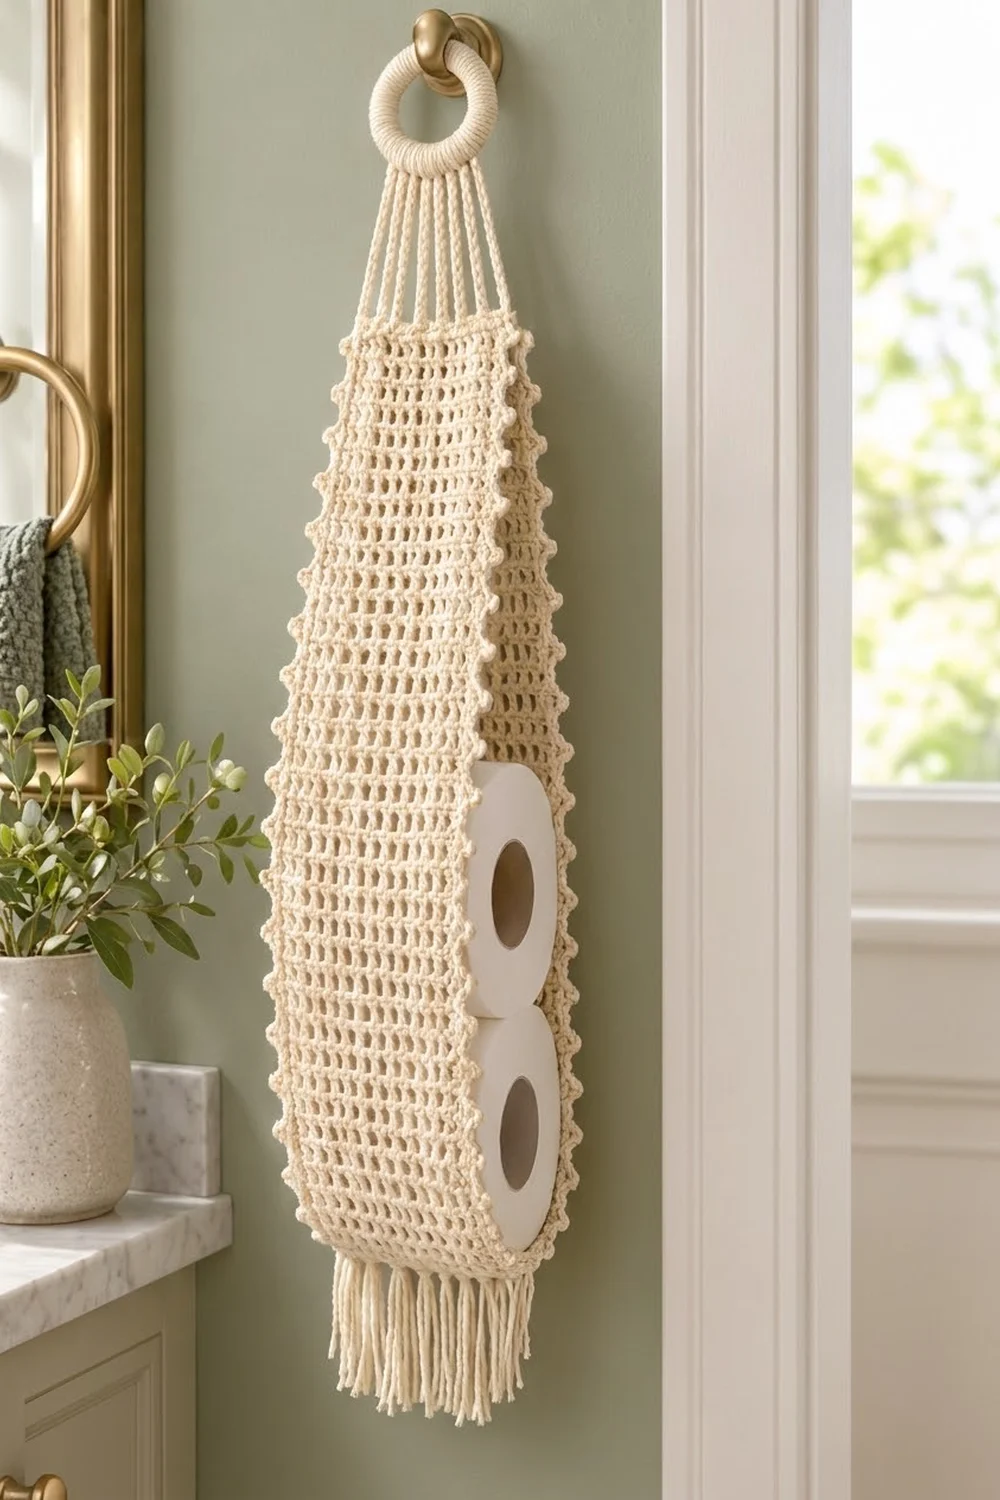
The Linen Ladder holder is a tall, airy pocket that hangs from a wall hook and keeps two spare rolls in view. The open grid of filet mesh looks light and calm on a bathroom wall. A delicate picot edge, a covered ring and a soft fringe give it a hand-finished, boho look.
The whole piece uses one cream worsted-weight cotton, so the texture does the work rather than the color. It suits neutral, sage, or warm-wood bathrooms equally well. All instructions use US crochet terms.
The flat body measures 14 in × 22 in (35.6 cm × 55.9 cm) after the border. Folded and hung, the pocket is about 5 in (12.7 cm) wide, 4 in (10.2 cm) deep and 22 in (55.9 cm) tall. The total hanging length from the top of the ring to the fringe tips is about 33 in (83.8 cm).
Construction is simple. You crochet one rectangle of filet mesh in rows and add a single crochet round with picot edges on the long sides. Then you fold the panel into a U-shape and seam the bottom closed. Finally, you cover a ring, add eight chain cords and knot on the fringe.
Finished Size and Construction
- Finished flat panel: 14 in × 22 in (35.6 cm × 55.9 cm)
- Assembled pocket: 5 in (12.7 cm) wide × 4 in (10.2 cm) deep × 22 in (55.9 cm) tall
- Total hanging length: about 33 in (83.8 cm)
- Skill level: Easy / advanced beginner
- Terminology: US
- Yarn weight: Worsted (#4)
- Hook: 5.0 mm (H-8)
- Number of pieces: 1 body panel, plus 1 covered ring, 8 cords and fringe
- Layout: One panel folded into back (9 mesh), gusset (8 mesh) and front (9 mesh)
- Panel size before border: 13 in × 21.5 in (33.0 cm × 54.6 cm), 26 mesh × 43 rows
- Border depth: 0.25 in (0.6 cm) on the top and bottom; 0.5 in (1.3 cm) on each long side including picots
Materials
Yarn: Use a smooth worsted-weight cotton or cotton blend. Cotton holds the mesh crisp and square, doesn’t stretch much under the weight of the rolls, and stands up to bathroom humidity. Avoid fuzzy or very splitty yarns, because they blur the open grid.
- Cream / ivory: 150 g, about 260 m (284 yd)
That amount covers the panel, border, ring cover, cords and fringe. It includes a margin of about 20% for your gauge swatch and small tension differences.
Tools:
- 5.0 mm (H-8) crochet hook
- One metal or wooden ring, 2 in (5.1 cm) outside diameter
- Tapestry needle
- Scissors
- 8 locking stitch markers
- Measuring tape
- Rust-proof pins and a blocking mat
- Spray bottle
Abbreviations (US Terms)
- ch – chain
- sl st – slip stitch
- sc – single crochet
- dc – double crochet
- sk – skip
- sp – space
- st(s) – stitch(es)
- rep – repeat
Picot: Ch 3, then sl st in the 3rd ch from the hook. This makes one small bump and does not count as a stitch.
Mesh square: One open square made of a dc, ch 1 and the next dc. Neighboring squares share their dc columns.
Gauge and Checkpoints
Gauge: 4 mesh squares and 4 rows = 2 in × 2 in (5.1 cm × 5.1 cm). Each mesh square is 0.5 in × 0.5 in (1.3 cm × 1.3 cm). Across a row, that equals 4 sts per inch counting dc and ch-1 alike.
Test first: Ch 16 and work Rows 1–2 below until the swatch has 6 rows of 5 mesh squares. Measure the middle 4 squares and 4 rows.
- Squares too big: Go down to a 4.5 mm hook.
- Squares too small: Go up to a 5.5 mm hook.
- Width right but rows too short: Pull up a slightly taller loop at the first yarn-over of each dc.
Checkpoints:
- After Row 4: 13 in (33.0 cm) wide and 2 in (5.1 cm) tall
- After Row 20: 10 in (25.4 cm) tall
- After Row 43: 21.5 in (54.6 cm) tall
- After the border: 14 in × 22 in (35.6 cm × 55.9 cm)
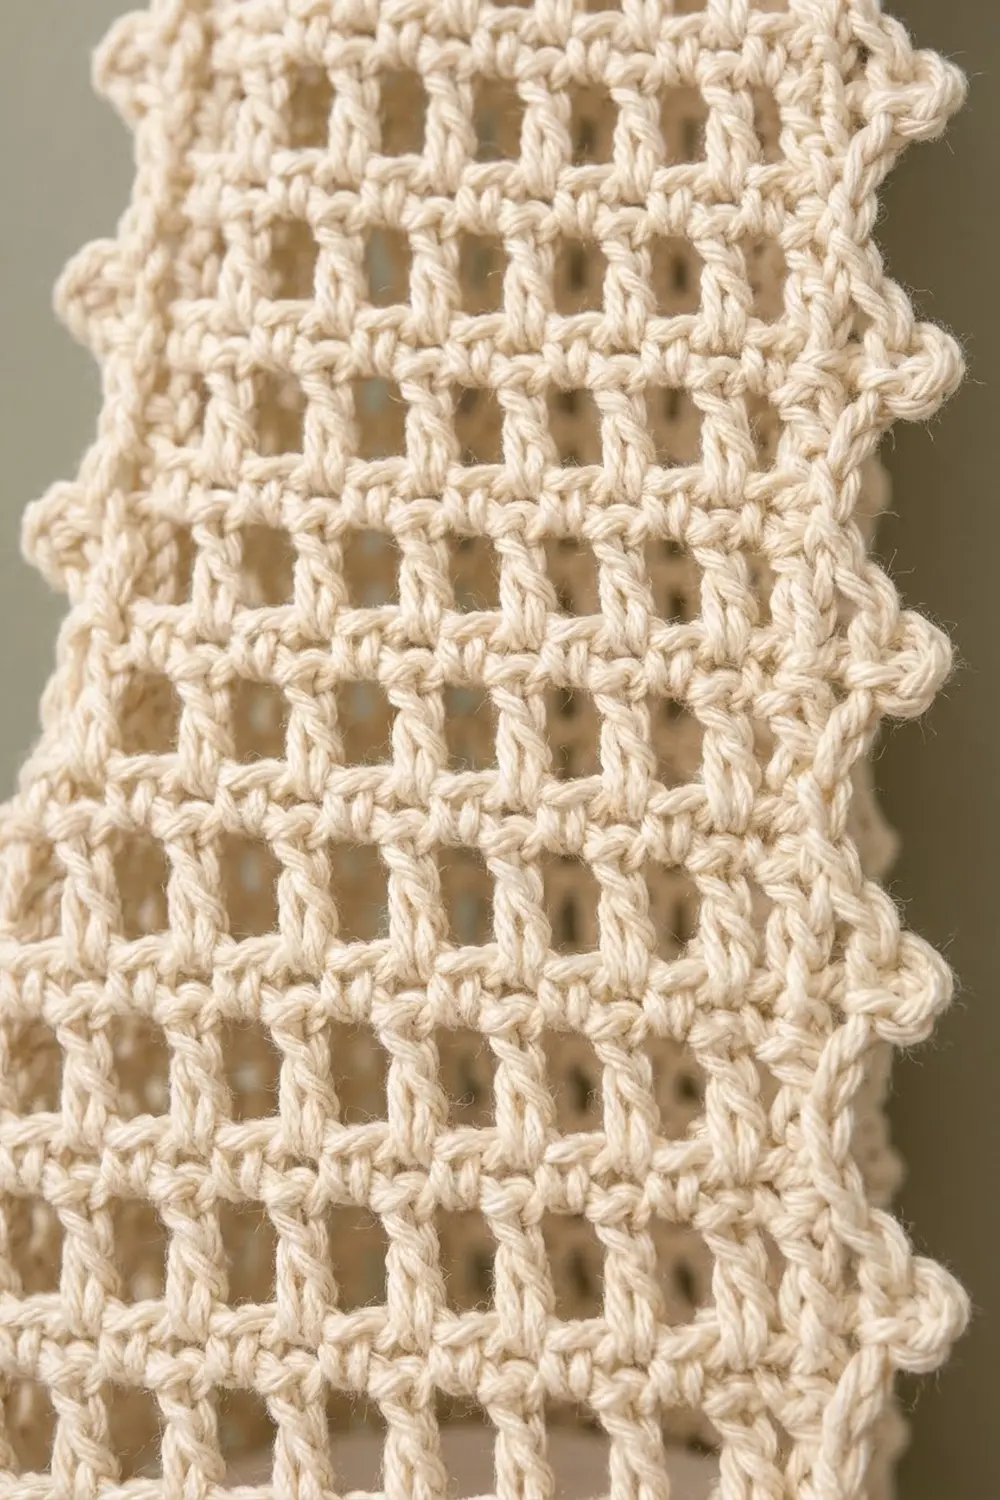
Body Panel
The panel is worked flat in rows. Every row has 27 dc and 26 ch-1 spaces, so it is 53 stitches wide and makes 26 mesh squares.
Foundation: Ch 56.
Row 1: Dc in the 6th ch from the hook. The 5 skipped chains count as the first dc, a ch-1 sp and a skipped chain. Ch 1, sk next ch, dc in next ch. Rep from * across. Turn. (27 dc, 26 ch-1 sps = 26 mesh)
Row 2: Ch 4 (counts as dc and ch 1). Dc in the next dc. Ch 1, dc in next dc. Rep from * across, working the last dc in the 4th ch of the turning chain. Turn. (27 dc, 26 ch-1 sps)
Row 3: Ch 4 (counts as dc and ch 1). Dc in the next dc. Ch 1, dc in next dc. Rep from * across, working the last dc in the 3rd ch of the turning ch-4. Turn. (27 dc, 26 ch-1 sps)
Rows 4–43: Rep Row 3. Do not fasten off after Row 43.
The panel measures 13 in × 21.5 in (33.0 cm × 54.6 cm). Keep each dc column directly on top of the one below it, so the squares stack in straight vertical “ladders.”
Border
Border gauge: 4 sc per inch on every edge. Across the top and bottom, you work 1 sc into each of the 53 sts, which matches the 4-sts-per-inch mesh gauge. Along the sides, each row end is one dc, which is 0.5 in (1.3 cm) tall. Two sc per row end gives the same 4 sc per inch, so the edges lie flat without ruffling or pulling in.
Round 1 (sc all around): Ch 1, then rotate the panel to work along Row 43.
- Top: Sc in each dc and each ch-1 sp across. Count 27 sc worked into dc plus 26 sc worked into spaces, for 53 sc. Ch 1 for the corner.
- First long side: Work 2 sc around the post of each row end, for 43 × 2 = 86 sc. Ch 1 for the corner.
- Bottom: Working into the foundation chain, sc in each of the 27 chains under a dc and each of the 26 ch-1 sps, for 53 sc. Ch 1 for the corner.
- Second long side: Work 2 sc in each row end, for 86 sc. Ch 1 for the corner.
Join with a sl st to the first sc and fasten off.
The round totals 53 + 86 + 53 + 86 = 278 sc, plus 4 corner ch-1 sps. Corner chains are not counted as stitches.
Number the top-edge sc from 1 to 53 with markers at sc 1, 8, 15, 23, 31, 39, 46 and 53. These marks are where the cords will attach.
Round 2 (picot edges, long sides only): Work this round separately on each long side.
- Join the yarn with a sl st in a corner ch-1 sp at one end of the side.
- Sc in each of the next 4 sc, picot. Rep from * 21 times in total.
- Sc in each of the last 2 sc, then sl st in the next corner ch-1 sp. Fasten off.
That gives 86 sc and 21 picots per side, with a picot about every 1 in (2.5 cm). The math checks out because 21 × 4 + 2 = 86 sc. Repeat on the second long side. The top and bottom edges keep only Round 1, so they stay flat for the seam and cords.
The finished flat panel measures 14 in × 22 in (35.6 cm × 55.9 cm).
Assembly: Fold and Close the Bottom
Fold lines: Lay the panel right side down with the bottom edge toward you. Counting along the bottom edge from sc 1:
- Back: sc 1–19 (9 mesh)
- Gusset: sc 19–35 (8 mesh)
- Front: sc 35–53 (9 mesh)
Fold the panel lengthwise along the dc columns above sc 19 and sc 35. This makes a U-channel with a back about 5 in (12.7 cm) wide including the picot edge, a 4 in (10.2 cm) gusset, and a front about 5 in (12.7 cm) wide. The two picot edges sit side by side and form the open side.
Bottom seam: Flatten the bottom of the U so the gusset folds inward in half at sc 27. Sc 1 now lies on top of sc 53, sc 2 on sc 52, and so on.
Join the yarn at the open-side corner. Working through both layers, sc each pair together (sc 1 with 53, 2 with 52, through 26 with 28), then sc into sc 27 alone at the fold. That makes 27 seam sc. Fasten off and weave in the ends.
Seam with even, medium tension. A tight seam puckers the point, and a loose one gaps.
Covered Ring
Join the yarn around the 2 in (5.1 cm) ring. Work 40 sc tightly around the ring, pushing the stitches together so no metal or wood shows. Sl st to the first sc and fasten off. Turn the stitch tops to the inside edge for a smooth, rope-like outer edge.
Mark covering sc 17–24, which are 8 consecutive sc at the bottom of the ring.
Hanging Cords
Make 8 cords, one at each marked top-edge sc.
- Join the yarn with a sl st in the marked top sc.
- Ch 30, which is about 6 in (15.2 cm).
- Sl st through the matching marked sc on the ring, working the outer cords to the outer ring stitches so the cords don’t cross.
- Sl st in each chain back down, for 30 sl st.
- Sl st in the same top sc and fasten off.
The sl st return doubles the cord, so it won’t stretch under the weight of the rolls. Check that all 8 cords match in length to within 0.25 in (0.6 cm) before weaving in the ends.
Fringe
Cut 54 strands, each 7 in (17.8 cm) long. Hold 2 strands together, fold them in half, and attach them with a lark’s head knot through each of the 27 seam sc.
Trim the finished fringe evenly to 3 in (7.6 cm) below the seam.
Final Blocking
- Before adding the cords and fringe, mist the bordered panel until it is damp but not soaked.
- Pin it flat to 14 in × 22 in (35.6 cm × 55.9 cm), with pins in the corners first.
- Run a long ruler or yarn guide along the dc columns and nudge them straight.
- Pin each picot outward so it points away from the edge.
- Let the panel dry completely.
- After assembly, slide two rolls inside and steam the fold lines lightly to set the U-shape.
- Comb the fringe with damp fingers and re-trim if needed.
Final Quality-Control Checklist
- Every row has 26 mesh squares and the columns line up vertically
- The panel has 43 rows and measures 13 in × 21.5 in (33.0 cm × 54.6 cm) before the border
- Border Round 1 has 278 sc: 53 on the top and bottom, 86 on each side
- Each long side has 21 evenly spaced picots
- The bottom seam has 27 sc with the fold centered at sc 27
- All 8 cords are equal, about 6 in (15.2 cm) long
- No ring material shows through the 40 covering sc
- There are 27 fringe knots trimmed level at 3 in (7.6 cm)
- Two standard rolls slide in and out of the open side easily
Troubleshooting
Panel narrows toward the top: You probably skipped the turning-chain stitch. Always work the last dc into the turning chain, and count 27 dc per row.
Squares look like tall rectangles: Your dc are too tall for the width. Work them a little more snugly or go down a hook size.
Side edges ripple: You are using too many sc per row end. Use exactly 2 per row.
Side edges cup inward: Your sc are too tight. Loosen your tension or go up a hook size for the border only.
Holder leans to one side: The cords are uneven or attached out of order. Redo the longest cord so it matches the others.
Rolls slide out the open side: Your mesh is loose. Block it again, or work the gusset seam a little tighter at the bottom so the pocket cups more.
Picots flop: Make sure the sl st goes into the 3rd ch from the hook, not into the next sc.
Care
Hand wash in cool water with mild soap, press out the water in a towel, and dry flat, reshaping the U-fold while damp. Don’t tumble dry, because the mesh can shrink unevenly.
Final Notes
The measurement chain is short and easy to check:
- Mesh gauge: 0.5 in (1.3 cm) squares
- Panel: 26 squares × 43 rows = 13 in × 21.5 in (33.0 cm × 54.6 cm)
- Border: 4 sc per inch on every edge brings the flat panel to 14 in × 22 in (35.6 cm × 55.9 cm)
- Pocket: folded into 9 + 8 + 9 mesh, it is 5 in (12.7 cm) wide and 4 in (10.2 cm) deep
- Hanging length: with the ring, cords and fringe, about 33 in (83.8 cm)
If your gauge is right at the first checkpoint, every count after it falls into place. Hang it on a hook, tuck in two rolls, and enjoy the quiet texture of the mesh.
Happy crocheting!