

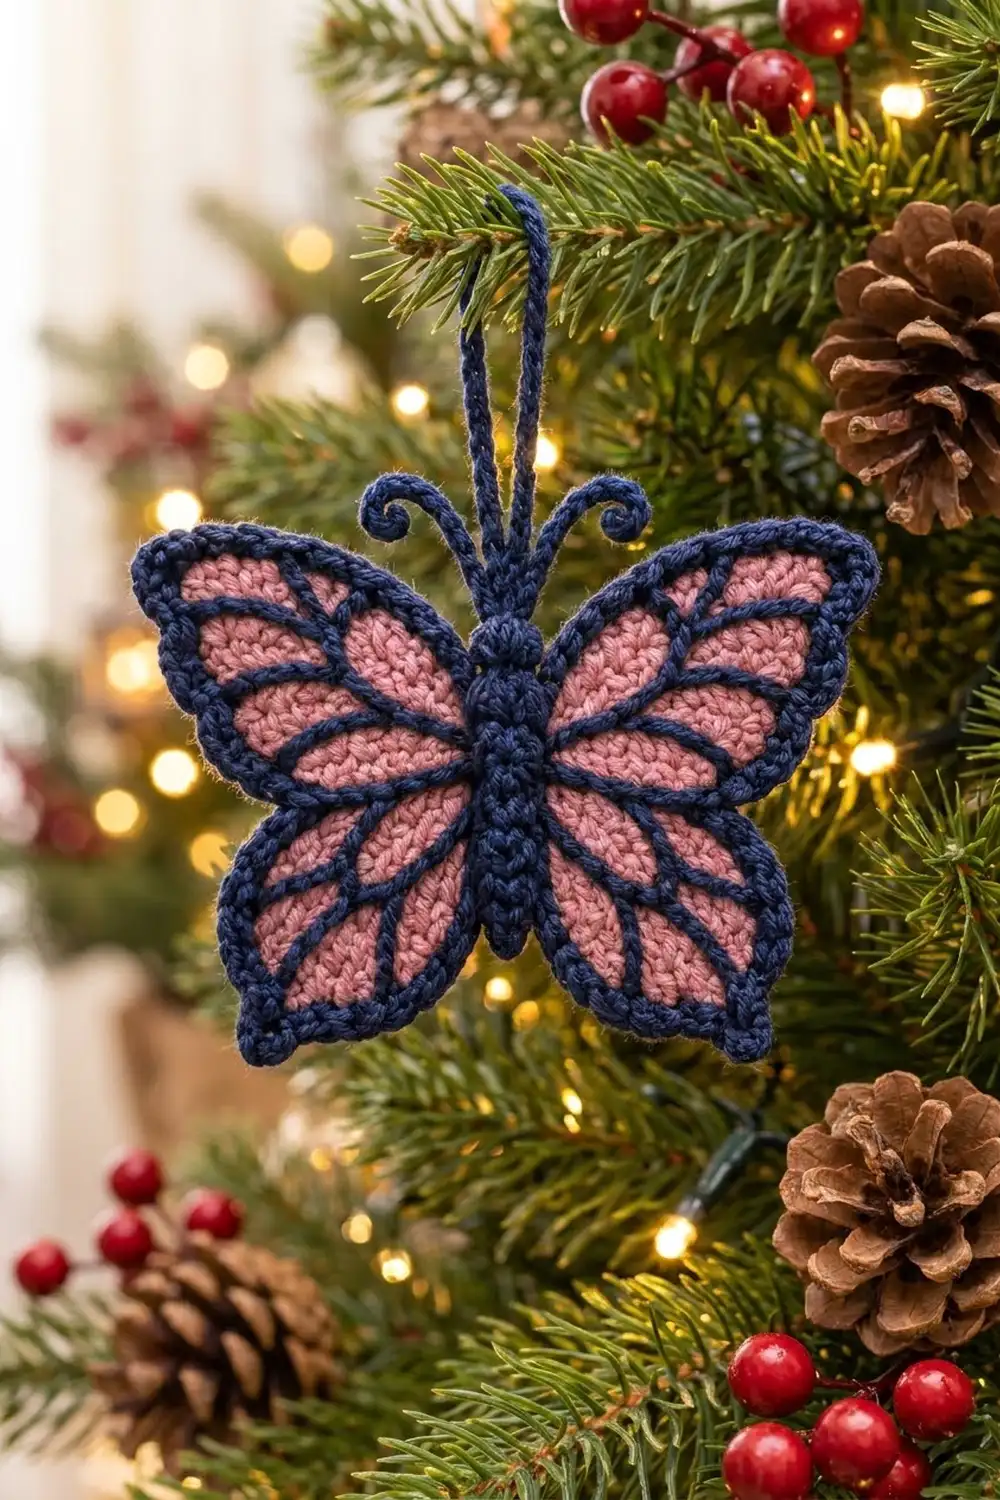
This butterfly ornament pairs soft dusty rose wings with deep navy outlines, veins, and a raised, segmented body. The navy rope edge and stained-glass veining give it a bold, graphic look. It hangs from a doubled navy chain loop and works just as well on a tree as it does laid flat as a gift topper.
The design uses only two colors: dusty rose for the wing base and navy for everything else. It is a single motif. All four wings grow from one shared center, and a small separate body is stitched on top to finish the butterfly.
All instructions use US crochet terms. The finished butterfly measures about 4.5 in wide x 3.5 in tall (11.4 cm x 8.9 cm) across the wings, or about 4.25 in (10.8 cm) tall including the antennae.
The construction is simple. You crochet a small center ring and work four fan-shaped wings in rows off that ring. Then you add one pink edging round and two navy border rounds, finishing with a corded reverse single crochet edge. Navy veins go on with surface slip stitch, and the stuffed body, antennae, and hanging loop complete the piece.
Finished Size and Construction
- Finished size: 4.5 in x 3.5 in (11.4 cm x 8.9 cm), 4.25 in (10.8 cm) tall with antennae
- Skill level: Easy-intermediate
- Terminology: US crochet terms
- Yarn weight: DK (weight 3), cotton or cotton blend
- Hook: 3.5 mm (E-4)
- Number of pieces: 1 motif (one wing base plus a sewn-on body)
- Layout: Single butterfly, upper wings larger than lower wings
- Wing base before edging: about 3.75 in x 2.75 in (9.5 cm x 7.0 cm)
- Size before border: 4 in x 3 in (10.2 cm x 7.6 cm) after the pink edging round
- Border depth: 0.25 in (0.6 cm) on every edge
Materials
Choose a smooth, tightly plied DK cotton. Cotton shows each stitch crisply, holds the wing shape after blocking, and makes the surface veins stand out cleanly. Avoid fuzzy or very splitty yarn, because it blurs the surface slip stitch lines.
- Color A, dusty rose: 8 g, about 18 m
- Color B, navy: 7 g, about 16 m
These amounts include about a 25% margin, so one butterfly won’t use all of it. For a set of ornaments, multiply the amounts by the number of butterflies.
Tools:
- 3.5 mm (E-4) crochet hook
- Tapestry needle
- 3 locking stitch markers
- Small pinch of fiberfill for the body
- Scissors
- Blocking mat and rustproof pins
- Spray bottle with water
Abbreviations (US Terms)
- ch – chain
- sl st – slip stitch
- sc – single crochet
- sc2tog – single crochet 2 together
- MR – magic ring
- st(s) – stitch(es)
- RS – right side
- rev sc – reverse single crochet
Special stitches:
Reverse single crochet (rev sc): Working from left to right (if you crochet right-handed), insert the hook into the next stitch to the right, yarn over, pull up a loop, yarn over, and pull through both loops. This creates the twisted, corded navy edge.
Surface slip stitch: Hold the yarn behind the work. Insert the hook from front to back between stitches and pull up a loop. Then insert the hook into the next space along your line, pull up a loop, and draw it through the loop on the hook. Repeat to “draw” a chain line on the surface.
Gauge and Checkpoints
Gauge: 20 sc and 22 rows = 4 in (10.2 cm) in sc worked in rows.
Instead of a large swatch, work the center ring and one upper wing first, then measure. That wing is your real gauge test.
Checkpoints:
- Center ring: about 0.6 in (1.5 cm) across.
- Upper wing after Row 10: about 1.8 in (4.6 cm) long from the ring and 2.4 in (6.1 cm) at its widest row.
- Lower wing after Row 8: about 1.5 in (3.8 cm) long and 2 in (5.1 cm) at its widest row.
- After the pink edging: 4 in x 3 in (10.2 cm x 7.6 cm).
- After the navy border: 4.5 in x 3.5 in (11.4 cm x 8.9 cm).
If your wing is too big, go down to a 3.25 mm hook. If it is too small, go up to a 3.75 mm hook. Don’t change the stitch counts, because the border math depends on them.

Pattern
Center Ring
With Color A:
Rnd 1: MR, ch 1, 8 sc in ring, sl st to first sc to join. (8 sts)
Fasten off and weave in the tail. Pull the ring fully closed.
Hold the ring with the RS facing and number the stitches 1 to 8 counterclockwise, starting at the top right. Stitches 1–2 hold the upper right wing, 3–4 the lower right wing, 5–6 the lower left wing, and 7–8 the upper left wing. Each wing uses exactly 2 ring stitches, so all 8 are used.
Upper Wings (make 2)
Work the first upper wing into ring sts 1–2 and the second into ring sts 7–8. Turn at the end of every row. The turning ch 1 does not count as a stitch.
Row 1: Join Color A in the first ring st, ch 1, 2 sc in each of the 2 ring sts. (4 sts)
Row 2: Ch 1, [sc in next st, 2 sc in next st] twice. (6 sts)
Row 3: Ch 1, [sc in next 2 sts, 2 sc in next st] twice. (8 sts)
Row 4: Ch 1, [sc in next 3 sts, 2 sc in next st] twice. (10 sts)
Row 5: Ch 1, sc in each st across. (10 sts)
Row 6: Ch 1, [sc in next 4 sts, 2 sc in next st] twice. (12 sts)
Rows 7–8: Ch 1, sc in each st across. (12 sts)
Row 9: Ch 1, sc2tog, sc in next 8 sts, sc2tog. (10 sts)
Row 10: Ch 1, sc2tog, sc in next 6 sts, sc2tog. (8 sts)
Fasten off. The wing is a fan that widens quickly and then rounds off at the tip.
Lower Wings (make 2)
Work the first lower wing into ring sts 3–4 and the second into ring sts 5–6.
Row 1: Join Color A in the first ring st, ch 1, 2 sc in each of the 2 ring sts. (4 sts)
Row 2: Ch 1, [sc in next st, 2 sc in next st] twice. (6 sts)
Row 3: Ch 1, [sc in next 2 sts, 2 sc in next st] twice. (8 sts)
Row 4: Ch 1, sc in each st across. (8 sts)
Row 5: Ch 1, [sc in next 3 sts, 2 sc in next st] twice. (10 sts)
Row 6: Ch 1, sc in each st across. (10 sts)
Row 7: Ch 1, sc2tog, sc in next 6 sts, sc2tog. (8 sts)
Row 8: Ch 1, sc2tog, sc in next 4 sts, sc2tog. (6 sts)
Fasten off. Weave in all wing tails on the wrong side. The wing base now measures about 3.75 in x 2.75 in (9.5 cm x 7.0 cm).
Pink Edging Round
This round goes around each wing separately, so the outline dips into a pinched valley wherever two wings meet.
Join Color A at the top valley, in the first row end of the upper right wing.
Upper right wing: Ch 1. Sc in each of the 10 row ends up the first side (10). Work 2 sc in the first st of Row 10, sc in the next 6 sts, and 2 sc in the last st (10). Sc in each of the 10 row ends down the second side (10). (30 sts for this wing)
Lower right wing: Sc in each of the 8 row ends (8). Work 2 sc in the first st of Row 8, sc in the next 4 sts, and 2 sc in the last st (8). Sc in each of the 8 row ends (8). (24 sts)
Lower left wing: Work as for the lower right wing. (24 sts)
Upper left wing: Work as for the upper right wing. (30 sts)
Sl st to the first sc to join. Round total: 30 + 24 + 24 + 30 = 108 sts. Fasten off.
Navy Border
Border gauge: together, the two navy rounds add 0.25 in (0.6 cm) beyond the pink edge on every side.
Rnd 1: Join Color B in the first st of the upper right wing. Ch 1, sc in each st around, sl st to first sc. (108 sts: 30 + 24 + 24 + 30)
Each upper wing has 10 / 10 / 10 sts (side, tip, side), and each lower wing has 8 / 8 / 8 sts.
Rnd 2: Ch 1, rev sc in each st around, sl st to first rev sc. (108 sts, same counts on each side)
Fasten off and weave in the tail.
Why the math works: One sc per row end puts 10 stitches along a 1.8 in (4.6 cm) side. At this gauge the side strictly needs only 9, so you have about 10% extra. That small surplus lets the edge ease around the curved wing without cupping. The 2-sc increases at both tip corners add the extra length the outer curve needs. Both navy rounds are worked 1:1 into the 108 pink stitches, with nothing added and nothing skipped. So the corded edge sits flat, and every wing keeps the same count on each side from the edging through the finish.
Veins
Use Color B and work surface slip stitch on the RS. Keep the working yarn behind the wing.
Upper wings (each):
- Inner outline: Work along the top of Row 8 from row end to row end. This makes a navy U that follows the wing tip about 2 rows inside the border.
- Radial veins: Work 4 lines from the center ring out to the inner outline, spaced evenly across the wing like spokes.
Lower wings (each):
- Inner outline: Work along the top of Row 6 from row end to row end.
- Radial veins: Work 3 lines from the center ring out to the inner outline, evenly spaced.
The veins divide each wing into rounded pink cells, like stained glass. Fasten off each line and weave the tail along the back of the same line.
Body, Antennae, and Hanging Loop
Body
Use Color B and work in continuous rounds. Place a marker in the first st of each round.
Rnd 1: 6 sc in MR. (6 sts)
Rnd 2: [Sc in next st, 2 sc in next st] 3 times. (9 sts)
Rnd 3: Sc in each st around. (9 sts)
Rnd 4: [Sc in next st, sc2tog] 3 times. (6 sts)
Rnd 5: [Sc in next st, 2 sc in next st] 3 times. (9 sts)
Rnd 6: Sc in each st around. (9 sts)
Rnd 7: [Sc in next st, sc2tog] 3 times. (6 sts)
Rnd 8: [Sc in next st, 2 sc in next st] 3 times. (9 sts)
Rnd 9: Sc in each st around. (9 sts)
Rnd 10: [Sc in next st, sc2tog] 3 times. (6 sts)
Stuff lightly.
Rnd 11: [Sc in next st, 2 sc in next st] 3 times. (9 sts)
Rnd 12: [Sc in next st, sc2tog] 3 times. (6 sts)
Rnd 13: Sc2tog 3 times. (3 sts)
Fasten off with a long tail and close the opening. Rnds 1–3 form the round head, and the 6-st rounds make the pinched segments. The body measures about 2.4 in (6.1 cm) long and 0.55 in (1.4 cm) across.
Antennae (make 2)
Join Color B in a stitch on top of the head. Place one antenna on each side of center.
Ch 9, 3 sc in 2nd ch from hook, 2 sc in next ch, sl st in each of the remaining 6 ch. Fasten off.
The extra stitches at the tip make it curl outward. Each antenna is about 0.75 in (1.9 cm) long.
Assembly
Center the body vertically over the ring, with the head just above the top valley. Sew it down along both sides with the tail.
Hanging Loop
With Color B, ch 36, about 6 in (15.2 cm). Fold the chain in half and sew both ends to the back of the head. The finished doubled loop is about 3 in (7.6 cm) long.
Final Blocking
- Mist the wings lightly with water until just damp. Keep the body dry.
- Lay the butterfly RS up on a blocking mat.
- Pin each wing tip so the piece measures 4.5 in x 3.5 in (11.4 cm x 8.9 cm).
- Pin into each of the 4 valleys to sharpen the pinched outline.
- Smooth the veins flat with your fingertip so they sit evenly.
- Shape the antenna curls with your fingers.
- Let it dry completely, then remove the pins.
Final Quality-Control Checklist
- The center ring is fully closed and has 8 sts.
- Upper wings end at 8 sts and lower wings at 6 sts.
- The pink edging totals 108 sts (30 / 24 / 24 / 30).
- Both navy rounds total 108 sts with no gaps.
- Each upper wing has 1 inner outline and 4 radial veins. Each lower wing has 1 inner outline and 3 radial veins.
- The body is centered and the head sits above the top valley.
- The antennae curl outward evenly on both sides.
- The loop is firmly attached and the butterfly hangs straight.
- The size is 4.5 in x 3.5 in (11.4 cm x 8.9 cm).
Troubleshooting
Wings ruffle: Your tension is too loose for the increases. Go down a hook size.
Wings cup: Your tension is too tight. Go up a hook size and keep the turning chains relaxed.
Edging puckers at the tip: Check that you worked 2 sc into both corner sts of the last row.
Veins pull the wing in: Loosen each surface slip stitch, or work the veins with a hook one size larger.
Navy border flares: Your rev sc is too loose. Tighten it, or work Rnd 2 with a 3.25 mm hook.
Body leans: Re-pin it in the center and add a few tacking stitches at the neck.
Ornament tilts when hung: Move the loop so it sits exactly at the center of the head.
Care
Hand wash in cool water with mild soap and lay flat to dry. Reshape the wings and antennae while damp.
Final Notes
Here is the full measurement chain:
- 0.6 in (1.5 cm) center ring
- Upper wings 1.8 in (4.6 cm) long and lower wings 1.5 in (3.8 cm) long
- Wing base of 3.75 in x 2.75 in (9.5 cm x 7.0 cm)
- 4 in x 3 in (10.2 cm x 7.6 cm) after the 108-st pink edging
- 4.5 in x 3.5 in (11.4 cm x 8.9 cm) after the navy border
If each checkpoint matches, the finished butterfly will too.
Happy crocheting!