

The Orchid Cascade Curtain is a bohemian window panel: a deep plum diamond-net valance with a wavy coral scalloped edge, and below it plum chain cords hung with bright magenta orchids, draped chain swags and little dusty-rose buds.
Each orchid has three pointed sepals and two wide petals. All five are worked as open fans, so they show radiating mesh lines and a solid outline. A separate coral lip sits on top of each orchid, with magenta throat stitches and a yellow center. The palette is plum, magenta, coral, dusty rose and a touch of yellow.
This pattern uses US crochet terms. The finished curtain measures 29.8 in (75.7 cm) wide and about 40 in (101.6 cm) long, from the top edge of the border to the tip of the lowest bud.
Construction is simple. Make the orchids, lips and buds as separate pieces. Work the valance flat from the top down, then make the slip-stitch cords and hang them from the scallop centers. Add the swags, sew on the motifs, and finish with a two-row border with rod loops.
Finished Size and Construction
- Finished size: 29.8 in (75.7 cm) wide x about 40 in (101.6 cm) long
- Skill level: Intermediate
- Terminology: US
- Yarn weight: DK (3), cotton
- Hook: 3.5 mm (E-4)
- Number of pieces: 1 valance, 5 main strands, 4 bud strands, 16 swags, 13 orchids, 13 lips, 29 buds
- Layout: 5 main strands, 6.4 in (16.3 cm) apart, carrying orchids in a staggered 3-2-3-2-3 pattern
- Piece size: orchid 4 in (10.2 cm) across; lip 1.5 x 1.25 in (3.8 x 3.2 cm); bud about 1 x 0.75 in (2.5 x 1.9 cm)
- Size before border: valance 29 in (73.7 cm) wide x 5.2 in (13.2 cm) deep at the side edges
- Border depth: 0.4 in (1.0 cm), plus rod loops
Materials
Use a smooth mercerized or matte cotton DK. Cotton holds the petal shape, keeps its stitch definition and doesn’t stretch much when it hangs. The meterage below assumes about 115 m per 50 g.
- Plum (A): 75 g / 173 m (valance, strands, swags, border)
- Magenta (B): 80 g / 184 m (orchids, throat stitches)
- Coral (C): 40 g / 92 m (scalloped edge, lips)
- Dusty Rose (D): 35 g / 81 m (buds)
- Yellow (E): 3 g / 7 m (orchid centers)
Tools:
- 3.5 mm (E-4) hook
- Tapestry needle
- Stitch markers (at least 20)
- A small amount of fiberfill or yarn scraps for the buds
- Blocking mat and rustproof pins
- Measuring tape
All quantities include a margin of about 15–20%.
Abbreviations (US Terms)
- ch – chain
- sl st – slip stitch
- sc – single crochet
- hdc – half double crochet
- dc – double crochet
- tr – treble crochet
- sc2tog – single crochet 2 together
- sp(s) – space(s)
- MR – magic ring
- RS / WS – right side / wrong side
Special stitch: Slip-stitch cord. Ch the stated number, then sl st in the back bump of the 2nd ch from the hook and of each ch across. You get one sl st fewer than the chain count. This makes a firm, non-curling cord that looks like a thick chain.
Gauge and Checkpoints
- Fabric gauge: 20 sc x 20 rows = 4 in (10.2 cm), so each sc row is 0.2 in (0.5 cm)
- Net row height: 0.6 in (1.5 cm) per ch-5 net row
- Chain gauge: 25 ch = 5 in (12.7 cm), measured on a slip-stitch cord
Make one orchid first and check:
- After Round 1: center is 0.7 in (1.8 cm) across
- After Round 4: orchid is 4 in (10.2 cm) from the left petal tip to the right petal tip
If the orchid is too big, go down 0.25 mm. If it’s too small, go up 0.25 mm. Then make one cord of 26 ch (25 sl st), which should measure 5 in (12.7 cm). The cord gauge matters most, because every strand and swag position is counted in sl sts.
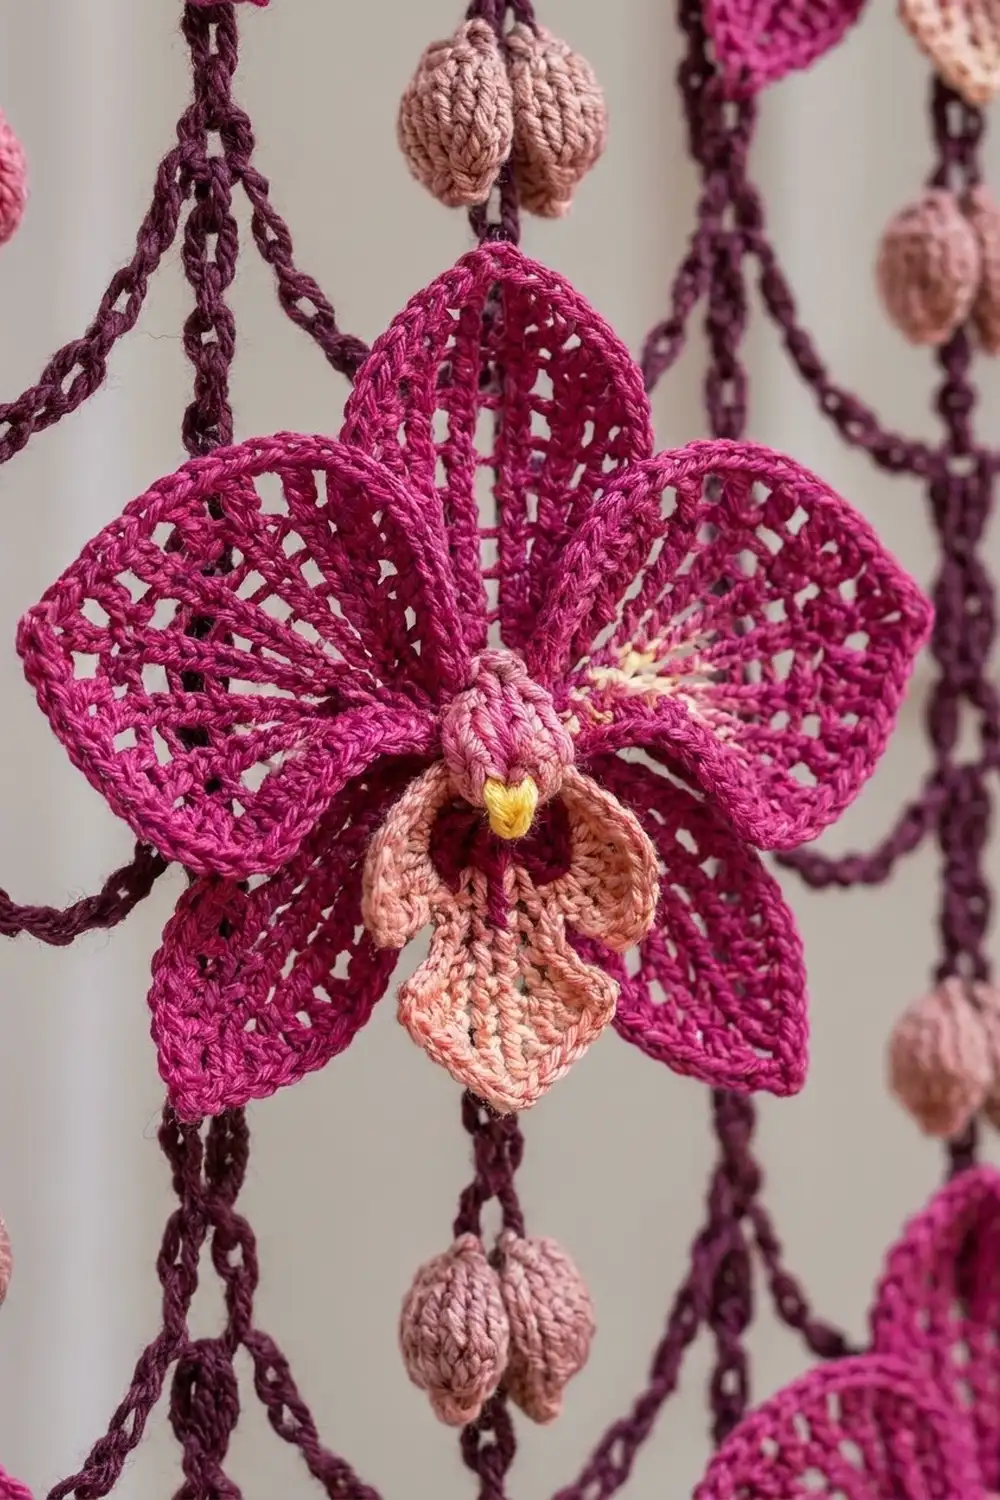
Orchid (make 13)
With B.
Round 1: MR, ch 1, 10 sc in ring, sl st to first sc. Pull the ring closed. (10 sc)
Round 2: Ch 1, sc in first st, ch 7, sk next st, [sc in next st, ch 9, sk next st], [sc in next st, ch 7, sk next st] twice, sc in next st, ch 9, sk last st, sl st to first sc. (5 sc, 5 loops: three ch-7, two ch-9)
Going around, the loops are: top sepal, right petal, lower right sepal, lower left sepal, left petal.
Sepal Fan (worked into a ch-7 loop): sc, hdc, dc, (ch 1, tr) twice, ch 2, (tr, ch 1) twice, dc, hdc, sc. (10 sts, 4 ch-1 sps, 1 ch-2 tip)
Petal Fan (worked into a ch-9 loop): sc, hdc, dc, (ch 1, tr) 3 times, ch 2, (tr, ch 1) 3 times, dc, hdc, sc. (12 sts, 6 ch-1 sps, 1 ch-2 tip)
Round 3: Sl st into the first ch-7 loop. Work the matching Fan into the loop, sl st in the next Round 2 sc; repeat from * around. (54 sts: 3 x 10 + 2 x 12, plus 5 sl sts)
The trebles fan out from the loop, which opens radiating holes, like the veins in an orchid petal.
Round 4 (outline): Work around each sepal: 1 sc in each st and 1 sc in each ch-1 sp, and (sc, ch 1, sc) in the ch-2 tip. (16 sc) Work around each petal: 1 sc in each st and 1 sc in each ch-1 sp, and 3 sc in the ch-2 tip. (21 sc) Sl st in each Round 2 sc between pieces. Join and fasten off. (90 sc: 3 x 16 + 2 x 21, plus 3 ch-1 tips)
The sepals end in a point and the petals end in a rounded tip. Checkpoint: 4 in (10.2 cm) across.
Lip (make 13)
With C.
Round 1: MR, ch 2, 8 hdc in ring, sl st to top of first hdc. (8 hdc)
Round 2:
– Side lobe: (hdc, dc, dc) in next st, (dc, dc, hdc) in next st. (6 sts)
– Lower lobe: (hdc, dc) in next st, (dc, tr, ch 2, tr, dc) in next st, (dc, hdc) in next st. (8 sts + ch-2)
– Second side lobe: same as the first side lobe over the next 2 sts. (6 sts)
– Sl st in the last st.
(20 sts, 1 ch-2 tip, 1 sl st)
Round 3: Sl st in each st around, and work (sl st, ch 2, sl st) in the ch-2 tip. Fasten off. (22 sl sts + 1 ch-2 notch) This sl st edge makes the lobes ruffle slightly.
Throat and column: With B, embroider 4 straight stitches from the center onto the lower lobe. With E, make one French knot (3 wraps) in the center and a second knot just above it. Checkpoint: 1.5 x 1.25 in (3.8 x 3.2 cm).
Bud (make 29)
With D. Work in continuous rounds.
- Round 1: 6 sc in MR. (6)
- Round 2: 2 sc in each st. (12)
- Rounds 3–5: Sc in each st. (12)
- Round 6: Sc2tog 6 times. (6) Stuff lightly.
- Round 7: Sc2tog 3 times. (3)
Fasten off, leaving a 10 in (25.4 cm) tail. Run the tail lengthwise around the bud 3 times and pull gently to give it soft lobed segments. Checkpoint: about 1 x 0.75 in (2.5 x 1.9 cm).
Valance
With A. Worked flat from the top edge down.
Row 1: Ch 146, sc in 2nd ch from hook and in each ch across. (145 sc)
Row 2: Ch 1, turn, sc in each st. (145 sc) Checkpoint: 29 in (73.7 cm) wide.
Row 3 (net setup): Ch 1, turn, sc in first st, ch 5, sk 3, sc in next st; repeat from * 35 more times. (36 ch-5 loops, 37 sc)
Row 4: Ch 5 (counts as dc + ch 2), turn, sc in first ch-5 sp, (ch 5, sc in next ch-5 sp) 35 times, ch 2, dc in last sc. (35 full loops, 2 edge half-loops, 36 sc)
Row 5: Ch 1, turn, sc in dc, (ch 5, sc in next ch-5 sp) 35 times, ch 5, sc in 3rd ch of turning ch. (36 loops, 37 sc)
Rows 6–9: Repeat Rows 4–5 twice. This gives 7 net rows, ending with a 36-loop row. Checkpoint: 4.6 in (11.7 cm) deep.
Row 10 (conversion): Ch 1, turn, 1 sc in each of the 37 sc and 3 sc in each of the 36 loops. (37 + 108 = 145 sc) Fasten off.
Row 11 (scallops): Join C. Ch 1, sc in first 2 sts, [hdc in next 2 sts, dc in next 3, tr in next 3, dc in next 3, hdc in next 2], sc in next 3; repeat from * 7 more times, work one more bracketed scallop, sc in last 2 sts. (2 + 8 x 16 + 13 + 2 = 145 sts: 9 scallops, 8 valleys)
Row 12: Ch 1, turn, sc in each st. (145 sc) Fasten off.
Because the taller stitches sit in the middle of each scallop, the bottom edge drops into soft waves. The center of each scallop is the middle tr, so in Row 12 the scallop centers fall on sts 9, 25, 41, 57, 73, 89, 105, 121 and 137. Place a marker in each one.
Checkpoint: 5.2 in (13.2 cm) deep at the sides and 5.8 in (14.7 cm) at the scallop centers.
Strands and Swags
With A, make slip-stitch cords:
- Main strand (make 5): ch 165, cord back. (164 sl sts = 32.8 in / 83.3 cm)
- Bud strand (make 4): ch 31, cord back. (30 sl sts = 6 in / 15.2 cm)
- Swag (make 16): ch 41, cord back. (40 sl sts = 8 in / 20.3 cm)
On each main strand, count from the top and mark sl sts 30, 60, 90, 120 and 150. These are the orchid positions at 6, 12, 18, 24 and 30 in (15.2, 30.5, 45.7, 61.0 and 76.2 cm). Also mark sl sts 45, 75, 105 and 135, which are the swag levels at 9, 15, 21 and 27 in (22.9, 38.1, 53.3 and 68.6 cm).
Make All Pieces
| Piece | Qty | Color |
|---|---|---|
| Orchid | 13 | B |
| Lip | 13 | C, with B and E embroidery |
| Bud | 29 | D |
| Main strand | 5 | A |
| Bud strand | 4 | A |
| Swag | 16 | A |
| Valance | 1 | A + C |
Layout grid (O = orchid, ~ = swag level; depth is measured below the scallop center):
Depth    S1   S2   S3   S4   S5
 6 in    O    |    O    |    O
 9 in    ~~~~~~~~~~~~~~~~~~~~~~
12 in    |    O    |    O    |
15 in    ~~~~~~~~~~~~~~~~~~~~~~
18 in    O    |    O    |    O
21 in    ~~~~~~~~~~~~~~~~~~~~~~
24 in    |    O    |    O    |
27 in    ~~~~~~~~~~~~~~~~~~~~~~
30 in    O    |    O    |    O
32.8 in  bud  bud  bud  bud  bud
Bud strands hang between the main strands, at scallops 2, 4, 6 and 8.
Joining
- Main strands: Sew the top of each main strand to Row 12 sts 9, 41, 73, 105 and 137, at the centers of scallops 1, 3, 5, 7 and 9. Every gap is 32 sts, which is 6.4 in (16.3 cm). The span from S1 to S5 is 128 sts, or 25.6 in (65.0 cm).
- Bud strands: Sew them to sts 25, 57, 89 and 121. Sew one bud to the tip of each. Then ch 6 from the tip and sew a second bud to the end of that chain. (8 buds)
- Swags: Sl st one end of a swag into marked sl st 45 on S1 and the other end into sl st 45 on S2. Join the other gaps and levels the same way. Matching sl st numbers on both strands keeps every swag level. The 8 in (20.3 cm) cord spans a 6.4 in (16.3 cm) gap, so it drapes about 2 in (5.1 cm). Sew a bud to the 20th sl st, at the center of each swag. (16 buds)
- Orchids: Following the grid, center Round 1 of each orchid over its marked sl st and sew it through the center. Tack the top sepal tip and both lower sepal tips to the cord so the orchid doesn’t twist. Sew a lip over each center with the lower lobe pointing down between the lower sepals.
- Strand ends: Sew one bud to the bottom of each main strand. (5 buds; 8 + 16 + 5 = 29)
Tension: Don’t pull sewing stitches tight, or the cord will pucker and lose length. Size checkpoint: each strand should hang 32.8 in (83.3 cm) below its scallop center.
Border
With A, at fabric gauge (5 sc per inch / 2.5 cm).
Border Row 1: With RS facing, join at the bottom of the right side edge. Work 26 sc up the side: 1 sc per sc-row end (5 rows) and 3 sc per net-row end (7 rows). Ch 1 at the corner. Work 145 sc across the top, one in each free loop of the foundation chain. Ch 1 at the corner. Work 26 sc down the other side. (197 sc + 2 corner ch-1 sps)
Border Row 2: Ch 1, turn, sc in each sc and 1 sc in each corner sp. On the top edge, at sts 1, 17, 33, 49, 65, 81, 97, 113, 129 and 145, work (sc, ch 8, sl st in same sc). Fasten off. (26 + 1 + 145 + 1 + 26 = 199 sc, 10 ch-8 rod loops)
Why the math works:
– The sides are 26 sc at 5 per inch, which is 5.2 in (13.2 cm) and matches the valance depth, so the sides don’t ruffle or pull in.
– The top count stays 145, so the width is unchanged.
– The rod loops are 16 sts apart, the same as one scallop repeat (145 = 1 + 9 x 16). That puts a loop above each valley and at each edge.
Final Blocking
- Soak the curtain in cool water and press the water out in a towel.
- Pin the valance flat to 29.8 x 5.6 in (75.7 x 14.2 cm), with the scallop centers at 6.2 in (15.7 cm).
- Pin out each net loop so the diamonds open evenly.
- Pin each orchid at 4 in (10.2 cm), shaping the sepal points and rounding the petal tips.
- Lift the lips slightly so they stand out from the orchids.
- Let everything dry flat.
- Hang the curtain and let the strands settle for a day.
Final Quality-Control Checklist
- Valance is 29.8 in (75.7 cm) wide with 9 even scallops
- 10 rod loops, 16 sts apart
- 5 main strands, each 32.8 in (83.3 cm) long
- 13 orchids in the 3-2-3-2-3 pattern
- All 16 swags are level and drape about 2 in (5.1 cm)
- All 29 buds are secure, with tails woven in
- Every lip points down
Troubleshooting
- Petals cup: The Round 2 loops are too tight. Chain more loosely or use a larger hook for Round 2 only.
- Valance narrower than 29 in (73.7 cm): Your net chains are tight. Go up a hook size for Rows 3–9.
- Strands twist: Tack the sepal tips again, and steam the cord lightly.
- Swags uneven: Recount the attachment sl sts.
- Buds lopsided: Stuff them evenly before Round 7.
Care
Hand wash in cool water and lay flat to dry. Between washes, shake the curtain gently to remove dust.

Final Notes
The measurements all follow from your gauge:
- 20 sc = 4 in (10.2 cm), so 145 sc gives a 29 in (73.7 cm) valance, and the border brings it to 29.8 in (75.7 cm).
- 25 ch = 5 in (12.7 cm), so the 164 sl st strands are 32.8 in (83.3 cm) long and the orchids land at 6 in (15.2 cm) intervals.
- With the 6.2 in (15.7 cm) valance center and a 1 in (2.5 cm) bud at the end, the curtain is about 40 in (101.6 cm) long.
Check the gauge first, and everything else should fall into place.
Happy crocheting!