

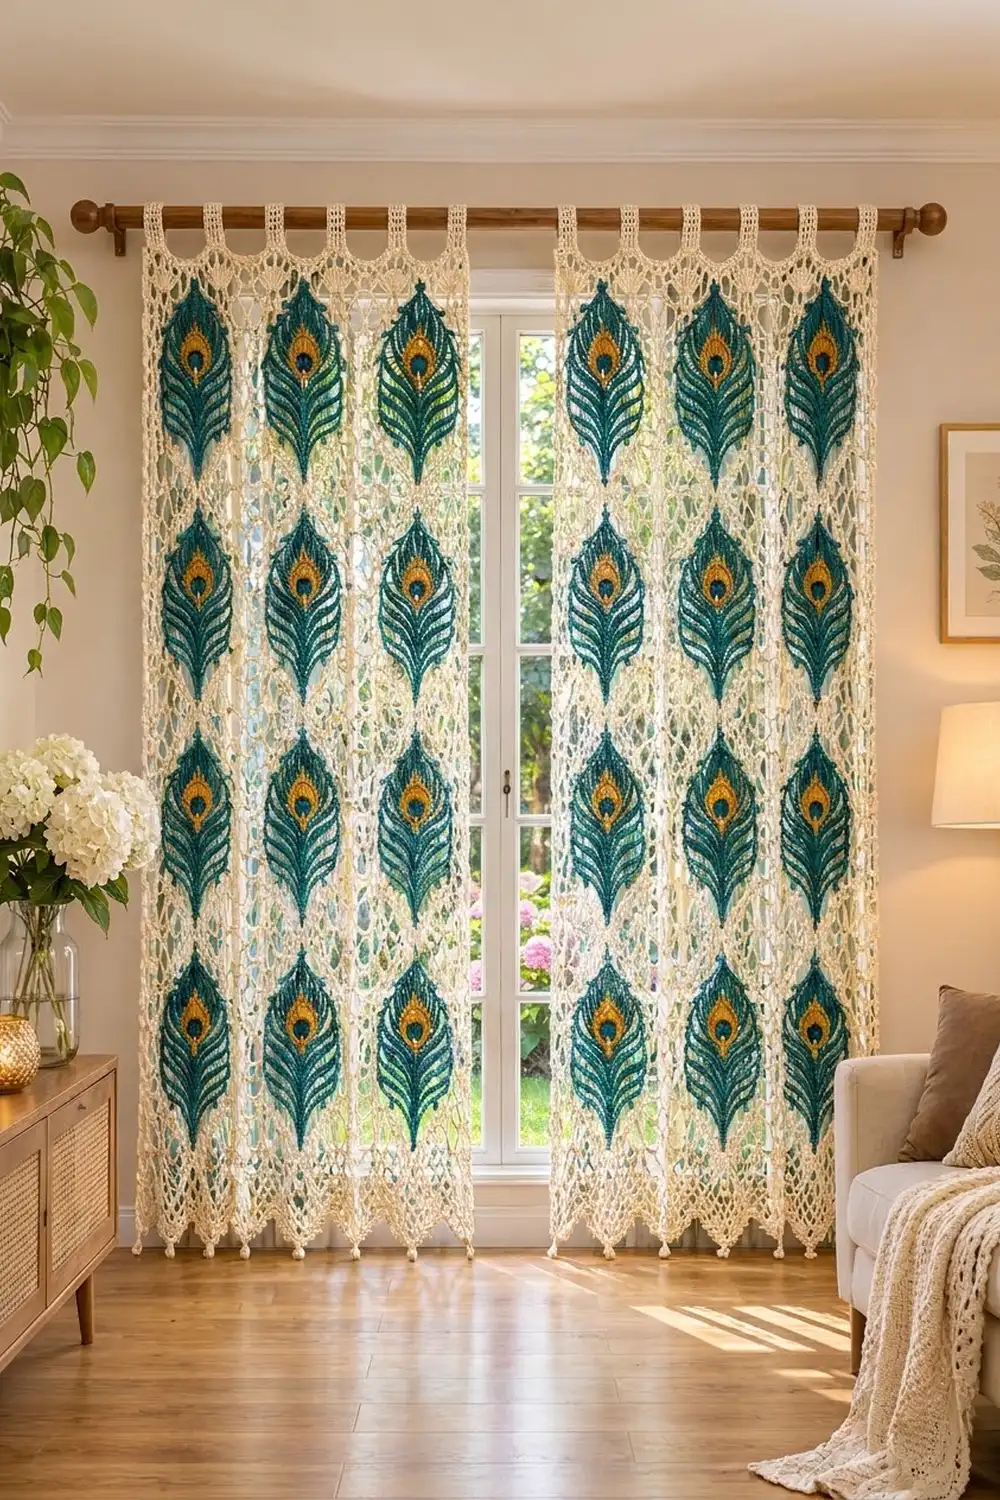
This curtain panel pairs an airy cream lace net with bold teal peacock feathers. Each panel has twelve feather appliqués in three neat columns, and every feather has a glowing gold and teal eye.
The colors are cream for the net, deep teal for the feathers, and warm gold for the eye rings, with a tiny cream accent in each eye. The style is boho with a vintage lace feel.
This pattern uses US crochet terms. One finished panel measures 30.5 in (77.5 cm) wide and 73.5 in (186.7 cm) long. The tab loops rise another 3 in (7.6 cm) above the top edge. The window shown uses two panels, so make two.
You work the net from the bottom up, then add a top band with fans and tabs. Next you add a border to the sides and a scalloped hem. The feathers and eyes are made separately, put together, and sewn on.
Finished Size and Construction
- Finished panel size: 30.5 in x 73.5 in (77.5 cm x 186.7 cm), plus 3 in (7.6 cm) tab loops
- Skill level: Intermediate
- Terminology: US
- Yarn weight: Worsted (#4) cotton
- Hook: 5.0 mm (H-8)
- Pieces per panel: 1 net panel + 12 feather bodies + 12 eyes
- Layout: 3 feathers across x 4 down
- Feather size: 6 in x 12 in (15.2 cm x 30.5 cm)
- Size before border: 30 in x 72 in (76.2 cm x 182.9 cm)
- Border depth: 0.25 in (0.6 cm) on the sides, 1.5 in (3.8 cm) at the bottom
Materials
Choose a smooth, mercerized or combed worsted cotton. It holds the lace shape and won’t stretch much on the rod. These amounts assume about 170 m per 100 g.
Per panel:
- Cream (net, tabs, border, eye accents): 800 g, about 1,360 m
- Teal (feathers, eye centers, eye outer rings): 350 g, about 595 m
- Gold (eye rings): 50 g, about 85 m
For the pair: 1,600 g cream (2,720 m), 700 g teal (1,190 m), 100 g gold (170 m).
All amounts include a margin of roughly 10%.
Tools: 5.0 mm (H-8) hook, tapestry needle, stitch markers, rust-proof pins, measuring tape, blocking mats, spray bottle.
Abbreviations (US Terms)
- ch – chain
- sl st – slip stitch
- sc – single crochet
- hdc – half double crochet
- dc – double crochet
- tr – treble crochet
- FPdc / FPtr – front post double / treble crochet
- sp – space
- st(s) – stitch(es)
- rnd – round
- RS / WS – right side / wrong side
Special stitches:
- FPdc: Yarn over (yo). Insert the hook from front to back to front around the post (the upright body) of the stitch named, then yo and pull up a loop. (Yo, pull through 2 loops) twice.
- FPtr: Yo twice. Insert the hook around the post as for FPdc, then yo and pull up a loop. (Yo, pull through 2 loops) 3 times.
Gauge and Checkpoints
- Net gauge: 4 ch-5 loops = 5 in (12.7 cm) wide; 6 rows = 4 in (10.2 cm) tall.
- Solid gauge: 16 sc and 18 rows = 4 in (10.2 cm).
Test one piece first. Make one complete feather with its eye before you start the net. It uses all three colors.
Feather checkpoints:
- After Rnd 1: 9.5 in x 1 in (24.1 cm x 2.5 cm)
- After Rnd 4: 11.5 in x 5 in (29.2 cm x 12.7 cm)
- After Rnd 5: 12 in x 6 in (30.5 cm x 15.2 cm)
Net checkpoints:
- After Row 1: 30 in (76.2 cm) wide
- After Row 105: 70 in (177.8 cm) tall
- After Row 109: 72 in (182.9 cm) tall
If your pieces are too big, go down 0.5 mm in hook size. If they are too small, go up 0.5 mm. Measure lace flat and unstretched.

Feather Body (make 12 per panel)
Use teal.
Foundation: Ch 33. Number the chains starting from the hook. Ch #1 is next to the hook, and ch #33 (the slip knot) becomes the top tip.
Rnd 1 (RS): Sc in ch #2. Working toward the slip knot: sc in ch #3–5, hdc in #6–9, dc in #10–24, hdc in #25–28, sc in #29–32, 3 sc in #33 (tip). Turn the piece and work along the other side of the foundation: sc in #32–29, hdc in #28–25, dc in #24–10, hdc in #9–6, sc in #5–3, 2 sc in #2 (bottom point). Join with sl st to the first sc. (66 sts: 3 at each end, 30 along each side)
Call the 3 sts at the bottom B1–B3 and the 3 sts at the tip T1–T3. B2 and T2 are the center sts.
Rnd 2: Ch 1, sc in B2, ch 2, skip B3. Side 1: dc in next st, ch 2, skip next st; repeat 15 times. Tip: dc in T1, ch 2, (dc, ch 3, dc) in T2, ch 2, dc in T3. Side 2: ch 2, skip next st, dc in next st; repeat 15 times. Ch 2, skip B1, join to first sc. (35 sts: 1 sc + 34 dc; 35 sps: 34 ch-2 + 1 ch-3)
Rnd 3: Ch 1, sc in first sc. Ch 3, FPdc around next dc; repeat 34 times. Before the FPdc around the second dc in T2, ch 5 instead of ch 3. Ch 3, join to first sc. (35 sts: 1 sc + 34 FPdc; 35 sps: 34 ch-3 + 1 ch-5)
Rnd 4: Ch 1, sc in first sc. Ch 4, FPtr around next FPdc; repeat 34 times. Above the ch-5 tip sp, ch 6 instead of ch 4. Ch 4, join. (35 sts: 1 sc + 34 FPtr; 35 sps: 34 ch-4 + 1 ch-6)
The post stitches stack up into raised ribs that fan out from the spine, with open spaces between them.
Rnd 5 (outline): Ch 1, sc in first sc. 4 sc in next ch-4 sp, sc in next FPtr; repeat around. In the ch-6 tip sp, work (3 sc, ch 4, 3 sc). Work 4 sc in the last ch-4 sp and join. (177 sc: 35 on sts + 136 in ch-4 sps + 6 at tip, plus 1 ch-4 tip loop)
Fasten off, leaving a 40 in (101.6 cm) tail.
Feather Eye (make 12 per panel)
Rnd 1 (teal): Magic ring, ch 2 (does not count), 12 hdc in ring, pull closed, join. (12 sts, 1.25 in / 3.2 cm across) Fasten off. Number the sts 1–12, with st 1 at the bottom and st 7 at the top.
Rnd 2 (gold): Join gold in st 1. Ch 1, 2 sc in each of sts 1–2, 2 hdc in each of sts 3–4, 2 dc in st 5, (dc, tr) in st 6, (tr, ch 2, tr) in st 7, (tr, dc) in st 8, 2 dc in st 9, 2 hdc in each of sts 10–11, 2 sc in st 12. Join. (24 sts + 1 ch-2 tip sp) Fasten off.
Rnd 3 (teal): Join teal. Ch 1, sc in each st, working (sc, ch 2, sc) in the tip sp. Join. (26 sc + 1 ch-2 tip) Fasten off, leaving a 16 in (40.6 cm) tail.
Cream accent: Embroider one straight stitch 0.5 in (1.3 cm) long, running up from the center of Rnd 1.
Eye checkpoint: 2.75 in x 3.5 in (7.0 cm x 8.9 cm).
Assemble: Center the eye on the feather’s spine, point up, with its center 3.5 in (8.9 cm) below the tip loop. Whipstitch around Rnd 3 with the teal tail.
Net Panel
Use cream. The net is worked from the bottom up.
Foundation: Ch 98.
Row 1 (RS): Sc in 2nd ch from hook. Ch 5, skip 3 ch, sc in next ch; repeat 24 times. Turn. (24 ch-5 loops, 25 sc)
Row 2: Ch 5 (counts as dc + ch 2). Sc in first loop, ch 5, sc in next loop; repeat to end. Ch 2, dc in last sc. Turn. (23 full loops + 2 half loops)
Row 3: Ch 1, sc in dc. Ch 5, sc in next loop; repeat across. Work the last sc in the 3rd ch of the turning ch. Turn. (24 loops, 25 sc)
Rows 4–105: Repeat Rows 2–3, ending with a Row 3 repeat. (30 in x 70 in / 76.2 cm x 177.8 cm)
Top Band
Row 106 (conversion): Ch 1, sc in each sc and 4 sc in each loop. Turn. (25 sc worked 1-per-sc + 96 sc in 24 loops = 121 sc)
Row 107 (fans): Ch 1, sc in first sc. Skip 3 sc, 7 dc in next sc, skip 3 sc, sc in next sc; repeat 15 times. Turn. (15 fans: 105 dc + 16 sc = 121 sts)
Row 108: Ch 4 (counts as tr). Ch 3, sc in 4th dc of next fan, ch 3, tr in next sc; repeat 15 times. Turn. (16 tr + 15 sc + 30 ch-3 sps)
Row 109 (conversion): Ch 1, sc in each st and 3 sc in each ch-3 sp. (31 sc worked 1-per-st + 90 sc in sps = 121 sc) Fasten off.
Tabs (make 7)
Number the Row 109 sts 1–121. Work one tab over each of these groups: 1–7, 20–26, 39–45, 58–64, 77–83, 96–102, and 115–121. This leaves 12 sts (3 in / 7.6 cm) between tabs.
Tab Row 1: With RS facing, join cream in the first st of the group. Ch 1, sc in the same st and the next 6 sts. Turn. (7 sc)
Tab Rows 2–27: Ch 1, sc in each sc. Turn. (7 sc)
Each tab measures 1.75 in x 6 in (4.4 cm x 15.2 cm). Fold the tab to the WS and sew its last row to the WS of Row 106. This makes a 3 in (7.6 cm) loop that fits a rod up to 1.5 in (3.8 cm) across.
Make All Pieces
Per panel: 1 cream net, 12 teal feather bodies, 12 eyes. For the pair: 2 nets, 24 feather bodies, 24 eyes.
Layout grid (one panel, RS facing):
[ top band + tabs ]
  F   F   F    row A
  F   F   F    row B
  F   F   F    row C
  F   F   F    row D
[ scalloped hem ]
Joining: Appliqué the Feathers
Placement: Lay the net flat, RS up, at 30 in x 72 in (76.2 cm x 182.9 cm). Measured from the left edge, the column centers sit at 6 in (15.2 cm), 15 in (38.1 cm), and 24 in (61.0 cm). This leaves 3 in (7.6 cm) of net at each edge and between columns.
Each feather covers 18 net rows (12 in / 30.5 cm). Counting from the bottom:
- Row D sits on Rows 10–27.
- Row C sits on Rows 34–51.
- Row B sits on Rows 58–75.
- Row A sits on Rows 82–99.
That leaves a 9-row (6 in / 15.2 cm) margin at the bottom and 6-row (4 in / 10.2 cm) gaps above each feather row. Check: 9 + (4 x 18) + (4 x 6) = 105 rows.
Method: Pin each feather with its tip loop at the top. With the teal tail, whipstitch through the back loop of each Rnd 5 sc, catching the net strand underneath. Where the edge crosses an open loop, run the needle behind the feather to the next strand.
Tension: Sew loosely so the net lies flat with no puckers.
Size checkpoint: The panel should still measure 30 in x 72 in (76.2 cm x 182.9 cm).
Border
Border gauge: 16 sc = 4 in (10.2 cm).
Border Row 1: With RS facing, join cream at the top right corner (the end of Row 109).
- Right side: Working down the row ends, work 1 sc in Row 109, 3 sc in Row 108, 2 sc in Row 107, and 1 sc in Row 106. Then work 2 sc in each odd net row and 3 sc around each even-row dc. (7 + 106 + 156 = 269 sc)
- Corner: Ch 1.
- Bottom: Working into the foundation chain, work 1 sc in each chain under a Row 1 sc. Work 4 sc across each group of 3 skipped chains. (25 + 72 worked 1-per-chain + 24 extra = 121 sc)
- Corner: Ch 1.
- Left side: Work as for the right side, in reverse. (269 sc)
Fasten off. (659 sc + 2 corner ch-1 sps) The corner chains are not part of the side counts, so nothing is counted twice.
Border Row 2 (scallops): With RS facing, join in the first bottom sc. Ch 1, sc in same st, skip 2 sc, 7 dc in next sc, skip 2 sc, sc in next sc; repeat 20 times. Turn. (20 scallops: 140 dc + 21 sc)
Border Row 3 (picots): Ch 1, sc in first sc, sc in next 3 dc, (sc, ch 3, sc) in next dc, sc in next 3 dc, sl st in next sc; repeat 20 times. Fasten off.
Why the math works: The bottom edge has 121 sc, the same as the top band, so the panel stays square. Each scallop uses 6 sts, so 1 + (6 x 20) = 121. The sides get 5 sc for every 2 net rows (3.75 sc per inch), so they neither ruffle nor pull in.
Final Blocking
- Weave in all ends through solid stitches.
- Spray the panel until it is damp, not dripping.
- Lay it flat, RS up, and pin it to 30.5 in x 73.5 in (77.5 cm x 186.7 cm).
- Pin out each scallop and picot.
- Open up the spaces between each feather’s ribs.
- Leave the panel until it is completely dry.
Final Quality-Control Checklist
- Rows 106 and 109 each have 121 sc.
- The top band has 15 fans and 7 evenly spaced tabs.
- Each feather has 34 ribs and measures 6 in x 12 in (15.2 cm x 30.5 cm).
- The hem has 20 scallops.
Troubleshooting
- Feather cups: Add 1 ch to each space in Rnd 4.
- Feather ruffles: Go down a hook size for Rnds 3–5.
- Net gets narrower: Check that each odd row has 24 loops.
- Puckers around a feather: Unpick and restitch more loosely.
Care
Hand wash in cool water, or machine wash on a gentle cycle in a mesh bag. Lay flat to dry, and never hang the panel while it is wet.
Final Notes
Each feather is 6 in x 12 in (15.2 cm x 30.5 cm). The net is 24 loops, or 30 in (76.2 cm), wide. After 109 rows it is 72 in (182.9 cm) long. The top and bottom edges both have 121 stitches, which keeps the panel square. The border brings the finished panel to 30.5 in x 73.5 in (77.5 cm x 186.7 cm).
Happy crocheting!