

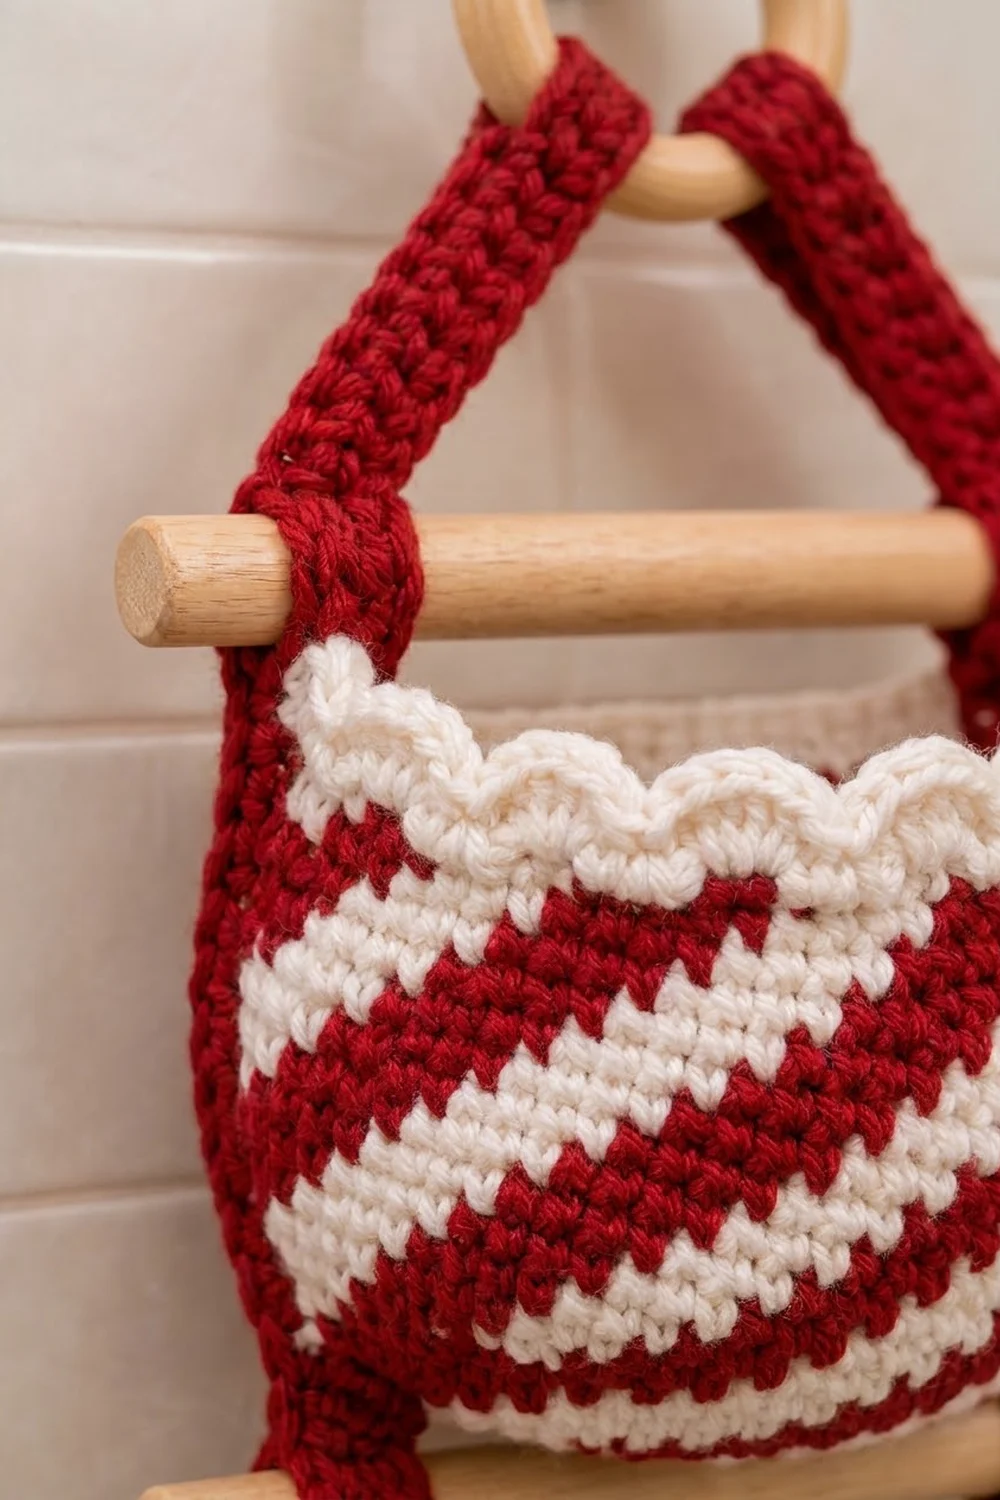
This hanging holder stores three spare toilet paper rolls in round, bowl-shaped pockets. Each pocket has bold diagonal candy-cane stripes in red and cream, with a soft cream scalloped rim at the top. Two red straps hold everything together. They thread around three wooden dowels and meet at a wooden ring for hanging.
The look is cozy and festive without feeling fussy. The firm single crochet fabric keeps the pockets upright, and the stripes spiral around each pocket like a peppermint stick. The pattern uses US crochet terms throughout.
The finished holder measures about 9 in (22.9 cm) wide at the dowels and about 23 1/2 in (59.7 cm) tall from the top of the ring to the bottom of the lowest pocket. Each pocket is about 4 in (10.2 cm) tall with a 5 in (12.7 cm) base.
You make each pocket from the bottom up: a flat circle base, a turning round, twelve rounds of tapestry-crochet stripes, and a scalloped rim. Then you crochet two flat straps, fold loops for the dowels and ring, and sew the pockets in between the straps.
Finished Size and Construction
- Finished size: about 9 in (22.9 cm) wide x 23 1/2 in (59.7 cm) tall
- Skill level: Intermediate (tapestry color changes)
- Terminology: US crochet terms
- Yarn weight: Worsted (#4)
- Hook: 5.0 mm (H-8)
- Number of pieces: 5 crocheted pieces (3 pockets, 2 straps), plus 3 dowels and 1 ring
- Layout: 3 pockets stacked in a single vertical column
- Pocket size: 5 in (12.7 cm) base, about 5.4 in (13.7 cm) across the opening, 4 in (10.2 cm) tall
- Pocket height before rim: 3.25 in (8.3 cm)
- Rim depth: 0.75 in (1.9 cm)
- Strap size: 1 1/8 in (2.9 cm) wide x 29 in (73.7 cm) long before folding
Materials
Choose a smooth worsted yarn with good stitch definition, so the diagonal stripes look crisp. Cotton or a cotton blend holds its shape best. Soft acrylic also works, but the pockets may relax a little more over time.
- Red (Color A): 100 g, about 170 m
- Cream (Color B): 60 g, about 102 m
These quantities include a margin of about 25 percent for your gauge swatch and small differences in tension.
Tools:
- 5.0 mm (H-8) crochet hook
- 3 wooden dowels, 9 in (22.9 cm) long and 1/2 in (1.3 cm) thick
- 1 wooden ring, 2 in (5.1 cm) inner diameter
- Stitch markers (at least 6)
- Tapestry needle
- Scissors
- Measuring tape
- A standard toilet paper roll for blocking and testing the fit
Abbreviations (US Terms)
- ch – chain
- sc – single crochet
- dc – double crochet
- sl st – slip stitch
- inc – 2 sc in the same stitch
- BLO – back loop only
- MR – magic ring
- sk – skip
- st(s) – stitch(es)
- sp – space
- R / C – sc in Red / sc in Cream
Special technique – tapestry color change: Work the last sc of a color until 2 loops remain on the hook. Yarn over with the new color and pull through to finish the stitch. Carry the unused color along the top of the previous round, and work over it with each new stitch so it stays hidden inside the fabric. Keep the carried strand relaxed so it does not pull the round in.
Gauge and Checkpoints
Gauge: 14 sc x 16 rounds = 4 in (10.2 cm) in tapestry single crochet. This works out to 3.5 sts and 4 rounds per inch.
Make one complete pocket before starting the others. It is your real gauge test, and it shows whether a toilet roll fits.
Checkpoints:
- After Rnd 6 (36 sts): base measures 3 in (7.6 cm) across.
- After Rnd 10 (60 sts): base measures 5 in (12.7 cm) across and lies flat.
- After Rnd 17: wall measures 1.75 in (4.4 cm) above the turning ridge.
- After Rnd 23: wall measures 3.25 in (8.3 cm), and the opening is about 17 in (43.2 cm) around.
- Finished pocket: 4 in (10.2 cm) tall.
If your piece is too big, go down one hook size. If it is too small or the roll fits too tightly, go up one hook size. Do not add or remove stitches, because the stripe repeat and the scallop count both depend on exactly 60 stitches.
Pocket (Make 3)
Work in joined rounds. Join each round with a sl st to the first sc, then ch 1. The ch 1 does not count as a stitch. When the next round starts with a different color, make the joining sl st with that new color.
Base
With Red:
Rnd 1: 6 sc in MR, join. (6)
Rnd 2: Inc in each st around. (12)
Rnd 3: Sc 1, inc 6 times. (18)
Rnd 4: Sc 2, inc 6 times. (24)
Rnd 5: Sc 3, inc 6 times. (30)
Rnd 6: Sc 4, inc 6 times. (36)
Rnd 7: Sc 5, inc 6 times. (42)
Rnd 8: Sc 6, inc 6 times. (48)
Rnd 9: Sc 7, inc 6 times. (54)
Rnd 10: Sc 8, inc 6 times. (60)
If your base starts to look hexagonal, move the increases around a little on alternate rounds. Keep 6 increases per round.
Wall
Rnd 11 (turning round): With Red, sc in BLO of each st around, join with Red. (60) This ridge creates the clean edge where the base turns up into the wall. Attach Cream by working over it starting on Rnd 12.
Stripe rounds: Each round has 60 sc in blocks of 6 Red and 6 Cream. Every round shifts the stripes 1 stitch over, which creates the diagonal. Twelve rounds make one complete diagonal cycle.
Rnd 12: 6 R, 6 C 5 times. (60)
Rnds 13–17: On each of these rounds, let k = 1, 2, 3, 4, 5 in order. Work k C, 6 R, 6 C 4 times, 6 R, then (6 − k) C. (60)
For example, Rnd 13 is 1 C, 6 R, 6 C 4 times, 6 R, 5 C. That adds up to 1 + 48 + 6 + 5 = 60.
Rnd 18: 6 C, 6 R 5 times. (60)
Rnds 19–23: On each of these rounds, let k = 1, 2, 3, 4, 5 in order. Work k R, 6 C, 6 R 4 times, 6 C, then (6 − k) R. (60)
For example, Rnd 23 is 5 R, 6 C, 6 R 4 times, 6 C, 1 R. That adds up to 5 + 48 + 6 + 1 = 60.
Make the joining sl st of Rnd 23 with Cream. Cut Red, leaving a 6 in (15.2 cm) tail, and weave it in.
Place a marker in the first st of the round (st 1, where the joins line up) and another in st 31. These two points will be sewn to the straps. The join seam sits at st 1, so it will be hidden against a strap.
Continue straight into the rim (see Border: Scalloped Rim) before you join anything.
Strap (Make 2)
With Red:
Row 1: Ch 5, sc in 2nd ch from hook and in each ch across. (4)
Rows 2–116: Ch 1, turn, sc in each st across. (4)
The strap measures 1 1/8 in (2.9 cm) wide and 29 in (73.7 cm) long. Fasten off, leaving a 24 in (61.0 cm) tail for sewing.
Mark the fold zones. Count from Row 1 at the bottom and place markers at these rows:
- Rows 17–24: dowel loop 3 (bottom dowel)
- Rows 47–54: dowel loop 2
- Rows 77–84: dowel loop 1 (top dowel)
- Rows 109–116: ring fold
Each fold zone is 8 rows, or 2 in (5.1 cm), which is enough to wrap a 1/2 in (1.3 cm) dowel with a little ease. The flat sections between the fold zones are 16 rows, then 22, 22, and 24, from the bottom up. Together that makes 16 + 8 + 22 + 8 + 22 + 8 + 24 + 8 = 116 rows.
Make All Pieces
- Pockets: 3 total. Each uses Red for the base, turning round, and stripes, and Cream for the stripes and rim.
- Straps: 2 total, all Red.
Layout (front view):
              ( RING )
              /      \
         strap        strap
            /            \
   ====[S]==================[S]====   Dowel 1
        |      POCKET 1      |
   ====[S]==================[S]====   Dowel 2
        |      POCKET 2      |
   ====[S]==================[S]====   Dowel 3
        |      POCKET 3      |
       end                  end
Joining
Dowel loops: Fold each dowel zone toward the back of the strap so that the strap wraps around the dowel. The front of the strap stays smooth and unbroken. Whipstitch the row just below the zone to the row just above it, through both layers, to close the loop. Slide the dowel through and center it. The strap centers should sit 1.25 in (3.2 cm) in from each dowel end and 6.5 in (16.5 cm) apart.
Ring fold: Wrap Rows 109–116 over the ring toward the back, and whipstitch Row 116 to Row 108. Repeat with the second strap. The straps will form a V from the ring down to Dowel 1, each leg about 6 in (15.2 cm) long.
Pockets: Hang Pocket 1 between the straps, just below Dowel 1. Align its marked st 1 with the inner edge of the left strap and st 31 with the inner edge of the right strap. Whipstitch the pocket wall to the strap edge, matching 1 pocket round to 1 strap row, from Rnd 24 down through Rnd 17. That gives a 2 in (5.1 cm) seam on each side. Repeat with Pocket 2 below Dowel 2 and Pocket 3 below Dowel 3.
Tension: Keep the whipstitches snug but not tight. Pulling too hard puckers the stripes.
Size checkpoint: The inner edges of the straps should be about 5.4 in (13.7 cm) apart. This matches the pocket opening, so each pocket hangs as a gentle oval instead of being stretched or squashed.
Border: Scalloped Rim
The rim is worked on each pocket right after Rnd 23, before you join the pieces. With Cream:
Rnd 24: Sc in each st around, join. (60)
Rnd 25: Ch 1, sc in first st, sk 2, 5 dc in next st, sk 2, sc in next st 9 times, sk 2, 5 dc in next st, sk 2, join with sl st to the first sc. (10 scallops)
Fasten off and weave in all ends.
Border gauge: Rnd 24 adds 0.25 in (0.6 cm), and the scallops add 0.5 in (1.3 cm). The total rim depth is 0.75 in (1.9 cm).
Counts per side: Between the two strap points (st 1 and st 31), each half of the pocket has 30 sts. Each half gets exactly 5 scallops.
Why the math works: Each scallop uses 6 sts (1 sc base, 2 skipped, 1 dc base, 2 skipped). That means 60 ÷ 6 = 10 scallops with nothing left over. Because 60 is also a multiple of the 12-stitch stripe repeat, the stripes and scallops both close neatly with no partial repeat at the join.
Final Blocking
- Wrap a toilet roll in a plastic bag.
- Lightly spray each pocket with water (for cotton), or hold a steamer just above it (for acrylic).
- Slide the wrapped roll into the pocket and shape the walls around it.
- Pinch each scallop into an even, rounded curve.
- Pin the straps flat, keeping them 1 1/8 in (2.9 cm) wide.
- Let everything dry completely before you assemble or hang the holder.
Final Quality-Control Checklist
- Each base lies flat at 5 in (12.7 cm).
- Every stripe round has exactly 60 sts.
- The diagonals step evenly by 1 stitch each round with no breaks.
- No carried strands show on the outside.
- Each pocket has 10 even scallops.
- Each pocket is 4 in (10.2 cm) tall.
- Both straps have 116 rows and matching fold zones.
- Dowel loops are tight, and the dowels are centered.
- Strap inner edges are 5.4 in (13.7 cm) apart.
- The pocket join seams are hidden against the left strap.
- All ends are woven in securely.
Troubleshooting
- Base ruffles: Your tension is loose. Go down a hook size, or spread the increases out more evenly.
- Base cups upward: Your tension is tight. Go up a hook size.
- Stripes look stair-stepped or broken: Recount each round. The first block should grow by 1 stitch each round and the last block should shrink by 1.
- Carried yarn shows through: Keep the carried strand along the top of the stitches and work snugly over it.
- Pocket looks narrower than the base: A tight carried strand is pulling the round in. Leave a little more slack.
- Scallops flare: Use 4 dc instead of 5 dc, keeping the same skips.
- Holder tilts: Check that both straps have 116 rows and that the fold zones match.
- Roll falls out of a pocket: Extend the side seams down one or two more rounds.
Care
Remove the dowels and ring before washing. Hand wash in cool water and lay flat to dry, reshaping each pocket around a roll.

Final Notes
The measurement chain runs like this: 14 sc and 16 rounds per 4 in (10.2 cm) give a 5 in (12.7 cm) base of 60 sts. Those 60 sts make a 17 in (43.2 cm) wall that stands 3.25 in (8.3 cm) tall. The 0.75 in (1.9 cm) rim brings each pocket to 4 in (10.2 cm). Three pockets hang between two 29 in (73.7 cm) straps, which wrap around 9 in (22.9 cm) dowels, for a finished holder about 23 1/2 in (59.7 cm) tall.
Check your first pocket against every checkpoint, and the other two will follow easily.
Happy crocheting!