

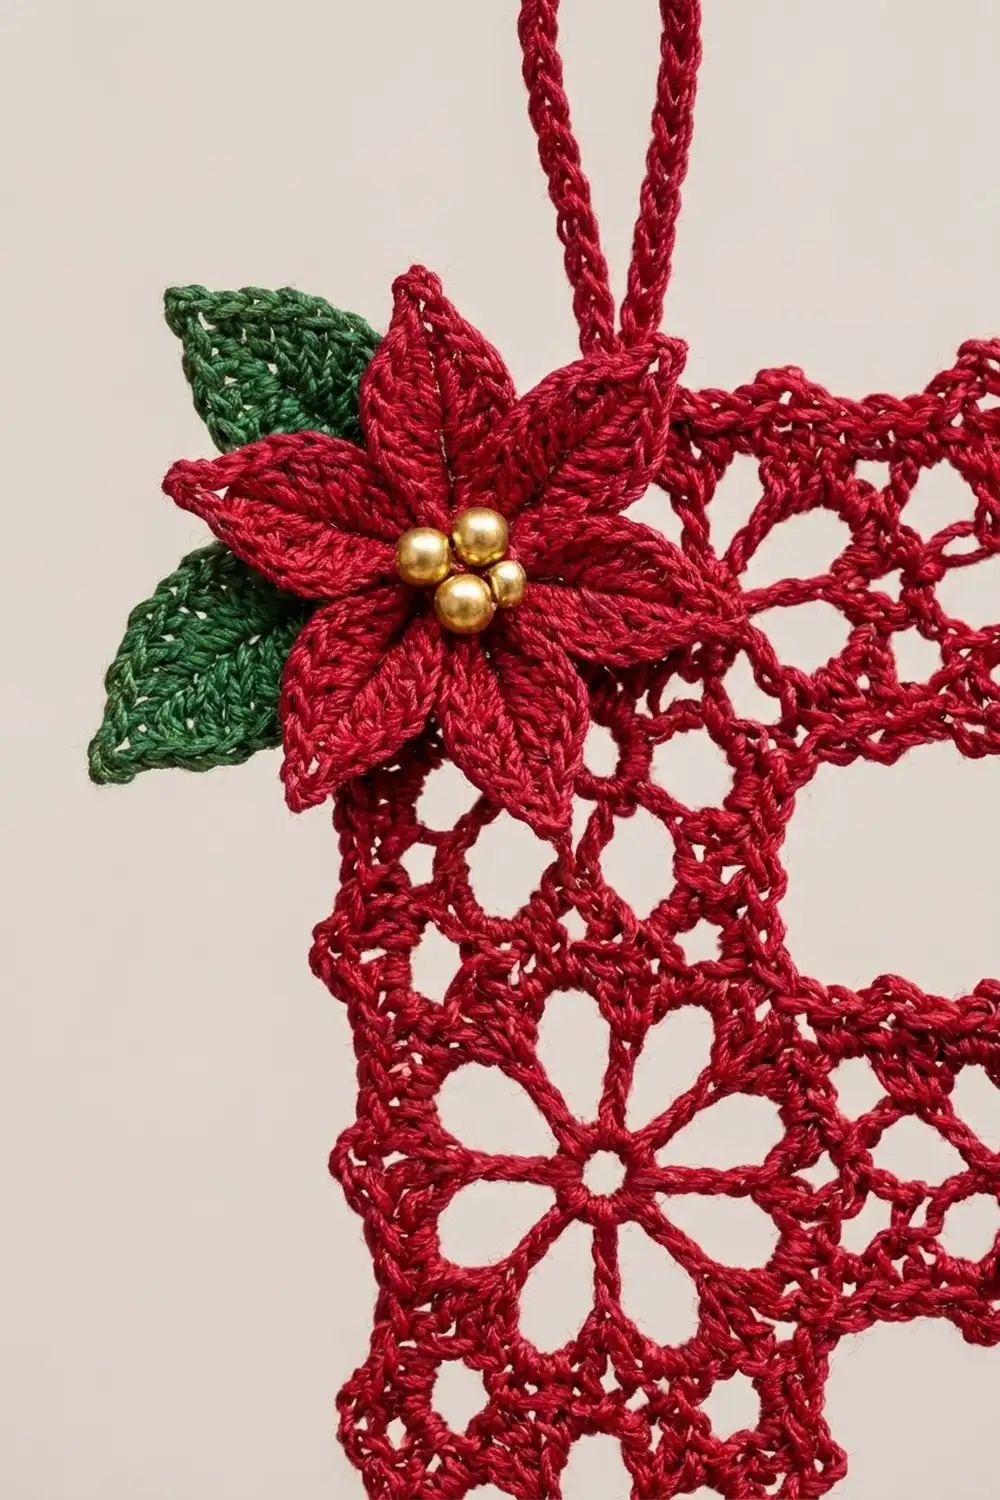
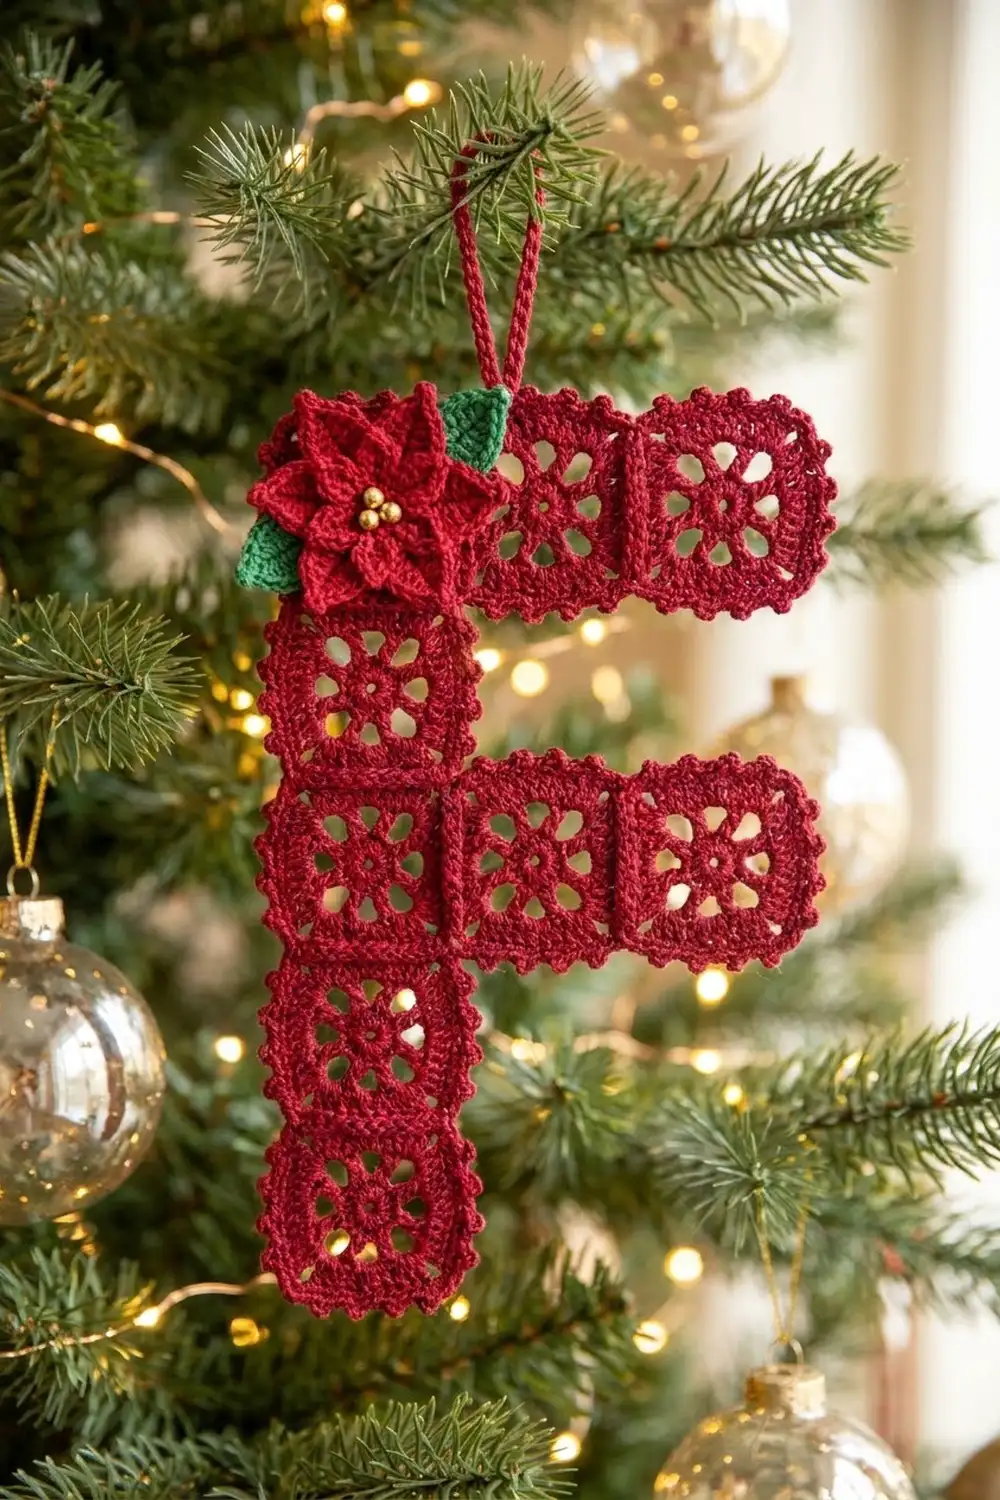
This ornament is a lacy capital letter F in deep cranberry red, trimmed with a picot edge and topped with a small poinsettia. Each square in the letter holds an open eight-loop flower, so lots of light comes through when it hangs on the tree.
The palette is simple: cranberry red thread for the letter, the poinsettia and the hanging loop, forest green for two leaves, and three small gold beads for the flower center. It looks like vintage thread lace with a clean, modern letter shape.
The pattern uses US crochet terms. The finished ornament measures 4.25 in (10.8 cm) wide across the top bar and 6.75 in (17.1 cm) tall, not counting the hanging loop.
Construction is simple. You make eight small square lace motifs, sew them into an F shape, then work a two-round picot border around the whole outline. Next you make the poinsettia and leaves separately, sew them over the top-left corner, and add a chain hanging loop.
Finished Size and Construction
- Finished size: 4.25 in (10.8 cm) wide x 6.75 in (17.1 cm) tall
- Skill level: Intermediate
- Terminology: US crochet terms
- Yarn weight: Lace (0), size 10 cotton crochet thread
- Hook: 1.75 mm steel hook
- Number of pieces: 8 lace motifs + 1 two-layer poinsettia + 2 leaves
- Layout: F shape on a 3-column x 5-row grid (8 squares used)
- Motif size: 1.25 in (3.2 cm) square
- Size before border: 3.75 in (9.5 cm) x 6.25 in (15.9 cm)
- Border depth: 0.25 in (0.6 cm) per side
Materials
Use mercerized cotton thread in size 10. It gives crisp stitch definition, holds its shape after blocking and doesn’t fuzz. Avoid acrylic thread here, since it won’t hold a pinned shape as well.
- Cranberry red, size 10 cotton thread: 15 g, about 42 m (letter, border, poinsettia, loop)
- Forest green, size 10 cotton thread: 2 g, about 6 m (leaves)
- 3 gold round beads, 4 mm
- 1.75 mm steel crochet hook
- Fine tapestry needle (thread-size eye)
- Fine beading or sewing needle and red sewing thread
- Blocking mat, rustproof pins, spray bottle
- Optional: light spray starch
All quantities include a margin of about 20 percent for swatching and weaving in ends.
Abbreviations (US Terms)
- ch – chain
- sl st – slip stitch
- sc – single crochet
- hdc – half double crochet
- dc – double crochet
- sk – skip
- sp – space
- MR – magic ring
- st(s) – stitch(es)
Special stitch: Picot – Ch 3, sl st in 3rd ch from hook.
Gauge and Checkpoints
Make one complete motif before anything else, block it lightly, and measure it. Gauge here is the motif itself.
Gauge: One motif = 1.25 in (3.2 cm) square, with 15 sc per side, which is 12 sc per inch.
Checkpoints for the test motif:
- After Round 1: circle about 0.5 in (1.3 cm) across
- After Round 2: about 0.8 in (2.0 cm) across, loops to loops
- After Round 3: about 1.1 in (2.8 cm) across, corner to corner along one side
- After Round 4: 1.25 in (3.2 cm) per side
If your motif is too big, go down to a 1.5 mm hook, or tighten the ch-5 loops in Round 2. If it’s too small, go up to a 2.0 mm hook. Don’t change the stitch counts. The border math depends on exactly 15 sc per side.
Lace Motif (Make 8)
Use cranberry red.
Round 1: MR, ch 3 (counts as dc), 15 dc in ring, join with sl st to top of ch-3. Pull the ring closed tightly. (16 dc)
Round 2: Ch 1, sc in same st as join, ch 5, sk next dc, sc in next dc, ch 5, sk next dc; repeat from * 6 more times, join with sl st to first sc. (8 sc, 8 ch-5 loops)*
These eight loops form the flower petals in the center of each square.
Round 3: Sl st into first ch-5 loop. Ch 3 (counts as dc), (2 dc, ch 2, 3 dc) in same loop for the first corner. Ch 3, sc in next loop, ch 3, (3 dc, ch 2, 3 dc) in next loop; repeat from * 2 more times, ch 3, sc in last loop, ch 3, join with sl st to top of beginning ch-3. (24 dc, 4 sc, 8 ch-3 sps, 4 corner ch-2 sps)*
Alternating corner and side loops is what turns the round flower into a square.
Round 4: Sl st in next 2 dc and into corner ch-2 sp. Ch 1, (sc, ch 2) in same sp. Sc in next 3 dc, 3 sc in ch-3 sp, sc in next sc, 3 sc in next ch-3 sp, sc in next 3 dc, (sc, ch 2, sc) in corner sp; repeat from * 2 more times. Sc in next 3 dc, 3 sc in ch-3 sp, sc in next sc, 3 sc in next ch-3 sp, sc in next 3 sts (2 dc and beginning ch-3), sc in first corner sp, join with sl st to first sc. (60 sc, 4 corner ch-2 sps)*
Per-side count: 1 corner sc + 13 sc + 1 corner sc = 15 sc per side. The ch-2 corner spaces are not counted as stitches.
Fasten off, leaving a 6 in (15.2 cm) tail on four motifs to use for sewing. Weave in the other ends.
Make All Pieces
Make 8 lace motifs in cranberry red, all to 1.25 in (3.2 cm) square. Lightly steam or pin each one square before joining.
Layout grid (X = motif, . = empty), rows top to bottom:
Row 1:  X X X    (top bar: A1 A2 A3)
Row 2:  X . .    (stem: B1)
Row 3:  X X .    (middle bar: C1 C2)
Row 4:  X . .    (stem: D1)
Row 5:  X . .    (stem: E1)
Total: 3 + 1 + 2 + 1 + 1 = 8 motifs.
Joining
Method: Whipstitch through the back loops with the cranberry tails, right sides facing up and edges butted together.
Stitch-to-stitch logic: Each shared edge has 15 sc on each motif. Match corner sc to corner sc and sew 15 pairs, one stitch to one stitch. Also catch the two matching corner ch-2 spaces at each end so you don’t get a gap. Joining adds no stitches.
Joining order (7 seams):
- Stem: A1 to B1, B1 to C1, C1 to D1, D1 to E1 (4 seams)
- Top bar: A1 to A2, A2 to A3 (2 seams)
- Middle bar: C1 to C2 (1 seam)
That makes 7 seams x 15 pairs = 105 stitch pairs in total.
Tension: Pull each whipstitch just snug enough that the edges lie flat side by side. If you pull too hard the seam puckers and the letter curves. If it’s too loose, the squares gap apart.
Size checkpoint: The joined letter should measure 3.75 in (9.5 cm) across the top bar, 6.25 in (15.9 cm) down the stem, and 1.25 in (3.2 cm) across the stem.
Border
Border gauge: 12 sc per inch along every edge, the same as the motifs.
The F outline has 18 motif edges, 7 outer (convex) corners and 3 inner (concave) corners. Every motif edge gives exactly 15 sc.
Border Round 1: With right side facing, join cranberry red in the first sc of A1’s top edge (the corner sc just right of the top-left corner space). Ch 1, sc in same st. Work clockwise around the letter:
- Sc in each sc along every motif edge (15 per edge).
- At each of the 7 outer corners, ch 2, skipping over the motif’s corner ch-2 sp. The last outer corner is the top-left corner, where you ch 2 before joining.
- At seams that run along the outline, and at the 3 inner corners, skip the sewn corner ch-2 spaces and go straight to the next motif’s first sc.
Join with sl st to first sc. (270 sc, 7 corner ch-2 sps)
Counts per run, clockwise from the top left:
- Top edge (A1 to A3): 3 edges = 45 sc
- Right end of top bar (A3): 15 sc
- Underside of top bar (A3, A2): 2 edges = 30 sc
- Stem right side, row 2 (B1): 15 sc
- Top of middle bar (C2): 15 sc
- Right end of middle bar (C2): 15 sc
- Underside of middle bar (C2): 15 sc
- Stem right side, rows 4–5 (D1, E1): 2 edges = 30 sc
- Bottom (E1): 15 sc
- Left side (E1 up to A1): 5 edges = 75 sc
45 + 15 + 30 + 15 + 15 + 15 + 15 + 30 + 15 + 75 = 270 sc, which is 18 edges x 15 sc.
Size checkpoint: 4.0 in (10.2 cm) x 6.5 in (16.5 cm).
Border Round 2 (picot): Ch 1. On each 15-sc edge work: sc in next 2 sc, picot, sc in next 3 sc, picot; repeat from * 3 more times, sc in last sc. That is 15 sc and 5 picots per edge. At each outer corner ch-2 sp work (sc, picot, sc). Join with sl st to first sc and fasten off. (284 sc, 97 picots)*
Why the math works: Each 15-sc edge runs 2 + (3 x 4) + 1 = 15, so on every edge the picots fall after sc 2, 5, 8, 11 and 14. Where two edges meet at a seam or an inner corner, the last sc of one edge plus the first 2 sc of the next make the same 3-sc gap, so the spacing never breaks. At each outer corner, the corner picot has 2 sc before it and 3 after, which keeps it close to the same rhythm. Totals: 18 edges x 15 sc = 270, plus 7 corners x 2 sc = 14, which gives 284 sc. Picots: 18 x 5 = 90, plus 7 corner picots = 97.
Poinsettia and Leaves
Back layer (cranberry): MR, ch 1, 10 sc in ring, join. (10 sc) Ch 6, sl st in 2nd ch from hook, sc in next ch, hdc in next ch, dc in next 2 ch, sk next sc on ring, sl st in next sc; repeat from * 4 more times. (5 petals)* Fasten off. This layer is about 1.5 in (3.8 cm) across.
Front layer (cranberry): MR, ch 1, 10 sc in ring, join. (10 sc) Ch 4, sl st in 2nd ch from hook, sc in next ch, hdc in next ch, sk next sc, sl st in next sc; repeat from * 4 more times. (5 petals)* Fasten off. This layer is about 1 in (2.5 cm) across.
Stack the front layer on the back layer with the petals offset so each small petal sits between two large ones. Sew through both centers. Then sew 3 gold beads in a tight cluster in the middle.
Leaf (make 2, green): Ch 9. Sl st in 2nd ch from hook, sc in next ch, hdc in next ch, dc in next 2 ch, hdc in next ch, sc in next ch, sl st in last ch. (8 sts) Then work along the opposite side of the foundation chain back toward the tip: sl st in first ch, sc, hdc, dc in next 2 ch, hdc, sc, sl st in last ch. (8 sts) Work a picot at the tip and fasten off. Each leaf is about 0.9 in (2.3 cm) long.
Placement: Center the poinsettia over the top-left corner of A1 so it overlaps the top edge and the left edge a little. Tuck the two leaves behind the petals, one pointing up-left and one pointing left, so they peek out past the left edge. Sew them invisibly from the back.
Hanging loop: Join cranberry in the 7th sc of A1’s top edge, between picots. Ch 36 and sl st in the same sc. Then sl st in each ch back around the loop to make a firm cord. Fasten off. The loop stands about 1.5 in (3.8 cm) above the letter.
Final Blocking
- Soak the ornament in cool water for 5 minutes, then roll it in a towel to press out excess water.
- Lay it right side up on the blocking mat.
- Pin the 7 outer corners first, measuring 4.25 in (10.8 cm) across the top bar and 6.75 in (17.1 cm) down the left side.
- Pin the 3 inner corners next so they come out crisp and square.
- Pin out each picot along the edges, or at least every second one.
- Ease the eight flower centers open with a pin tip.
- Mist with light starch if you’d like a stiffer ornament. Keep the poinsettia raised and don’t flatten it.
- Let it dry completely before you unpin it.
Final Quality-Control Checklist
- Each motif is 1.25 in (3.2 cm) square, with 15 sc per side
- 7 seams, each lying flat, with no gaps at the corners
- Border Round 1 totals 270 sc
- Border Round 2 has 284 sc and 97 picots, evenly spaced
- Finished size is 4.25 in (10.8 cm) x 6.75 in (17.1 cm)
- Poinsettia is secure, beads are tight, and the leaves don’t flop
- Hanging loop is firmly anchored
- All ends are woven in and trimmed
Troubleshooting
- Motif cups: The ch-5 loops are too short. Loosen your chains a little or check the Round 3 counts.
- Motif ruffles: The chains are too loose. Go down a hook size.
- Holes at the seam corners: Catch both corner ch-2 spaces when you whipstitch.
- Border total isn’t 270: You probably worked into a skipped seam space. Count each run against the list.
- Picots bunch at the corners: Check that each corner has (sc, picot, sc) and no extra sc.
- Letter leans: Re-block, pinning the left side in a straight line first.
Care
Hand wash in cool water with mild soap, then reshape and dry flat. Store flat or hanging, away from crushing weight.
Final Notes
The measurement chain is simple: 15 sc per side gives a 1.25 in (3.2 cm) motif. Eight motifs make a 3.75 in (9.5 cm) x 6.25 in (15.9 cm) letter. 18 edges x 15 sc gives 270 border stitches, and the picot round takes it to 4.25 in (10.8 cm) x 6.75 in (17.1 cm). If you check each step as you go, the finished ornament will come out right.
Happy crocheting!