
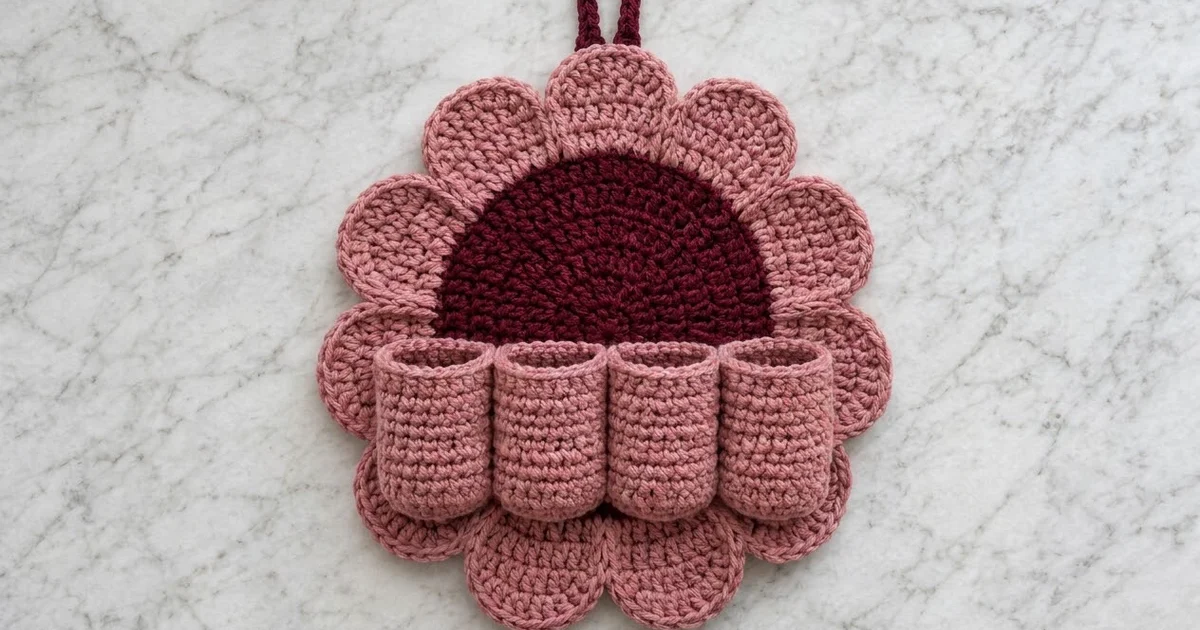
The Rosewood Bloom is a flower-shaped wall organizer with a deep burgundy center, twelve dusty-pink petals and a row of four pink pockets across the front. It hangs from a short burgundy loop and holds pens, a small notepad, a phone and a remote by your desk or door.
The look is soft and graphic. Two colors keep it calm, and solid stitches keep it sturdy. The pockets are small tubes with flat bases, so pens stand upright and don’t slide out.
This pattern uses US crochet terms. The finished organizer is 12.5 in (31.8 cm) across the petals and about 14.5 in (36.8 cm) tall including the loop.
You will make one dc disc, twelve teardrop petals, four sc pockets and one strip for the loop. You sew the petals behind the disc, work a slip-stitch border to lock the outer edge, then sew on the pockets and loop.
Finished Size and Construction
- Finished size: 12.5 in (31.8 cm) diameter; 14.5 in (36.8 cm) tall with loop
- Skill level: Intermediate
- Terminology: US
- Yarn weight: Worsted (#4), cotton or cotton blend
- Hook: 5.0 mm (H-8)
- Number of pieces: 18 (1 disc, 12 petals, 4 pockets, 1 loop)
- Layout: 12 petals around the disc; 4 pockets in one row across the lower half
- Piece sizes: disc 7.5 in (19.1 cm); petal 2.75 in (7.0 cm) wide x 3 in (7.6 cm) tall; pocket 1.9 in (4.8 cm) diameter x 3 in (7.6 cm) tall
- Size before border: 12.5 in (31.8 cm)
- Border depth: about 0.1 in (0.3 cm); it adds no measurable width
Materials
Choose a smooth worsted cotton or cotton blend. Cotton holds its shape on a wall and keeps the pockets upright. Acrylic also works, but the pockets will be softer.
- Burgundy (Color A): 45 g, about 85 m (93 yd), for the disc and loop
- Dusty pink (Color B): 110 g, about 209 m (229 yd), for the petals, pockets, border and sewing
These amounts include a margin of roughly 15-20% for gauge differences and sewing tails.
Tools:
- 5.0 mm (H-8) crochet hook
- Tapestry needle
- Scissors
- Stitch markers (at least 12)
- Pins and a blocking mat
- Spray bottle
- Measuring tape
Abbreviations (US Terms)
- ch – chain
- sl st – slip stitch
- sc – single crochet
- hdc – half double crochet
- dc – double crochet
- MR – magic ring
- BLO – back loop only
- st(s) – stitch(es)
- rnd – round
Special stitch – valley sl st: insert the hook through the stated stitch of the current petal and the stated stitch of the next petal together. Yarn over and pull through both layers and the loop on the hook.
Gauge and Checkpoints
Gauge: 14 dc = 4 in (10.2 cm); 16 sc and 18 sc rnds = 4 in (10.2 cm).
Make the disc first. It is your gauge swatch and the most important measurement in the project. Measure it flat, without stretching.
- Disc after Rnd 3: 3.25 in (8.3 cm)
- Disc after Rnd 5: 5.25 in (13.3 cm)
- Disc after Rnd 7: 7.25 in (18.4 cm)
- Disc after Rnd 8: 7.5 in (19.1 cm)
- Petal before edging: 2.25 in (5.7 cm) wide x 2.5 in (6.4 cm) tall
- Petal after edging: 2.75 in (7.0 cm) wide x 3 in (7.6 cm) tall
- Pocket base (Rnd 4): 1.9 in (4.8 cm)
If your disc is larger than 7.5 in (19.1 cm), go down to a 4.5 mm hook. If it’s smaller, go up to a 5.5 mm hook. A difference of 0.25 in (0.6 cm) is fine. More than that changes how the petals sit.

Center Disc (Color A, make 1)
The increases are staggered from round to round, as written, so the disc stays round instead of turning hexagonal. The ch 3 at the start of each round counts as 1 dc.
Rnd 1: MR, ch 3, 11 dc in ring, sl st to top of ch-3. (12 sts)
Rnd 2: Ch 3, dc in same st, 2 dc in each st around, sl st to join. (24 sts)
Rnd 3: Ch 3, dc in same st, dc in next st, 2 dc in next st, dc in next st 11 times, sl st to join. (36 sts)
Rnd 4: Ch 3, dc in next st, 2 dc in next st, dc in next 2 sts, 2 dc in next st 11 times, sl st to join. (48 sts)
Rnd 5: Ch 3, dc in next st, 2 dc in next st, dc in next st, dc in next 2 sts, 2 dc in next st, dc in next st 11 times, sl st to join. (60 sts)
Rnd 6: Ch 3, dc in next 2 sts, 2 dc in next st, dc in next st, dc in next 3 sts, 2 dc in next st, dc in next st 11 times, sl st to join. (72 sts)
Rnd 7: Ch 3, dc in next 2 sts, 2 dc in next st, dc in next 2 sts, dc in next 3 sts, 2 dc in next st, dc in next 2 sts 11 times, sl st to join. (84 sts)
Rnd 8 (trim round): Ch 1, sc in each st around, sl st to first sc. (84 sc + 0 added = 84 sts)
Fasten off. The disc now measures 7.5 in (19.1 cm).
Place a marker in every 7th sc of Rnd 8 (sts 7, 14, 21 … 84). This gives you 12 sections of 7 sts, one for each petal.
Petals (Color B, make 12)
Each petal is worked in rows from the narrow base up to the rounded top, then outlined with one round of sc. The ch 3 at the start of a row counts as 1 dc.
Foundation: Ch 4.
Row 1: 2 dc in 4th ch from hook (the skipped chs count as 1 dc), turn. (3 sts)
Row 2: Ch 3, dc in same st, 2 dc in next st, 2 dc in top of turning ch, turn. (6 sts)
Row 3: Ch 3, dc in same st, dc in next 4 sts, 2 dc in top of turning ch, turn. (8 sts)
Row 4: Ch 3, dc in each st across, turn. (8 sts)
Row 5 (rounded top): Ch 1, sc in first st, hdc in next st, dc in next st, 2 dc in each of next 2 sts, dc in next st, hdc in next st, sc in last st. (10 sts)
Don’t turn. The petal now measures 2.25 in (5.7 cm) wide x 2.5 in (6.4 cm) tall.
Rnd 6 (edging): Ch 1 and rotate to work down the side. Sc in the end of Row 5, 2 sc in the end of each of Rows 4, 3 and 2, then sc in the end of Row 1 (8 sc on this side). Sc in the base of the foundation ch (1 sc). Work up the other side the same way (8 sc). Sc in each of the 10 sts of Row 5. Sl st to first sc. (8 + 1 + 8 + 10 = 27 sts)
Fasten off and leave a 12 in (30.5 cm) tail for sewing.
On each side, number the side sts from the base upward, 1 to 8. Sts 1-5 will be hidden or overlapped. Sts 6-8 on each side and the 10 top sts stay visible.
Pockets (Color B, make 4)
Work in continuous spiral rounds. Move a marker to the first st of each round.
Rnd 1: 6 sc in MR. (6 sts)
Rnd 2: 2 sc in each st around. (12 sts)
Rnd 3: Sc in next st, 2 sc in next st 6 times. (18 sts)
Rnd 4: Sc in next 2 sts, 2 sc in next st 6 times. (24 sts)
The base measures 1.9 in (4.8 cm).
Rnd 5: Sc in BLO of each st around. (24 sts) This turns the wall up from the base.
Rnds 6-17: Sc in each st around. (24 sts)
Rnd 18 (rim): Sl st in each st around. (24 sts)
Fasten off and leave a 16 in (40.6 cm) tail. The pocket is 3 in (7.6 cm) tall.
Hanging Loop (Color A, make 1)
Foundation: Ch 26.
Row 1: Sc in 2nd ch from hook and in each ch across, turn. (25 sts)
Rows 2-3: Ch 1, sc in each st across, turn. (25 sts)
Fasten off and leave a 12 in (30.5 cm) tail. The strip measures 6.25 in (15.9 cm) x 0.75 in (1.9 cm).
Make All Pieces
- Color A: 1 disc, 1 loop
- Color B: 12 petals, 4 pockets
Layout (front view; P = petal, numbered clockwise from the top; [ ] = pocket):
              P12  P1  P2
          P11              P3
         P10     DISC       P4
          P9  [ ][ ][ ][ ] P5
              P8   P7  P6
P1 sits at 12 o’clock and carries the hanging loop. The pocket row sits on the lower half of the disc and reaches onto the lower petals at each end.
Joining
Petals to disc. Lay the disc face down. Place a petal face down behind each 7-st section with its base pointing to the center, so 0.5 in (1.3 cm) of the petal sits under the disc edge. Center each petal on the 4th st of its section.
Using the petal tail, whipstitch through the back loop of each of the 7 sc of Rnd 8 and into the petal underneath. That’s 7 sts per petal x 12 petals = 84 sts, which is exactly the Rnd 8 count. No stitch is used twice and none are skipped.
Neighboring petals overlap at side st 5. Let the right-hand petal sit on top of the left-hand one all the way around. Don’t sew the overlaps yet, because the border locks them.
Tension: pull each whipstitch just snug. Pulling hard makes the disc edge pucker and the petals tilt forward.
Size checkpoint: lay the flower face up. It should measure 12.5 in (31.8 cm) across: the 7.5 in (19.1 cm) disc plus 2.5 in (6.4 cm) of visible petal on each side.
Border
Border gauge: 1 sl st into each sc of the petal edging. Slip stitches add no width, so the flower stays 12.5 in (31.8 cm) across.
Work face up with Color B. Join with a sl st in side st 6 of P1, on the side facing P12.
Border Rnd (per petal): Sl st in side sts 6, 7 and 8 (3 sts). Sl st in each of the 10 top sts (10 sts). Sl st in side sts 8, 7 and 6 on the other side (3 sts). Then work 1 valley sl st through side st 5 of this petal and side st 5 of the next petal together (1 st). Continue to side st 6 of the next petal.
That’s 3 + 10 + 3 + 1 = 17 sts per petal. Repeat for all 12 petals. (17 x 12 = 204 sts)
Sl st to the first sl st and fasten off.
Why the math works: each petal has 27 edging sts. Side sts 1-4 on both sides (8 sts) and the base st (1 st) are hidden, which leaves 27 – 9 = 18 sts. Side st 5 on each side (2 sts) goes into the shared valley sl sts, which leaves 16 visible sts. Each petal ends with one valley sl st, so the total is 16 + 1 = 17 per petal. Nothing is added, so the edge lies flat.
Final Blocking
- Weave in all ends on the flower. Leave the pocket and loop tails for now.
- Pin the flower face up on a blocking mat to 12.5 in (31.8 cm) across.
- Pin each petal tip at even spacing. Check that opposite petals measure the same.
- Mist evenly until damp. Don’t soak it.
- Let it dry completely, at least 12 hours.
- Attach the pockets. Place the four pockets in a row with their rims 0.5 in (1.3 cm) below the disc center. Their bases will sit 0.25 in (0.6 cm) above the disc’s lower edge. Flatten each pocket slightly so its front face is 2 in (5.1 cm) wide. The row spans 8 in (20.3 cm) and reaches onto P5 and P9. Whipstitch the back 12 sts of each rim to the flower, then sew down the back center and along the back half of the base. Tack neighboring pockets together with 3 stitches where they touch.
- Attach the loop. Fold the strip in half. Sew both ends to the back of P1, 0.75 in (1.9 cm) deep, so the loop rises 2 in (5.1 cm) above the petal.
- Weave in the remaining ends.
Final Quality-Control Checklist
- Disc measures 7.5 in (19.1 cm) with 84 sts in Rnd 8
- All 12 petals have 27 edging sts and match in size
- Each petal is sewn across 7 disc sts
- Border has 204 sl sts, 17 per petal
- Flower measures 12.5 in (31.8 cm) across
- All 4 pockets have 24 sts and stand 3 in (7.6 cm) tall
- Pockets sit level and centered
- Loop is centered on P1 and firmly sewn
- All ends are woven in on the back
Troubleshooting
Disc ruffles: your dc is loose. Go down a hook size.
Disc cups: your dc is tight. Go up a hook size.
Petals look lopsided: check that Rows 2 and 3 have 6 and 8 sts. A missed turning-ch stitch is the usual cause.
Gaps between petals: the petals sit too deep under the disc. Keep the overlap at 0.5 in (1.3 cm).
Organizer sags when loaded: sew a 12 in (30.5 cm) felt circle to the back.
Pockets lean forward: add a second vertical seam at the back of each pocket.
Care
Spot clean, or hand wash in cool water. Lay flat to dry and reshape the pockets while damp.

Final Notes
The measurement chain is simple. A 7.5 in (19.1 cm) disc with 84 sts divides into 12 sections of 7 sts. Each petal is 3 in (7.6 cm) tall and shows 2.5 in (6.4 cm) beyond the disc, so the flower is 12.5 in (31.8 cm) across. The 204-st slip-stitch border locks the edge without changing the size. Four 24-st pockets fill an 8 in (20.3 cm) row across the front.
Check the disc first, and the rest will follow.
Happy crocheting!