

The Rosewood Blossom Curtain is a lace window valance with flower strands hanging below it. A cream lace header with pointed edges clips to a curtain rod. Eleven burgundy chain strands hang from the points, decorated with five-petal blossoms, small cream buds, and clusters of burgundy berries.
The palette uses two colors. Butter cream is used for the petals, buds, flower centers, and header. Deep burgundy is used for the inner flower layer, the picot outlines, the stems, and the berries. The look is romantic cottage style, and light shows through every gap between the strands.
This pattern uses US crochet terms. The finished curtain measures 33 in (83.8 cm) wide and about 40.3 in (102.4 cm) from the top of the header to the bottom bud. Each blossom measures 3.5 in (8.9 cm) from petal tip to petal tip.
Construction is modular. First crochet the 12 blossoms and 87 buds separately. Then work the header in rows. Finally, chain each strand down from a header point, attaching berries, buds, and blossoms as you go.
Finished Size and Construction
- Finished size: 33 in (83.8 cm) wide x 40.3 in (102.4 cm) long
- Skill level: Intermediate
- Terminology: US crochet terms
- Yarn weight: DK (#3) cotton
- Hook: 3.5 mm (E-4)
- Number of pieces: 12 blossoms, 87 buds, 1 header, 11 strands (all joined into one curtain)
- Layout: 11 strands, alternating Flower strand (F) and Bud strand (B), starting and ending with F
- Blossom size: 3.5 in (8.9 cm) tip to tip
- Bud size: 1 in (2.5 cm) long x 0.6 in (1.5 cm) wide
- Size before header: 33 in (83.8 cm) wide x 36 in (91.4 cm) strand drop
- Header depth: 2.3 in (5.8 cm) band plus 2 in (5.1 cm) points, 4.3 in (10.9 cm) total
Materials
Use a smooth mercerized cotton or cotton blend in DK weight, about 230 m (251 yd) per 100 g. Mercerized cotton gives crisp picots, and the strands will not stretch much while hanging.
- Color A, Butter Cream: 150 g, 345 m (377 yd)
- Color B, Burgundy: 100 g, 230 m (252 yd)
Tools:
- 3.5 mm (E-4) crochet hook
- Tapestry needle
- Scissors
- Stitch markers
- Small cream yarn scraps for stuffing the buds
- 11 curtain clip rings and a rod
- Blocking mat and rustproof pins
- Spray bottle
The yarn quantities include a margin of about 20% for gauge swatches and differences in tension.
Abbreviations (US Terms)
- ch: chain
- sl st: slip stitch
- sc: single crochet
- hdc: half double crochet
- dc: double crochet
- tr: treble crochet
- sc2tog: single crochet 2 together
- sp: space
- st(s): stitch(es)
- RS / WS: right side / wrong side
Special stitches:
- Picot: ch 3, sl st in the 3rd ch from the hook.
- Berry: a 3-dc bobble. (Yo, insert hook in the indicated st, pull up a loop, yo, pull through 2 loops) 3 times, then yo and pull through all 4 loops on the hook.
- Berry trio: ch 3, work a berry in the 3rd ch from the hook, sl st in the main-strand ch where this ch-3 began. Repeat from * 2 more times. This makes 3 berries clustered at one point on the strand.
Gauge and Checkpoints
Gauge in sc: 20 sts x 22 rows = 4 in (10.2 cm).
Gauge in dc mesh: 20 sts x 9 rows = 4 in (10.2 cm).
Chain gauge: 5 ch = 1 in (2.5 cm).
Test one blossom before making the rest. It should pass these checkpoints:
- After Round 1: 0.5 in (1.3 cm) across
- After Round 3: 1.5 in (3.8 cm) across
- After Round 5: 3.25 in (8.3 cm) tip to tip
- After Round 6: 3.5 in (8.9 cm) tip to tip
If the blossom is too big, go down 0.5 mm in hook size. If it is too small, go up 0.5 mm. Check the chain gauge separately, because it controls the length of the strands. Measure a 50-ch length while it hangs freely. It should be 10 in (25.4 cm).
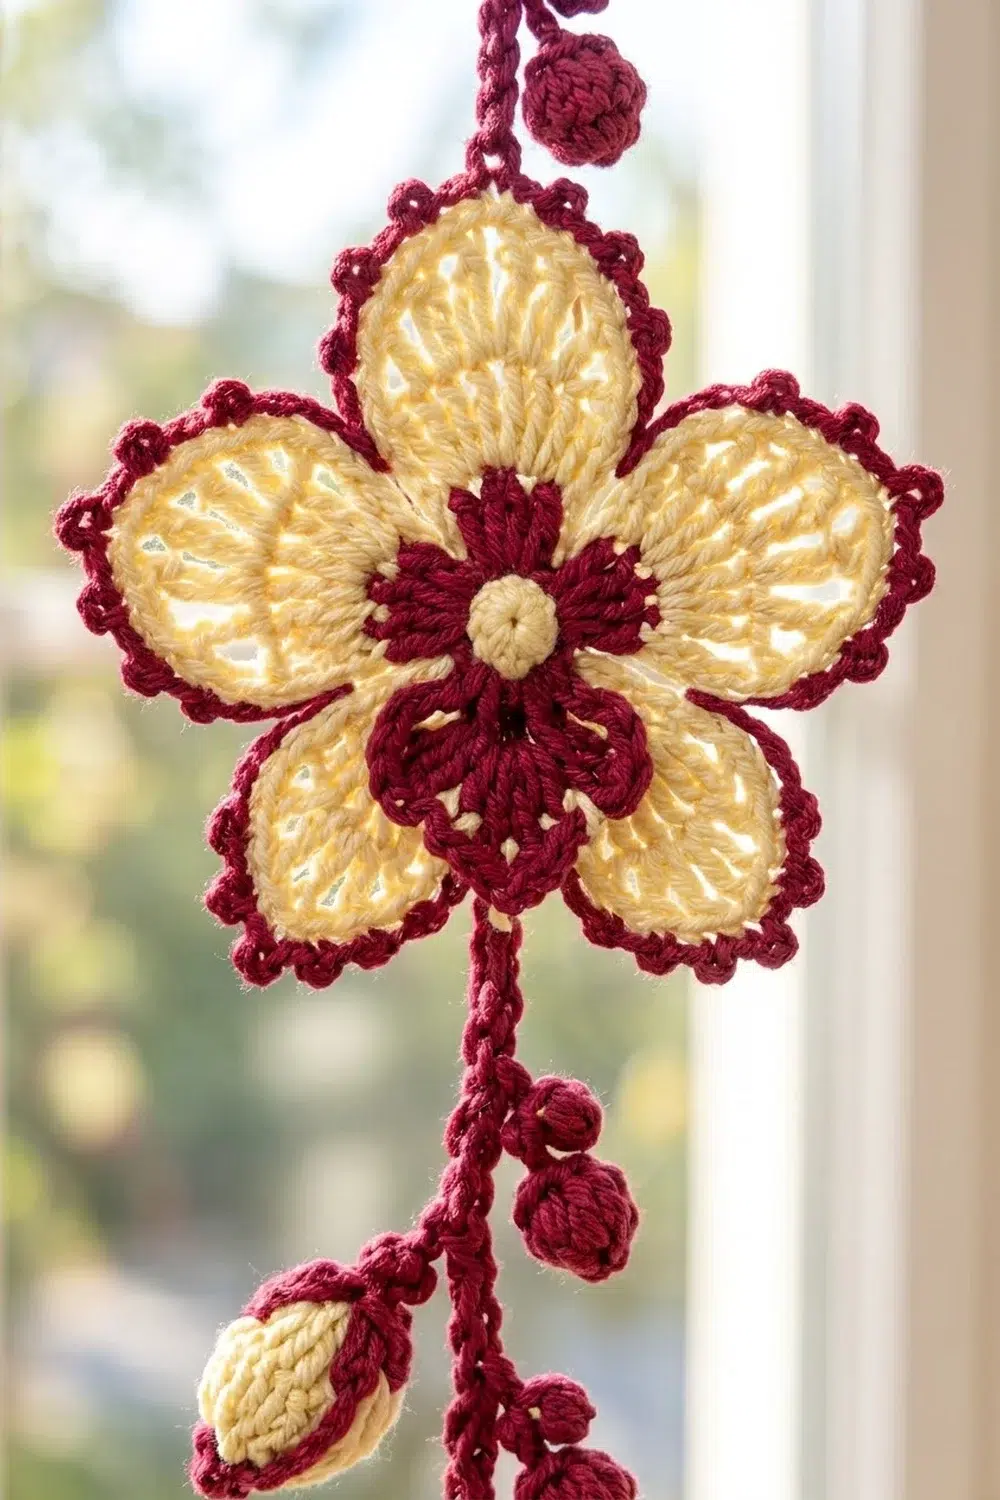
Blossom (make 12)
The blossom is a single flat piece worked in joined rounds. It has a cream button center, an inner ring of five burgundy petals, five large cream petals behind them, and a burgundy picot outline.
Round 1 (Color A): Make a magic ring. Ch 1, then work 10 sc in the ring. Pull the ring closed and sl st in the first sc. (10 sts) Fasten off. The tight ring puffs up into the raised center.
Round 2 (Color B): Join with a sl st in any sc. Ch 1, sc in the same st, ch 3, skip the next st. Sc in the next st, ch 3, skip the next st. Repeat from * 3 more times, then sl st in the first sc. (5 sc + 5 ch-3 sps)
Round 3 (Color B): In each ch-3 sp, work (sc, hdc, 3 dc, hdc, sc). Sl st in the first sc. (5 small petals, 7 sts each = 35 sts) Fasten off.
Round 4 (Color A): Work behind the burgundy petals. Join with a sl st around the back post of any Round 2 sc. Ch 5, sl st around the back post of the next Round 2 sc. Repeat from * around, with the last sl st going into the first sl st. (5 ch-5 loops)
Round 5 (Color A): In each ch-5 loop, work (sc, hdc, 2 dc, 4 tr, 2 dc, hdc, sc). Sl st in the first sc. (5 petals, 12 sts each = 60 sts) Fasten off. The tr stitches stand in ribbed lines that fan out to a rounded tip.
Round 6 (Color B): Join with a sl st in the first sc of any petal. On each petal, work [sc in the next 2 sts, picot] 5 times, sc in the last 2 sts. Sl st in the first sc. (60 sc + 25 picots)
Each petal now has 12 sc and 5 picots. The 3rd picot sits exactly over the center of the 4 tr, at the petal tip. Weave in all ends on the WS.
Bud (make 87)
Round 1 (Color A): Make a magic ring and work 5 sc in it. (5 sts) Work in a continuous spiral and mark the first st.
Round 2: Work 2 sc in each st. (10 sts)
Rounds 3–4: Sc in each st. (10 sts)
Round 5: Sc2tog 5 times. (5 sts) Stuff lightly with cream scraps. Fasten off and close the opening.
Calyx (Color B): Join with a sl st in any Round 5 st. Ch 1, sc in each st around (5 sts), then sl st in the first sc. Fasten off and weave in the ends. The burgundy cap is the top of the bud, where it attaches to its stem.
Make All Pieces
- Blossoms: 12 total (Color A Rounds 1, 4, and 5; Color B Rounds 2, 3, and 6)
- Buds: 87 total. Each Flower strand uses 7 buds (6 x 7 = 42) and each Bud strand uses 9 buds (5 x 9 = 45).
- Header: 1 piece in Color A
- Strands: 11 in Color B
Layout across the curtain, left to right, with one strand per header point:
Point:  1  2  3  4  5  6  7  8  9  10  11
Strand: F  B  F  B  F  B  F  B  F  B   F
Flowers:2  0  2  0  2  0  2  0  2  0   2   = 12
Buds:   7  9  7  9  7  9  7  9  7  9   7   = 87
Valance Header (Top Border)
The header works as the curtain’s border. It sets the width and the spacing of the strands. Each strand needs one point, and each point is worked over exactly 15 sts. That gives a starting count of 11 points x 15 sts = 165 sts. No extra stitches are added between points.
Header gauge: 20 sts = 4 in (10.2 cm), so 165 sts = 33 in (83.8 cm).
Row 1 (Color A): Ch 166. Sc in the 2nd ch from the hook and in each ch across. Turn. (165 sc)
Row 2: Ch 1, sc in each st across. Turn. (165 sc) This firm row takes the clip rings.
Row 3: Ch 4 (this counts as dc + ch 1), skip the first 2 sts, dc in the next st. Ch 1, skip the next st, dc in the next st. Repeat from * across. Turn. (83 dc + 82 ch-1 sps = 165 sts)
Rows 4–6: Ch 4 (counts as dc + ch 1). Dc in the next dc, ch 1. Repeat from * across, ending with a dc in the 3rd ch of the turning ch. Turn. (165 sts per row)
Row 7: Ch 1, sc in each dc and each ch-1 sp across. Turn. (165 sc)
Checkpoint: The band should measure 33 in (83.8 cm) x 2.3 in (5.8 cm). Fasten off.
Points (make 11): Each point is worked separately over 15 sts of Row 7. Point 1 uses sts 1–15, Point 2 uses sts 16–30, and so on, up to Point 11 on sts 151–165.
- P1 (RS): Join Color A in the first st of the section. Ch 3 (this counts as dc). Ch 1, skip the next st, dc in the next st. Repeat from * across the section. Turn. (8 dc + 7 sps = 15 sts)
- P2: Sl st in the ch-1 sp and the next dc. Ch 3 (counts as dc). Ch 1, dc in the next dc. Repeat from * until 6 dc have been worked. Turn. (6 dc + 5 sps = 11 sts)
- P3: Sl st in the ch-1 sp and the next dc. Ch 3, then work in the pattern as set until 4 dc have been worked. Turn. (4 dc + 3 sps = 7 sts)
- P4: Sl st in the ch-1 sp and the next dc. Ch 3, ch 1, dc in the next dc. Turn. (2 dc + 1 sp = 3 sts)
- P5: Ch 1. Sc in the dc, sc in the sp, sc in the top of the ch-3. (3 sc) Fasten off.
Each row loses 2 sts at each end (15, 11, 7, 3), so the point narrows evenly to a center sc. That center sc sits directly above st 8, the middle of the 15-st section. Each point measures 3 in (7.6 cm) wide and 2 in (5.1 cm) deep.
Joining: Strands
Each strand is worked from the top down. Join Color B with a sl st in the center sc of the point’s P5. Keep your chain tension even, at 5 ch per 1 in (2.5 cm).
There are two strand units:
- Unit A: Ch 10, then work a berry trio. (2 in / 5.1 cm)
- Unit B: Ch 10, then attach a bud on a side stem: ch 6, sl st in the top of a bud’s calyx, then sl st back up each of the 6 ch to the main strand. (2 in / 5.1 cm)
Flower strand (F):
- Work Unit A, B, A, B. (8 in / 20.3 cm)
- Ch 5, then sl st in the tip picot of a blossom’s top petal.
- Ch 15 behind the blossom, then sl st into the valley between its two lower petals. The blossom covers 3 in (7.6 cm).
- Work Unit A, B, A, B, A.
- Repeat Steps 2–3 for the second blossom.
- Work Unit A, B, A, B.
- Ch 5, then sl st in the calyx of the end bud. Fasten off.
Bud strand (B):
- Work [Unit A, Unit B] 8 times, then Unit A.
- Ch 5, then sl st in the calyx of the end bud. Fasten off.
Both strand types have 175 main chains: 175 ÷ 5 = 35 in (88.9 cm). The end bud adds 1 in (2.5 cm), for a drop of 36 in (91.4 cm) below each point.
Checkpoint: Hang the curtain and measure each strand. Every strand should end 36 in (91.4 cm) below its point. If a strand is short, the chains are too tight. Rework the last few units rather than adding plain chains at the bottom.
Final Blocking
- Lay the header RS up on the blocking mat. Pin it to 33 in (83.8 cm) x 4.3 in (10.9 cm), placing one pin at each point tip.
- Spritz the header until damp, not soaked.
- Lay each blossom flat. Pin it to 3.5 in (8.9 cm), with one pin in each tip picot.
- Pinch the buds into a slightly oval shape.
- Hang the curtain while it is still slightly damp. Gravity will straighten the strands.
- Let everything dry completely. Then attach the clip rings to Row 2, one above the center of each point.
Final Quality-Control Checklist
- Header Row 7 has 165 sts, and all 11 points are complete.
- Each blossom has 60 sc and 25 picots in Round 6.
- Every blossom hangs with one petal pointing straight up.
- All 87 buds are firmly attached, and their calyxes are closed.
- Flower strands and Bud strands alternate, F at both ends.
- All 11 strands are 36 in (91.4 cm) long below their points.
- All ends are woven in on the WS.
Troubleshooting
- Blossom cups or ruffles: The Round 4 loops are too short or too long. Use ch 4 for cupping or ch 6 for ruffling.
- Inner petals hidden: Work the Round 4 sl sts around the back post only, so the cream loops sit behind the burgundy petals.
- Points lean sideways: You likely missed a sl st shift at the start of a row. Each row must start one dc in.
- Strands twist: Hang a damp curtain overnight, or steam the strand lightly.
- Buds hang crooked: Center the side stem in the middle of the calyx.
Care
Hand wash in cool water with mild soap. Roll the curtain in a towel to press out water, then hang it to dry, reshaping the blossoms as it dries.
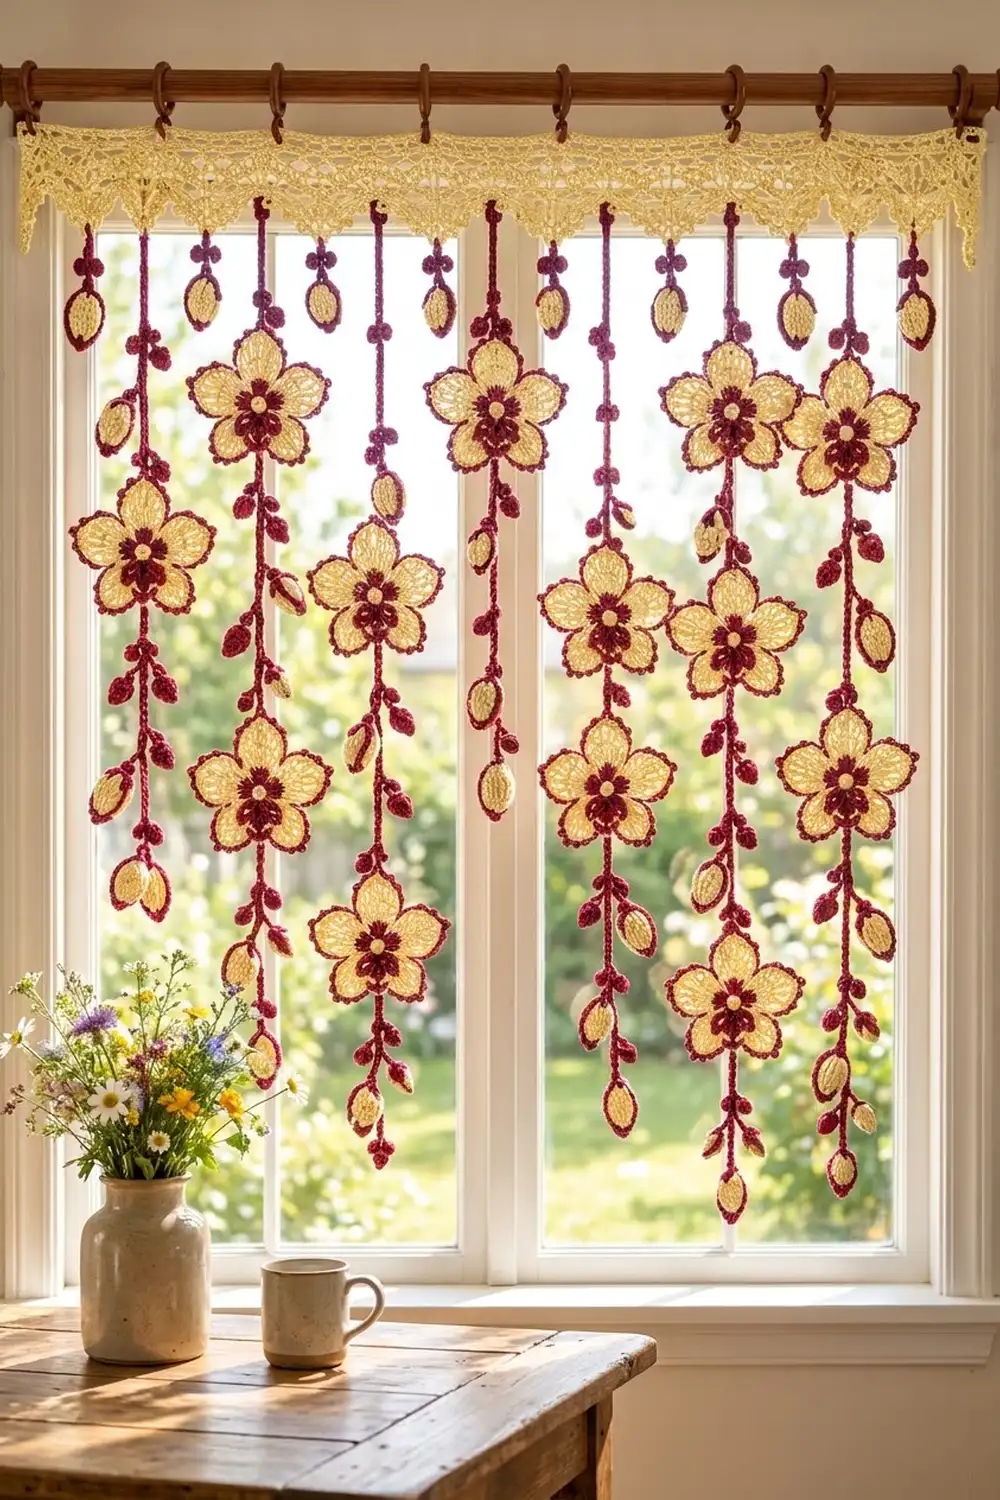
Final Notes
Everything in this curtain depends on one measurement chain. Gauge of 20 sts = 4 in (10.2 cm) gives a 165-st header that is 33 in (83.8 cm) wide. That header holds 11 points of 15 sts and 3 in (7.6 cm) each. Each point anchors one strand of 175 chains plus an end bud, for a 36 in (91.4 cm) drop. Together with the 4.3 in (10.9 cm) header, the curtain is 40.3 in (102.4 cm) long. Check each stage and the finished piece will hang evenly.
Happy crocheting!