
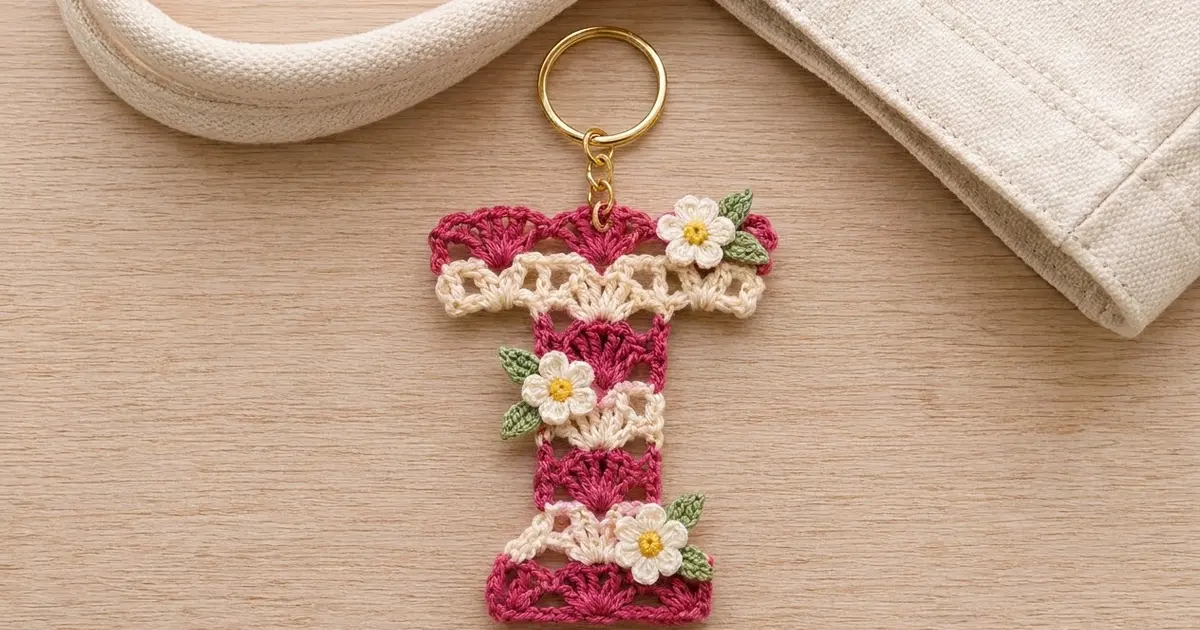
This little letter T keychain is made of raspberry shells and cream openwork mesh, stacked in alternating stripes. The base flares into three shells, the stem narrows to a slim lacy column, and the crossbar opens back out to three raspberry scallops along the top edge. Three small white flowers with yellow centers and green leaves sit on top.
The colors are raspberry pink and warm cream, with white, yellow, and green for the flowers. The style is light and vintage-inspired, a bit like a lacy doily cut into the shape of a letter. All instructions use US crochet terms.
The finished letter measures 3 in wide by 3.25 in tall (7.6 cm by 8.3 cm), not counting the hardware. With the keyring and chain added, the keychain hangs about 5 in (12.7 cm) long.
You work the T as one flat piece from the bottom up, in seven rows. You keep the right side facing on every row and change color on every row. The crossbar arms are short chain extensions added in Row 6. To finish, you work a slip-stitch edge, sew on the flowers and leaves, and attach the hardware.
Finished Size and Construction
- Finished size: 3 in x 3.25 in (7.6 cm x 8.3 cm), letter only
- Hanging length with hardware: about 5 in (12.7 cm)
- Skill level: Easy (confident beginner)
- Terminology: US crochet terms
- Yarn weight: Super Fine (#1) fingering-weight cotton
- Hook: 2.5 mm
- Number of pieces: 1 letter, plus 3 flower and 5 leaf appliqués sewn on
- Layout: single piece, no joining
- Piece size: base and crossbar 3 in (7.6 cm) wide; stem 2 in (5.1 cm) wide
- Size before border: 3 in x 3.25 in (7.6 cm x 8.3 cm)
- Border depth: slip-stitch edge, adds less than 1/16 in (0.2 cm)
Materials
Use a smooth mercerized cotton in fingering weight. It gives crisp shells and clear mesh holes, and it holds up to daily handling. Acrylic also works, but the shells look softer and the piece is harder to block flat.
- Raspberry pink (main color): 4 g, about 14 m
- Cream (contrast color): 3 g, about 10 m
- White (flower petals): 1 g, about 4 m
- Yellow (flower centers): 1 g, about 2 m
- Green (leaves): 1 g, about 3 m
These amounts include a margin for swatching and weaving in ends.
Tools:
- 2.5 mm crochet hook
- Small blunt tapestry needle
- Scissors
- 1 in (2.5 cm) gold split keyring
- Gold chain, 0.75 in (1.9 cm) long (3 to 4 links)
- Two 0.25 in (0.6 cm) gold jump rings
- 2 pairs of flat-nose pliers
- Rustproof pins, a foam blocking mat, and a spray bottle
- Optional: fabric stiffener
Abbreviations (US Terms)
- ch – chain
- sl st – slip stitch
- sc – single crochet
- hdc – half double crochet
- dc – double crochet
- sk – skip
- st(s) – stitch(es)
- rep – repeat
- RS – right side
Special stitches:
- Shell: 5 dc in the same stitch.
- Half shell: 3 dc in the same stitch.
- Standing sc / standing dc: Start with a slipknot on the hook, then work the stitch as usual into the stitch named. Use this to begin rows without a turning chain.
- Mesh space: ch 2, sk 2 sts.
Counting note: Each chain in a mesh space or an arm counts as 1 position. Positions are numbered from right to left, in the order you work them.
Gauge and Checkpoints
Gauge: 1 shell repeat (sc to sc, 6 sts) = 1 in (2.5 cm) wide. Each row is about 0.45 in (1.1 cm) tall. The foundation chain plus Row 1 together measure about 0.55 in (1.4 cm).
Before you commit, work Rows 1 to 3 as a test. Lay the piece flat without stretching it and measure.
Checkpoints:
- After Row 1: 3 in (7.6 cm) wide, 0.55 in (1.4 cm) tall
- After Row 3: stem 2 in (5.1 cm) wide; total height 1.45 in (3.7 cm)
- After Row 5: total height 2.35 in (6.0 cm)
- After Row 7: crossbar 3 in (7.6 cm) wide; total height 3.25 in (8.3 cm)
Too big? If one shell repeat measures more than 1 in (2.5 cm), switch to a 2.25 mm hook. Too small? Switch to a 2.75 mm hook. A tight foundation chain is the most common cause of size problems, so chain loosely, or make the chain with a hook one size larger.

Pattern
Work every row with the RS facing, from right to left. Don’t turn your work. At the end of each row, fasten off and leave a 4 in (10.2 cm) tail. To save weaving time later, crochet over the tails as you go.
Foundation and Row 1 – Base (Raspberry)
With raspberry, ch 20.
Row 1: Sc in 2nd ch from hook, sk 2 ch, shell in next ch, sk 2 ch, sc in next ch; rep from * 2 more times. Fasten off.
Count: 19 sts (3 shells, 4 sc).
The positions are:
- 1: sc
- 2–6: shell (center dc at 4)
- 7: sc
- 8–12: shell (center dc at 10)
- 13: sc
- 14–18: shell (center dc at 16)
- 19: sc
That makes 3 shell repeats, or 3 in (7.6 cm).
Row 2 – Narrowing Mesh (Cream)
This row narrows the piece from 19 sts to 13. You work only positions 4 to 16. The 3 sts at each end are left unworked and become the flared foot of the T.
Row 2: Join cream with a standing dc in the center dc of the first shell (position 4). Ch 2, sk 2 dc, dc in next sc (position 7). Ch 2, sk 2 dc, dc in center dc of next shell (position 10). Ch 2, sk 2 dc, dc in next sc (position 13). Ch 2, sk 2 dc, dc in center dc of last shell (position 16). Fasten off.
Count: 13 sts (5 dc + 4 mesh spaces of 2 ch).
From here on, number the stem positions 1 to 13. Stem position 1 sits directly above Row 1 position 4.
Row 3 – Stem Shells (Raspberry)
Row 3:
- Join raspberry with a standing dc in the first dc (position 1), then work 2 more dc in the same st to make a half shell.
- Sk 2 ch, sc in next dc (position 4).
- Sk 2 ch, shell in next dc (position 7).
- Sk 2 ch, sc in next dc (position 10).
- Sk 2 ch, 3 dc in last dc (position 13) for a half shell.
- Fasten off.
Count: 13 sts (3 + 1 + 5 + 1 + 3).
This row has one full center shell, with a half shell forming a partial scallop at each edge.
Row 4 – Stem Mesh (Cream)
Row 4: Join cream with a standing dc in the first dc of the half shell (position 1). Ch 2, sk 2 dc, dc in sc (position 4). Ch 2, sk 2 dc, dc in center dc of shell (position 7). Ch 2, sk 2 dc, dc in sc (position 10). Ch 2, sk 2 dc, dc in last dc (position 13). Fasten off.
Count: 13 sts (5 dc + 4 mesh spaces of 2 ch).
Row 5 – Stem Shells (Raspberry)
Row 5: Work as for Row 3.
Count: 13 sts.
Row 6 – Crossbar Mesh with Arms (Cream)
Row 6: Work as for Row 4 across all 13 positions, but don’t fasten off. Ch 3 for the left arm, then fasten off.
Right arm: With RS facing, join cream with a sl st in the top of the first dc of Row 6. Ch 3, then fasten off, pulling the tail snug through the last chain.
Count: 13 sts worked 1 per position + 6 arm ch added (3 per side) = 19 positions.
The wide positions now run as follows:
- 1–3: right-arm chains (position 1 is the outermost chain)
- 4–16: the Row 6 mesh
- 17–19: left-arm chains (position 19 is the outermost chain)
Both arms start at the top of Row 6, so they sit level with each other.
Row 7 – Crossbar Scallops (Raspberry)
Row 7:
- Join raspberry with a standing sc in the outermost chain of the right arm (position 1).
- Sk 2 ch, shell in first dc of Row 6 (position 4).
- Sk 2 ch, sc in next dc (position 7).
- Sk 2 ch, shell in next dc (position 10).
- Sk 2 ch, sc in next dc (position 13).
- Sk 2 ch, shell in last dc (position 16).
- Sk 2 arm ch, sc in the outermost chain (position 19).
- Fasten off.
Count: 19 sts (3 shells, 4 sc).
The outer shells sit over the arm chains, so the crossbar comes out the same 3 in (7.6 cm) width as the base. Checkpoint: 3 in x 3.25 in (7.6 cm x 8.3 cm).
Flowers (Make 3)
Round 1 (yellow): Make a magic ring. Ch 1, work 5 sc in the ring, then join with a sl st to the first sc. Pull the ring closed and fasten off. Count: 5 sc.
Round 2 (white): Join white in any sc. (Sl st, ch 2, 2 dc, ch 2, sl st) in the same sc, then move to the next sc; rep from * 4 more times. Join with a sl st to the first sl st. Fasten off, leaving an 8 in (20.3 cm) tail for sewing.
Count: 5 petals (10 dc). Each flower is about 0.75 in (1.9 cm) across.
Leaves (Make 5)
With green, ch 5. Sl st in 2nd ch from hook, sc in next ch, hdc in next ch, sc in last ch. Fasten off, leaving a 6 in (15.2 cm) tail.
Count: 4 sts. Each leaf is about 0.4 in (1.0 cm) long.
Border
The border is a raspberry slip-stitch edge worked across the top and bottom only. It keeps the scallops and the foundation from stretching. The side edges of the stem and arms are left plain, so the row ends stay open and lacy.
Border gauge: 1 sl st per st, which matches the body gauge of 6 sts per 1 in (2.5 cm). Keep the slip stitches loose. If your slip stitches tend to be tight, use a 2.75 mm hook.
Top edge: With RS facing, join raspberry with a sl st in the first sc of Row 7, then sl st in each st across. Count: 19 sl st. Fasten off.
Bottom edge: Rotate the piece. Join raspberry in the first foundation chain at the right, then sl st in each foundation chain across. Count: 19 sl st, one in each of the 19 chains Row 1 was worked into. Fasten off.
Side edges: 0 sts.
Why the math works: Row 7 and the foundation each have exactly 19 sts, and the border puts exactly 1 sl st in each one. Nothing is added or skipped, so the edge doesn’t ruffle or pull in. The top and bottom stay 3 in (7.6 cm) wide.
Final Blocking
- Weave in the row tails along the row ends, keeping each tail inside its own color stripe.
- Spray the letter evenly with water until it’s damp but not soaked.
- Pin it flat, RS up. Set the base and crossbar to 3 in (7.6 cm) wide and the stem to 2 in (5.1 cm) wide.
- Pin the height to 3.25 in (8.3 cm). Check that the stem is centered and the arms are level.
- Pin each of the 6 scallops into a smooth arch and open up the mesh spaces.
- If you’re using stiffener, brush on a thin coat.
- Let it dry completely, at least 6 hours.
- Sew on the appliqués with small stitches through the flower centers and leaf bases:
- One flower at the right end of the crossbar, with 2 leaves behind its right side.
- One flower on the left edge of the stem at Row 4, with 2 leaves.
- One flower at the lower right of the stem at Rows 2–3, with 1 leaf above and to the right.
- Open a jump ring and pass it through the center dc of the middle shell in Row 7 and the border sl st above it. Add the chain, then link the chain to the split ring with the second jump ring. Close both jump rings fully.
Final Quality-Control Checklist
- Rows 1 and 7 each have 19 sts and 3 shells.
- Rows 2 to 6 each have 13 sts, and Row 6 also has 3 arm ch on each side.
- The base and crossbar are 3 in (7.6 cm) wide, and the stem is 2 in (5.1 cm) wide.
- The total height is 3.25 in (8.3 cm).
- The stem is centered, and the arms match.
- No tails show on the RS.
- The appliqués are secure and lie flat.
- The jump rings are fully closed with no gaps.
Troubleshooting
The stem leans to one side. Row 2 started in the wrong place. Start it in the center dc of the first shell (position 4).
The shells look crowded. Check that you skipped exactly 2 sts or 2 ch on each side of every shell.
The mesh holes are uneven. Keep every ch-2 the same size, and work each dc into the stitch named, not into a chain.
The arms droop. Pull the outermost arm chain snug when you fasten off, and pin the arms level when blocking.
The top edge puckers. The border is too tight. Pull it out and redo it with a larger hook.
The piece curls. Block it again, and add stiffener if needed.
Care
Hand wash in cool water with mild soap, press out the water in a towel, and dry flat. Keep the hardware as dry as you can so it doesn’t tarnish.

Final Notes
All the measurements come from one number: a 6-st shell repeat equals 1 in (2.5 cm). The base and crossbar are 3 repeats over 19 sts, so they measure 3 in (7.6 cm). The stem is 2 repeats over 13 sts, so it measures 2 in (5.1 cm). Seven rows build a height of 3.25 in (8.3 cm). The border adds 19 slip stitches to the top edge and 19 to the bottom without changing the size, so the finished letter stays 3 in x 3.25 in (7.6 cm x 8.3 cm). The flowers and gold keyring are the last touches.
Happy crocheting!