

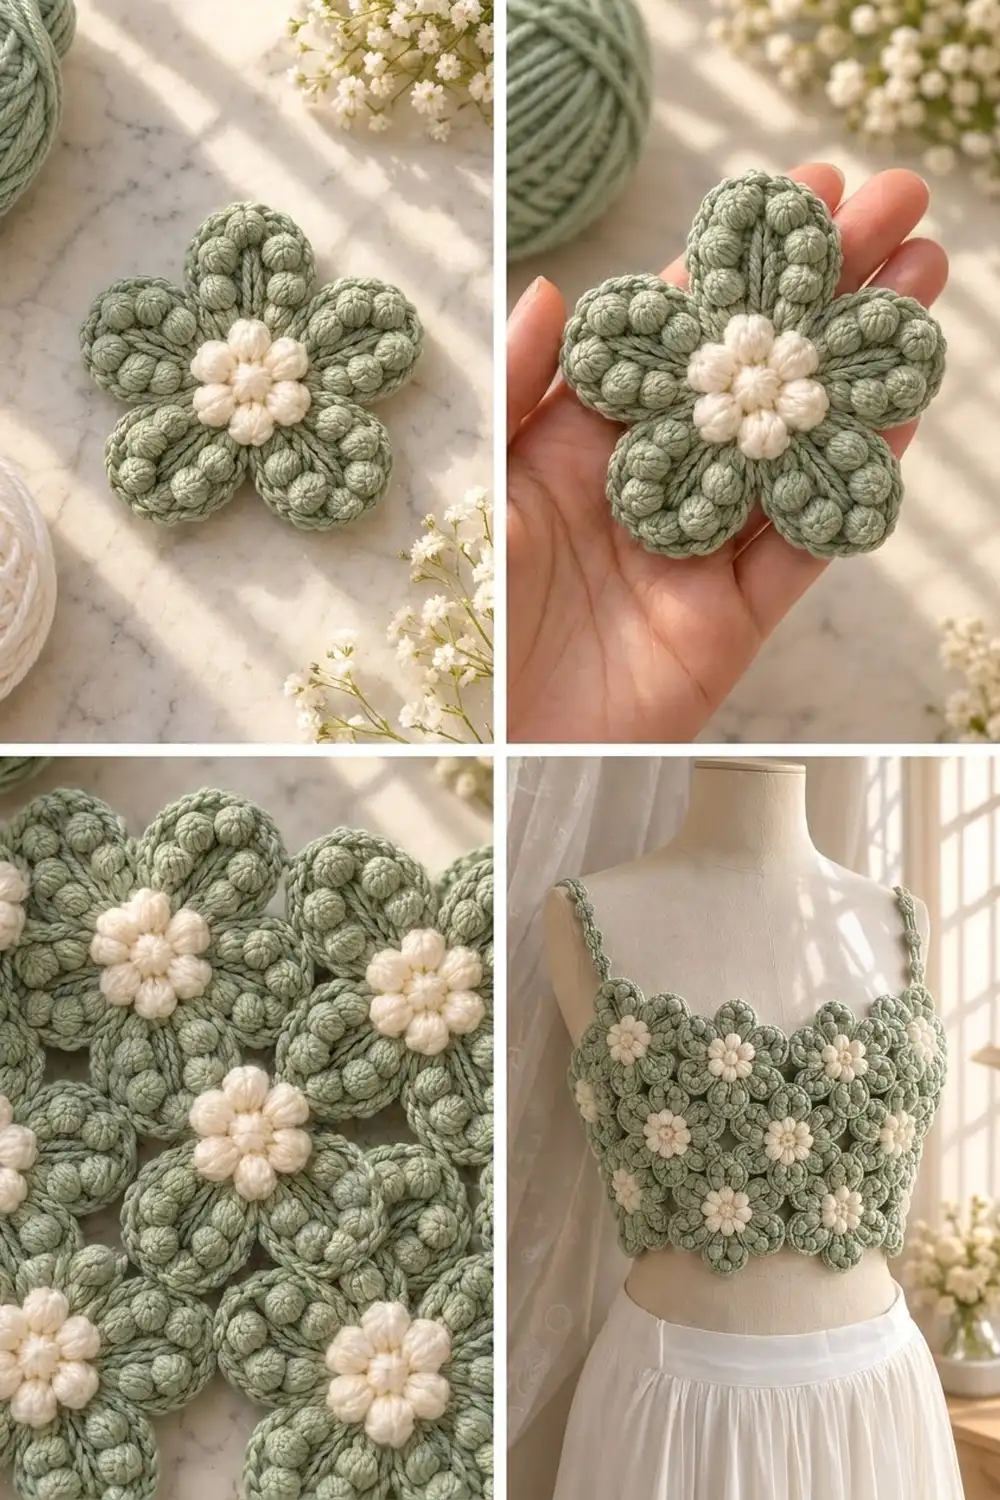
The Sage Blossom Crop Top is made of soft, sculpted flowers. Each motif has six rounded sage-green petals edged with plump bobbles, and a small cream puff-stitch flower sits in the middle of each one.
The flowers join tip to tip in a honeycomb layout. The top and bottom edges are scalloped, and two slim bobble straps hold the top up. It suits summer, festivals, or wearing over a long white skirt.
This pattern uses US crochet terms. The finished top is 32 in (81.3 cm) around and 11 in (27.9 cm) tall, including the border. It fits a bust of about 32–35 in (81.3–88.9 cm) because the lace stretches.
Construction is simple and repeats. You make one test motif, then join 24 motifs as you go in three rows that close into a tube. A two-round border finishes the top and bottom edges, and last you sew on the straps.
Finished Size and Construction
- Finished size: 32 in (81.3 cm) around × 11 in (27.9 cm) tall
- Skill level: Intermediate
- Terminology: US crochet terms
- Yarn weight: Worsted (#4) cotton or cotton blend
- Hook: 4.0 mm (G-6)
- Number of pieces: 24 flower motifs + 2 straps
- Layout: 3 offset rows of 8 motifs, joined into a tube
- Motif size: 4 in (10.2 cm) tip to tip; about 3.5 in (8.9 cm) top to bottom when the side petals point left and right
- Size before border: 32 in (81.3 cm) around × 10.5 in (26.7 cm) tall
- Border depth: 0.25 in (0.6 cm) on the top edge and 0.25 in (0.6 cm) on the bottom edge
Materials
Use a smooth mercerized or combed cotton in worsted weight, about 77 m per 50 g. Cotton shows off the bobbles clearly, holds the petal shape, and stays cool to wear. Avoid fuzzy yarn because it hides the V-shaped center line in each petal.
Yarn:
– Sage Green: 250 g (385 m), for petals, border, and straps
– Cream: 50 g (77 m), for the flower centers
Tools:
– 4.0 mm (G-6) crochet hook
– Tapestry needle
– 4 locking stitch markers
– Rust-proof pins and a blocking mat
– Measuring tape
– Spray bottle
These quantities include a margin of about 15%. Each motif uses about 7 g of green and 1.5 g of cream, and the border and straps use about 20 g of green.
Abbreviations (US Terms)
- ch – chain
- sl st – slip stitch
- sc – single crochet
- dc – double crochet
- tr – treble crochet
- rev sc – reverse single crochet (crab stitch)
- sp – space
- MR – magic ring
- st(s) – stitch(es)
Special stitches:
- Puff: (Yo, insert hook in st, yo, pull up a loop to 0.5 in [1.3 cm] tall) 4 times, so you have 9 loops on the hook. Yo and pull through all 9 loops, then ch 1 to close. The closing ch 1 does not count as a stitch.
- Bobble (4-dc bobble): (Yo, insert hook in st, yo, pull up a loop, yo, pull through 2 loops) 4 times in the same st, so you have 5 loops on the hook. Yo and pull through all 5 loops. A bobble counts as 1 stitch.
- Tip join: Replaces the usual 3 sc in a petal tip. Work (sc, sc) in the ch-2 sp, sl st into the center tip sc of the neighboring motif’s petal, then sc in the same ch-2 sp. The tip still counts as 3 sc. The sl st is not counted.
Gauge and Checkpoints
Gauge: 16 sc and 18 rows = 4 in (10.2 cm) in sc. You’ll use this gauge directly for the straps.
Make one test motif first. The motif is the real gauge for this top. Measure it before you make the other 23.
Checkpoints:
– After Round 2 (cream center): 1.25 in (3.2 cm) across
– After Round 5: 3.25 in (8.3 cm) from one petal tip to the opposite tip
– After Round 7: 4 in (10.2 cm) tip to tip, and about 3.5 in (8.9 cm) between flat sides
If your motif is too big: Go down to a 3.75 mm (F-5) hook. If it’s more than 0.25 in (0.6 cm) too big, go down to 3.5 mm (E-4).
If your motif is too small: Go up to a 4.5 mm (7) hook.
A difference of 0.25 in (0.6 cm) per motif changes the total circumference by 2 in (5.1 cm), so match the size before you go on.
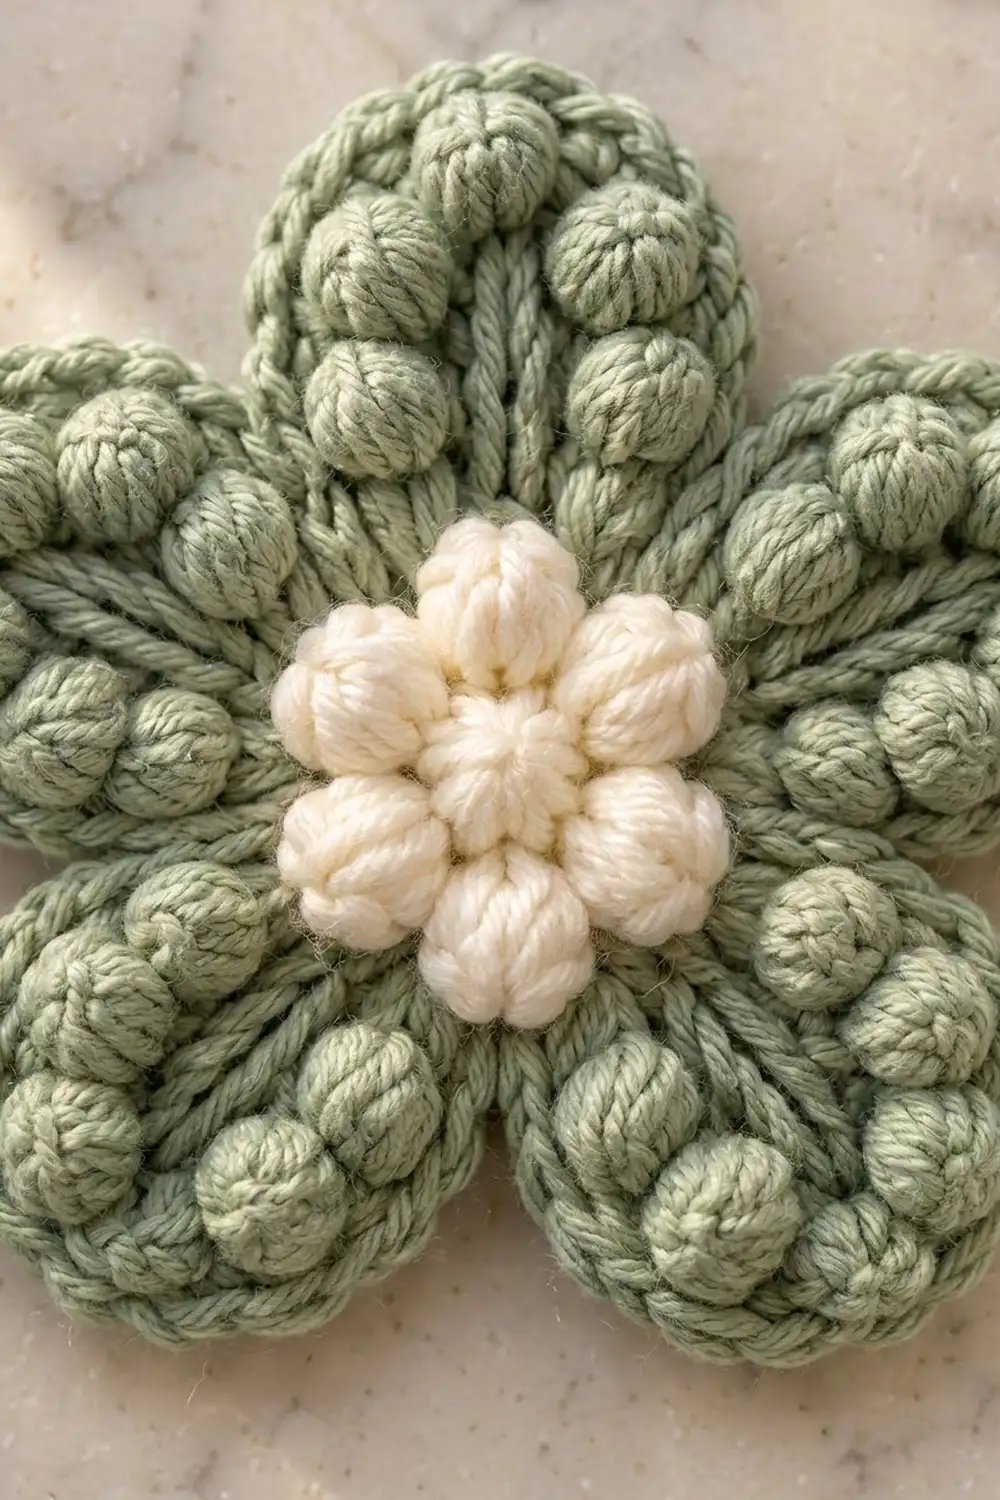
Flower Motif Pattern
Make 24.
Cream Center
Round 1: With Cream, MR, ch 1, work 6 sc in the ring. Join with a sl st to the first sc. (6 sc)
Round 2: Ch 1. (Puff in the next sc, ch 2) 6 times. Join with a sl st to the top of the first puff. (6 puffs, 6 ch-2 sps)
Pull the ring tight so it closes completely. The six puffs make the small cream flower. Fasten off.
Checkpoint: 1.25 in (3.2 cm) across.
Green Petals
Round 3: Join Sage Green in any ch-2 sp. Ch 1. (2 sc in the ch-2 sp, sc in the closing ch of the next puff) 6 times. Join to the first sc. (18 sc)
This round is worked one stitch into each puff top, plus 2 extra stitches in each space: 6 + 12 = 18 sc.
Round 4: Ch 1. (Sc in the next sc, ch 3, skip the next 2 sc) 6 times. Join to the first sc. (6 sc, 6 ch-3 sps)
Each ch-3 sp is the base of one petal.
Round 5 (petal fill): Sl st into the first ch-3 sp. In each ch-3 sp work (2 dc, 3 tr, ch 2, 3 tr, 2 dc), then sc in the next sc from Round 4. Repeat around and join with a sl st. (Per petal: 10 sts + 1 ch-2 tip; total 60 petal sts + 6 sc between petals = 66 sts, plus 6 ch-2 sps)
The two groups of tr lean toward each other at the ch-2 tip. That makes the sunken V-shaped center line down each petal.
Checkpoint: 3.25 in (8.3 cm) tip to tip.
Round 6 (bobble edge): Ch 1. Work the following for each petal:
- Sc in the first dc, bobble in the next dc, sc in the next tr, bobble in the next tr, sc in the next tr
- (Bobble, ch 2, bobble) in the ch-2 tip
- Sc in the next tr, bobble in the next tr, sc in the next tr, bobble in the next dc, sc in the last dc
- Sl st in the sc between petals
Join to the first sc. (Per petal: 10 sts worked 1-per-stitch + 2 tip bobbles + 1 sl st = 13 sts, plus 1 ch-2 sp. Total: 78 sts including 36 bobbles, plus 6 ch-2 sps)
Each petal has 3 bobbles on each side, including the tip bobbles. Push every bobble to the front (right side) as you go.
Round 7 (outline): Ch 1. For each petal: skip the sl st, sc in the next 6 sts, 3 sc in the ch-2 sp, sc in the next 6 sts. Join to the first sc. (Per petal: 15 sc; total 90 sc)
Skipping the sl st pulls the petals together at the valleys, which gives the deep rounded flower shape. The center sc of each 3-sc group is the tip sc.
For the first motif only, fasten off. On every motif after the first, you’ll work Round 7 with tip joins (see Joining).
Checkpoint: 4 in (10.2 cm) tip to tip.
Make All Pieces
- Flower motifs: 24, each with a Cream center (Rounds 1–2) and Sage Green petals (Rounds 3–7)
- Straps: 2, in Sage Green
Make Rounds 1–6 of all 24 motifs ahead of time if you like. Only Round 7 is worked during joining.
Petal positions: Lay each motif with one petal pointing right (0°). Going counterclockwise, the petals sit at 0°, 60°, 120°, 180°, 240°, and 300°.
Layout grid (every motif is GREEN with a CREAM center):
ROW 1:  F1   F2   F3   F4   F5   F6   F7   F8
ROW 2:    F9   F10  F11  F12  F13  F14  F15  F16
ROW 3:  F17  F18  F19  F20  F21  F22  F23  F24
Row 2 is shifted half a motif to the right. Each row closes into a ring, so F8 joins F1, F16 joins F9, and F24 joins F17.
Joining
Method: Join as you go on Round 7, using the tip join at each petal tip that touches a neighbor.
Joining logic:
– In each row, a motif’s 180° petal joins the 0° petal of the motif before it.
– Motifs in Row 2 join upward with their 60° and 120° petals. These connect to the 240° and 300° petals of the two Row 1 motifs above.
– Motifs in Row 3 join upward to Row 2 in the same way.
Row 2 motifs end up joined on all 6 petals. Row 1 and Row 3 motifs each have 2 free petals facing the edge.
Closing the rings: When you work Round 7 of F8, also join its 0° petal to F1’s 180° petal. Do the same for F16 with F9, and F24 with F17. Lay the strip flat and check that it isn’t twisted before you make the closing join.
Stitch logic: A tip join keeps exactly 15 sc per petal. The sl st links only the two center tip sc and adds no stitches to the count.
Tension: Keep the joining sl st snug but not tight. If you pull it too hard, the petal tips pucker. If it’s too loose, gaps open between the flowers.
Size checkpoint:
– After Row 1: 32 in (81.3 cm) around, 3.5 in (8.9 cm) tall
– After Row 2: 7 in (17.8 cm) tall
– After Row 3: 10.5 in (26.7 cm) tall
Center-to-center spacing is 4 in (10.2 cm) along a row. Each new row adds 3.5 in (8.9 cm) of height.
Border
Border gauge: The border is worked into the Round 7 sc, so it matches motif gauge. Two rounds add 0.25 in (0.6 cm) to each edge.
Per-motif edge count (Row 1 or Row 3):
– Half of the joined horizontal petal (6 side sc + 1 outer tip sc): 7 sc
– Free petal 1: 15 sc
– Free petal 2: 15 sc
– Half of the other joined horizontal petal: 7 sc
– Total: 7 + 15 + 15 + 7 = 44 sc per motif
Each motif also has 3 valleys along the edge: the 180°/120° valley, the 120°/60° valley, and the 60°/0° valley. There is 1 tip joint between neighboring motifs.
Top Edge
Border Round 1: Join Sage Green in the first sc after any tip joint on Row 1. Ch 1, then work around the top edge:
- Sc in each of the 44 edge sc of each motif.
- Ch 1 across each valley.
- At each tip joint, skip both center tip sc and sl st into the joining sl st.
Join to the first sc.
Count per edge: 8 motifs × 44 sc = 352 sc, plus 24 ch-1 valley sps (8 × 3) and 8 joint sl sts.
Border Round 2: Ch 1. Work rev sc in each sc and sl st in each ch-1 valley sp and each joint sl st. Join and fasten off. (352 rev sc, 24 valley sl sts, 8 joint sl sts)
Bottom Edge
Repeat Border Rounds 1–2 along the free petals of Row 3, which are the 240° and 300° petals. The counts are the same: 352 sc, 24 ch-1 sps, 8 joint sl sts, then 352 rev sc in Round 2.
Why the Math Works
Every edge stitch comes straight from the motif’s own Round 7. Each motif has 15 sc per petal, so two whole petals plus two 7-sc halves give 44 sc. No stitches are added at seams, because tip joints are slip stitches and valleys are spacer chains only.
So 8 × 44 = 352 on each edge. The edge follows the petal curves, and the border just firms up the scallops without changing their shape.
Straps (Make 2)
Row 1: Ch 57. Sc in the 2nd ch from the hook and in each ch across. Turn. (56 sc)
Row 2: Ch 1. Sc in the first sc, then (bobble in the next sc, sc in the next sc) 27 times, sc in the last sc. (56 sts: 29 sc + 27 bobbles)
Fasten off and leave a 10 in (25.4 cm) tail. Each strap is 14 in (35.6 cm) long and 0.5 in (1.3 cm) wide.
Attaching:
– Front: Sew one end of each strap to the top valley (the one between the two free petals) of F2 and F4. These points are 8 in (20.3 cm) apart, centered on F3.
– Back: Sew the other ends to the top valleys of F6 and F8, also 8 in (20.3 cm) apart, centered on F7.
Try the top on before you sew the back ends. For every 1 in (2.5 cm) of length you want to add or take away, add or remove 4 chains in the foundation chain.
Final Blocking
- Weave in all ends along the back of the petal outlines.
- Pin the tube flat as a double layer measuring 16 in (40.6 cm) wide × 11 in (27.9 cm) tall.
- Pin each top and bottom scallop at its petal tip so the curves are even.
- Spray until damp, but not soaked.
- Gently roll each bobble with a fingertip to round it and push it to the front.
- Let it dry completely, at least 8 hours.
- Turn the tube so the fold lines move to the other side. Mist those spots and let them dry again.
- Block the straps by pinning them straight at 14 in (35.6 cm).
Final Quality-Control Checklist
- [ ] All 24 motifs measure 4 in (10.2 cm) tip to tip
- [ ] Every petal has 6 bobbles, all facing the front
- [ ] Every Round 7 petal has 15 sc
- [ ] Every tip that touches a neighbor is joined, and there are no stray gaps
- [ ] Each row closes into a ring with no twist
- [ ] Circumference is 32 in (81.3 cm) and height is 11 in (27.9 cm)
- [ ] Each border edge has 352 sc in Round 1
- [ ] Straps are the same length and evenly placed
- [ ] Ends are woven in securely and invisibly
Troubleshooting
Cream center has a hole: Pull the magic ring tighter before joining Round 1, then weave the tail around the ring once more.
Petals cup or ruffle: Your tr are probably too tall or too loose. Shorten your yarn-overs, or go down a hook size for Round 5 only.
Bobbles sink to the back: Bobbles pop out on the side facing away from you. Check that you’re working Round 6 with the right side facing you, and push each bobble forward as you go.
Motifs pucker at the joins: Your joining sl st is too tight. Work it with a relaxed loop.
Top is too loose: Leave out one motif per row (8 in [20.3 cm] → 4 motifs removed means −4 in [−10.2 cm] around). The total then drops to 28 in (71.1 cm). The border count becomes 7 × 44 = 308 sc per edge.
Border ripples: Make sure you skipped the tip sc at the joints and chained only 1 at each valley.
Care
Hand wash in cool water with a mild detergent, gently press out the water in a towel, and dry flat in shape. Do not tumble dry, because heat can flatten the bobbles.
Final Notes
The measurement chain is short and reliable. A 1.25 in (3.2 cm) center grows into a 4 in (10.2 cm) motif. Eight motifs make a ring 32 in (81.3 cm) around, and three rows stack to 10.5 in (26.7 cm). The border adds 0.25 in (0.6 cm) at each edge, for a finished height of 11 in (27.9 cm).
Every count follows from one number: 15 sc per petal. That gives 44 sc per edge motif and 352 sc per border edge. If your test motif is right, the whole top will come out right.
Happy crocheting!