

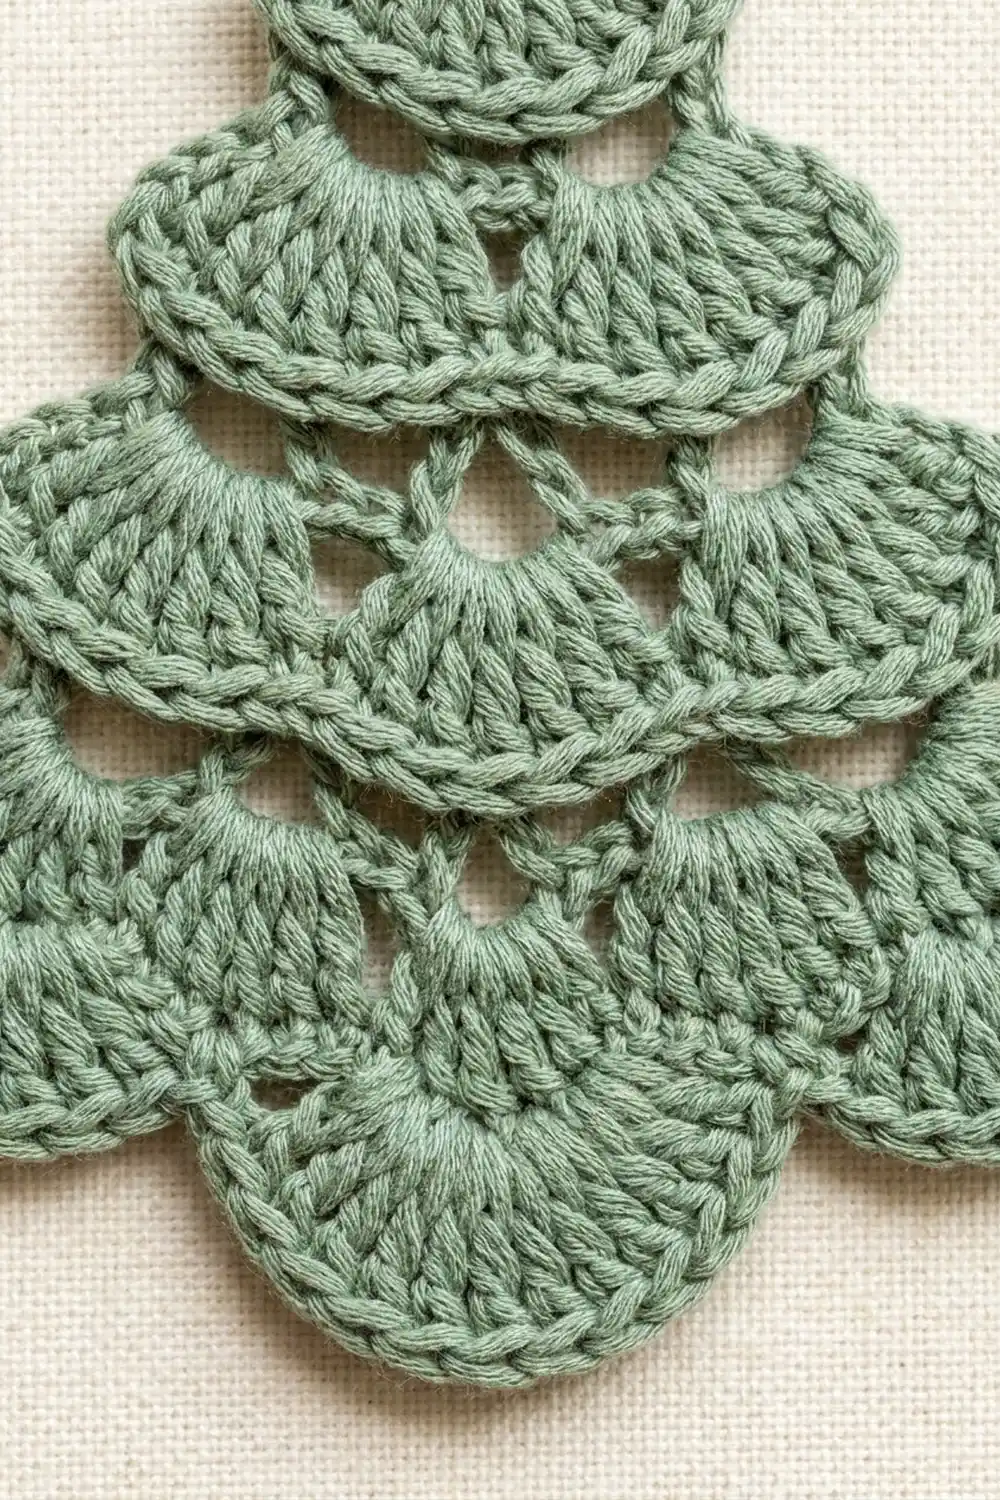
This little tree is made from fan shells stacked into four tiers: one fan at the top, then two, three, and four. Each tier finishes with a firm single-crochet rim, so the tiers read clearly as overlapping branches. Open chain loops between the tiers keep the ornament light and lacy.
The sample uses one soft sage green cotton. The color looks gentle and a little vintage, and it stands out against a real or artificial tree. A white, cream, or metallic gold thread would also suit the design.
This pattern uses US crochet terms. The finished ornament is 4.25 in (10.8 cm) wide and 4.5 in (11.4 cm) tall, not counting the hanging loop. The loop adds about 1.5 in (3.8 cm).
The ornament is made in one piece from the top down, in turned rows. You start with a small ring at the tip and work one fan into it. Each new tier then follows three rows: a mesh row, a fan row with one more fan than the tier above, and a rim row. A single border round outlines the whole tree and adds the hanging loop. You don’t sew anything and you don’t join any pieces.
Finished Size and Construction
- Finished size: 4.25 in (10.8 cm) wide × 4.5 in (11.4 cm) tall, excluding the loop
- Hanging loop: about 1.5 in (3.8 cm) when hanging
- Skill level: Easy+ (you need to be comfortable with treble crochet)
- Terminology: US
- Yarn weight: Sport / #2 (light fingering-to-sport cotton)
- Hook: 2.5 mm
- Number of pieces: 1
- Layout: one single tree motif, 4 tiers (1–2–3–4 fans)
- Piece size before border: 4 in (10.2 cm) wide × 4.25 in (10.8 cm) tall
- Border depth: about 0.125 in (0.3 cm) on each edge
Materials
Yarn: Use a smooth mercerized or matte cotton in sport weight. Cotton holds the fan shapes and blocks crisply. Acrylic will work, but the scallops will be softer and may curl.
- Sage green: 10 g, about 28 m (31 yd)
These quantities include a generous margin. One ornament usually uses about 6–7 g, so 10 g covers a test swatch or a few rows you might need to pull out and redo.
Tools:
– 2.5 mm crochet hook
– Tapestry needle
– Scissors
– Blocking mat or folded towel
– Rust-proof pins
– Spray bottle with water (optional: light spray starch)
Abbreviations (US Terms)
- ch – chain
- sl st – slip stitch
- sc – single crochet
- tr – treble crochet (yarn over twice, insert hook, pull up a loop, [yarn over, pull through 2 loops] 3 times)
- sk – skip
- sp(s) – space(s)
- st(s) – stitch(es)
Special stitch:
– Fan: 9 tr worked into the same ring or chain space.
Gauge and Checkpoints
Gauge isn’t critical for an ornament, but it controls the final size and how neatly the tiers overlap.
Gauge: One finished fan measures 1 in (2.5 cm) across its widest point. One tr is about 0.5 in (1.3 cm) tall.
Test first: Work Rows 1–5 (Tiers 1 and 2) and measure before you go on. This section works as your gauge swatch.
Checkpoints (measured flat, gently smoothed):
– After Row 2 (Tier 1): 1 in (2.5 cm) wide × 0.875 in (2.2 cm) tall
– After Row 5 (Tier 2): 2 in (5.1 cm) wide × 2 in (5.1 cm) tall
– After Row 8 (Tier 3): 3 in (7.6 cm) wide × 3.125 in (7.9 cm) tall
– After Row 11 (Tier 4): 4 in (10.2 cm) wide × 4.25 in (10.8 cm) tall
If your tree is too big: go down to a 2.25 mm hook, or tighten the last loop of each tr.
If your tree is too small: go up to a 2.75 mm hook. Also check that you aren’t pulling the chain loops tight in the mesh rows.
If fans ruffle: your chain loops are too short for your tension. Add 1 ch to each loop and keep the stitch counts unchanged.
Pattern
The tree is worked top down. Turn at the end of every row unless told otherwise. The ch 1 at the start of a row does not count as a stitch.
Every tier follows the same logic:
– Mesh row: places one sc at each edge and one sc at the center tr of each fan above. This creates one more chain space than the tier above had fans.
– Fan row: works one fan into each chain space, with a sc between fans.
– Rim row: works 1 sc into every stitch, giving each tier its solid scalloped edge.
For a tier with k fans, the fan row and rim row each have 10k + 1 sts.
Tier 1 (Tip)
Start: Ch 5, sl st in first ch to form a ring. This ring is the top point of the tree.
Row 1 (fan): Ch 1, (sc, 9 tr, sc) in ring. Turn.
(11 sts: 2 sc + 9 tr)
The fan should open downward like a small half-circle.
Row 2 (rim): Ch 1, sc in each st across. Turn.
(11 sc)
Checkpoint: 1 in (2.5 cm) wide × 0.875 in (2.2 cm) tall.
Tier 2 (Two Fans)
Row 3 (mesh): Ch 1, sc in first st, ch 4, sk next 4 sts, sc in next st (6th st, the center of the fan), ch 4, sk next 4 sts, sc in last st (11th). Turn.
(3 sc, 2 ch-4 sps)
Row 4 (fan): Ch 1, sc in first sc, [Fan in next ch-4 sp, sc in next sc] 2 times. Turn.
(21 sts: 3 sc + 18 tr)
Row 5 (rim): Ch 1, sc in each st across. Turn.
(21 sc)
Checkpoint: 2 in (5.1 cm) wide × 2 in (5.1 cm) tall.
The new fans are wider than the base they sit on. This is intentional: it makes them flare past the tier above, which creates the stepped tree outline.
Tier 3 (Three Fans)
Row 6 (mesh): Ch 1, sc in first st, ch 4, sk next 4 sts, sc in next st (6th), ch 5, sk next 9 sts, sc in next st (16th), ch 4, sk next 4 sts, sc in last st (21st). Turn.
(4 sc, 3 ch-sps: two ch-4 end spaces and one ch-5 center space)
The 6th and 16th sts are the center tr of each fan from Row 4, with the rim stitches on top of them.
Row 7 (fan): Ch 1, sc in first sc, [Fan in next ch-sp, sc in next sc] 3 times. Turn.
(31 sts: 4 sc + 27 tr)
Row 8 (rim): Ch 1, sc in each st across. Turn.
(31 sc)
Checkpoint: 3 in (7.6 cm) wide × 3.125 in (7.9 cm) tall.
Tier 4 (Four Fans, Bottom)
Row 9 (mesh): Ch 1, sc in first st, ch 4, sk next 4 sts, sc in next st (6th), [ch 5, sk next 9 sts, sc in next st] 2 times (16th and 26th), ch 4, sk next 4 sts, sc in last st (31st). Turn.
(5 sc, 4 ch-sps: two ch-4 and two ch-5)
Row 10 (fan): Ch 1, sc in first sc, [Fan in next ch-sp, sc in next sc] 4 times. Turn.
(41 sts: 5 sc + 36 tr)
Row 11 (rim): Ch 1, sc in each st across. Do not turn and do not fasten off.
(41 sc)
Checkpoint: 4 in (10.2 cm) wide × 4.25 in (10.8 cm) tall. This is the size before the border.
Stitch math check: Every fan row adds exactly one fan, or 10 sts: 11 → 21 → 31 → 41. Each mesh row uses all of the previous rim’s stitches. For example, Row 9 works 1 + 4 + 1 + 9 + 1 + 9 + 1 + 4 + 1 = 31 sts.
Border
The border is one round of sc around the whole outline. It neatens the stepped sides, firms up the bottom scallops, and adds the hanging loop at the tip.
Border gauge: about 6 sc per 1 in (2.5 cm) along the edges. Each sc adds about 0.125 in (0.3 cm) to the edge it’s worked on.
You start at the bottom corner where Row 11 ended and work up the first side.
Side stitch placement, per tier, working upward:
– 1 sc in the end of the rim row
– 3 sc around the post of the outer tr of the end fan
– 1 sc in the end of the mesh row (Tiers 2–4 only)
Border Round:
1. Side 1: Ch 1. Work up the side: for each of Tiers 4, 3, and 2, work 1 sc in the rim-row end, 3 sc around the end fan, and 1 sc in the mesh-row end (5 sc per tier, 15 sc total). For Tier 1, work 1 sc in the rim-row end and 3 sc around the end of the fan (4 sc).
(19 sc on Side 1)
2. Tip: Work (sc, ch 20, sc) around the ring at the very top, between the two end sc of Row 1.
(2 sc + ch-20 loop)
3. Side 2: Work down the second side in the same pattern, in reverse order. Tier 1: 3 sc around the fan end, 1 sc in the rim-row end (4 sc). Tiers 2, 3, and 4: 1 sc in the mesh-row end, 3 sc around the fan end, 1 sc in the rim-row end (5 sc each).
(19 sc on Side 2)
4. Bottom: Sc in each of the 41 sts of Row 11.
(41 sc; these include both bottom corner stitches, the first and last sts of Row 11)
5. Join with sl st to the first sc of Side 1. Fasten off, leaving a 6 in (15.2 cm) tail.
Border total: 19 + 2 + 19 + 41 = 81 sc, plus the ch-20 loop.
Why the math works:
– Sides: a tr is about 0.5 in (1.3 cm) tall and a sc is about 0.167 in (0.4 cm) tall, so 3 sc cover one tr. The rim and mesh rows are each about one sc tall, so they get 1 sc each. That matches the side length row for row, so the edge neither ruffles nor pulls in.
– Bottom: the bottom edge gets exactly 1 sc per stitch because the rim row already follows the curve of each scallop.
– Corners: the bottom count already includes both corner stitches, so no extra stitches are added there.
Final size: 4.25 in (10.8 cm) wide × 4.5 in (11.4 cm) tall. The ch-20 chain is about 3 in (7.6 cm) long, so it hangs as a loop about 1.5 in (3.8 cm) deep.
Final Blocking
- Weave in all ends along the rim rows, where they’re hidden by solid stitches. Leave them uncut for now.
- Soak the ornament in cool water for 5 minutes, then press out the water in a towel. Don’t wring it.
- Lay the ornament flat on a blocking mat.
- Pin the tip first, then the two bottom corners. The bottom should be 4.25 in (10.8 cm) wide, and the tip should sit 4.5 in (11.4 cm) above the bottom edge.
- Pin the center of each bottom scallop so the four curves are even.
- Open each fan so the tr spokes fan out evenly. Pin the outer point of each tier’s end fan so both sides of the tree match.
- Straighten the hanging loop and pin it flat.
- For a crisper ornament, mist lightly with spray starch.
- Let it dry completely, at least 6–8 hours. Then unpin it and trim the woven ends.
Final Quality-Control Checklist
- Four tiers with 1, 2, 3, and 4 fans
- Every fan has 9 tr
- Rim rows count 11, 21, 31, and 41 sc
- Both sides of the tree mirror each other
- Each tier’s scallops overlap the top of the tier below
- The border has 19 sc on each side and 41 sc across the bottom
- The hanging loop is centered at the tip and isn’t twisted
- The ornament is 4.25 in (10.8 cm) × 4.5 in (11.4 cm)
- All ends are secured and trimmed
Troubleshooting
Tree leans to one side: you probably skipped the wrong number of sts in a mesh row. Count back from the last st: the final sc must land in the last rim stitch.
Fans look cramped or cupped: the chain spaces are too tight. Add 1 ch to each loop, or chain more loosely.
Fans ruffle or wave: your tr are too tall for your tension, or the hook is too big. Drop one hook size.
The border pulls the sides in: work 4 sc around each end fan instead of 3. Keep both sides identical.
Bottom scallops flatten: you probably worked extra sc in the valleys between fans. Use exactly 1 sc per st.
Loop twists: before you work the second tip sc, make sure the chain lies flat with no twist.
Care
Hand wash in cool water with mild soap, press dry in a towel, and lay flat to dry, reshaping the scallops. Between seasons, store it flat in tissue paper so the fans keep their shape.

Final Notes
The size of this ornament follows one simple chain of measurements:
– Gauge: one fan is 1 in (2.5 cm) wide.
– Tier widths: 1 in (2.5 cm), 2 in (5.1 cm), 3 in (7.6 cm), and 4 in (10.2 cm).
– Before the border: 4 in (10.2 cm) × 4.25 in (10.8 cm).
– After the border: a 0.125 in (0.3 cm) edge brings it to 4.25 in (10.8 cm) × 4.5 in (11.4 cm).
Check your gauge at Tier 2 and your counts at every rim row, and the rest follows. Once you’ve made one, the next tree goes quickly, so you can easily make a whole branch’s worth.
Happy crocheting!