

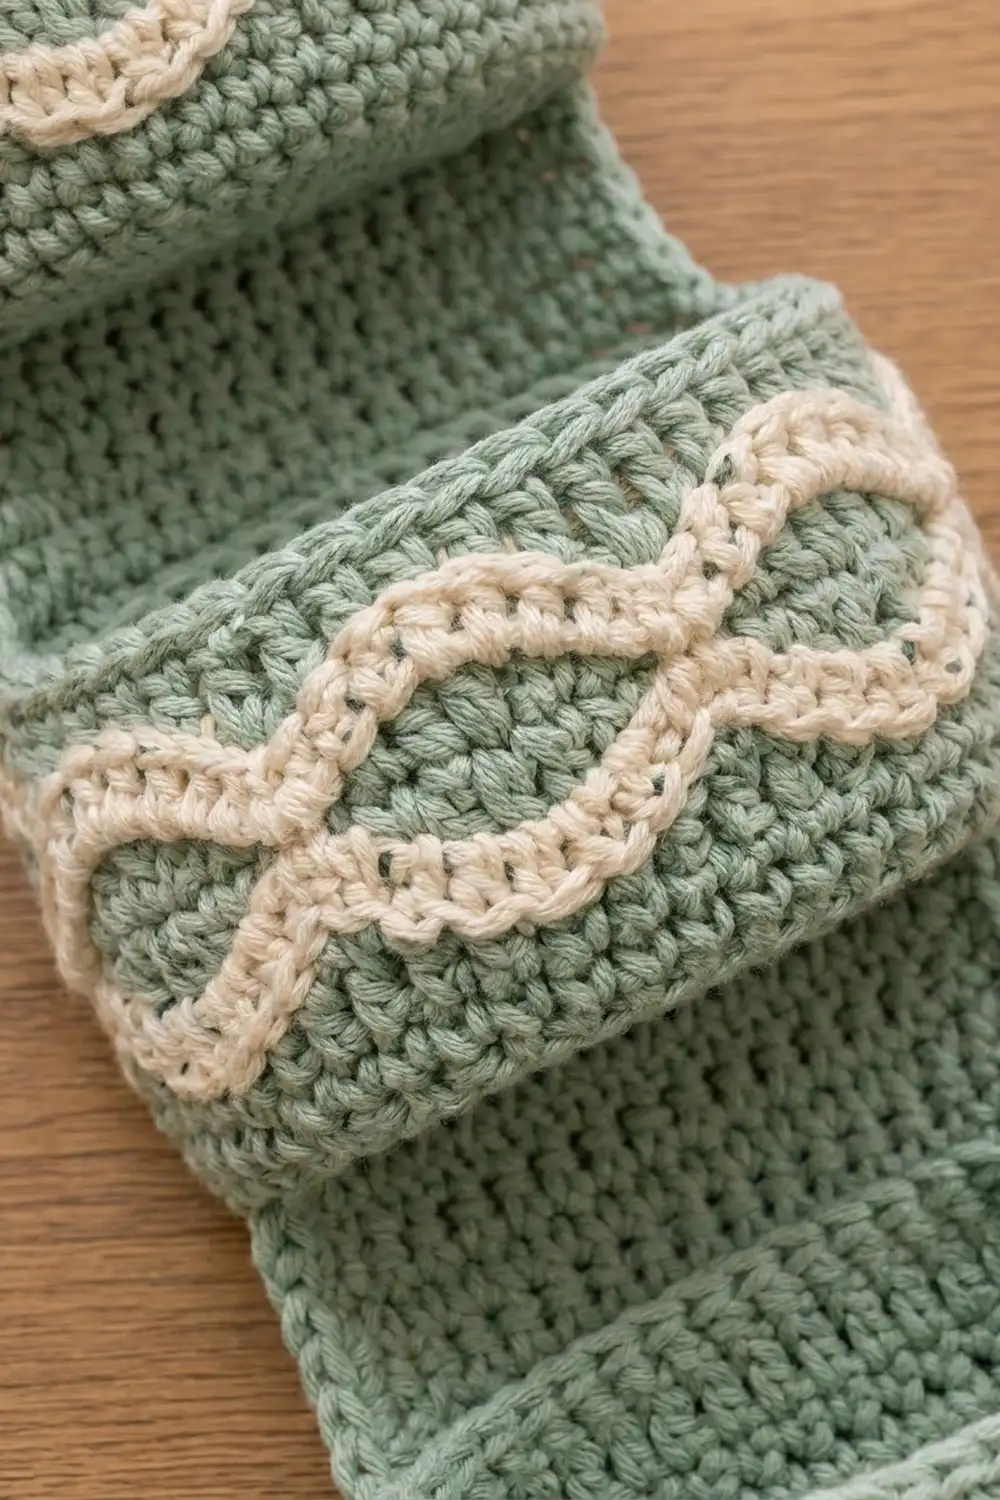
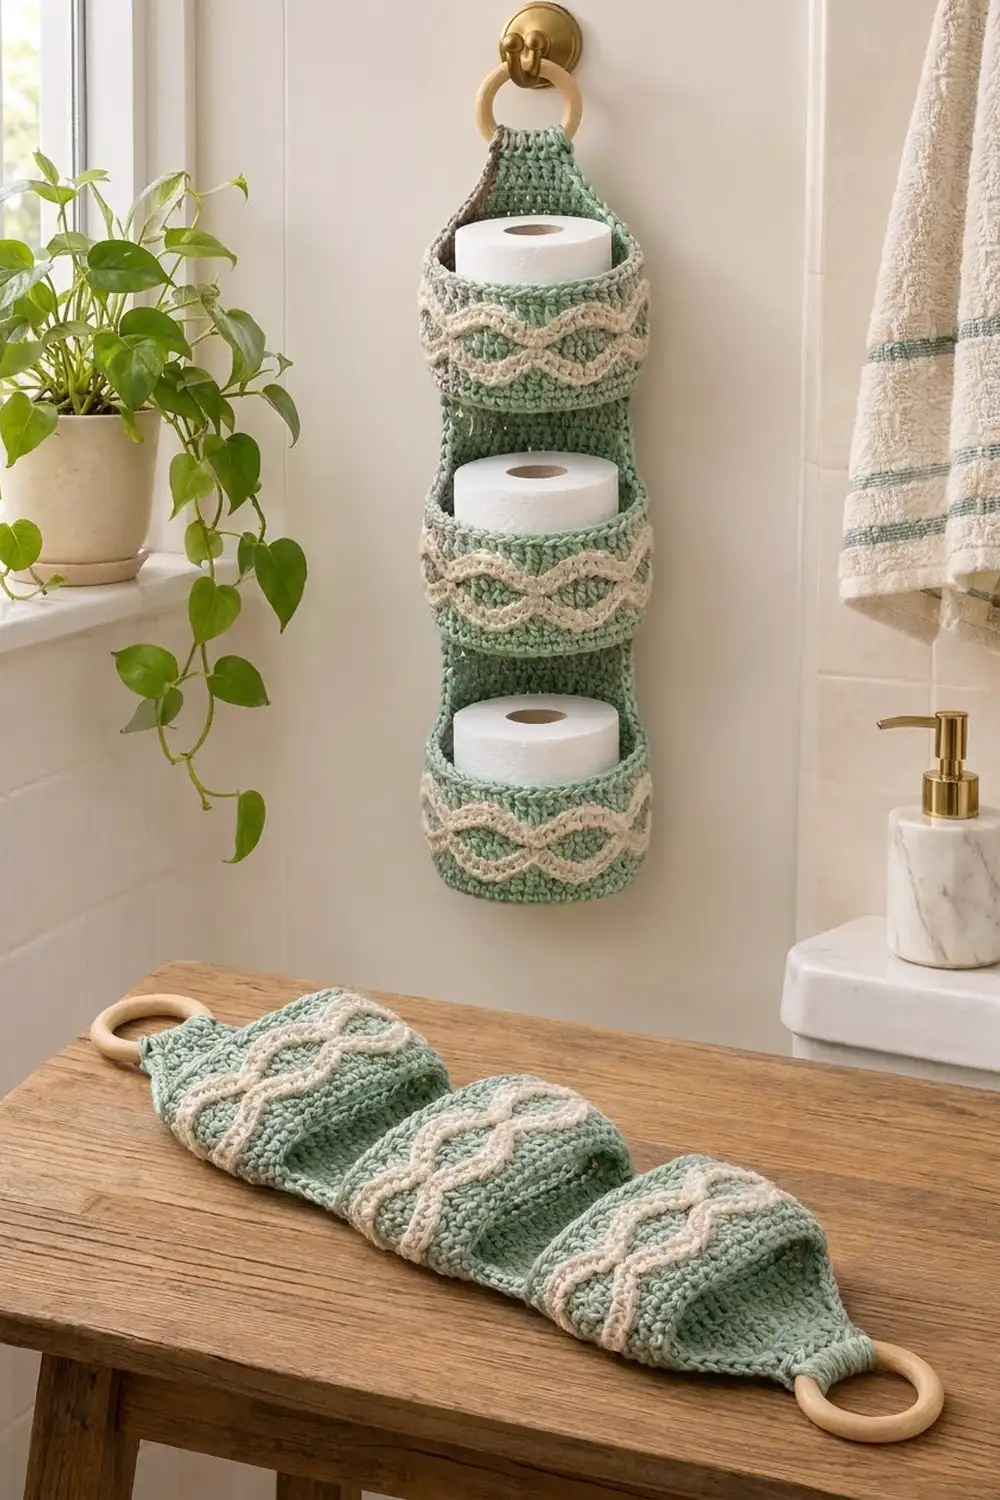
This wall-hung organizer holds three spare rolls in a neat vertical stack. A flat sage-green back panel carries three round pockets. Each pocket has a cream band of two wavy lines that nearly touch, leaving small sage ovals between them. At the top, the panel narrows into a strap that loops around a wooden ring, so it hangs from any towel hook.
The palette is two calm colors: soft sage and warm cream. With worsted-weight cotton and firm single crochet, the pockets keep their shape and the panel lies flat against the wall.
This pattern uses US crochet terms. The finished holder is about 6 in (15.2 cm) wide and about 20.5 in (52.1 cm) long from the bottom edge to the top of the ring loop. Each pocket is about 5 in (12.7 cm) across and 3.5 in (8.9 cm) tall.
How it’s built: you crochet one back panel in rows and add a two-round border. Then you make three pockets in joined rounds, each with a flat circular base, straight walls and the wave band. Last, you sew the pockets to the panel.
Finished Size and Construction
- Finished size: about 6 in x 20.5 in (15.2 cm x 52.1 cm), including the ring loop
- Skill level: Intermediate (color changes, wave stitch pattern, sewing up)
- Terminology: US crochet terms
- Yarn weight: Worsted (#4), cotton or cotton blend
- Hook: 4.5 mm (US 7)
- Number of pieces: 4 (1 back panel and 3 pockets)
- Layout: 1 column of 3 pockets on one panel
- Panel body before border: 5.5 in x 16 in (14.0 cm x 40.6 cm)
- Panel with taper, before border: 17.8 in (45.2 cm) tall
- Pocket size: about 5 in (12.7 cm) across and 3.5 in (8.9 cm) tall
- Border depth: about 0.25 in (0.6 cm)
Materials
Choose a smooth worsted cotton with about 170 m per 100 g. Cotton holds its shape, doesn’t stretch much under the weight of the rolls, and handles bathroom humidity well. Avoid fluffy or very stretchy acrylics, because the pockets will sag.
- Sage green (main color, MC): 220 g / 374 m
- Cream (contrast color, CC): 60 g / 102 m
These quantities include a margin of about 15% for gauge swatches and differences in tension.
Tools:
– 4.5 mm (US 7) crochet hook
– 1 wooden ring, about 2.5 in (6.4 cm) across
– Tapestry needle
– 8 locking stitch markers
– Rust-proof pins and a blocking mat
– Measuring tape and scissors
Abbreviations (US Terms)
- ch – chain
- sl st – slip stitch
- sc – single crochet
- hdc – half double crochet
- dc – double crochet
- tr – treble crochet
- sc2tog – single crochet 2 together
- BLO – back loop only
- MR – magic ring
- st(s) – stitch(es)
- rnd(s) – round(s)
Special technique: color change at a join. Work the last st of the round. Then insert the hook into the first st, yarn over with the new color and pull through to make the joining sl st. Carry the unused color loosely up the inside of the pocket for up to 2 rounds. If it is out of use for longer, cut it.
Round setup: All pocket rounds are joined with a sl st to the first stitch. The beginning chain never counts as a stitch: ch 1 before sc, ch 2 before hdc, ch 3 before dc and ch 4 before tr.
Gauge and Checkpoints
Gauge: 16 sc and 18 rows = 4 in (10.2 cm) in sc, worked firmly.
Make one pocket before you start the panel. It works as your gauge swatch and shows you the wave band before you commit to the full project.
Checkpoints:
– Pocket base after Rnd 11 (64 sts): about 5 in (12.7 cm) across, lying flat
– Pocket walls after Rnd 24: about 3.5 in (8.9 cm) tall, measured from the base ridge
– Panel after Row 22: 5.5 in (14.0 cm) wide and about 4.9 in (12.4 cm) tall
– Panel after Row 72: 5.5 in x 16 in (14.0 cm x 40.6 cm)
If your work is too big: go down 0.5 mm in hook size. A loose pocket lets the roll lean and makes the walls floppy.
If your work is too small: go up 0.5 mm in hook size. The roll must drop in easily. Test with a real roll after Rnd 15.
Pocket (Make 3)
Every pocket has the same stitch count, 64 sts, from Rnd 11 to the end. The wave pattern repeats every 8 sts, so the round holds exactly 8 repeats.
Base (MC)
Rnd 1: Make an MR. Ch 1, 6 sc in the ring, sl st to the first sc. (6 sts)
Rnd 2: Ch 1, 2 sc in each st around, join. (12 sts)
Rnd 3: Ch 1, [sc 1, 2 sc in next] 6 times, join. (18 sts)
Rnd 4: Ch 1, [sc 2, 2 sc in next] 6 times, join. (24 sts)
Rnd 5: Ch 1, [sc 3, 2 sc in next] 6 times, join. (30 sts)
Rnd 6: Ch 1, [sc 4, 2 sc in next] 6 times, join. (36 sts)
Rnd 7: Ch 1, [sc 5, 2 sc in next] 6 times, join. (42 sts)
Rnd 8: Ch 1, [sc 6, 2 sc in next] 6 times, join. (48 sts)
Rnd 9: Ch 1, [sc 7, 2 sc in next] 6 times, join. (54 sts)
Rnd 10: Ch 1, [sc 8, 2 sc in next] 6 times, join. (60 sts)
Rnd 11: Ch 1, [sc 14, 2 sc in next] 4 times, join. (64 sts)
Rnd 11 is a trim round: 60 sts are worked once each and 4 extra sts are added (60 + 4 = 64). That brings the count to a multiple of 8 for the wave.
Walls
Rnd 12 (MC): Ch 1, sc in BLO of each st around, join. (64 sts) This makes a ridge where the base turns up into the wall.
Rnds 13–15 (MC): Ch 1, sc in each st around, join. (64 sts each round) On Rnd 15, change to CC at the join.
Wave Band
Rnd 16 (CC), lower wave: Ch 1, [sc 2, hdc 1, dc 2, hdc 1, sc 2] 8 times, join. (64 sts) The cream line rises over the dc pairs.
Rnd 17 (CC): Ch 1, sc in each st around, join, and change to MC. (64 sts) This thickens the lower cream line and keeps its wavy shape.
Rnd 18 (MC), ovals: Ch 4, [tr 2, dc 1, sc 2, dc 1, tr 2] 8 times, join, and change to CC. (64 sts) The trebles land over the low parts of the cream line and rise slightly above them. The sc pairs sit over the cream peaks, so only a thin sage line separates the two cream waves there. This creates the sage ovals.
Rnd 19 (CC), upper wave: Ch 1, [sc 2, hdc 1, dc 2, hdc 1, sc 2] 8 times, join. (64 sts) The short stitches sit over the raised sage ovals and the dc pairs fill the dips. That leaves the top of this round level.
Rnd 20 (CC): Ch 1, sc in each st around, join, and change to MC. (64 sts)
Rim (MC)
Rnds 21–24: Ch 1, sc in each st around, join. (64 sts each round)
Fasten off and leave a 24 in (61.0 cm) tail for sewing. Weave in the CC ends on the inside.
The round joins form a faint seam. That seam becomes the center back of the pocket.
Back Panel (MC)
Foundation: Ch 23.
Row 1: Sc in 2nd ch from hook and in each ch across, turn. (22 sts)
Rows 2–72: Ch 1, sc in each st across, turn. (22 sts each row)
Check that the panel measures 5.5 in x 16 in (14.0 cm x 40.6 cm).
Taper
Rows 73–80: Ch 1, sc2tog, sc across to the last 2 sts, sc2tog, turn.
Stitch counts for each row: Row 73 has 20, Row 74 has 18, Row 75 has 16, Row 76 has 14, Row 77 has 12, Row 78 has 10, Row 79 has 8 and Row 80 has 6.
The taper adds 8 rows, about 1.8 in (4.6 cm), for a total height of 17.8 in (45.2 cm).
Strap
Rows 81–104: Ch 1, sc in each st across, turn. (6 sts each row)
The strap is 1.5 in (3.8 cm) wide and about 5.3 in (13.5 cm) long. Don’t fasten off. Continue straight into the border.
Border
Border gauge: 1 sc in each sc stitch along the top and bottom edges, and 1 sc in each row end along the sides. In this tight gauge, sc row ends pack closely, so one sc per row keeps the edge flat without gathering.
Rnd 1: Ch 1. Work down the side, around the bottom, up the other side and across the end of the strap:
- Left side: 104 sc, 1 in each row end (80 panel and taper rows plus 24 strap rows)
- Bottom edge: 3 sc in the first st, sc in the next 20, 3 sc in the last st. That is 26 sts: 22 worked once each + 4 extra corner sts.
- Right side: 104 sc, 1 in each row end
- Strap end: 3 sc in the first st, sc in the next 4, 3 sc in the last st. That is 10 sts: 6 worked once each + 4 extra corner sts.
Sl st to the first sc. Total: 104 + 26 + 104 + 10 = 244 sts.
Rnd 2: Sl st in each st around. (244 sl sts) Fasten off.
Why the math works: Each side count equals its row count, and each short edge equals its stitch count plus the 4 extra stitches that turn its 2 corners. The corner stitches are counted only once, inside the edge they belong to. Nothing is added to the sides.
The border adds about 0.25 in (0.6 cm) on each edge. The panel body becomes 6 in (15.2 cm) wide, and its height to the start of the taper becomes 16.25 in (41.3 cm).
Strap loop: Pass the strap through the wooden ring from front to back. Fold it down behind the taper and sew the strap end to the back of Rows 74–78. The finished loop rises about 2.5 in (6.4 cm) above the taper.
Make All Pieces
- Pockets: 3, each made with MC (about 55 g) and CC (about 17 g)
- Back panel: 1, made with MC (about 50 g), including the strap and border
Layout, viewed from the front with the ring at the top:
      [ ring ]
       strap
     /  taper \
   |   Row 61-72: open |
   | [ Pocket 3 ]      |  base at Row 45
   |   gap             |
   | [ Pocket 2 ]      |  base at Row 23
   |   gap             |
   | [ Pocket 1 ]      |  base at Row 1
   ---- bottom edge ----
Joining
Method: Whipstitch with MC through both loops of the panel and through the pocket stitches.
Preparing each pocket: Lay the pocket flat with the seam at the center back. Count 8 sts on each side of the seam along Rnd 12 and mark them. These 16 sts form the flat back of the pocket. Mark the matching 16 sts of Rnd 24 at the rim.
Stitch-to-stitch logic: Center the 16 pocket sts on the 22 panel sts, leaving 3 panel sts clear on each side. Sew one pocket stitch to one panel stitch, so 16 stitches meet 16 stitches. Nothing is gathered and nothing is eased.
Pocket placement:
– Pocket 1: base ridge (Rnd 12) along Row 1, rim (Rnd 24) along Row 16
– Pocket 2: base ridge along Row 23, rim along Row 38
– Pocket 3: base ridge along Row 45, rim along Row 61
For each pocket, sew the base line first, then the rim line. Then tack the two side edges of the flat back to the panel with 3 small stitches at about the middle of the wall on each side.
Tension: Pull each whipstitch until it is snug, not tight. Puckering means the stitches are too tight.
Size checkpoint: There should be a gap of about 1.5 in (3.8 cm) between each rim and the base of the pocket above it. Put a roll in each pocket. About 0.75 in (1.9 cm) of each roll should show above the rim without touching the pocket above.
Final Blocking
- Dampen the whole holder with cool water and press out the extra water in a towel.
- Lay it face up on the blocking mat.
- Pin the panel to 6 in (15.2 cm) wide and 16.25 in (41.3 cm) from the bottom edge to the start of the taper.
- Stuff each pocket with a dry rolled hand towel or a wrapped roll so it dries round.
- Shape the wave band with your fingers so the ovals are even.
- Let it dry completely, usually 24 hours.
Final Quality-Control Checklist
- Each pocket has 64 sts and 8 complete wave repeats.
- The sage ovals are spaced evenly with no doubled or missing repeat.
- The round seams sit at the center back.
- The border has 244 sts with neat corners.
- The panel lies flat with no rippling edges.
- The pockets are level and centered, with a 3-stitch margin on each side.
- The strap is sewn securely and the ring is centered.
- All ends are woven in on the inside or the back.
Troubleshooting
The wave has an uneven repeat: Your round count is off. Count the base again to make sure you have 64 sts before Rnd 16.
The pocket flares open: Your stitches are loose. Go down a hook size, or work Rnds 21–24 with a 4 mm hook.
The roll doesn’t fit: Your base is too small. Go up a hook size and remake the pocket. The base must measure about 5 in (12.7 cm).
The panel edge ruffles: The border is too loose. Rework Rnd 2 more firmly.
A pocket sags forward: Add a tack stitch at the top of each side edge of the flat back.
The sage ovals look flat: Make sure Rnd 18 starts with trebles over the sc pairs of Rnd 16, not over the dc pairs.
Care
Hand wash in cool water and lay flat to dry, reshaping the pockets over a rolled towel. Don’t tumble dry, because cotton can shrink and distort the wave band.
Final Notes
Everything follows from one gauge: 16 sc and 18 rows = 4 in (10.2 cm). That gauge gives a 64-stitch pocket about 5 in (12.7 cm) across with walls 3.5 in (8.9 cm) tall. It also gives a 22-stitch panel that is 5.5 in x 16 in (14.0 cm x 40.6 cm), and 6 in (15.2 cm) wide after its 244-stitch border. Three pockets sewn 16 stitches to 16 stitches complete a holder about 20.5 in (52.1 cm) long. Check each stage and the next one will fit.
Happy crocheting!