

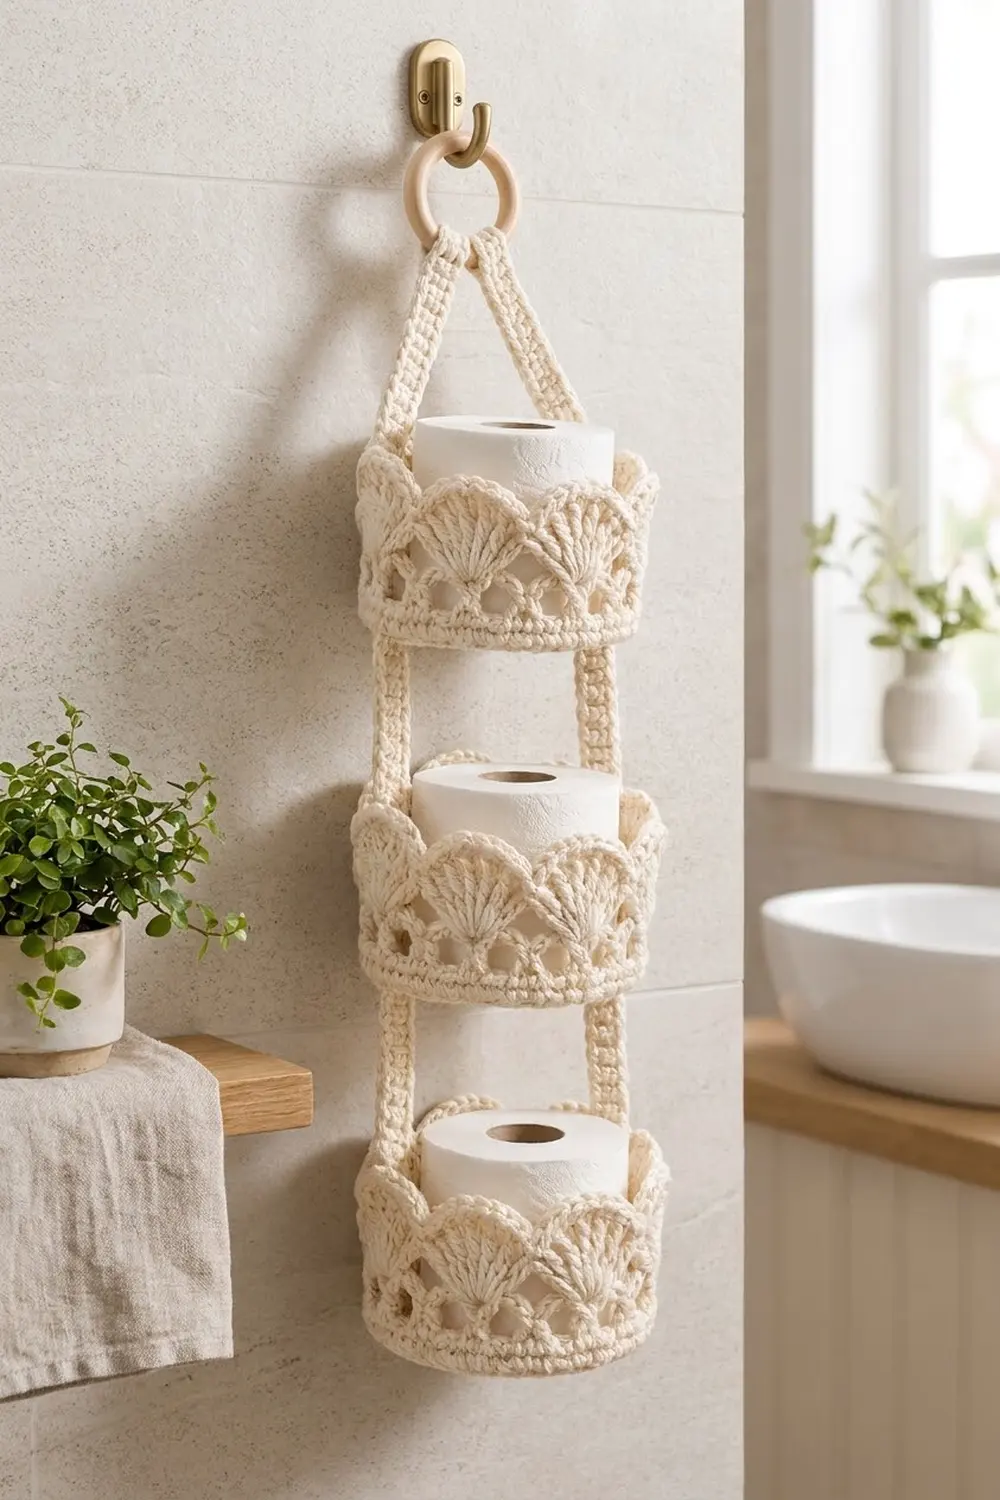
The Seashell Cascade holder brings a bit of vintage seaside charm to a small bathroom. Three round baskets hang one above another on two sturdy straps, and the whole holder hangs from a simple wooden ring. Each basket holds one standard toilet paper roll, with the top of the roll peeking out over a crown of scalloped shells.
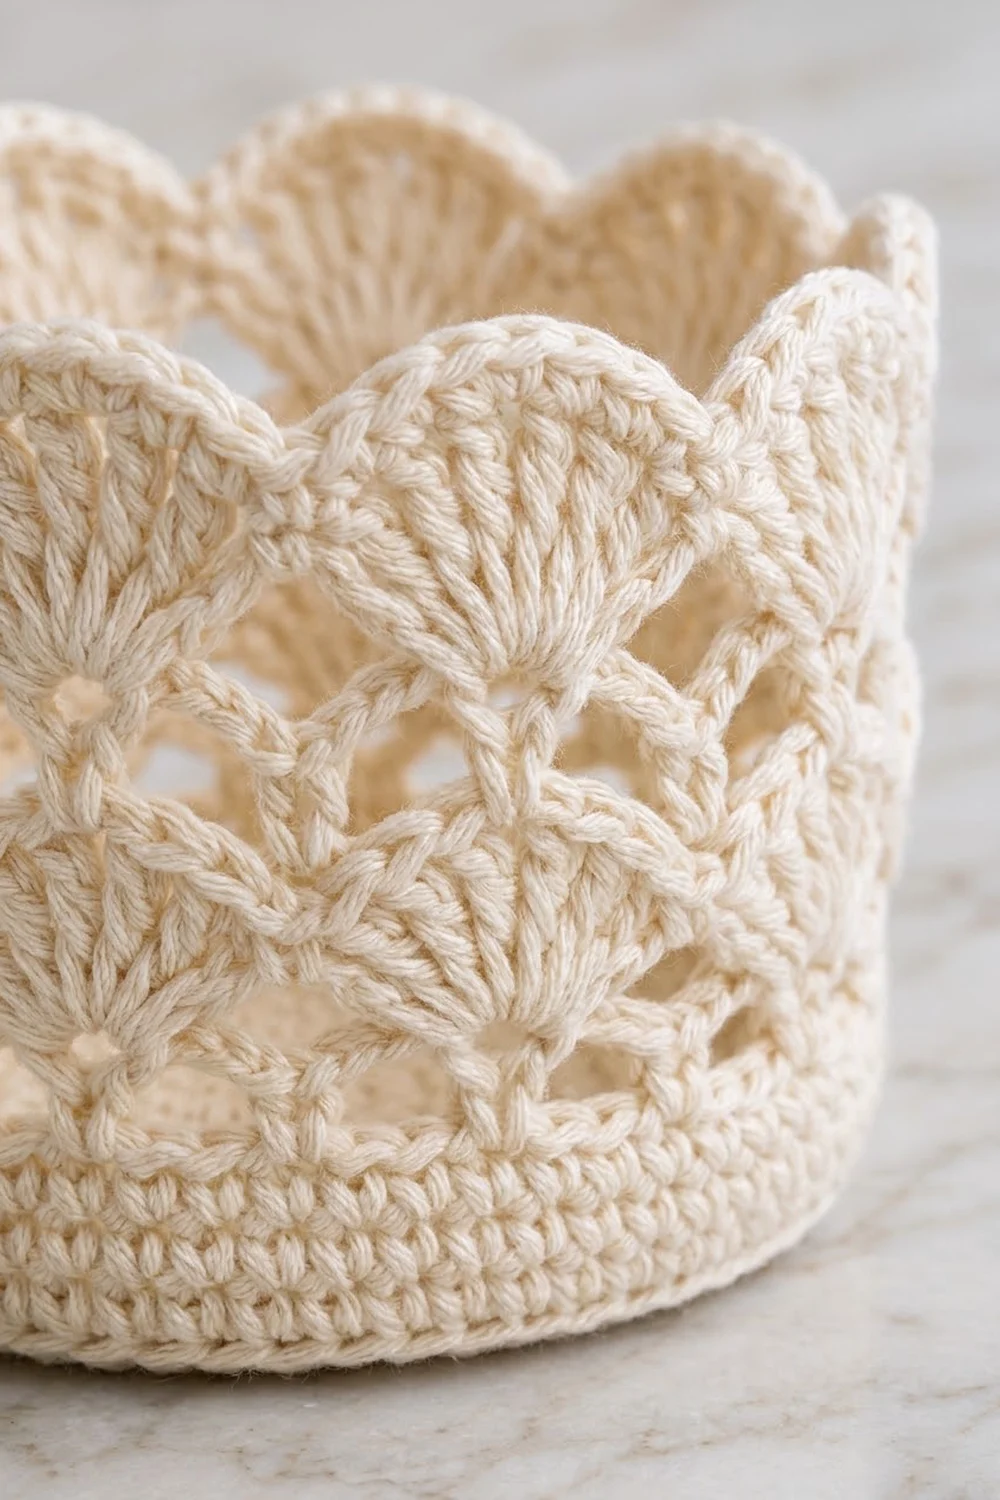
The design uses a single cream cotton, so the texture does all the work. Each basket wall goes from a dense single-crochet band to a round of eyelets, then a tier of fan shells, then a lattice of V-stitches, and finally a top tier of larger scallops sitting between the lower fans. It looks elegant but uses only basic stitches.
This pattern uses US crochet terms. The finished holder is about 20 in (50.8 cm) long from the ring fold to the bottom of the lowest basket, or about 22 in (55.9 cm) with the ring. Each basket is about 5 in (12.7 cm) across and 3.5 in (8.9 cm) tall.
Construction is simple. You crochet three identical baskets in joined rounds and two flat straps in rows. Then you sew the straps to opposite sides of the baskets, fold the top ends over the wooden ring, and stitch them closed.
Finished Size and Construction
- Finished size: about 5 in (12.7 cm) wide × 20 in (50.8 cm) long, plus a 2 in (5.1 cm) ring
- Skill level: Easy-intermediate
- Terminology: US crochet terms
- Yarn weight: Worsted weight (#4) cotton
- Hook: 5.0 mm (H-8)
- Number of pieces: 5 crocheted pieces (3 baskets, 2 straps) plus 1 wooden ring
- Layout: 3 baskets stacked vertically, 1.5 in (3.8 cm) apart, between 2 straps
- Basket size: 5 in (12.7 cm) diameter × 3.5 in (8.9 cm) tall
- Size before border: 5 in (12.7 cm) diameter base with a 1 in (2.5 cm) wall
- Border (shell crown) depth: 2.5 in (6.4 cm)
- Strap size: 1 in (2.5 cm) × 21 in (53.3 cm)
Materials
Use a smooth, firm worsted-weight cotton or cotton blend. Cotton holds its shape well, handles bathroom humidity, and shows the shell texture clearly. Avoid fuzzy or very stretchy acrylics, because the baskets will sag under the weight of the rolls.
- Cream (Main Color): 250 g, about 425 m (465 yd)
Each basket uses about 50 g (about 85 m / 93 yd). Each strap uses about 15 g (about 26 m / 28 yd). The quantity above includes a comfortable margin for your gauge swatch and for weaving in ends.
Tools:
– 5.0 mm (H-8) crochet hook
– 1 wooden ring, 2 in (5.1 cm) outside diameter
– Tapestry needle
– 4 locking stitch markers
– Scissors
– Measuring tape
– Rust-proof pins and a blocking surface
– Optional: fabric stiffener or a light starch spray
Abbreviations (US Terms)
- ch – chain
- sl st – slip stitch
- sc – single crochet
- dc – double crochet
- MR – magic ring
- BLO – back loop only
- sp – space
- st(s) – stitch(es)
- rep – repeat
Special stitches:
– Shell: 7 dc worked into the same stitch or space.
– Large shell: 9 dc worked into the same stitch or space.
– V-st: (dc, ch 1, dc) worked into the same stitch.
Throughout the pattern, ch 1 at the start of a round does not count as a stitch. Ch 4 at the start of Round 15 counts as 1 dc plus 1 ch.
Gauge and Checkpoints
Gauge: 16 sc × 16 rounds = 4 in (10.2 cm). That works out to 4 sts and 4 rounds per 1 in (2.5 cm).
Make one complete basket before you start the others. It’s your real gauge swatch. Check it at each of these stages:
- After Round 4 (24 sts): the disc measures 2 in (5.1 cm) across.
- After Round 10 (60 sts): the base measures 5 in (12.7 cm) across and lies flat.
- After Round 14: the sc wall stands 1 in (2.5 cm) tall.
- After Round 19: the full basket stands 3.5 in (8.9 cm) tall.
If your basket is too big, go down to a 4.5 mm hook. If it is too small, go up to a 5.5 mm hook. A standard roll is about 4.5 in (11.4 cm) across, so the inside of the basket needs to clear that. If the base cups upward, your tension is tight. If it ruffles, your tension is loose. Adjust before you go on.
Basket (Make 3)
Base
Work in joined rounds. Join each round with a sl st to the first sc.
Round 1: Make an MR. Ch 1, then 6 sc in the ring. Join. (6 sts)
Round 2: Ch 1, 2 sc in each st around. Join. (12 sts)
Round 3: Ch 1, sc in next st, 2 sc in next st; rep from * 6 times total. Join. (18 sts)
Round 4: Ch 1, sc in next 2 sts, 2 sc in next st; rep 6 times. Join. (24 sts)
Round 5: Ch 1, sc in next 3 sts, 2 sc in next st; rep 6 times. Join. (30 sts)
Round 6: Ch 1, sc in next 4 sts, 2 sc in next st; rep 6 times. Join. (36 sts)
Round 7: Ch 1, sc in next 5 sts, 2 sc in next st; rep 6 times. Join. (42 sts)
Round 8: Ch 1, sc in next 6 sts, 2 sc in next st; rep 6 times. Join. (48 sts)
Round 9: Ch 1, sc in next 7 sts, 2 sc in next st; rep 6 times. Join. (54 sts)
Round 10: Ch 1, sc in next 8 sts, 2 sc in next st; rep 6 times. Join. (60 sts)
Checkpoint: the base is 5 in (12.7 cm) across.
Wall
Round 11 (turning round): Ch 1, sc in BLO of each st around. Join. (60 sts)
Working in the back loop makes a crisp ridge that turns the wall upward.
Rounds 12–14: Ch 1, sc in each st around. Join. (60 sts)
Checkpoint: the wall is 1 in (2.5 cm) tall, and the basket measures 5 in (12.7 cm) across at the top. Don’t fasten off. Go straight on to the shell crown.
Border: Shell Crown
Border gauge: One shell repeat covers 6 base sts, or 1.5 in (3.8 cm) of the wall. That gives 60 ÷ 6 = 10 repeats around. Because the border is round, it has no sides or corners. All counts are given per repeat and for the full round.
Round 15 (eyelets, conversion round): Ch 4 (counts as dc + ch 1), skip next st, dc in next st, ch 1, skip next st; rep from * around. Join with a sl st to the 3rd ch of the starting ch-4.
Count: 30 dc + 30 ch-1 sps = 60 sts, worked 1 per existing stitch. Per repeat: 3 dc + 3 ch-1 sps. Height: 0.5 in (1.3 cm).
Round 16 (lower fans): Ch 1, sc in the same st as the join, skip next ch-1 sp and next dc, shell (7 dc) in next ch-1 sp, skip next dc and next ch-1 sp, sc in next dc; rep from * around, leaving out the final sc. Join to the first sc.
Count: 10 sc + 70 dc = 80 sts (10 shells). Per repeat: 1 sc + 7 dc. Height: 0.75 in (1.9 cm).
Each fan sits in the center of its 6-stitch repeat, so the fans are evenly spaced around the basket.
Round 17 (lattice): Sl st in each of the next 4 dc to reach the center dc of the first shell. Ch 1, sc in the same dc, ch 3, skip the last 3 dc of the shell, V-st in next sc, ch 3, skip the first 3 dc of the next shell, sc in the center dc; rep from * around, leaving out the final sc. Join to the first sc.
Count: 10 sc + 60 ch + 20 dc + 10 ch = 100 sts. Per repeat: 1 sc + 3 ch + V-st (3 sts) + 3 ch = 10. Height: 0.5 in (1.3 cm).
The chain arches and V-stitches form the open diamond windows between the two tiers of fans.
Round 18 (top scallops): Ch 1, sc in the first sc, skip the ch-3 sp, large shell (9 dc) in the ch-1 sp of the next V-st, skip the ch-3 sp, sc in next sc; rep from * around, leaving out the final sc. Join to the first sc.
Count: 10 sc + 90 dc = 100 sts (10 large shells). Per repeat: 1 sc + 9 dc.
The V-stitches sit above the sc between the lower fans, so each large scallop lands halfway between two lower fans. That offset gives the cascading look.
Round 19 (rim, trim round): Ch 1, sl st in next sc, sc in next 4 dc, 3 sc in next dc, sc in next 4 dc; rep from * around. Join and fasten off.
Count: 100 sts worked 1 per existing stitch + 20 extra sts (2 extra at each of the 10 scallop peaks) = 120 sts. Per repeat: 1 sl st + 11 sc = 12.
Height of Rounds 18–19 together: 0.75 in (1.9 cm).
Why the math works: The 60-stitch base divides evenly into 10 repeats of 6 sts. Every border round keeps exactly 10 repeats: 60, then 80, then 100, then 100, then 120. So the fans never drift or crowd. The border depth adds up as 0.5 + 0.75 + 0.5 + 0.75 = 2.5 in (6.4 cm). With the 1 in (2.5 cm) sc wall, the basket stands 3.5 in (8.9 cm) tall.
Weave in all ends on the inside of the basket.
Strap (Make 2)
The straps are worked lengthwise in rows.
Row 1: Ch 85. Sc in the 2nd ch from the hook and in each ch across. (84 sts)
Rows 2–4: Ch 1, turn, sc in each st across. (84 sts)
Fasten off, leaving a 24 in (61.0 cm) tail for sewing.
Checkpoint: the strap measures 1 in (2.5 cm) wide (4 rows) and 21 in (53.3 cm) long (84 sts at 4 sts per inch).
Make All Pieces
Everything is worked in Cream:
- 3 baskets, Cream
- 2 straps, Cream
- 1 wooden ring, 2 in (5.1 cm)
Layout (front view, top to bottom):
         [ RING ]
          /    \
     Strap A  Strap B      sts 55–84 (free + fold)
       |  [BASKET 3]  |    sts 41–54
       |    (gap)     |    sts 35–40
       |  [BASKET 2]  |    sts 21–34
       |    (gap)     |    sts 15–20
       |  [BASKET 1]  |    sts 1–14
Strap stitch numbers count from the bottom end of the strap.
Joining
Method: Whipstitch with the yarn tail and a tapestry needle, sewing through both layers.
Stitch-to-stitch logic: The strap has 4 sts per inch along its length, and the basket wall has 4 rounds per inch of height. That means each strap stitch lines up with 0.25 in (0.6 cm) of wall height. A 3.5 in (8.9 cm) basket uses exactly 14 strap sts. Each 1.5 in (3.8 cm) gap uses 6 sts.
- On each basket, place markers in stitch 1 and stitch 31 of Round 14. These two stitches are directly opposite each other, 30 sts apart.
- Lay Strap A along the outside of each basket at the stitch 1 marker. Lay Strap B at the stitch 31 marker.
- Bottom basket: Line up strap sts 1–14 with the basket wall, with the end of the strap flush with the base edge. Whipstitch both long edges of the strap to the wall from the base up to the rim.
- Middle basket: Line it up with strap sts 21–34 and sew the same way.
- Top basket: Line it up with strap sts 41–54 and sew the same way.
- Repeat on the other side with Strap B. Check that the baskets hang level, with the markers facing each other.
- Pass the top 4 sts of each strap (sts 81–84) over the wooden ring. Fold them back onto sts 77–80 and whipstitch them closed securely.
Tension advice: Pull each whipstitch snug but not tight. If you over-tighten, the wall puckers and the sc band creases. Sew through the sc band and the solid parts of the shells, not through the chain spaces.
Size checkpoint: Hang the holder from the ring. Each gap is 1.5 in (3.8 cm), each basket is 3.5 in (8.9 cm) tall, and 6.5 in (16.5 cm) of free strap runs from the top basket to the ring fold. The total length is 20 in (50.8 cm).
Final Blocking
- Fill each basket with a toilet paper roll or a 5 in (12.7 cm) wide jar so it holds its round shape.
- Spray the baskets lightly with water, or with diluted fabric stiffener for extra firmness.
- Pin out each top scallop so the peaks stand evenly upright.
- Lay the straps flat, pin them straight, and mist them.
- Let everything dry completely. This takes 12–24 hours.
- Take out the forms and hang the holder. Check that it is 20 in (50.8 cm) long.
Final Quality-Control Checklist
- Each base lies flat and measures 5 in (12.7 cm) across.
- Each basket has exactly 10 lower fans and 10 top scallops.
- The top scallops sit halfway between the lower fans all the way around.
- All three baskets stand 3.5 in (8.9 cm) tall.
- Both straps measure 1 in (2.5 cm) × 21 in (53.3 cm).
- The gaps between the baskets are an even 1.5 in (3.8 cm).
- The baskets hang level without tilting.
- The ring fold is sewn firmly and all ends are hidden.
Troubleshooting
Base cups or ruffles: Check your tension and change hook size. Stagger the increases if you see visible corners.
The last shell doesn’t fit: Recount Round 15. It must have 30 dc and 30 ch-1 sps.
Scallops line up with the lower fans instead of sitting between them: In Round 17, the V-sts must go into the sc between the shells, not into the shells themselves.
Basket leans on the strap: The straps aren’t directly opposite each other. Re-mark stitches 1 and 31 and sew again.
Roll doesn’t fit: Your gauge is tight. Remake the basket with a larger hook.
Straps stretch: Starch them lightly, or sew a cotton ribbon to the back of each strap.
Care
Hand wash in cool water with mild soap. Press out the water gently, reshape the baskets around a roll, and dry flat.
Final Notes
The measurement chain is short and reliable. A 60-stitch base gives a 5 in (12.7 cm) circle. Four sc rounds add a 1 in (2.5 cm) wall. Ten even shell repeats add a 2.5 in (6.4 cm) crown, for a 3.5 in (8.9 cm) basket. Then 84-stitch straps hold three baskets and two gaps for a 20 in (50.8 cm) hanging holder. Check your first basket at each checkpoint, and the other pieces will fit together easily.
Happy crocheting!