

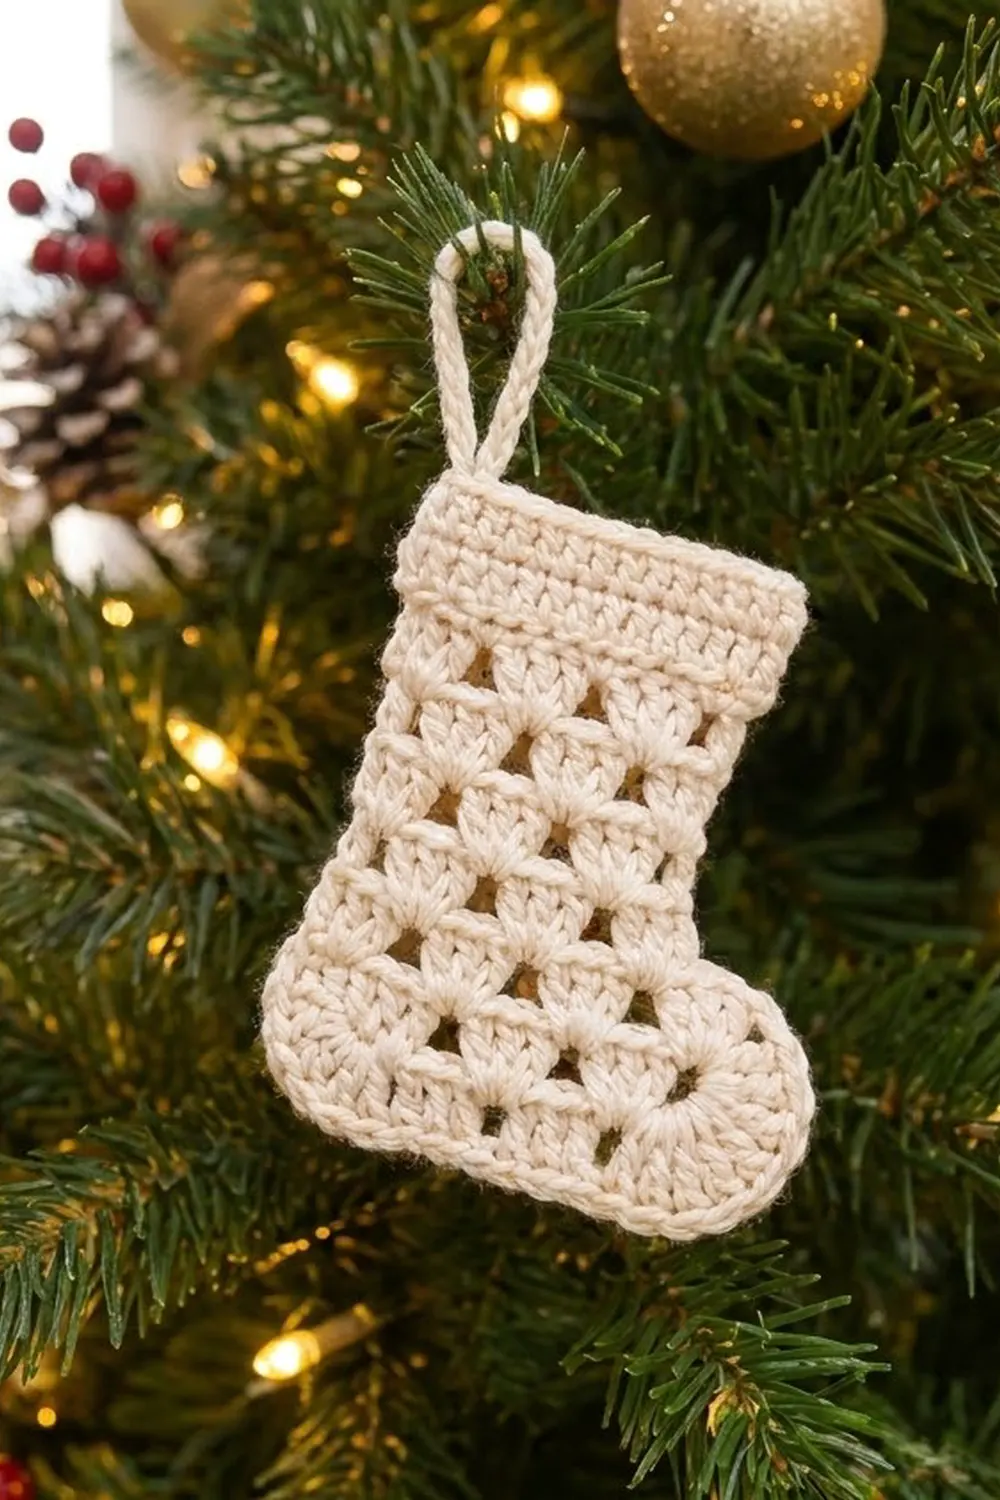
This little stocking is a flat, single-layer Christmas ornament worked in creamy white cotton. Rows of small fans, each one set off by tiny triangular eyelets, give the leg and foot an airy lace look. A dense ribbed cuff sits across the top, and a smooth single crochet border outlines the whole shape and rounds off the heel and toe.
It’s all one color, which gives it a calm, Scandinavian-style feel. Hang several on a tree, use one as a gift tag, or tie one to a wrapped present. The pattern uses US crochet terms throughout.
The finished stocking measures 4.2 in (10.7 cm) across the cuff, 5.0 in (12.7 cm) across the foot, and 6.2 in (15.7 cm) tall, not counting the hanging loop. With the loop, it’s about 7.7 in (19.6 cm) tall.
You make it flat in one piece, from the sole up. Five rows form the wide foot. The next six rows continue over the heel-side stitches only to make the leg, and five more rows make the cuff. Two rounds of border go around the outside, and a chain loop covered in single crochet finishes the top corner on the heel side.
Finished Size and Construction
- Finished size: 4.2 in (10.7 cm) wide at the cuff, 5.0 in (12.7 cm) wide at the foot, 6.2 in (15.7 cm) tall without the loop
- Skill level: Easy / advanced beginner
- Terminology: US crochet terms
- Yarn weight: DK (light worsted, #3), cotton or cotton blend
- Hook: 3.5 mm (US E-4)
- Number of pieces: 1
- Layout: One flat stocking shape. The toe points right and the heel is on the left when the right side faces you.
- Piece size before border: 3.4 in (8.6 cm) wide at the leg, 4.2 in (10.7 cm) wide at the foot, 5.4 in (13.7 cm) tall
- Border depth: 0.4 in (1.0 cm) on every side, which is two rounds of single crochet
Materials
Yarn: Use a smooth, mercerized or matte DK cotton in cream, ivory, or natural white. Cotton holds the fan texture crisply and blocks flat, so it suits an ornament that hangs. Acrylic works too, but the edges may curl more and need firmer blocking.
- Cream (one color): 15 g, about 35 m (38 yd)
Quantities include a margin for your gauge swatch and weaving in ends. One stocking uses about 10 g.
Tools:
- 3.5 mm (US E-4) crochet hook
- Tapestry needle
- Scissors
- 2 stitch markers
- Blocking mat or folded towel
- Rust-proof pins
- Spray bottle with clean water
Abbreviations (US Terms)
- ch – chain
- sl st – slip stitch
- sc – single crochet
- hdc – half double crochet
- dc – double crochet
- sc2tog – single crochet 2 together
- dc3tog – double crochet 3 together
- BLO – back loop only
- sk – skip
- sp – space
- st(s) – stitch(es)
- RS / WS – right side / wrong side
- rep – repeat
Special stitches
- Shell: Work 3 dc in the same stitch.
- dc3tog: (Yarn over, insert hook in next st, yarn over and pull up a loop, yarn over and pull through 2 loops) 3 times, working once in each of the next 3 sts. Yarn over and pull through all 4 loops on the hook. This counts as 1 st.
Gauge and Checkpoints
Gauge: 20 dc and 10 rows of the fan pattern = 4 in (10.2 cm). One pattern row (fan row or cluster row) is about 0.4 in (1.0 cm) tall. In sc, 5 sts and 5 rows = 1 in (2.5 cm).
There’s only one piece, so treat the start of the stocking as your test. Check these measurements as you go. Lay the work flat and don’t stretch it.
- After Row 1: 21 dc = 4.2 in (10.7 cm) wide
- After Row 5 (foot done): 2.0 in (5.1 cm) tall
- After Row 11 (leg done): 4.4 in (11.2 cm) tall overall. The leg is 3.4 in (8.6 cm) wide.
- After Row 16 (cuff done): 5.4 in (13.7 cm) tall overall
- After the border: 4.2 in (10.7 cm) at the cuff, 5.0 in (12.7 cm) at the foot, 6.2 in (15.7 cm) tall
If your piece is too big: Go down 0.5 mm in hook size and start again. If it’s too small: Go up 0.5 mm. Fix this at Row 1. Every later count depends on that 21-stitch row being 4.2 in (10.7 cm) wide.
Measure width on the dc or cluster rows. Fan rows flare slightly before the next row pulls them in.
Pattern Notes
- The stocking is worked in turned rows. The ch 3 at the start of a dc-based row counts as 1 dc.
- Row 1 is the RS. With the RS facing, RS rows travel right to left and finish at the heel (left) edge.
- The fan pattern repeats over 4 sts plus 1. The foot uses 5 repeats (21 sts) and the leg uses 4 repeats (17 sts).
Stocking Body
Foot
Foundation: Ch 23.
Row 1 (RS): Dc in the 4th ch from hook (the skipped 3 ch count as 1 dc). Dc in each of the next 19 ch. Turn. (21 sts)
Row 2 (WS, fan row): Ch 3 (counts as dc in the first st). Ch 1, sk next st, shell in next st, ch 1, sk next st, dc in next st; rep from * 4 more times. Turn. (31 sts: 5 shells of 3 dc, 10 ch-1 sps, 6 single dc)*
Row 3 (RS, cluster row): Ch 3 (counts as dc). Dc in next ch-1 sp, dc3tog over next 3 dc, dc in next ch-1 sp, dc in next dc; rep from * 4 more times. Make the final dc in the top of the turning ch-3. Turn. (21 sts)*
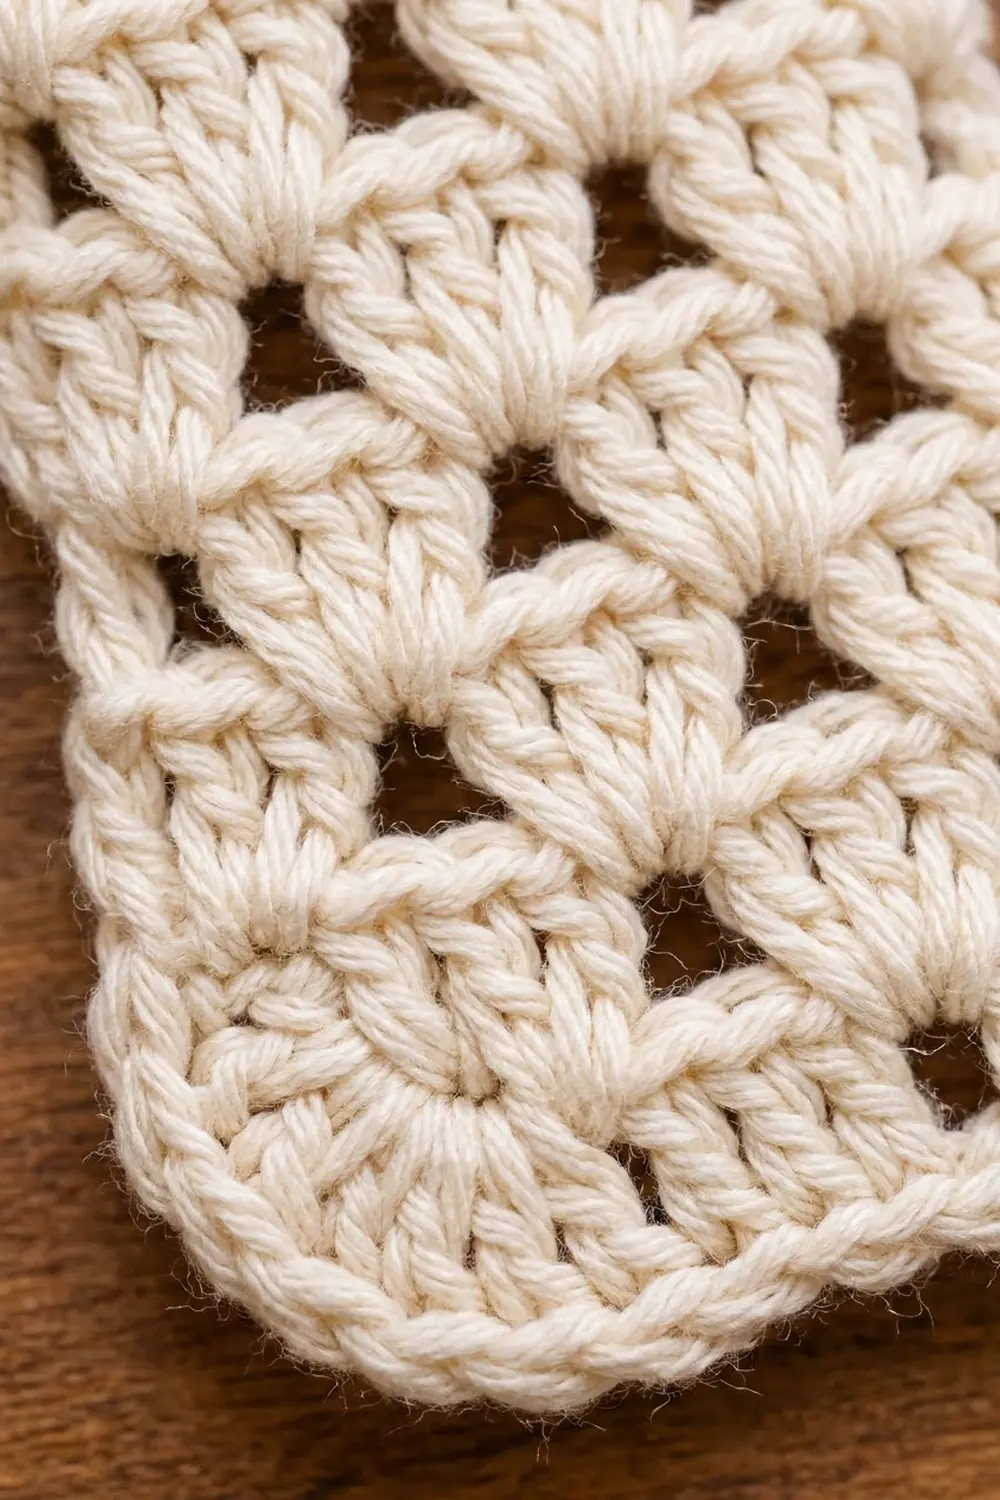
Each dc3tog pulls a shell back into a point, so the fan opens below it. The dc worked into each ch-1 sp leaves a small triangular eyelet beside the fan.
Row 4 (WS): Repeat Row 2. (31 sts)
Row 5 (RS): Repeat Row 3. (21 sts) You finish at the heel edge.
Checkpoint: 4.2 in (10.7 cm) wide and 2.0 in (5.1 cm) tall.
Leg
Now you work only over the 17 heel-side sts. The 4 sts at the toe end of Row 5 stay unworked. That step forms the top of the toe.
Row 6 (WS, fan row): Ch 3 (counts as dc in the first st). Ch 1, sk next st, shell in next st, ch 1, sk next st, dc in next st; rep from * 3 more times. Turn, and leave the last 4 sts unworked. (25 sts: 4 shells)*
Row 7 (RS, cluster row): Ch 3. Dc in next ch-1 sp, dc3tog over next 3 dc, dc in next ch-1 sp, dc in next dc; rep from * 3 more times. Make the final dc in the turning ch. Turn. (17 sts)*
Rows 8 and 10 (WS): Repeat Row 6, working across all sts. (25 sts each)
Rows 9 and 11 (RS): Repeat Row 7. (17 sts each)
That gives five fan rows in total: two across the foot and three up the leg. The fans sit in straight columns.
Checkpoint: the leg is 3.4 in (8.6 cm) wide and the piece is 4.4 in (11.2 cm) tall.
Cuff
Row 12 (WS): Ch 1 (doesn’t count as a st). Sc in each st across. Turn. (17 sc)
Rows 13–16: Ch 1 (doesn’t count). Hdc in BLO of each st across. Turn. (17 hdc each)
The back-loop hdc rows make the compact, ribbed band you see on the cuff. Row 16 is a WS row, so it ends at the top-right corner of the cuff (the toe side). Don’t fasten off.
Checkpoint: the cuff is 1.0 in (2.5 cm) deep. The piece measures 3.4 in (8.6 cm) wide at the leg, 4.2 in (10.7 cm) wide at the foot, and 5.4 in (13.7 cm) tall.
Border
Border gauge: 5 sc per inch (2.5 cm) along every edge. This is how the row-end counts work:
- Each pattern row is 0.4 in (1.0 cm) tall, so it gets 2 sc.
- Each cuff row is 0.2 in (0.5 cm) tall, so it gets 1 sc.
- Along top and bottom edges, each stitch gets 1 sc.
Put markers in the center sts of the corners as you go if you find that helpful.
Round 1 (RS)
Ch 1 and turn so the RS faces you. Work counterclockwise around the stocking.
- Cuff top: 3 sc in the first st (corner A). Sc in each of the next 15 sts. 3 sc in the last st (corner B). (15 sc between corners)
- Heel edge: Work down the left side. 1 sc in each of the 5 cuff row ends, then 2 sc in each of the 11 pattern row ends. (27 sc)
- Sole: Work along the underside of the foundation chain. 3 sc in the first ch (corner C), sc in each of the next 19 ch, 3 sc in the last ch at the base of the beginning ch-3 (corner D). (19 sc between corners)
- Toe end: Work up the right side of the foot, 2 sc in each of the 5 row ends. (10 sc)
- Toe top: 3 sc in the top of the turning ch-3 of Row 5 (corner E). Sc in each of the next 2 unworked sts. Then make an sc2tog with the first leg of the stitch in the last unworked st and the second in the Row 6 row end. That sc2tog is the inner corner.
- Leg front: Work up the right side of the leg. 1 more sc in the Row 6 row end, 2 sc in each row end for Rows 7–11, and 1 sc in each of the 5 cuff row ends. (16 sc)
Join with a sl st to the first sc. (105 sts)
Check: 18 + 3 + 27 + 3 + 19 + 3 + 10 + 3 + 2 + 1 + 16 = 105. The first 18 are corner A (3) plus the 15 cuff sts.
Round 2 (RS)
Ch 1. Don’t turn.
- Sc in the first st, and 3 sc in the next st (center of A).
- Sc in each of the next 17 sts, then 3 sc in the next st (center of B).
- Sc in each of the next 28 sts.
- 2 sc in each of the next 3 sts (corner C).
- Sc in each of the next 19 sts.
- 2 sc in each of the next 3 sts (corner D).
- Sc in each of the next 10 sts.
- 2 sc in each of the next 3 sts (corner E).
- Sc in each of the next 2 sts. Sc2tog over the sc2tog and the next sc.
- Sc in each of the remaining 15 sts.
Join with a sl st to the first sc. (117 sts) Fasten off.
Why the math works: Round 2 uses up all 105 sts of Round 1: 1 + 1 + 17 + 1 + 28 + 3 + 19 + 3 + 10 + 3 + 2 + 2 + 15 = 105. It adds 2 sts at each of the two square cuff corners (+4) and 3 sts at each of the three rounded corners (+9). The inner corner loses 1 st (−1). So 105 + 12 = 117.
Spreading increases over three stitches at C, D, and E turns those corners into the smooth, rounded heel and toe. A and B get a single 3-sc point, so the cuff keeps crisp square corners. Every edge gets 5 sc per inch (2.5 cm), so the border lies flat without ruffling or cupping.
Hanging Loop
Join yarn with a sl st in the center sc of corner B (the top heel-side corner). Ch 15, then sl st in the same st. Work 22 sc into the ch-15 loop, completely covering the chain. Sl st in the same corner st. Fasten off.
The loop stands about 1.5 in (3.8 cm) tall. Weave in all ends along the border on the WS.
Final Blocking
- Lightly spray the stocking with water until it’s damp all the way through. Don’t soak it.
- Lay it RS up on the blocking mat.
- Pin the cuff first. Make the top edge straight and 4.2 in (10.7 cm) wide, with square corners.
- Pin the sole straight and 5.0 in (12.7 cm) wide. Then curve the heel and toe corners smoothly with several pins each.
- Ease the height to 6.2 in (15.7 cm) without stretching the fans tall.
- Open each triangular eyelet gently with a fingertip so the fans line up in columns.
- Pin the loop upright, and let everything dry completely before you unpin.
Final Quality-Control Checklist
- [ ] Row 1 has 21 sts and is 4.2 in (10.7 cm) wide
- [ ] Each fan row has the right count: 31 sts on the foot, 25 sts on the leg
- [ ] Each cluster row is back to 21 or 17 sts
- [ ] The leg has 4 fans per row and the foot has 5
- [ ] The cuff has 17 sts in every row and is 1.0 in (2.5 cm) deep
- [ ] Border Round 1 = 105 sts and Round 2 = 117 sts
- [ ] The heel and toe are rounded and the cuff corners are square
- [ ] The inner corner above the toe lies flat
- [ ] The piece measures 4.2 x 6.2 in (10.7 x 15.7 cm) at the leg and 5.0 in (12.7 cm) at the foot
- [ ] The loop is centered on corner B and all ends are woven in securely
Troubleshooting
The piece is wider than 4.2 in (10.7 cm) after Row 1. Your foundation chain is probably loose. Go down a hook size, or make the chain with a hook one size smaller.
The fan rows ripple. Check that you skip 1 st on each side of every shell. Your dc3tog should also be snug.
The cluster row count is off. Count 4 sts per repeat plus the turning ch. Don’t forget the final dc in the turning ch-3.
The leg is on the wrong side. Row 6 must start at the heel edge, which is where Row 5 ended. If you’re at the toe end instead, recount your foot rows. There should be exactly 5.
The border cups. You may be working too many sts along the row ends. Use exactly 2 sc per pattern row.
The border ruffles at the heel or toe. Your tension is loose at the increases. Work the 2-sc groups a little tighter.
The inner corner puckers. Make sure the sc2tog straddles the unworked foot stitch and the Row 6 row end.
The loop sags. Pack the 22 sc tightly, or add 2 more.
Care
Hand wash in cool water with mild soap. Press out the water in a towel and dry flat, reshaping the heel and toe. Store flat or hang from the loop, away from direct sunlight.
Final Notes
The size of this stocking comes down to one chain of measurements:
- Row 1 sets the foot at 4.2 in (10.7 cm) wide.
- Five pattern rows make the foot 2.0 in (5.1 cm) tall.
- Six more rows on 17 sts build the 3.4 in (8.6 cm) leg, for 4.4 in (11.2 cm) of height.
- The cuff adds 1.0 in (2.5 cm), for 5.4 in (13.7 cm) before the border.
- The border adds 0.4 in (1.0 cm) on every side, for a finished 4.2 in (10.7 cm) cuff, 5.0 in (12.7 cm) foot, and 6.2 in (15.7 cm) height.
If your first row measures right, everything after it will too. Make one for a gift tag, or make a set for the tree.
Happy crocheting!