

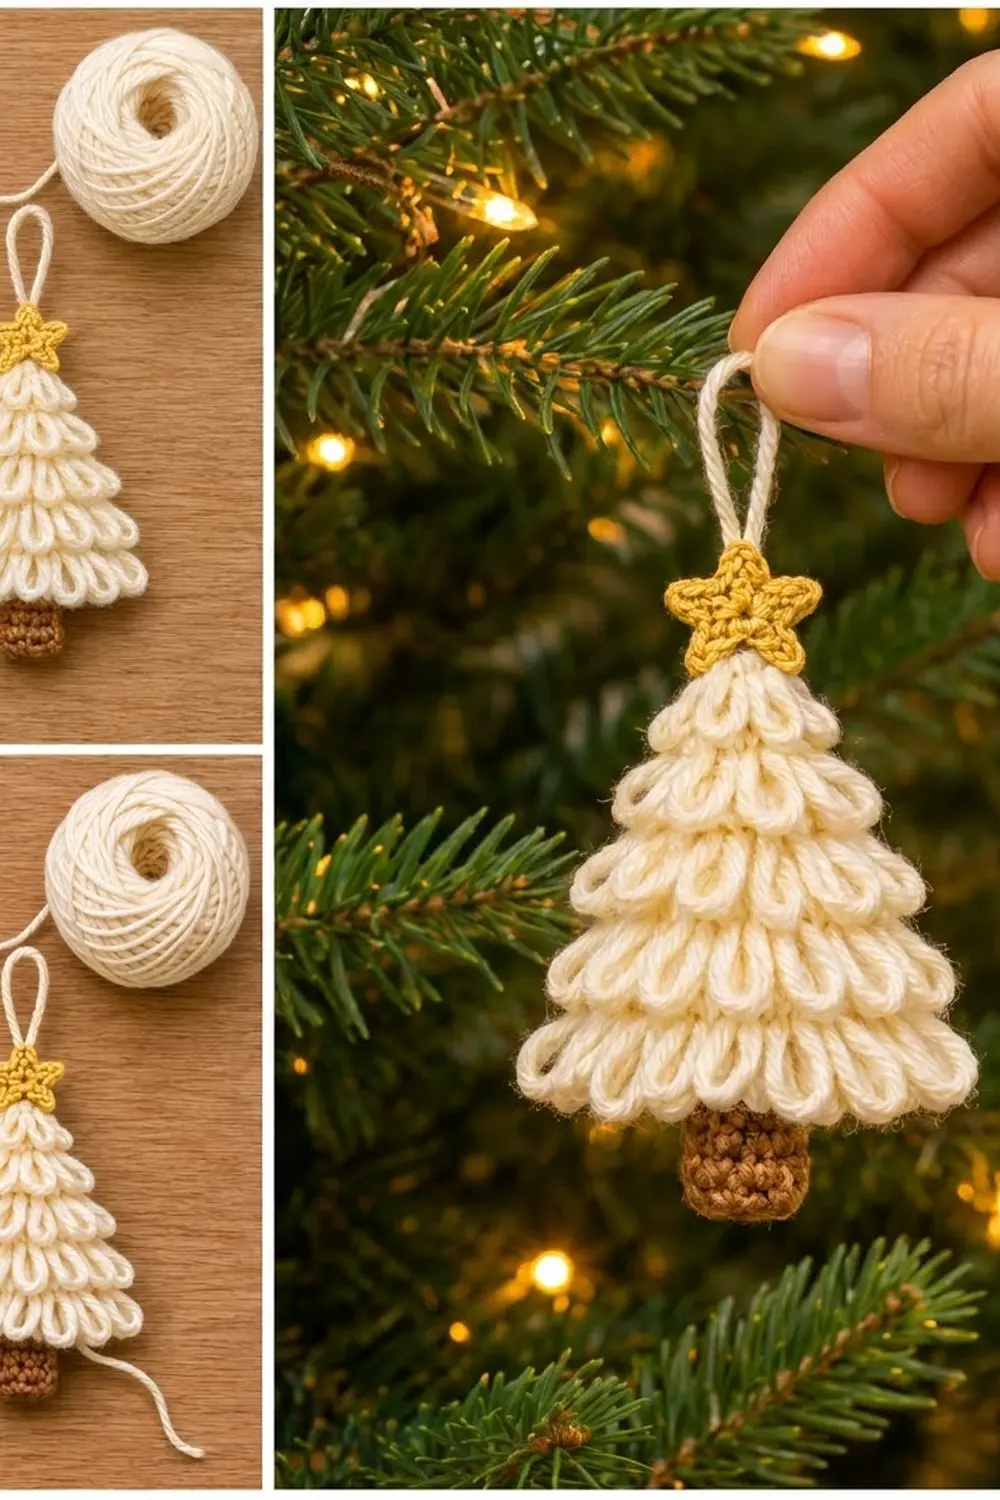
This little tree ornament is made of soft cream loops. Five tiers of chain loops hang down a small cone like layered snowy branches, with a gold star on top and a short brown trunk below. It looks handmade and cozy, and it works well on a real tree, a gift package, or a wreath.
The palette is simple: cream for the tree and hanging loop, warm gold for the star, and chestnut brown for the trunk. The texture comes from plain chain loops worked into free front loops, so the stitches are easy even though the result looks detailed.
The pattern uses US crochet terms. The finished ornament is about 3 in (7.6 cm) wide and 4 in (10.2 cm) tall, not counting the hanging loop, which adds about 1.3 in (3.3 cm).
Construction overview: you crochet a single-crochet cone from the tip down. Some rounds are worked in the back loop only (BLO) to leave a ring of free front loops. After the cone is closed, you work five chain-loop tiers into those free loops, ending with the longest tier around the base as a scalloped border. A small trunk and a five-point star are crocheted separately and sewn on, and a chain loop is added for hanging.
Finished Size and Construction
- Finished size: 3 in (7.6 cm) wide × 4 in (10.2 cm) tall, plus hanging loop
- Skill level: Easy / advanced beginner
- Terminology: US crochet terms
- Yarn weight: DK (#3), cotton or cotton blend
- Hook: 3.5 mm (E-4)
- Number of pieces: 1 finished ornament (cone body, trunk, and star sewn together into one tree)
- Layout: single standalone ornament, worn hanging upright
- Piece size (cone body, flattened): 2.4 in (6.1 cm) wide × 2.8 in (7.1 cm) tall
- Size before border: 2.4 in (6.1 cm) wide at the base, before the bottom loop tier is added
- Border depth: the bottom loop tier hangs about 0.6 in (1.5 cm), and its side loops push the width out to 3 in (7.6 cm)
Materials
Yarn: Use a smooth DK cotton or cotton blend. Cotton gives clear loops that hold their U shape. Fuzzy or very soft acrylic makes the loops collapse and blur the tiers.
- Cream (tree body, loops, hanging loop): 8 g / 20 m (22 yd)
- Gold (star): 2 g / 5 m (5.5 yd)
- Chestnut brown (trunk): 2 g / 5 m (5.5 yd)
The quantities include a margin of about 30% for your gauge swatch and tails.
Tools:
– 3.5 mm (E-4) crochet hook
– Tapestry needle
– 1 stitch marker
– A small pinch of polyester fiberfill
– Scissors
– Pins and a steam iron or garment steamer for blocking
Abbreviations (US Terms)
- ch – chain
- sl st – slip stitch
- sc – single crochet
- hdc – half double crochet
- inc – 2 sc in the same stitch
- sc2tog – single crochet 2 together
- MR – magic ring
- BLO – back loop only
- FL – front loop
- st(s) – stitch(es)
- rep – repeat
Special stitch – Loop tier: With the cone tip pointing up, join yarn with a sl st in any free FL. Ch the number given, skip the next free FL, sl st in the next free FL. Rep from * around. On the last repeat, finish with a sl st into the first sl st. Each loop uses 2 free front loops, so the number of loops in a tier is half the number of free front loops in that ring.
Gauge and Checkpoints
Gauge: 5 sc and 6 rounds = 1 in (2.5 cm) in tight continuous-round sc with a 3.5 mm hook. Chain gauge: 6 ch = 1 in (2.5 cm).
Instead of a flat swatch, use the cone itself as your test. Crochet Rounds 1–11, then flatten the piece and measure:
- After Round 5: 0.8 in (2.0 cm) tall, 1 in (2.5 cm) wide flattened
- After Round 11: 1.8 in (4.6 cm) tall, 2 in (5.1 cm) wide flattened
- After Round 17: 2.8 in (7.1 cm) tall, 2.4 in (6.1 cm) wide flattened
If your cone is too big: go down to a 3.25 mm hook, or tighten your tension. Gaps between stitches will also let stuffing show through.
If your cone is too small: go up to a 3.75 mm hook. The stitches should still be firm enough that the free front loops sit as a clear ridge.
Tree Body (Cream)
Work in continuous spiral rounds. Do not join or turn. Place a marker in the first stitch of every round and move it up as you go.
Round 1: Make an MR, ch 1, 6 sc in the ring. Pull the ring tight. (6 sts)
Round 2: Sc in each st around. (6 sts)
Round 3: (Sc 2, inc) 2 times. (8 sts)
Round 4: Sc in each st around. (8 sts)
Round 5: (Sc 3, inc) 2 times. (10 sts)
Round 6 (BLO): Working in BLO, sc in each st around. (10 sts)
This leaves 10 free front loops from Round 5 for Tier 1.
Round 7: (Sc 4, inc) 2 times. (12 sts)
Round 8: (Sc 5, inc) 2 times. (14 sts)
Round 9 (BLO): Working in BLO, (sc 6, inc) 2 times. (16 sts)
This leaves 14 free front loops from Round 8 for Tier 2.
Round 10: (Sc 7, inc) 2 times. (18 sts)
Round 11 (BLO): Working in BLO, (sc 8, inc) 2 times. (20 sts)
This leaves 18 free front loops from Round 10 for Tier 3.
Checkpoint: the cone should measure 1.8 in (4.6 cm) tall and 2 in (5.1 cm) wide when flattened.
Round 12: (Sc 9, inc) 2 times. (22 sts)
Round 13: Sc in each st around. (22 sts)
Round 14 (BLO): Working in BLO, (sc 10, inc) 2 times. (24 sts)
This leaves 22 free front loops from Round 13 for Tier 4.
Rounds 15–17: Sc in each st around. (24 sts each round)
Checkpoint: the cone should measure 2.8 in (7.1 cm) tall and 2.4 in (6.1 cm) wide when flattened.
Stuff the tip and sides lightly with a small pinch of fiberfill. The tree should stay fairly flat, so it lies close to a branch.
Round 18 (BLO, base): Working in BLO, (sc 2, sc2tog) 6 times. (18 sts)
This leaves 24 free front loops from Round 17 for Tier 5, the bottom border.
Round 19: (Sc 1, sc2tog) 6 times. (12 sts)
Round 20: Sc2tog 6 times. (6 sts)
Fasten off. Leave a 6 in (15.2 cm) tail and weave it through the front loops of the last 6 sts. Pull it closed and weave the end in. Press the cone flat with your fingers so the increases sit at the two side edges.
Loop Tiers 1–4 (Cream)
Work the tiers from top to bottom so the lower loops don’t get in the way. Hold the cone tip up. Each loop hangs down over the stitches below it.
Tier 1 (Round 5 front loops): Join cream in any free FL. Ch 4, skip 1 FL, sl st in next FL. Rep around. (10 FL used, 5 loops) Fasten off.
Tier 2 (Round 8 front loops): Join in any free FL. Ch 5, skip 1 FL, sl st in next FL. Rep around. (14 FL used, 7 loops) Fasten off.
Tier 3 (Round 10 front loops): Join in any free FL. Ch 6, skip 1 FL, sl st in next FL. Rep around. (18 FL used, 9 loops) Fasten off.
Tier 4 (Round 13 front loops): Join in any free FL. Ch 7, skip 1 FL, sl st in next FL. Rep around. (22 FL used, 11 loops) Fasten off.
The tiers are 2 or 3 rounds apart, about 0.3–0.5 in (0.8–1.3 cm), and each loop hangs 0.3–0.6 in (0.8–1.5 cm). So each tier overlaps the top of the tier below it, which gives the layered, snowy branch look.
Border: Tier 5 (Bottom Loop Hem, Cream)
Border gauge: 6 ch = 1 in (2.5 cm). A ch-8 loop is about 1.3 in (3.3 cm) of chain. It folds into a U that hangs about 0.6 in (1.5 cm).
Starting count: 24 free front loops on Round 17. Flattened, that is 12 front loops on the front face and 12 on the back face.
Tier 5: Join cream in the free FL at one side edge. Ch 8, skip 1 FL, sl st in next FL. Rep around, ending with a sl st in the first sl st. (24 FL used, 12 loops: 6 on the front face, 6 on the back face) Fasten off and weave in all ends on the inside of the cone.
Why the math works: Round 17 has 24 stitches, so it has 24 free front loops. Each loop uses exactly 2, and 24 ÷ 2 = 12 loops with nothing left over. The side edges fall between loops, so each flattened face gets an even 6 loops. The two edge loops spread outward by about 0.3 in (0.8 cm) on each side. That brings the 2.4 in (6.1 cm) body to the finished 3 in (7.6 cm) width. Every tier above follows the same rule: 10, 14, 18, and 22 front loops are all even numbers, giving 5, 7, 9, and 11 loops with no partial loop at the join.
Trunk (Chestnut Brown)
Round 1: MR, ch 1, 6 sc in the ring. (6 sts)
Round 2: (Sc 2, inc) 2 times. (8 sts)
Rounds 3–5: Sc in each st around. (8 sts each round)
Fasten off and leave a 10 in (25.4 cm) tail. Do not stuff. Flatten the tube. It should measure about 0.8 in (2.0 cm) wide and 0.8 in (2.0 cm) long.
Center the open end under the closed base of the cone and whipstitch all around. About 0.6 in (1.5 cm) of trunk should show below the Tier 5 loops. Weave in the tail.
Star (Gold)
Round 1: MR, ch 1, 10 sc in the ring. Pull the ring tight and sl st to the first sc. (10 sts)
Round 2: Ch 3, sc in 2nd ch from hook, hdc in next ch, skip next sc, sl st in next sc. Rep from * 4 more times. The last sl st goes into the first sc of Round 1. (5 points)
Fasten off and leave a 10 in (25.4 cm) tail. The star measures about 1 in (2.5 cm) across from point to point.
Hanging Loop and Assembly (Cream)
- Join cream with a sl st at the very tip of the cone, through the MR stitches.
- Ch 16, about 2.7 in (6.9 cm) long.
- Sl st back into the same tip stitch to form a loop about 1.3 in (3.3 cm) tall. Fasten off and weave the ends down into the cone.
- Place the star on the front face so its center sits over the tip and the hanging loop rises from behind its top point. About 0.5 in (1.3 cm) of star should sit above the cone.
- Whipstitch around the star’s center ring with the gold tail. Add a small tack stitch under each of the two lower points so they don’t curl. Weave in the end.
Final Blocking
- Check that all ends are woven in and trimmed close.
- Lay the ornament face up on an ironing board or foam mat.
- Use your fingers to pull each loop down into an even U. Fan the edge loops of every tier slightly outward to make the triangle outline.
- Pin the star points and the base corners of the cone if they want to roll.
- Hold a steam iron 1 in (2.5 cm) above the piece and let the steam soak in for a few seconds. Don’t press the iron down, because that would flatten the loops.
- Let it dry completely, about 20–30 minutes, then remove the pins.
- Measure: 3 in (7.6 cm) wide and 4 in (10.2 cm) tall without the hanging loop.
Final Quality-Control Checklist
- Cone measures 2.4 in (6.1 cm) wide × 2.8 in (7.1 cm) tall when flattened
- Tiers have 5, 7, 9, 11, and 12 loops, top to bottom
- Loop lengths increase by one chain per tier (ch 4 to ch 8)
- Every tier joins cleanly, with no gap or doubled loop
- Bottom tier has 6 loops on each face and hangs about 0.6 in (1.5 cm)
- Trunk is centered, with about 0.6 in (1.5 cm) showing
- Star is centered over the tip, with all 5 points lying flat
- Hanging loop is secure and about 1.3 in (3.3 cm) tall
- Finished size is 3 in (7.6 cm) × 4 in (10.2 cm)
- No stuffing shows between the stitches
Troubleshooting
Loops point sideways instead of hanging down: You may have worked the tier with the cone upside down. Rework it with the tip pointing up.
The tier ends with an odd front loop: A round count is off. Count the free front loops before you start. Each tier ring should have an even number: 10, 14, 18, 22, or 24.
Tiers don’t overlap: Your chains are too tight. Go up 0.25 mm in hook size for the loop tiers only, or add 1 chain to each loop length.
Cone leans or twists: That is normal spiral drift. Steam the cone and roll it gently between your palms to straighten it.
Star points curl: Steam-block them pinned flat, and add a tack stitch under each point.
Hard to find the front loops: Work the tiers in good light, and slide the hook under only the outer loop sitting just above each BLO round.
Care
Hand wash in cool water with a mild soap, press out the water in a towel, and reshape the loops before drying flat. Store flat or hanging so the loops aren’t crushed.

Final Notes
The measurement chain is simple. Gauge of 5 sc and 6 rounds per 1 in (2.5 cm) gives a 24-stitch, 17-round cone that measures 2.4 in (6.1 cm) wide and 2.8 in (7.1 cm) tall when flattened. Five even loop tiers finish with a 12-loop hem that widens the tree to 3 in (7.6 cm). The trunk and star bring the height to 4 in (10.2 cm). Check those few numbers along the way and every ornament will match. Make one for each branch, or tie one onto a gift.
Happy crocheting!