

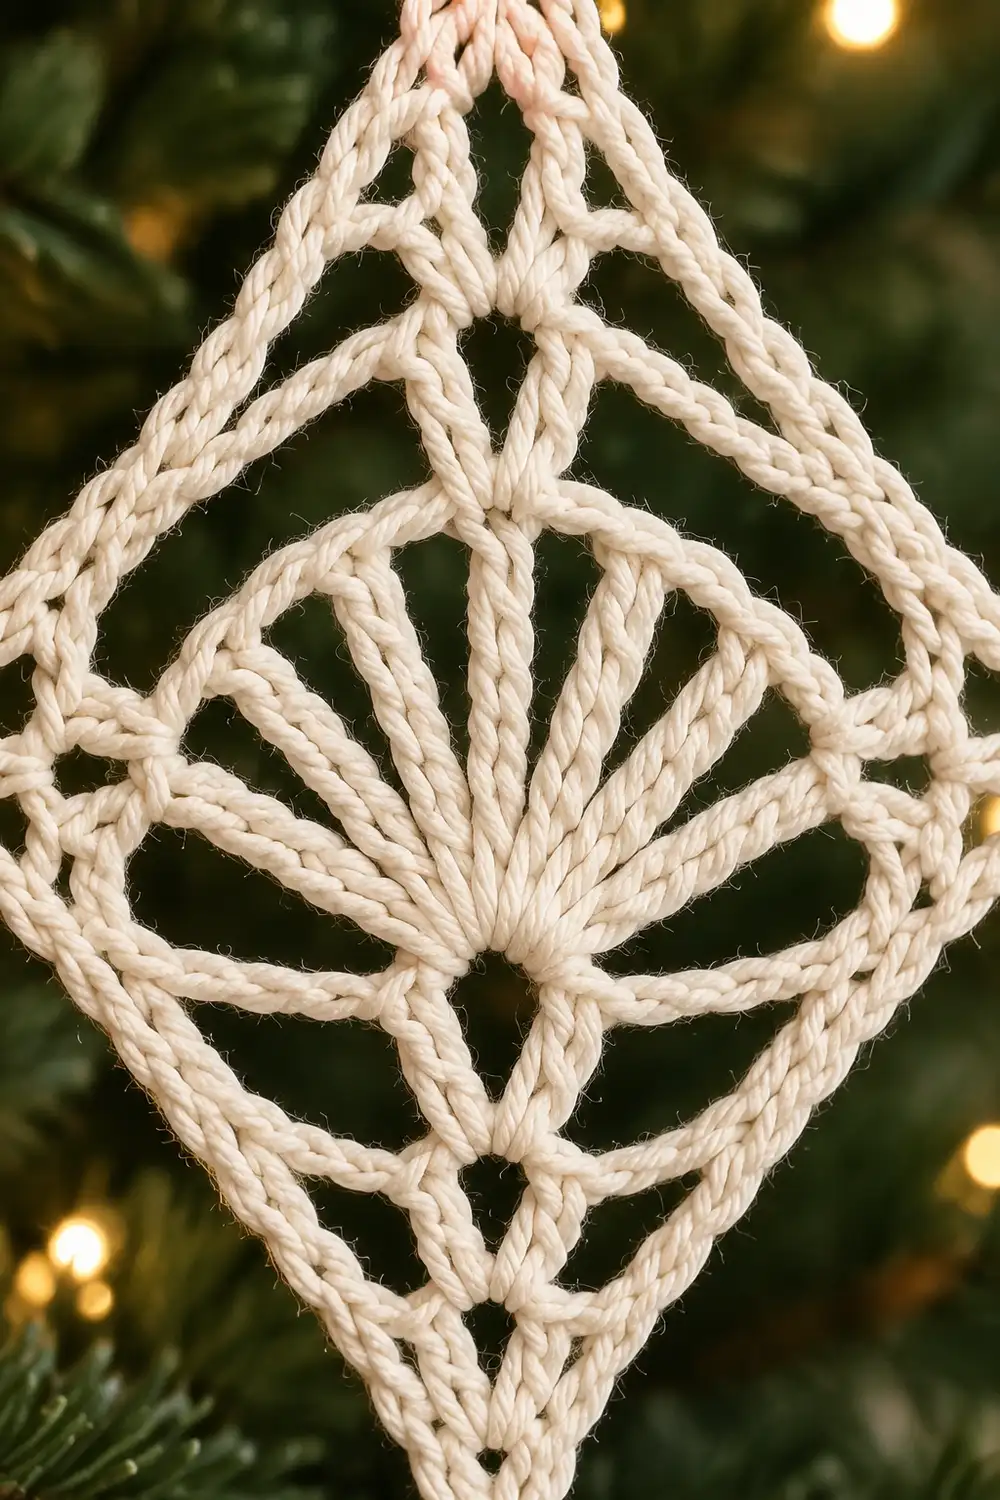
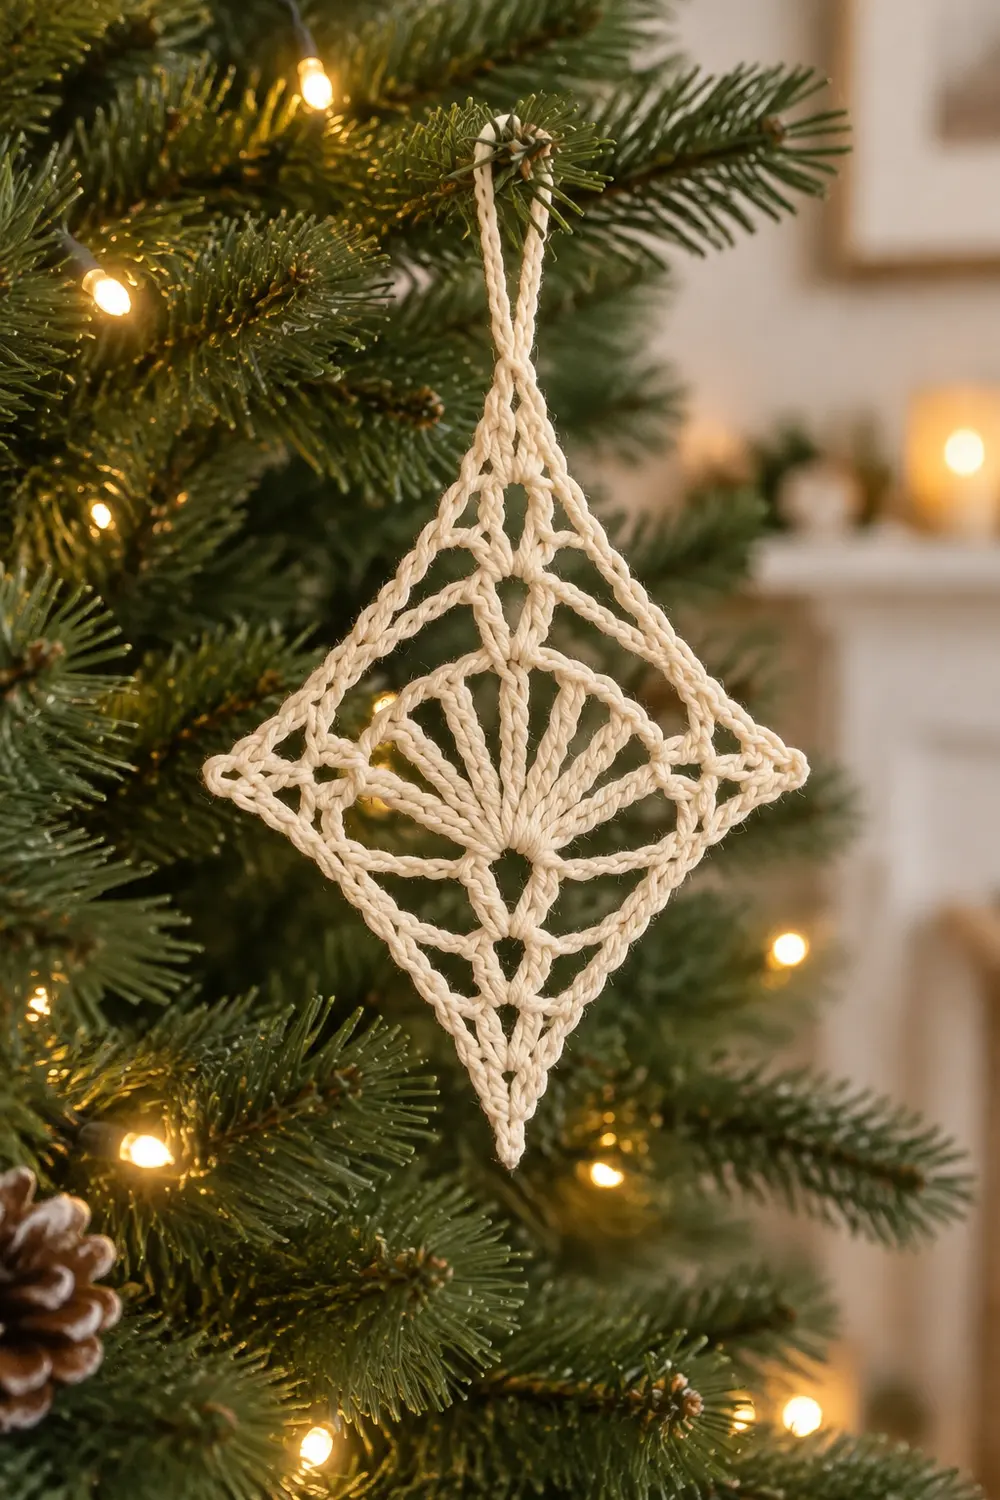
This little ornament is a single lacy motif worked in cream cotton and hung on point so it reads as a crisp four-pointed diamond. Long treble spokes form a starburst at the center. Chain loops and shaped corners around it create a ring of geometric cutouts that look like a delicate lattice when the tree lights shine through.
The style is quiet and classic. One neutral color keeps the focus on the openwork. Cream or off-white looks especially good against evergreen branches and warm white fairy lights.
The pattern uses US crochet terms. The finished ornament measures about 3.5 in (8.9 cm) from tip to tip across its widest point. Each straight side measures about 2.5 in (6.4 cm).
Construction is simple. You work the motif in the round from a magic ring: 3 rounds of lace for the starburst and lattice, then 2 rounds of single crochet that square off the edges and form the pointed tips. A twisted yarn cord threaded through the top tip makes the hanging loop.
Finished Size and Construction
- Finished size: 3.5 in (8.9 cm) tip to tip, sides 2.5 in (6.4 cm)
- Skill level: Advanced beginner
- Terminology: US crochet terms
- Yarn weight: Sport weight (Fine, #2) cotton
- Hook: 2.75 mm (C-2)
- Number of pieces: 1 crocheted motif plus 1 twisted yarn cord
- Layout: Single square motif hung on point as a diamond
- Piece size: 2.5 in (6.4 cm) per side after the border
- Size before border: 2 in (5.1 cm) per side, about 2.8 in (7.1 cm) tip to tip
- Border depth: 2 rounds, about 0.25 in (0.6 cm) per edge
Materials
Yarn advice: Choose a smooth, tightly plied mercerized or matte cotton in sport weight. Cotton holds the sharp points and open spaces much better than acrylic. It also takes stiffener well. Avoid fuzzy or brushed yarns, which blur the lattice.
- Cream / off-white sport weight cotton: 8 g, about 16 m (17 yd)
This covers the motif (about 5 g) and the twisted cord (about 1 g). The quantity includes a margin for a test swatch and weaving in ends.
Tools:
- 2.75 mm (C-2) crochet hook
- Tapestry needle
- Scissors
- Stitch marker
- Rustproof pins and a foam blocking mat
- Fabric stiffener or spray starch (optional but recommended)
- Ruler or measuring tape
Abbreviations (US Terms)
- ch – chain
- sl st – slip stitch
- sc – single crochet
- dc – double crochet
- tr – treble crochet
- sp(s) – space(s)
- st(s) – stitch(es)
- rep – repeat
- beg – beginning
- [ ] – work the bracketed instructions the stated number of times
- * – repeat from the asterisk as directed
Special stitch – Corner shell: (2 dc, ch 3, 2 dc) all worked into the same ch-3 loop.
Gauge and Checkpoints
Gauge is not critical for a tree ornament. It does control whether the points come out crisp and whether the size lands near 3.5 in (8.9 cm). Work one complete motif first and measure at each checkpoint before you make several.
Border gauge: 7.5 sc = 1 in (2.5 cm), measured along a finished edge.
Checkpoints:
- After Round 1: the starburst is about 1.25 in (3.2 cm) across.
- After Round 2: the circle is about 1.75 in (4.4 cm) across.
- After Round 3: the square is about 2 in (5.1 cm) per side.
- After Round 4: about 2.25 in (5.7 cm) per side.
- After Round 5: 2.5 in (6.4 cm) per side and 3.5 in (8.9 cm) tip to tip.
If your motif is too big: go down to a 2.5 mm hook, or keep the chain loops snug. Loose chains are the most common cause of oversizing.
If your motif is too small or cups: go up to a 3.0 mm hook. Also make sure your trebles are pulled to their full height in Round 1.
Small differences of about 0.25 in (0.6 cm) can be corrected during blocking.
Motif Pattern
Round 1 – Starburst Spokes
Make a magic ring.
Ch 5 (counts as tr + ch 1). [Tr into ring, ch 1] 11 times. Join with a sl st to the 4th ch of the beg ch-5. Pull the ring closed tightly.
Count: 12 tr and 12 ch-1 sps.
The 12 trebles form the radiating spokes of the starburst. Keep the ch-1s small so the spokes look like straight lines from the center.
Round 2 – Inner Ring of Loops
Sl st into the first ch-1 sp. Ch 1, then sc in the same sp. *Ch 3, sc in the next ch-1 sp; rep from * 10 more times. Ch 3 and join with a sl st to the first sc.
Count: 12 sc and 12 ch-3 loops.
Each sc caps one gap between spokes. The ch-3 loops form the arched ring around the starburst.
Round 3 – Lattice and Corners
This round turns the circle into a square. There are 3 loops per quarter: 1 becomes a corner and 2 stay as side loops.
Sl st into the first ch-3 loop. Ch 3 (counts as dc), then work (dc, ch 3, 2 dc) in the same loop. This is the first corner shell.
*[Ch 3, sc in the next loop] twice. Ch 3, then work a corner shell in the next loop. Rep from * 2 more times.
[Ch 3, sc in the next loop] twice. Ch 3 and join with a sl st to the top of the beg ch-3.
Count for this round: 16 dc, 8 sc, 4 corner ch-3 sps, and 12 side ch-3 sps.
Per side: 2 dc, ch-3, sc, ch-3, sc, ch-3, 2 dc. That is 3 side spaces per side.
The side ch-3 spaces create the open geometric cutouts around the starburst. Measure now: 2 in (5.1 cm) per side.
Twisted Cord Hanger (make now, attach after blocking)
- Cut a 30 in (76.2 cm) strand of the same yarn.
- Fold it in half. Anchor the fold on a hook or doorknob.
- Twist the two loose ends together in one direction until the strand kinks back on itself.
- Bring the ends up to the fold and let the halves twist around each other.
- Knot the loose ends together.
The finished cord is about 6 in (15.2 cm) long. Set it aside.
Border
The border is 2 rounds of sc. It fills the side spaces with solid edges and sharpens the four corners into points.
Border gauge: 7.5 sc = 1 in (2.5 cm). With 19 sc per side after Round 5, each side measures about 2.5 in (6.4 cm).
Round 4 – Conversion Round
This is a conversion round. It does not continue the growth pattern of Round 3. You work 1 sc into each existing stitch and 3 sc into each space.
Ch 1. Sc in the same st and in the next dc (2 sc). Work 3 sc in the corner ch-3 sp.
*Sc in each of the next 2 dc. [3 sc in the next ch-3 sp, sc in the next sc] twice. 3 sc in the next ch-3 sp. Sc in each of the next 2 dc. Work 3 sc in the corner ch-3 sp. Rep from * 2 more times.
Sc in each of the next 2 dc. [3 sc in the next ch-3 sp, sc in the next sc] twice. 3 sc in the next ch-3 sp. Join with a sl st to the first sc.
Count:
- Stitches worked 1 per existing stitch: 16 dc + 8 sc = 24 sc
- Stitches added into side spaces: 12 sps x 3 = 36 sc
- Stitches added into corner spaces: 4 sps x 3 = 12 sc
- Total: 24 + 36 + 12 = 72 sc
Per side: 15 sc between the corner spaces (2 + 4 + 4 + 3 + 2). Add the 2 outer sc of the corner groups for 17. Then add the 2 shared corner-center sc for 19 sc per side, including corners.
Check: 4 sides x 19 = 76. Subtract the 4 shared corner sc counted twice: 76 – 4 = 72. ✓
Why the math works: a ch-3 spans about the width of 3 sc, so 3 sc per space lies flat without ruffling or pulling. The 3-sc corner groups provide the extra stitches a square corner needs.
Round 5 – Pointed Tips
The corner-center sc is the 4th sc of Round 4.
Ch 1. Sc in each of the first 3 sc. In the next sc (the corner center), work (sc, ch 2, sc).
*Sc in each of the next 17 sc. In the next sc, work (sc, ch 2, sc). Rep from * 2 more times.
Sc in each of the last 14 sc. Join with a sl st to the first sc. Fasten off and weave in the ends.
Count:
- Stitches worked 1 per existing stitch: 72 sc
- Extra stitches added at the corners: 4 x 1 = 4 sc
- Total: 76 sc plus 4 ch-2 tips
Per side: In this round the corner stitch is split into 2 sc with a ch-2 between them. Each side owns one sc from each corner pair, so the corner stitches are not shared here.
Each side has 17 sc + 2 corner sc = 19 sc per side, and 4 x 19 = 76. ✓
The ch-2 between the corner pair forms the sharp tip. Measure now: 2.5 in (6.4 cm) per side and 3.5 in (8.9 cm) tip to tip.
Final Blocking
- Wet the motif. Soak it in cool water for a few minutes. Gently press out the water in a towel. Do not wring.
- Stiffen (optional). Dip the damp motif in diluted fabric stiffener, or spray it well with starch. Blot away the excess so the open spaces stay clear.
- Pin the tips. Lay the motif on the mat as a diamond. Pin through each ch-2 tip so opposite tips are 3.5 in (8.9 cm) apart, both vertically and horizontally.
- Straighten the sides. Pin along each edge so each side measures 2.5 in (6.4 cm) and runs straight from tip to tip.
- Open the lattice. Use a pin or blunt needle to nudge each Round 3 space open evenly. Fan the 12 starburst spokes into equal angles.
- Dry fully. Leave it pinned for at least 12 hours, or until completely dry and stiff.
- Attach the cord. Thread the folded end of the cord through the top ch-2 tip. Pass the knotted end through the folded loop and pull snug to form a lark’s head knot. This leaves a hanging loop about 3 in (7.6 cm) tall.
Final Quality-Control Checklist
- [ ] 12 evenly spaced spokes in the starburst
- [ ] 12 sc and 12 ch-3 loops in Round 2
- [ ] 4 corner shells and 12 side spaces in Round 3
- [ ] 72 sc in Round 4, with 19 per side including corners
- [ ] 76 sc and 4 ch-2 tips in Round 5, with 19 per side
- [ ] Sides measure 2.5 in (6.4 cm)
- [ ] Tip to tip measures 3.5 in (8.9 cm) in both directions
- [ ] All four tips are sharp and symmetrical
- [ ] Motif lies flat with no cupping or ruffling
- [ ] Ends woven in securely and invisibly
- [ ] Cord is firmly attached at the top tip and twisted evenly
Troubleshooting
The center hole won’t close. Pull the magic ring tail firmly before joining Round 1. Weave the tail through a few trebles to lock it.
The motif cups like a bowl. Your trebles or chain loops are too short. Go up a hook size, or make the ch-3 loops slightly looser.
The edges ruffle. You probably worked 4 sc in some spaces. Recount Round 4. Each side should have exactly 15 sc between the corner groups.
The tips are rounded, not pointed. Check that you worked (sc, ch 2, sc) in the corner-center sc, not in the stitch beside it. Pin the tips firmly while blocking.
One side is longer than the others. A side space is missing or doubled. Each side in Round 3 must have exactly 3 side ch-3 spaces.
The cord untwists. Twist it more tightly before folding, and knot the ends securely.
The motif comes out too big or too small. Change the hook size as described in Gauge and Checkpoints, then make a new test motif.
Care
Store the ornament flat or hanging, away from moisture and crushing. If it softens, re-wet it, re-stiffen it, and pin it back to 3.5 in (8.9 cm) tip to tip.
Final Notes
The measurement chain is short and easy to track:
- Round 1 starburst: about 1.25 in (3.2 cm) across
- Round 2 ring: about 1.75 in (4.4 cm) across
- Round 3 square: 2 in (5.1 cm) per side
- Round 4: 2.25 in (5.7 cm) per side, 72 sc
- Round 5: 2.5 in (6.4 cm) per side, 76 sc
- Finished ornament: 3.5 in (8.9 cm) tip to tip
Check your counts at each stage and block the tips firmly. You’ll end up with a crisp, lacy diamond that glows beautifully among the lights.
Optional: in a single color, these ornaments also make simple gift-wrap toppers.
Happy crocheting!