

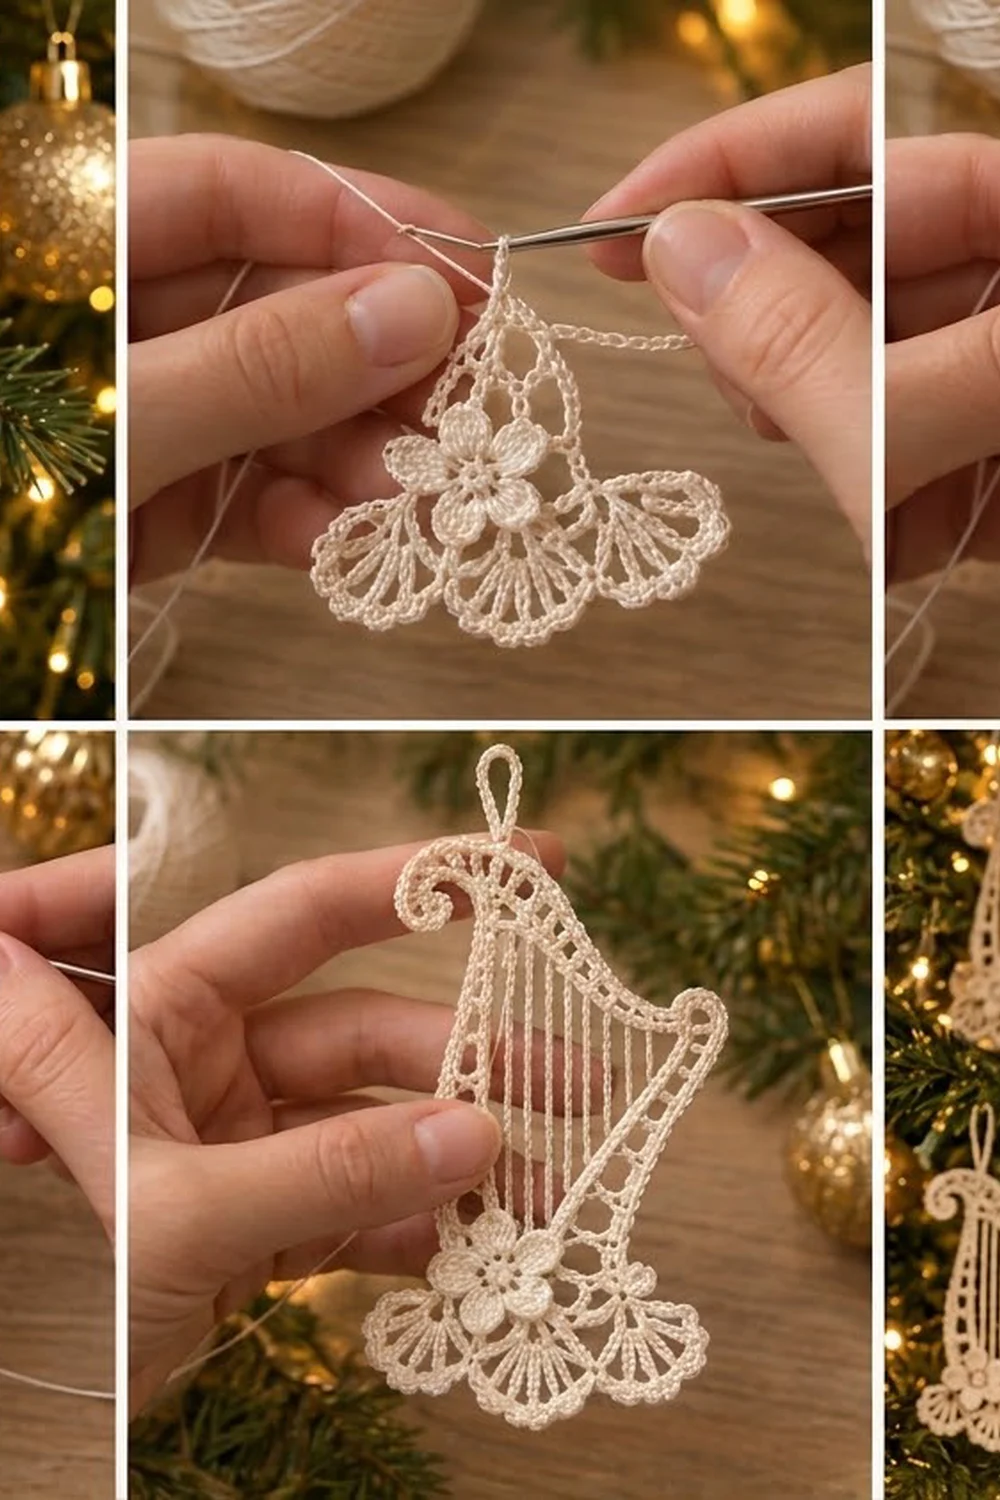
This little harp is a thread-lace Christmas ornament with a lot of detail in a small shape. It has an open ladder frame, a curled scroll at the top-left, a smaller curl at the right end of the neck, fine doubled “strings” running down the middle, and three scalloped fans along the base. A small five-petal flower is sewn over the lower-left corner.
The sample uses one color: cream or ivory cotton thread. A single color makes the lace look like vintage tatting and lets the texture stand out. The harp works as a tree ornament, a gift tag, or a window decoration.
The pattern uses US crochet terms. The finished harp is about 5.5 in (14.0 cm) tall and 3.25 in (8.3 cm) wide, not counting the hanging loop. The loop adds 1 in (2.5 cm), so the total hanging length is 6.5 in (16.5 cm).
Construction is simple once you see it. You crochet one closed ladder band as a ring, then pin it into the harp outline. The curls and the hanging loop are chained into the outer edge as you go. Next you add the strings across the open center, then work the scalloped fans along the base. The flower is made separately and sewn on.
Finished Size and Construction
- Finished size: 5.5 in (14.0 cm) tall x 3.25 in (8.3 cm) wide; the hanging loop adds 1 in (2.5 cm)
- Skill level: Intermediate (thread work, shaping during blocking)
- Terminology: US crochet terms
- Yarn weight: Size 10 cotton crochet thread (lace weight, category 0)
- Hook: 1.5 mm steel hook
- Number of pieces: 1 ornament (one frame body plus 1 sewn-on flower appliqué)
- Layout: single ornament, not joined to any other pieces
- Piece size: 5.5 in (14.0 cm) x 3.25 in (8.3 cm)
- Size before border: the frame with curls is 4.7 in (11.9 cm) tall x 3.25 in (8.3 cm) wide
- Border depth: the scalloped base fans add 0.8 in (2.0 cm) of height
Materials
Use mercerized cotton crochet thread in size 10. Mercerized thread has a soft sheen, holds starch well, and shows each stitch clearly. Avoid fuzzy or very soft thread, because the strings and picots will blur.
- Cream (main color): about 8 g, roughly 45 m (49 yd)
This amount makes one ornament, flower included. It includes a margin for a test swatch, a few restarts, and sewing tails.
Tools:
- 1.5 mm steel crochet hook
- Fine tapestry needle
- 4 locking stitch markers
- Rust-proof pins and a foam blocking board
- Fabric stiffener or spray starch
- Small scissors
- Ruler or tape measure
Abbreviations (US Terms)
- ch – chain
- sl st – slip stitch
- sc – single crochet
- hdc – half double crochet
- dc – double crochet
- tr – treble crochet
- sp – space
- st(s) – stitch(es)
- rnd – round
- picot – ch 3, sl st in 3rd ch from hook
Special stitch – Doubled string: Ch the stated number, then sl st in the target st. Next, sl st in the back bump of each ch, working back to where you started. This gives a firm double line that won’t sag.
Gauge and Checkpoints
Gauge matters more than usual here because the strings are sized by chain count. Before starting, make a 3 in (7.6 cm) chain and work 1 row of sc on it to check your gauge.
- Gauge: 10 sc = 1 in (2.5 cm); 12 ch = 1 in (2.5 cm); 1 dc is 0.25 in (0.6 cm) tall.
Checkpoints:
- After Rnd 1: the ring measures 10.8 in (27.4 cm) around.
- After Rnd 3: the band is 0.4 in (1.0 cm) wide.
- After pinning the frame: the left column measures 4.4 in (11.2 cm) along its outside edge, and the base bar measures 2.6 in (6.6 cm) across.
- Before the fans: the frame is 4.7 in (11.9 cm) tall, including the scroll.
- Finished: 5.5 in (14.0 cm) tall.
If your piece is too big: go down to a 1.4 mm or 1.3 mm hook, or work your chains tighter. If it is too small: go up to a 1.65 mm hook. Don’t change the stitch counts, because the counts set the shape.

Frame
The frame is one closed ladder band. Each dc in Rnd 2 is a “rung.” Number the rungs P1 to P36 as you go. The corners are P1, P13, P22, and P31; place a marker on each corner rung.
- Left column: spaces after P1 through P12 (12 spaces)
- Neck: spaces after P13 through P21 (9 spaces)
- Right column: spaces after P22 through P30 (9 spaces)
- Base bar: spaces after P31 through P36 (6 spaces)
That is 12 + 9 + 9 + 6 = 36 spaces.
Foundation: Ch 108. Join with sl st into the first ch to form a ring, taking care not to twist the chain.
Rnd 1 (inner rail): Ch 1, sc in each ch around, join with sl st to first sc. (108 sc)
Check the ring: it should measure 10.8 in (27.4 cm) around.
Rnd 2 (ladder): Ch 5 (counts as dc and ch 2; this is P1), skip next 2 sc, dc in next sc, ch 2, skip next 2 sc; repeat from * 34 more times. Join with sl st in 3rd ch of beg ch-5. (36 dc rungs, 36 ch-2 spaces)*
Each repeat covers 3 sc of Rnd 1, and 36 x 3 = 108, so the round closes evenly.
Rnd 3 (outer rail with curls and loop):
- Ch 1, 2 sc in P1 (corner). [3 sc in next ch-2 sp, sc in next dc] 11 times, 3 sc in next sp. (Left column: 47 sc)
- 2 sc in P13 (corner).
- Scroll: Ch 14. Working back along the chain, 2 sc in 2nd ch from hook and in each of next 8 ch (18 sc), then sc in each of last 4 ch (4 sc). Sl st in last sc made on P13. (22 sc in scroll) The increases are at the tip, so the bar curls tightly at the end.
- [3 sc in next sp, sc in next dc] 2 times. You have now worked P14 and P15.
- Hanging loop: Ch 24, sl st in same sc on P15.
- [3 sc in next sp, sc in next dc] 6 times (P16 to P21), 3 sc in next sp. (Neck: 35 sc)
- 2 sc in P22 (corner).
- Right curl: Ch 10. 2 sc in 2nd ch from hook and in each of next 5 ch (12 sc), then sc in each of last 3 ch (3 sc). Sl st in last sc made on P22. (15 sc in curl)
- [3 sc in next sp, sc in next dc] 8 times (P23 to P30), 3 sc in next sp. (Right column: 35 sc)
- 2 sc in P31 (corner).
- [3 sc in next sp, sc in next dc] 5 times (P32 to P36), 3 sc in last sp. (Base bar: 23 sc)
- Join with sl st to first sc. Fasten off.
Rnd 3 total: 47 + 35 + 35 + 23 + (4 corners x 2) = 148 sc, not counting the scroll, curl, and loop.
Pin the frame now. Lay the ring flat and pin it into the harp shape:
- Left column: a gentle outward bow.
- Neck: a soft S-curve that dips down from the scroll and rises again to the right curl.
- Right column: straight down.
- Base bar: straight across.
Coil the scroll inward and the right curl downward, and tack each coil in place with a few stitches of thread. Then compare the frame with the “after pinning” checkpoint.
Strings
The strings run from the inner rail (Rnd 1) under the neck down to the inner rail of the base bar. The neck’s inner rail has 27 sc (9 spaces x 3), and the base bar’s inner rail has 18 sc (6 spaces x 3).
- Neck anchors: the 2nd sc of each 3-sc group under the neck, counting from the scroll end. This gives 9 anchors spaced 0.3 in (0.8 cm) apart.
- Base anchors: count the 18 inner sc of the base bar starting from the left (P1) end. Use sc 1, 3, 5, 7, 9, 11, 13, 15, and 17. This gives 9 anchors spaced 0.2 in (0.5 cm) apart.
The strings narrow slightly from 2.4 in (6.1 cm) across at the top to 1.6 in (4.1 cm) at the bottom, like the strings of a real harp.
String row: Keep the frame pinned. Join thread with sl st in the first neck anchor (the one nearest the scroll). Work a Doubled string of ch 40 down to base sc 1. Sl st into the same neck anchor again. Then sl st in each of the next 3 sc along the neck rail to reach the next anchor. Repeat for the remaining strings, working across the neck in this order:
| String | Chain | Base anchor |
|---|---|---|
| 1 | 40 | sc 1 |
| 2 | 39 | sc 3 |
| 3 | 38 | sc 5 |
| 4 | 37 | sc 7 |
| 5 | 36 | sc 9 |
| 6 | 35 | sc 11 |
| 7 | 34 | sc 13 |
| 8 | 33 | sc 15 |
| 9 | 32 | sc 17 |
(9 strings) Fasten off after String 9.
At 12 ch per inch, String 1 is about 3.3 in (8.4 cm) long and String 9 is about 2.7 in (6.9 cm). Each string should lie straight without pulling the neck down. If a string bows, take out its slip stitches and add or remove 1 ch.
Flower Appliqué
Ch 4, join with sl st to form a ring.
Rnd 1: Ch 1, 10 sc in ring, join to first sc. (10 sc)
Rnd 2: Sc in next sc, (hdc, 3 dc, hdc) in next sc; repeat from * 4 more times, join. (5 petals, 30 sts)*
Fasten off, leaving a 6 in (15.2 cm) tail for sewing. The flower is 0.9 in (2.3 cm) across. Pull the starting tail snug so the center puffs up slightly.
Border: Scalloped Base Fans
The fans are worked in rows along the outer rail of the base bar only.
Border gauge: after blocking, each fan is 0.8 in (2.0 cm) wide and 0.8 in (2.0 cm) deep. The fan tips spread a little wider than the base bar.
The working edge: the 2nd sc on P31, the 23 base-bar sc, and the 1st sc on P1, for 25 sts in total. Number them 1 to 25.
Row 1 (fans): Join thread with sl st in st 1. Ch 1, sc in st 1, skip 3 sts, work (tr, ch 2) 4 times and then 1 tr, all in next st; skip 3 sts, sc in next st; repeat from * 2 more times. (3 fans, each with 5 tr and 4 ch-2 sp; 4 sc)*
The fans land on sts 5, 13, and 21 (rungs P32, P34, and P36), and the sc land on sts 1, 9, 17, and 25. Each repeat uses 8 sts, and 1 + (3 x 8) = 25, so the row starts and ends on a corner stitch.
Row 2: Ch 1, turn. Sc in first sc, sc in next tr, [3 hdc in next ch-2 sp, sc in next tr] 4 times, sc in next sc; repeat from * 2 more times. (55 sts: 1 + 3 x 18)*
Row 3 (picots): Ch 1, turn. Sl st in first sc. Sc in next sc, [sc in next 2 hdc, picot, sc in next hdc, sc in next sc] 4 times, sl st in next sc; repeat from * 2 more times. Fasten off. (Per fan: 17 sc and 4 picots; total: 51 sc, 12 picots, 4 sl sts)*
Why the math works: Row 2 puts 17 sts on each fan plus 1 sc at each boundary: 1 + 3 x (17 + 1) = 55. Row 3 works 1 st into each of the 17 fan sts and 1 sl st into each boundary sc. That gives 3 x 17 = 51 sc plus 4 sl sts, which uses all 55 sts. Each picot sits on the middle hdc of a 3-hdc group, and the edge stays flat.
Final Blocking
- Weave in all ends along the rails, never across open spaces.
- Sew the flower over the lower-left corner. Center it 0.5 in (1.3 cm) above the outer edge of the base bar, so it overlaps the bottom of the left column and the ends of Strings 1 and 2. Stitch around the center ring and tack down each petal tip.
- Soak the ornament in cool water, then roll it in a towel to remove excess water.
- Pin it face up on the board, setting each part as before: the bowed left column, the S-curve neck, the coiled scroll and curl, and straight strings. Spread each fan so its trebles radiate outward.
- Pin each picot and the top of the hanging loop.
- Apply fabric stiffener or spray starch generously.
- Let it dry completely, at least 12 hours, before removing the pins.
- Measure: the ornament should be 5.5 in (14.0 cm) tall x 3.25 in (8.3 cm) wide.
Final Quality-Control Checklist
- Rnd 1 has 108 sc, Rnd 2 has 36 rungs, and Rnd 3 has 148 sc.
- The scroll has 22 sc and the curl has 15 sc, and both are tacked flat.
- There are 9 strings, all straight and evenly spaced.
- There are 3 fans, each with 5 tr and 4 picots.
- The flower is sewn at the lower-left corner with no loose petals.
- The hanging loop is 1 in (2.5 cm) tall and firmly anchored.
- The ornament measures 5.5 in (14.0 cm) x 3.25 in (8.3 cm).
Troubleshooting
- The ring twisted: Rip back to the foundation, because a twist can’t be blocked out.
- The band ruffles: Your outer rail is too loose. Work Rnd 3 with a hook one size smaller.
- Strings sag: Remove 1 or 2 ch from that string.
- Neck pulls down: The strings are too short; add 1 ch to each.
- Fans cup: Block them flatter with extra pins, or work the ch-2 spaces a little looser.
- Scroll won’t coil: Wet it, coil it around a pin, and let it dry before tacking.
- Flower looks flat: Tighten the center ring tail and press the petals upward while they dry.
Care
Hand wash in cool water with mild soap, then re-block and re-starch as needed. Store flat in tissue so the curls and picots stay crisp.
Final Notes
Here is how the measurements build up:
- A 10.8 in (27.4 cm) ring of 108 sc becomes a 0.4 in (1.0 cm) wide ladder band with 36 rungs.
- The band pins into a frame 4.7 in (11.9 cm) tall.
- Nine doubled strings fill the center.
- The fans add 0.8 in (2.0 cm), bringing the finished harp to 5.5 in (14.0 cm) tall and 3.25 in (8.3 cm) wide.
Make one first and check it against every checkpoint, then make a whole set of harps for the tree.
Happy crocheting!