
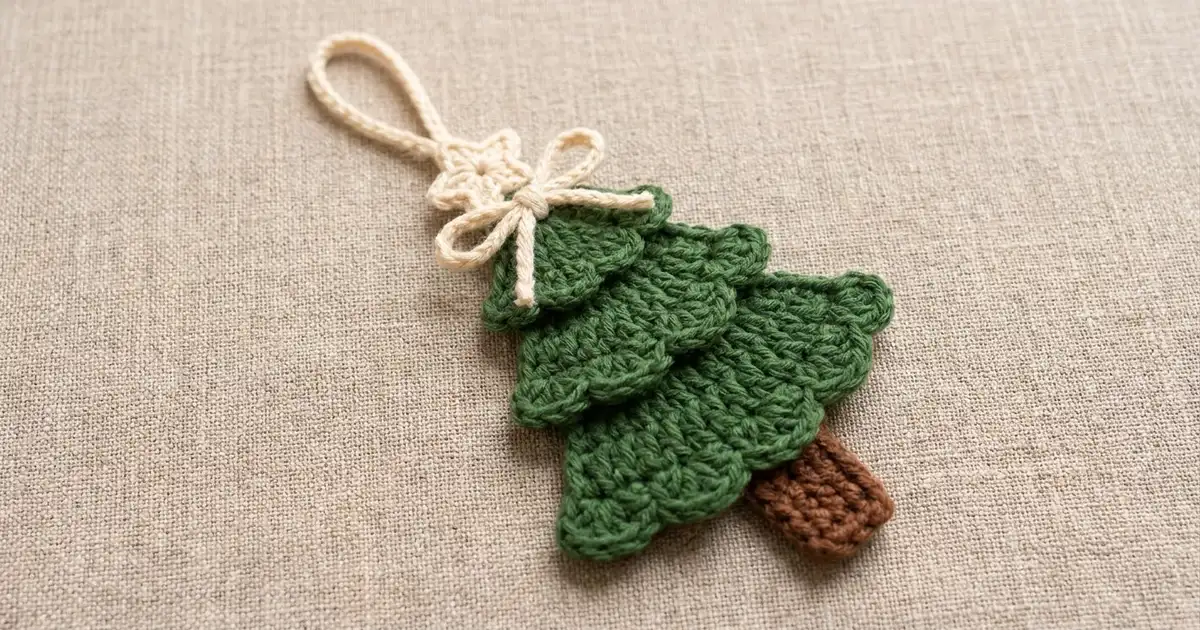
The Starlit Pine is a small, flat Christmas tree ornament with three stacked green tiers. Each tier ends in a row of soft, rounded scallops. A cream star sits on top, a short brown trunk shows below, and a cream bow and hanging loop finish it off.
It uses three colors: forest green, chocolate brown and cream. The style is classic and cozy, the kind of handmade ornament that looks good on a real tree, on a gift package or tied to a wreath.
This pattern uses US crochet terms. The finished ornament is about 3.5 in (8.9 cm) wide and 5.5 in (14.0 cm) tall from the bottom of the trunk to the tip of the star. The hanging loop adds about 3 in (7.6 cm).
You make each part separately: a single-crochet trunk, three double-crochet tiers worked from the narrow top edge down to the wide bottom edge, a scalloped edging on each tier, a five-point star, and two slip-stitch cords for the loop and the bow. Then you block the parts and layer them together.
Finished Size and Construction
- Finished size: 3.5 in (8.9 cm) wide × 5.5 in (14.0 cm) tall, plus a 3 in (7.6 cm) loop
- Skill level: Easy
- Terminology: US crochet terms
- Yarn weight: Worsted (#4)
- Hook: 4.0 mm (G-6)
- Number of pieces: 1 finished ornament, made from 7 components (trunk, 3 tiers, star, loop, bow)
- Layout: Three tiers stacked vertically, each overlapping the one below by 1 in (2.5 cm)
- Tier sizes before edging (bottom edge × height):
- Tier 1: 3.25 in × 1.5 in (8.3 cm × 3.8 cm)
- Tier 2: 2.75 in × 1.5 in (7.0 cm × 3.8 cm)
- Tier 3: 2.25 in × 1.5 in (5.7 cm × 3.8 cm)
- Size before border: Each tier is 1.5 in (3.8 cm) tall
- Border depth: The scallop edge adds 0.5 in (1.3 cm), so each finished tier is 2 in (5.1 cm) tall
Materials
Yarn: Use a smooth worsted-weight yarn with good stitch definition. Cotton or a cotton blend gives crisp scallops and a firm, flat ornament. Acrylic also works, but it may need firmer blocking. These amounts assume a yarn of about 200 m per 100 g (2 m per g).
- Forest green: 8 g / 16 m (tiers)
- Chocolate brown: 3 g / 6 m (trunk)
- Cream: 4 g / 8 m (star, loop, bow)
The quantities include a safety margin of roughly 30–50%, so leftovers from your stash are usually enough.
Tools:
- 4.0 mm (G-6) crochet hook
- Tapestry needle
- Scissors
- Stitch marker
- Ruler or tape measure
- Blocking mat and rust-proof pins
- Spray bottle with water
Abbreviations (US Terms)
- ch – chain
- sl st – slip stitch
- sc – single crochet
- hdc – half double crochet
- dc – double crochet
- st(s) – stitch(es)
- inc – increase (2 sts in the same st)
- MR – magic ring
Special stitch – Scallop: Work 3 dc in the same stitch. Each scallop sits between two sc and uses 2 stitches of the row below: 1 stitch for the scallop and 1 for the sc after it.
Gauge and Checkpoints
Gauge:
- 16 dc and 8 dc rows = 4 in (10.2 cm), which is 4 dc per inch and 0.5 in (1.3 cm) per dc row
- 16 sc and 19 sc rows = 4 in (10.2 cm)
Test one piece first. Make Tier 1 before anything else and use it as your gauge piece. It is the largest component, so any size difference shows clearly.
Checkpoints:
- Tier 1, Row 1: 9 dc = 2.25 in (5.7 cm) wide
- Tier 1, Row 3: 13 dc = 3.25 in (8.3 cm) wide, 1.5 in (3.8 cm) tall
- Tier 1, after the edging: about 3.5 in (8.9 cm) wide at the scallop tips, 2 in (5.1 cm) tall
- Trunk: 1 in × 1.25 in (2.5 cm × 3.2 cm)
If your piece is too big: Change to a 3.75 mm (F-5) hook and remake the test tier. Don’t remove stitches. The scallop math depends on odd counts.
If your piece is too small: Change to a 4.5 mm (7) hook. If the tier only cups or ripples, first try working the dc a little more loosely before you change hooks.

Trunk (Brown)
With brown, ch 5.
- Row 1: Sc in 2nd ch from hook and in each ch across, turn. (4 sc)
- Rows 2–6: Ch 1 (does not count as a st), sc in each st across, turn. (4 sc)
Fasten off and leave a 6 in (15.2 cm) tail for sewing.
Checkpoint: 1 in (2.5 cm) wide × 1.25 in (3.2 cm) tall. In the assembled ornament, the top 0.5 in (1.3 cm) hides behind Tier 1 and 0.75 in (1.9 cm) shows below it.
Tiers (Green)
All three tiers start along the narrow top edge. Each row adds 1 stitch at each end, so the shape widens into a trapezoid. The beginning ch 3 counts as the first dc throughout. Don’t fasten off after Row 3. The scallop edging is worked straight onto the last row (see Border).
Tier 1 (Bottom, Largest)
Ch 11.
- Row 1: Dc in 4th ch from hook (the skipped 3 ch count as a dc) and in each ch across, turn. (9 dc)
- Row 2: Ch 3, dc in the first st (inc made), dc in each st across to the last st (the top of the turning ch), 2 dc in the last st, turn. (11 dc)
- Row 3: Repeat Row 2. (13 dc)
Checkpoint: 3.25 in (8.3 cm) along the bottom, 2.25 in (5.7 cm) along the top, 1.5 in (3.8 cm) tall. Keep the loop live.
Tier 2 (Middle)
Ch 9.
- Row 1: Dc in 4th ch from hook and in each ch across, turn. (7 dc)
- Row 2: Ch 3, dc in the first st, dc across to the last st, 2 dc in the last st, turn. (9 dc)
- Row 3: Repeat Row 2. (11 dc)
Checkpoint: 2.75 in (7.0 cm) along the bottom, 1.75 in (4.4 cm) along the top, 1.5 in (3.8 cm) tall.
Tier 3 (Top, Smallest)
Ch 7.
- Row 1: Dc in 4th ch from hook and in each ch across, turn. (5 dc)
- Row 2: Ch 3, dc in the first st, dc across to the last st, 2 dc in the last st, turn. (7 dc)
- Row 3: Repeat Row 2. (9 dc)
Checkpoint: 2.25 in (5.7 cm) along the bottom, 1.25 in (3.2 cm) along the top, 1.5 in (3.8 cm) tall.
Star (Cream)
Make a magic ring.
- Round 1: Ch 2 (does not count as a st), 10 hdc in the ring. Pull the ring closed and sl st to the first hdc. (10 hdc)
- Round 2: *Ch 3, sl st in 2nd ch from hook, hdc in next ch, skip next st, sl st in next st*. Repeat from * 4 more times. The last sl st lands in the same st as the joining sl st. (5 points)
Each point uses 2 stitches of Round 1, and 5 points × 2 sts = 10 sts. That’s why the star closes evenly. Fasten off and leave a 6 in (15.2 cm) tail.
Checkpoint: about 1.25 in (3.2 cm) from point to point.
Hanging Loop (Cream)
- Ch 30.
- Sl st in the back bump of the 2nd ch from hook and in each ch across. (29 sl st)
Fasten off. The cord is about 6 in (15.2 cm) long. Folded in half, it makes a loop about 3 in (7.6 cm) tall.
Bow (Cream)
- Ch 40.
- Sl st in the back bump of the 2nd ch from hook and in each ch across. (39 sl st)
Fasten off. The cord is about 8 in (20.3 cm) long. Tie it into a bow about 2 in (5.1 cm) wide, leaving two short tails. Trim the yarn ends but leave enough to secure the knot.
Border: Scalloped Tier Edging
The scallop edging is the border of each tier. It runs across the wide bottom edge only. The slanted sides stay as plain dc row-ends, and the top edge is hidden under the next tier.
Border gauge: One scallop plus one sc uses 2 stitches of Row 3, so each repeat covers 0.5 in (1.3 cm). The 3 dc of the scallop flare a little past the edge. That adds about 0.5 in (1.3 cm) of depth and about 0.25 in (0.6 cm) of total width.
This is a conversion row. Every stitch of Row 3 is worked once, and each scallop stitch gets 2 extra stitches.
Tier 1 Edging
With the Row 3 loop still live, turn.
- Edging row: Ch 1, sc in the first st, *3 dc in the next st, sc in the next st*. Repeat from * 5 more times, ending with sc in the top of the turning ch.
Count: 13 sts worked 1-per-stitch + 12 extra (6 scallops × 2) = 25 sts (6 scallops, 7 sc).
Fasten off and leave a 10 in (25.4 cm) tail for sewing.
Tier 2 Edging
- Edging row: Ch 1, sc in the first st, *3 dc in the next st, sc in the next st*. Repeat from * 4 more times.
Count: 11 sts worked 1-per-stitch + 10 extra (5 scallops × 2) = 21 sts (5 scallops, 6 sc).
Fasten off and leave a 10 in (25.4 cm) tail.
Tier 3 Edging
- Edging row: Ch 1, sc in the first st, *3 dc in the next st, sc in the next st*. Repeat from * 3 more times.
Count: 9 sts worked 1-per-stitch + 8 extra (4 scallops × 2) = 17 sts (4 scallops, 5 sc).
Fasten off and leave a 10 in (25.4 cm) tail.
Why the math works: Every tier ends with an odd count: 13, 11 or 9. An odd count can be split as 1 + 2k. The first sc takes the 1, and the k repeats of scallop + sc take the 2k. So Tier 1 gets 6 scallops, Tier 2 gets 5, and Tier 3 gets 4, and each tier starts and ends on an sc. The edges stay symmetrical, and the outermost scallops sit just inside the corners, so the corners don’t curl.
Finished tier widths at the scallop tips:
- Tier 1: about 3.5 in (8.9 cm)
- Tier 2: about 3 in (7.6 cm)
- Tier 3: about 2.5 in (6.4 cm)
Final Blocking and Assembly
- Weave in the ends you don’t need. Keep the long sewing tails on the trunk, all three tiers and the star.
- Mist the parts. Lay the tiers, trunk and star flat on the blocking mat and spray them until they’re damp, not soaked.
- Pin the tiers. Pin each tier to its trapezoid shape, with the top and bottom edges straight and the sides symmetrical. Pin the tip of each scallop so it fans out into a rounded curve.
- Pin the trunk and star. Square the trunk to 1 in × 1.25 in (2.5 cm × 3.2 cm). Pin each star point outward to about 1.25 in (3.2 cm) across.
- Let them dry. Leave everything to dry completely, usually 4–6 hours.
- Attach the trunk. Place the trunk behind Tier 1 at the center so its top 0.5 in (1.3 cm) is hidden. Whipstitch it to the back of Tier 1 with the brown tail.
- Attach Tier 2. Lay Tier 2 on top of Tier 1, centered, so its scallop tips sit 1 in (2.5 cm) below Tier 1’s top edge. Using the green tail, stitch along the back of Tier 2’s sc row, through the front layer of Tier 1 only. The scallops stay free.
- Attach Tier 3. Layer Tier 3 on Tier 2 the same way, also with a 1 in (2.5 cm) overlap.
- Attach the star. Center the star over Tier 3’s top edge so its two lower points overlap the tier by about 0.5 in (1.3 cm). Sew it through its center ring.
- Attach the loop. Fold the loop cord in half and sew both ends to the back of the star and the top of Tier 3.
- Attach the bow. Center the bow just below the star and secure its knot with 2–3 small stitches.
Checkpoint: 3.5 in (8.9 cm) wide and 5.5 in (14.0 cm) tall, from the bottom of the trunk to the tip of the star.
Final Quality-Control Checklist
- Each tier has the right number of scallops: 6, 5 and 4 from bottom to top.
- Each scallop edge starts and ends with an sc.
- The tiers are centered on one vertical line, and the trunk lines up with them.
- Each overlap is the same 1 in (2.5 cm).
- No stitching shows on the front of the tiers.
- The trunk shows 0.75 in (1.9 cm) below Tier 1.
- The star sits upright and its points are even.
- The bow loops are even and the knot is secure.
- The hanging loop is firmly attached and holds the ornament straight when it hangs.
- All ends are woven in and trimmed.
Troubleshooting
- The tier curls at the bottom corners: Block it again with pins in the corners. If it still curls, work the dc rows a little more loosely.
- The scallops flip upward: Your edging tension is tighter than your dc rows. Rework the edging with a 4.5 mm (7) hook.
- The count comes out even: You probably missed an increase or skipped the turning ch. Check that Row 3 has 13, 11 or 9 sts before you start the edging.
- The sides look uneven: Make sure every increase goes into the first st and into the top of the turning ch.
- The star points are lopsided: Make sure you skip exactly 1 st between points, and pin each point while blocking.
- The ornament tilts when it hangs: Re-center the loop on the back so it’s on the ornament’s center line.
Care
Hand wash in cool water with mild soap, press out the water in a towel, and dry flat, re-pinning the scallops if needed. Store flat so the bow and scallops keep their shape.

Final Notes
The measurement chain is simple. A gauge of 4 dc per inch makes tiers 3.25 in, 2.75 in and 2.25 in (8.3 cm, 7.0 cm and 5.7 cm) wide before edging. The scallops bring them to about 3.5 in, 3 in and 2.5 in (8.9 cm, 7.6 cm and 6.4 cm). Each tier is 2 in (5.1 cm) tall, and stacking them with 1 in (2.5 cm) overlaps gives a 4 in (10.2 cm) tree body. Add 0.75 in (1.9 cm) of trunk below and 0.75 in (1.9 cm) of star above, and the ornament is 5.5 in (14.0 cm) tall. If your test tier matches the checkpoints, every other part will fit.
Happy crocheting!