

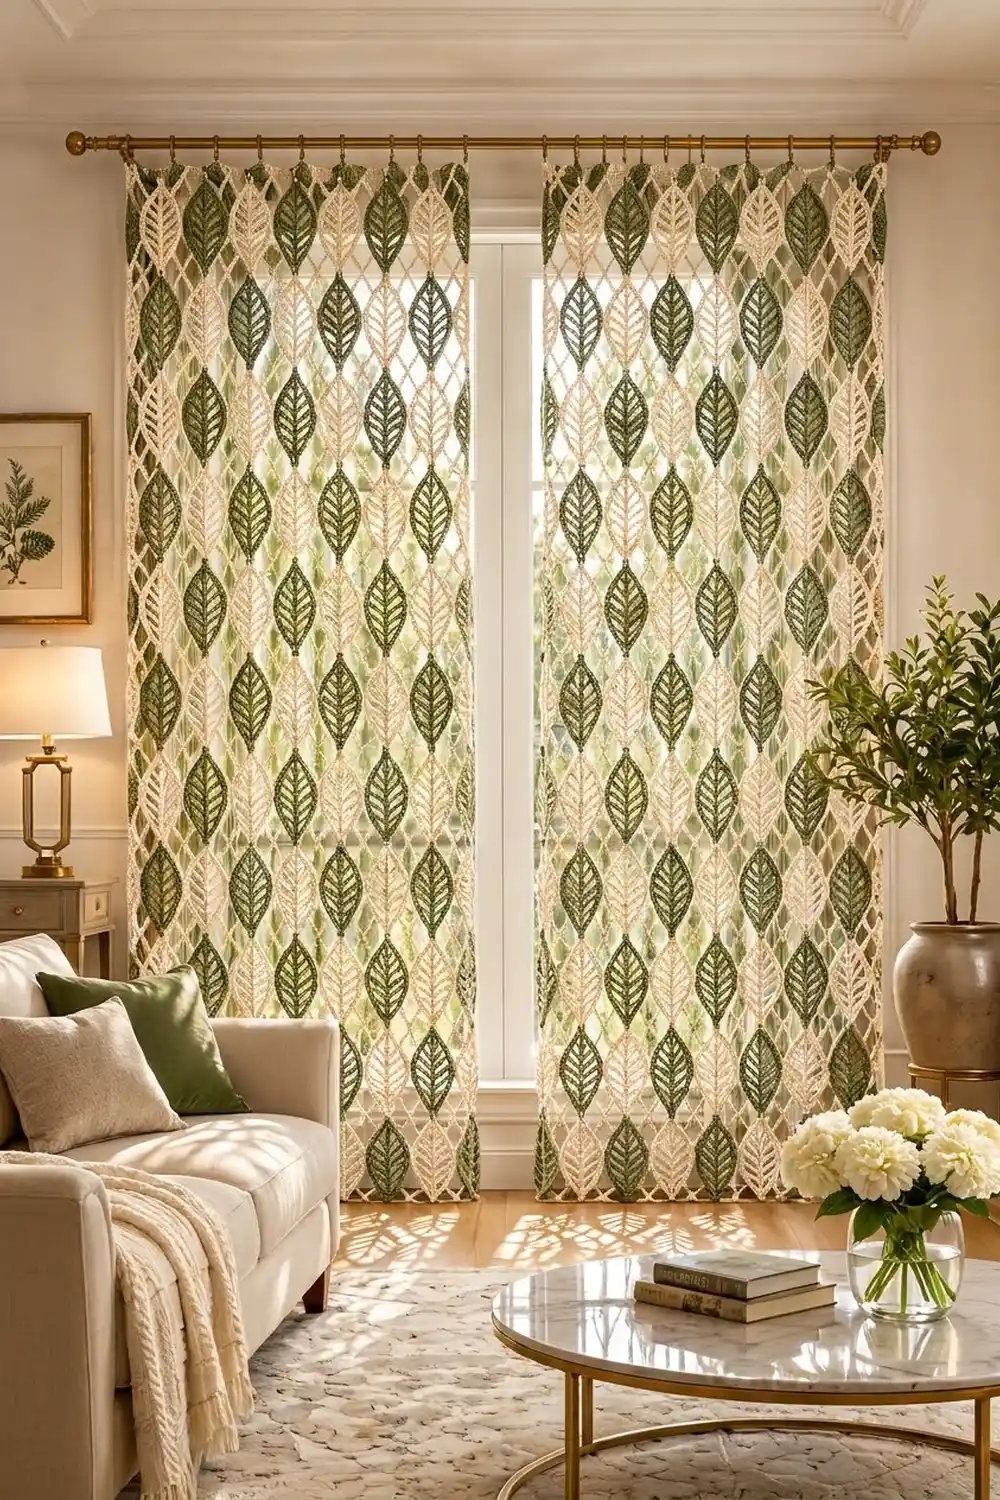
The Willow Vein Leaf Lace Curtain is a light, airy panel built from pointed leaf motifs. Each leaf has a cord-like outline, a straight center spine, and seven pairs of angled veins. Hung in a window, it throws soft leaf shadows and still lets in plenty of light.
The palette is quiet and botanical: sage green and natural cream, set in a checkerboard so the colors alternate across every row and down every column. The style is rustic but tidy, a little like macramé done with a crochet hook.
This pattern uses US crochet terms. One finished panel measures 36 in (91.4 cm) wide by 90 in (228.6 cm) long, plus hanging loops. The room photo shows two panels side by side, so make two if you want a pair.
Construction is simple and repetitive. Each leaf starts as a chain ring, which gets a single crochet outline with tip loops and side join points. A spine-and-vein row then fills the center. You join leaves as you go during the outline round, and a solid single crochet band with hanging loops finishes the top edge.
Finished Size and Construction
- Finished panel size: 36 in (91.4 cm) wide x 90 in (228.6 cm) long, excluding hanging loops
- Skill level: Intermediate
- Terminology: US crochet terms
- Yarn weight: DK / light worsted cotton (weight 3)
- Hook: 4.0 mm (US G-6)
- Number of pieces: 99 leaf motifs, joined as you go
- Layout: 9 columns x 11 rows, checkerboard colors
- Single motif size: 4 in (10.2 cm) wide x 8 in (20.3 cm) tall including tip loops; the oval body is 7 in (17.8 cm) tall
- Size before border: 36 in (91.4 cm) x 88 in (223.5 cm)
- Border depth: 2 in (5.1 cm), top edge only
Materials
Use a smooth, mercerized or combed cotton in DK / light worsted weight, at about 100 m per 50 g. Cotton keeps the veins crisp and holds the leaf shape after blocking. Avoid fuzzy blends, because they blur the cord-like texture.
- Color A, Sage Green: 700 g (about 1,400 m), for 50 motifs
- Color B, Natural Cream: 750 g (about 1,500 m), for 49 motifs plus the top band
- 4.0 mm (US G-6) crochet hook
- Locking stitch markers (at least 4)
- Tapestry needle
- Scissors
- Rust-proof pins and a blocking board or foam mats
- Spray bottle
- Measuring tape
- Curtain rod and rings, or a rod threaded through the loops
Each motif uses about 12 g (about 24 m). All quantities include a margin of about 10% for swatching and dye-lot safety.
Abbreviations (US Terms)
- ch – chain
- sc – single crochet
- sl st – slip stitch
- sp – space
- st(s) – stitch(es)
- sk – skip
- RS – right side
Special stitch: Join point. When a motif has a neighbor, replace “ch 2” at a side point with: ch 1, sl st in the neighbor’s matching ch-2 sp, ch 1. When joining to a motif above, replace “ch 5” at the top tip with: ch 2, sl st in the bottom ch-5 loop of the motif above, ch 2. Each join still counts as the same ch-2 or ch-5 space.
Gauge and Checkpoints
Gauge: 20 sc and 20 rows = 4 in (10.2 cm) in sc worked flat. Chains relaxed: 5 ch = 1 in (2.5 cm).
Make one full motif before you start joining. It is your real gauge swatch.
Checkpoint 1 (Rnd 1): The ring of 84 ch should lie about 16.8 in (42.7 cm) long when stretched out flat.
Checkpoint 2 (Rnd 2): Pinch the ring into a pointed oval. It should measure 7 in (17.8 cm) from tip to tip without the loops, 8 in (20.3 cm) including the loops, and 4 in (10.2 cm) across from side point to side point.
Checkpoint 3 (spine row): The motif should lie flat. The spine should be straight and the veins taut, with no puckering in the outline.
If your motif is too big, go down 0.5 mm. If it is too small, go up 0.5 mm. If only the spine pulls the oval shorter, chain more loosely on the spine instead of changing hooks.
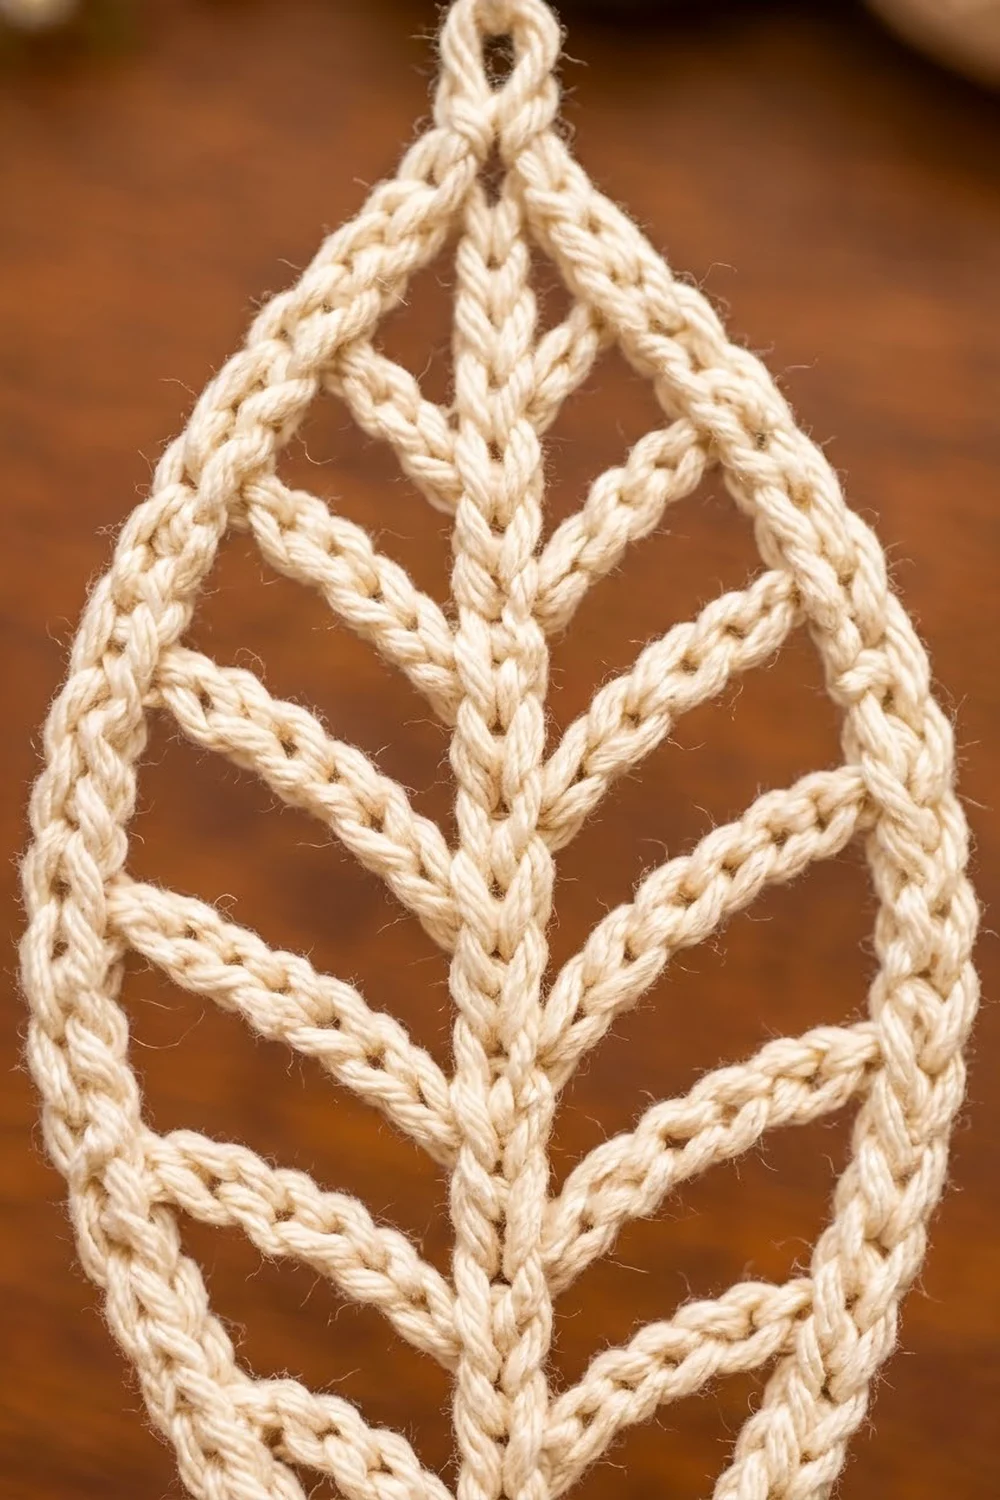
Leaf Motif (make 99)
Make 50 motifs in Color A and 49 in Color B, following the layout below. Work the spine row of each motif before starting the next one.
Round 1: Foundation Ring
Ch 84, and join with sl st to the first ch to form a ring, taking care not to twist. (84 ch)
Round 2: Outline
Hold the RS facing you. You will work counterclockwise: down the left side (Side A), around the bottom tip, and up the right side (Side B).
Ch 1, sc in the first ch, ch 5 (top tip loop), sc in the next 21 ch, ch 2 (Side A point), sc in the next 21 ch, ch 5 (bottom tip loop), sc in the next 21 ch, ch 2 (Side B point), sc in the next 20 ch, and join with sl st to the first sc.
Count: 84 sc + 2 ch-5 tip loops + 2 ch-2 side points.
Each side has 42 sc. On Side A, that is 21 sc above the point and 21 sc below it. On Side B, it is 21 sc below the point, then 20 sc plus the first sc of the round above it. Each side’s count includes the sc next to each tip loop.
Do not fasten off. Mark the top tip loop.
Pinch the top and bottom loops so that the ring folds into a pointed oval, with the side points at the widest place.
Spine and Vein Row
Sl st into the bottom ch-5 loop.
Spine: Ch 35, and sl st into the top ch-5 loop. (35 spine ch)
Now work back down the spine, adding veins as you go. Count outline sc on each side from the top tip loop: the sc next to the loop is #1. The side point sits between #21 and #22.
Vein: Ch the stated number, then sl st in the stated outline sc, then sc in each vein ch back to the spine. That makes the same number of sc as ch.
- Sc in the next 6 spine ch. At the 6th sc, make a Side A vein (ch 4, sl st in sc #4), then a Side B vein (ch 4, sl st in sc #4).
- Sc in the next 4 spine ch. At the last sc, make veins on both sides: ch 7, sl st in sc #9.
- Sc in the next 4 ch. Veins: ch 9, sl st in sc #14.
- Sc in the next 4 ch. Veins: ch 10, sl st in sc #19.
- Sc in the next 4 ch. Veins: ch 10, sl st in sc #24.
- Sc in the next 4 ch. Veins: ch 9, sl st in sc #29.
- Sc in the next 4 ch. Veins: ch 7, sl st in sc #33.
- Sc in the last 5 spine ch, sl st in the bottom ch-5 loop, and fasten off.
Count: 35 spine sc + 112 vein sc (56 per side: 4 + 7 + 9 + 10 + 10 + 9 + 7) = 147 sc.
Each vein starts on the spine and ends higher up on the outline, so it angles upward like the veins in the photo. Weave in the ends along the spine.
Make All Pieces
- Color A (Sage): 50 motifs
- Color B (Cream): 49 motifs
Odd rows (1, 3, 5, 7, 9, 11) have 5 A and 4 B. Even rows (2, 4, 6, 8, 10) have 4 A and 5 B.
Layout grid, top to bottom (A = Sage, B = Cream):
Row 1:  A B A B A B A B A
Row 2:  B A B A B A B A B
Row 3:  A B A B A B A B A
Row 4:  B A B A B A B A B
Row 5:  A B A B A B A B A
Row 6:  B A B A B A B A B
Row 7:  A B A B A B A B A
Row 8:  B A B A B A B A B
Row 9:  A B A B A B A B A
Row 10: B A B A B A B A B
Row 11: A B A B A B A B A
Joining
The panel is joined as you go, during Round 2 of each new motif. Work across each row from left to right, and work the rows from top to bottom.
Vertical joins (rows 2–11): At the top tip, instead of ch 5, work ch 2, sl st in the bottom ch-5 loop of the motif directly above, ch 2. That joins tip loop to tip loop.
Horizontal joins (columns 2–9): At the Side A point (left side), instead of ch 2, work ch 1, sl st in the Side B ch-2 point of the motif to the left, ch 1.
Stitch-to-stitch logic: Every join replaces chains one for one. The motif’s counts (84 sc, 2 tip loops, 2 side points) never change, so joined and unjoined motifs are exactly the same size.
Totals: 90 vertical joins (9 columns x 10) and 88 horizontal joins (11 rows x 8).
Tension: Make each join sl st snug but not tight. If it is too tight, the leaves pull together and the side points cup. If it is too loose, the lattice sags.
Size checkpoint: After Row 1, the strip should measure 36 in (91.4 cm) from the outer left side point to the outer right side point. Each completed row adds 8 in (20.3 cm) to the length: a 7 in (17.8 cm) oval plus about 1 in (2.5 cm) of linked tip loops. After 11 rows, the panel should measure 88 in (223.5 cm) from top loop to bottom loop.
Border (Top Hanging Band)
The sides and bottom keep their pointed leaf edge, which is part of the design. Only the top edge gets a band.
Border gauge: 20 sc and 20 rows = 4 in (10.2 cm), the same as the motif gauge.
Top-edge allotment: Each top-row motif gets 20 stitches: 7 ch, then 5 sc in its tip loop, then 8 ch. With 9 motifs x 20 sts, the band has 180 sts. At 5 sts per inch, that is exactly 36 in (91.4 cm), which matches the panel width.
Row 1 (RS): With Color B, make a slip knot and ch 7. Work 5 sc in the top loop of Motif 1, then ch 15, 5 sc in the top loop of the next motif; repeat from * 7 more times. Ch 8.
Count: 7 + (9 x 5) + (8 x 15) + 8 = 180 sts (45 sc + 135 ch).
The 15-ch bridges are made of 8 ch from one motif’s allotment plus 7 ch from the next.
Row 2: Ch 1, turn, and sc in each st across. (180 sc)
Rows 3–10: Ch 1, turn, and sc in each sc across. (180 sc)
Row 11 (hanging loops): Ch 1, turn. Sc in the next 9 sts, then in the next st work sc, ch 10, sl st in that same sc (hanging loop). Sc in the next 10 sts; repeat from * 8 more times. Fasten off.
Count: 180 sc (1 per existing st) + 0 added sc + 9 ch-10 hanging loops. One loop sits centered over each leaf column.
Why the math works: 9 motifs x 20 sts = 180 sts, and 180 sts ÷ 5 sts per in = 36 in (91.4 cm), the joined panel width. The 11 band rows add 2 in (5.1 cm) above the top tip loops, so 88 in + 2 in = 90 in (228.6 cm).
Final Blocking
- Weave in any remaining ends along the spines and the band.
- Lay the panel on foam mats, working in sections if needed.
- Pin the top band straight at 36 in (91.4 cm) wide.
- Pin each leaf’s tip loops in line, so that every column hangs straight down.
- Pin each side point so that the leaves are 4 in (10.2 cm) wide.
- Spray until damp. Gently straighten the spines and open the vein spaces evenly.
- Let it dry completely before you unpin, then move on to the next section.
- Check the final length: 90 in (228.6 cm).
Final Quality-Control Checklist
- 99 motifs: 50 Sage, 49 Cream, in checkerboard order
- Every motif has 84 outline sc and 147 spine-and-vein sc
- All seven vein pairs angle upward and are symmetrical
- All 90 vertical and 88 horizontal joins are secure
- The top band has 180 sc and 9 evenly spaced hanging loops
- The panel measures 36 in (91.4 cm) x 90 in (228.6 cm)
- All ends are woven in invisibly
Troubleshooting
Leaf curls or cups: The veins are too short or too tight. Chain more loosely and check that the veins attach to the correct outline sc.
Spine is wavy: The spine chain is too loose. Chain more firmly, or use 34 ch and sc only 5 in the first group of step 8.
Ring twisted: Check before joining Round 1. A twist can’t be fixed afterward.
Columns lean: A vertical join probably went into the wrong loop. Undo it and rejoin in the bottom loop of the motif directly above.
Band ripples: Your chain bridges in Row 1 are too loose. Redo the row with firmer chains.
Band pulls the top inward: The chains are too tight. Go up 0.5 mm for Row 1 only.
Care
Hand wash cool or machine wash on a gentle cycle in a mesh bag, then lay flat and re-pin to dry. Don’t hang it while wet, because the weight can stretch the lattice.
Final Notes
The measurement chain is simple. One 84-st ring becomes a 4 in x 8 in (10.2 cm x 20.3 cm) leaf. Nine leaves make a 36 in (91.4 cm) row, and eleven rows make 88 in (223.5 cm). The 180-st band adds 2 in (5.1 cm) for a finished 90 in (228.6 cm) panel. Check your first motif carefully and the rest will follow.
Happy crocheting!