

The Winter Feather Dove is a light, lacy Christmas ornament with a solid little body and two fans of open feathers. The body is worked in tight single crochet so it holds its shape. The wings and tail are chain loops covered in stitches, so the tree lights show through them.
The sample is in soft lavender. The same pattern also works well in cream, dusty pink, or mint, and a mixed set looks lovely on a tree. Its smooth stitches and clean outline give it a gentle, vintage feel.
This pattern uses US crochet terms. The finished dove measures 5.5 in (14.0 cm) wide and 4.5 in (11.4 cm) tall, not counting the hanging loop.
Construction is simple and uses one piece. You work the body in four rounds around a foundation chain, with the head, crown, and beak shaped in Round 4. Six chain loops form the wing and tail fans. A border round covers every loop. Last, you add a hanging loop to the top feather.
Finished Size and Construction
- Finished size: 5.5 in (14.0 cm) wide × 4.5 in (11.4 cm) tall
- Skill level: Easy–Intermediate
- Terminology: US crochet terms
- Yarn weight: Sport (#2) mercerized cotton
- Hook: 2.75 mm (US C-2)
- Number of pieces: 1
- Layout: Single ornament; no joining
- Body size (after Rnd 4): 3.5 in (8.9 cm) long including beak × 1.75 in (4.4 cm) tall at the head
- Size before border (after Rnd 5): about 5 in (12.7 cm) × 4 in (10.2 cm)
- Border depth: 0.25 in (0.6 cm) along the feather sides, 0.375 in (1.0 cm) at the scalloped tips
Materials
Use a smooth mercerized cotton in sport weight. Cotton gives crisp stitches and blocks flat, and it won’t stretch out while hanging. Avoid fuzzy or very splitty yarns, because the feather loops need clear definition.
- Main color (lavender): 10 g, about 31 m
- Optional colorways (cream, dusty pink, mint): 10 g, about 31 m per ornament in each color
Tools:
– 2.75 mm (US C-2) crochet hook
– Tapestry needle
– Scissors
– 1 stitch marker
– Blocking mat and rustproof pins
– Spray bottle, or liquid starch (optional)
Yarn amounts include a margin of about 40% over what the sample used, so you have room for a gauge swatch and some frogging.
Abbreviations (US Terms)
- ch – chain
- sl st – slip stitch
- sc – single crochet
- hdc – half double crochet
- dc – double crochet
- sk – skip
- st(s) – stitch(es)
- ch-sp – chain space
- Rnd – round
Special technique: covering a loop. Work every stitch into the ch-sp, with the hook under the whole chain, rather than into the individual chains. This lets you pack in more stitches than there are chains, so the loop curves smoothly and stays firm.
Gauge and Checkpoints
Gauge: 12 sc × 12 rows = 2 in (5.1 cm) square. Chain gauge: 7 ch = 1 in (2.5 cm).
Make one dove as your test piece before starting a set. Measure at each checkpoint:
- After Rnd 1: 2.25 in (5.7 cm) long × 0.5 in (1.3 cm) tall
- After Rnd 2: 2.5 in (6.4 cm) × 0.75 in (1.9 cm)
- After Rnd 3: 2.75 in (7.0 cm) × 1.25 in (3.2 cm)
- After Rnd 4: 3.5 in (8.9 cm) including beak × 1.75 in (4.4 cm) at the head
- After Rnd 6: 5.5 in (14.0 cm) × 4.5 in (11.4 cm)
If your body comes out more than 0.25 in (0.6 cm) too big, drop down a hook size. If it’s that much too small, go up one size. If only the feathers come out too long, your chains are looser than your stitches. Re-chain the loops with tighter tension, or chain them with the next smaller hook.
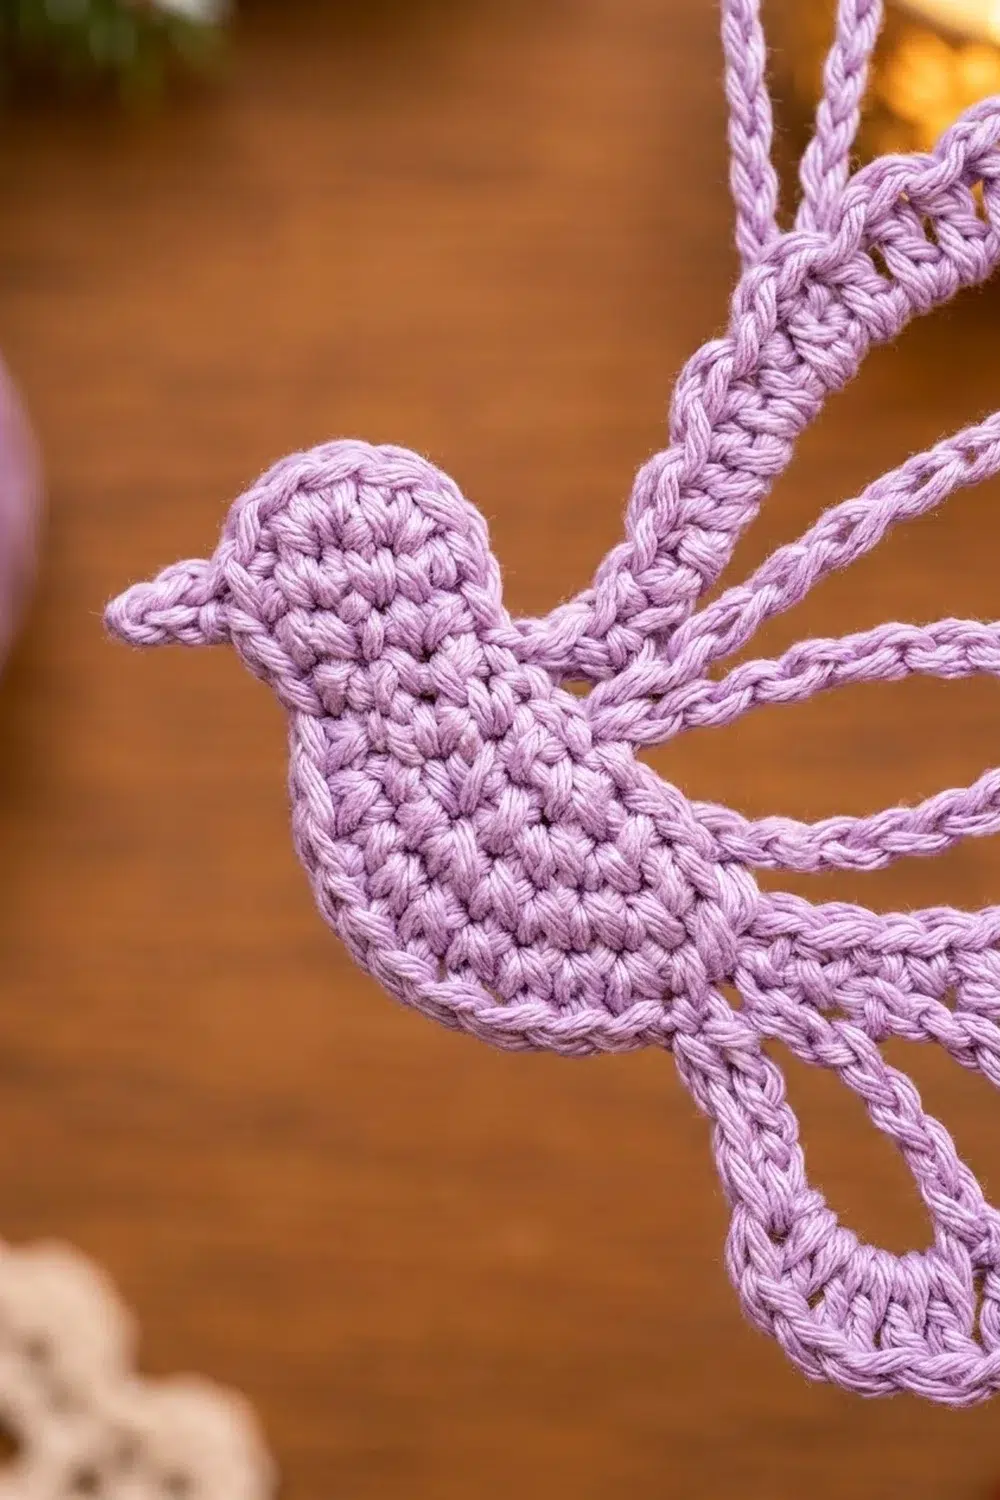
Body
The body is worked in joined rounds without turning. Rnd 1 goes around both sides of the foundation chain. The first side becomes the belly, then comes the head end, then the back, then the tail.
Ch 13.
Rnd 1: Sc in 2nd ch from hook, sc in next 10 ch, 3 sc in last ch. Rotate and work along the opposite side of the foundation chain: sc in next 10 ch, 2 sc in same ch as first sc. Join with sl st to first sc. (26 sts)
Count: 11 + 3 + 10 + 2 = 26.
Rnd 2: Ch 1. 2 sc in first st, sc in next 10 sts, 2 sc in each of next 3 sts, sc in next 10 sts, 2 sc in each of last 2 sts. Join. (32 sts)
Count: 2 + 10 + 6 + 10 + 4 = 32. You have 6 increases, 3 at each end.
Rnd 3 (belly shaping): Ch 1. Sc in first st, 2 sc in next st, sc in next 2 sts, hdc in next 6 sts, sc in next 2 sts, [2 sc in next st, sc in next st] 3 times, sc in next 10 sts, [2 sc in next st, sc in next st] 2 times. Join. (38 sts)
Count: 1 + 2 + 2 + 6 + 2 + 9 + 10 + 6 = 38. The 6 hdc along the middle of the belly make the soft downward curve.
The sts of Rnd 3 now run in this order: sts 1–13 tail start and belly, sts 14–22 head end, sts 23–32 back, sts 33–38 tail end.
Rnd 4 (head, crown, and beak): Ch 1.
– Sc in each of sts 1–16.
– In st 17, work (sc, ch 4, sl st in 2nd ch from hook, sc in next ch, hdc in next ch, sc). This makes the beak.
– Hdc in st 18.
– 2 dc in each of sts 19–22. This raises the crown.
– Dc in st 23, hdc in st 24.
– Sc in each of sts 25–38.
– Join. Fasten off and weave in the beginning tail.
(43 sts, not counting the 3 beak sts)
Count: 16 + 2 + 1 + 8 + 1 + 1 + 14 = 43. That’s the 38 sts from Rnd 3, plus 1 extra in st 17 and 4 extra in sts 19–22.
The beak points forward, and the dc crown rises above the line of the back so the head reads as a separate dome. For reference, the Rnd 4 sts are numbered as follows: sts 30–37 are the back and sts 38–43 are the tail end. Place a marker in st 30.
Checkpoint: 3.5 in (8.9 cm) × 1.75 in (4.4 cm).
Feather Frames
Rnd 5 (chain loops): With the right side facing, join yarn with sl st in st 30. Leave each loop untwisted and lying flat.
Upper wing:
– U1: Ch 18, sk next st, sl st in st 32.
– U2: Ch 24, sk next st, sl st in st 34.
– U3: Ch 30, sk next st, sl st in st 36.
– Sl st in st 37.
Lower wing (tail fan):
– L1: Ch 26, sk next st, sl st in st 39.
– L2: Ch 22, sk next st, sl st in st 41.
– L3: Ch 18, sk next st, sl st in st 43.
Do not fasten off. Arrange the loops on your work surface: the upper wing fans up and to the right, with U3 tallest and outermost. The tail fans right and down, with L1 the longest and highest.
Checkpoint (size before border): about 5 in (12.7 cm) × 4 in (10.2 cm) with the loops spread out.
Border
The border is a single round that covers all six loops. You work it back along the same path, from L3 to U1. Every loop follows the same layout: sc, hdc, dc, hdc, sc. The dc group lands on the outer tip and builds the ridged scallop edge.
Border gauge: 6 covering sts = 1 in (2.5 cm) along the sides, measured on the inner edge of the loop.
Rnd 6 (border): Turn so the wrong side faces you; this keeps the sts lying the same way as Rnd 5. Work into each ch-sp as listed below. After each loop, sl st into the anchor st named.
| Loop | Chains | Covering stitches | Total | Then |
|---|---|---|---|---|
| L3 | 18 | 5 sc, 2 hdc, 10 dc, 2 hdc, 5 sc | 24 | sl st in st 41 |
| L2 | 22 | 6 sc, 2 hdc, 12 dc, 2 hdc, 6 sc | 28 | sl st in st 39 |
| L1 | 26 | 6 sc, 2 hdc, 16 dc, 2 hdc, 6 sc | 32 | sl st in st 37, sl st in st 36 |
| U3 | 30 | 7 sc, 2 hdc, 18 dc, 2 hdc, 7 sc | 36 | sl st in st 34 |
| U2 | 24 | 6 sc, 2 hdc, 14 dc, 2 hdc, 6 sc | 30 | sl st in st 32 |
| U1 | 18 | 5 sc, 2 hdc, 10 dc, 2 hdc, 5 sc | 24 | sl st in st 30 |
Fasten off.
Per-wing counts: The upper wing has 24 + 30 + 36 = 90 sts. The lower wing has 32 + 28 + 24 = 84 sts. The total for the round is 174 sts.
Why the math works: Each loop gets exactly its chain count plus 6. Packing those 6 extra stitches around the tip is enough to curve it, and the sides still lie straight. With fewer stitches the tip pulls into a point and cups. With more, it ruffles.
The sc at both ends of each loop keep the base slim where the loops meet the body. The 2 hdc on each side step the height up to the dc tip, so the scallop rises smoothly with no notch.
Hanging loop: Count the 36 sts of U3. With the right side facing, join yarn with sl st in st 18, which is the 9th of the 18 dc. Ch 24, sl st in st 19. Work 32 sc into the ch-sp to cover the loop (the chain count plus 8, for a firm, round curve), then sl st in st 19. Fasten off.
The hanging loop stands about 1.75 in (4.4 cm) tall.
Final Blocking
- Weave in all ends through the solid body, not through the feathers, where the ends would show.
- Soak the dove in cool water for 10 minutes, then gently press it in a towel.
- Pin the body flat on the mat, with the beak pointing left and the belly curving down.
- Fan the upper wing so U1, U2, and U3 sit side by side and touch, with no gaps or overlaps. Pin each tip at its center dc.
- Fan the tail the same way, with L1 highest and L3 lowest.
- Check the overall size: 5.5 in (14.0 cm) × 4.5 in (11.4 cm). Adjust the pins until it matches.
- Pin the hanging loop straight up from the U3 tip.
- For a stiffer ornament, spray with light starch. Let it dry completely, at least 12 hours, before you unpin.
Final Quality-Control Checklist
- Body rounds: 26, 32, 38, and 43 sts.
- The beak points forward, and the crown sits above the line of the back.
- Six loops, three per fan, each anchored with 1 skipped st between anchors.
- Border counts: 24, 28, 32, 36, 30, and 24 sts.
- Every loop has its dc group centered on the outer tip.
- The hanging loop is centered on U3, at the join between sts 18 and 19.
- No ends show on the feathers.
- Finished size: 5.5 in (14.0 cm) × 4.5 in (11.4 cm).
Troubleshooting
- The body cups instead of lying flat: Your tension is too tight on the increases. Loosen up, or go up a hook size.
- The body ruffles: Check your counts for Rnds 2 and 3. Extra increases are the usual cause.
- The beak droops: Make sure the beak’s sl st, sc, and hdc go into the chains, then finish with the sc into st 17 to lock it.
- The feathers twist: Untwist the chain before you anchor it, and check again before working Rnd 6.
- The feather tips are pointed or cupped: You likely have fewer than the chain count plus 6. Recount that loop.
- The feather tips ruffle: There are too many dc. Match the chart exactly.
- The fans overlap: Block the fans wider, or add 2 ch to the longest loop so it clears its neighbor.
- The hanging loop flops over: Cover it with all 32 sc. A bare chain won’t stand up.
Care
Hand wash in cool water with mild soap, then block flat to dry. Store flat or hanging, away from heavy decorations that could crush the feathers.

Final Notes
Here is the full measurement chain. Your gauge of 12 sc = 2 in (5.1 cm) gives a 3.5 in (8.9 cm) body. Six chain loops spread it to about 5 in (12.7 cm) × 4 in (10.2 cm). The chain-plus-6 border brings the finished dove to 5.5 in (14.0 cm) × 4.5 in (11.4 cm). If each checkpoint matches, the final size will too.
Once your first dove is right, try a set in mixed colors for the tree, or tie one onto a gift.
Happy crocheting!