

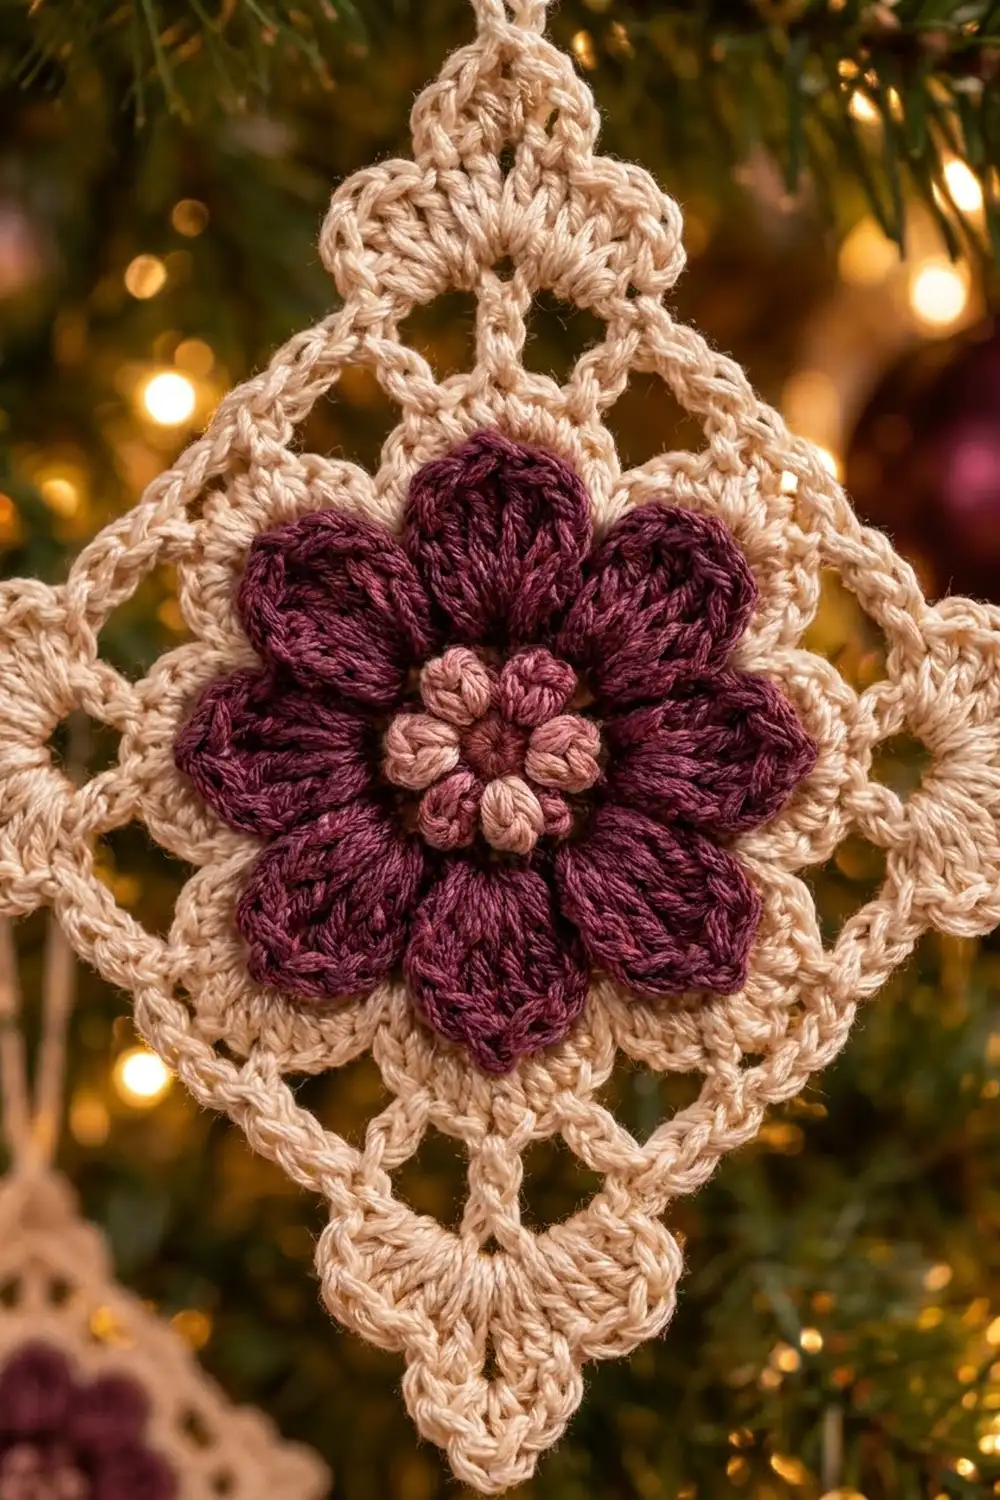
The Winter Plum Blossom Diamond Ornament is a small, lacy square motif that hangs on point as a diamond. A plum eight-petal flower with a rose-pink puff center sits inside a cream frame of mesh and small arches. Each corner ends in a neat point, and a padded hanging loop sits at the top.
The colors are warm and quiet: deep plum, soft dusty rose, and creamy ecru. The style is vintage, close to the look of thread doilies, but it is sturdy enough to hang on a tree, tie onto a gift, or clip to a garland.
This pattern uses US crochet terms. The finished ornament measures 3.25 in (8.3 cm) per side and about 4.6 in (11.7 cm) from point to point, not counting the 2.75 in (7.0 cm) hanging loop.
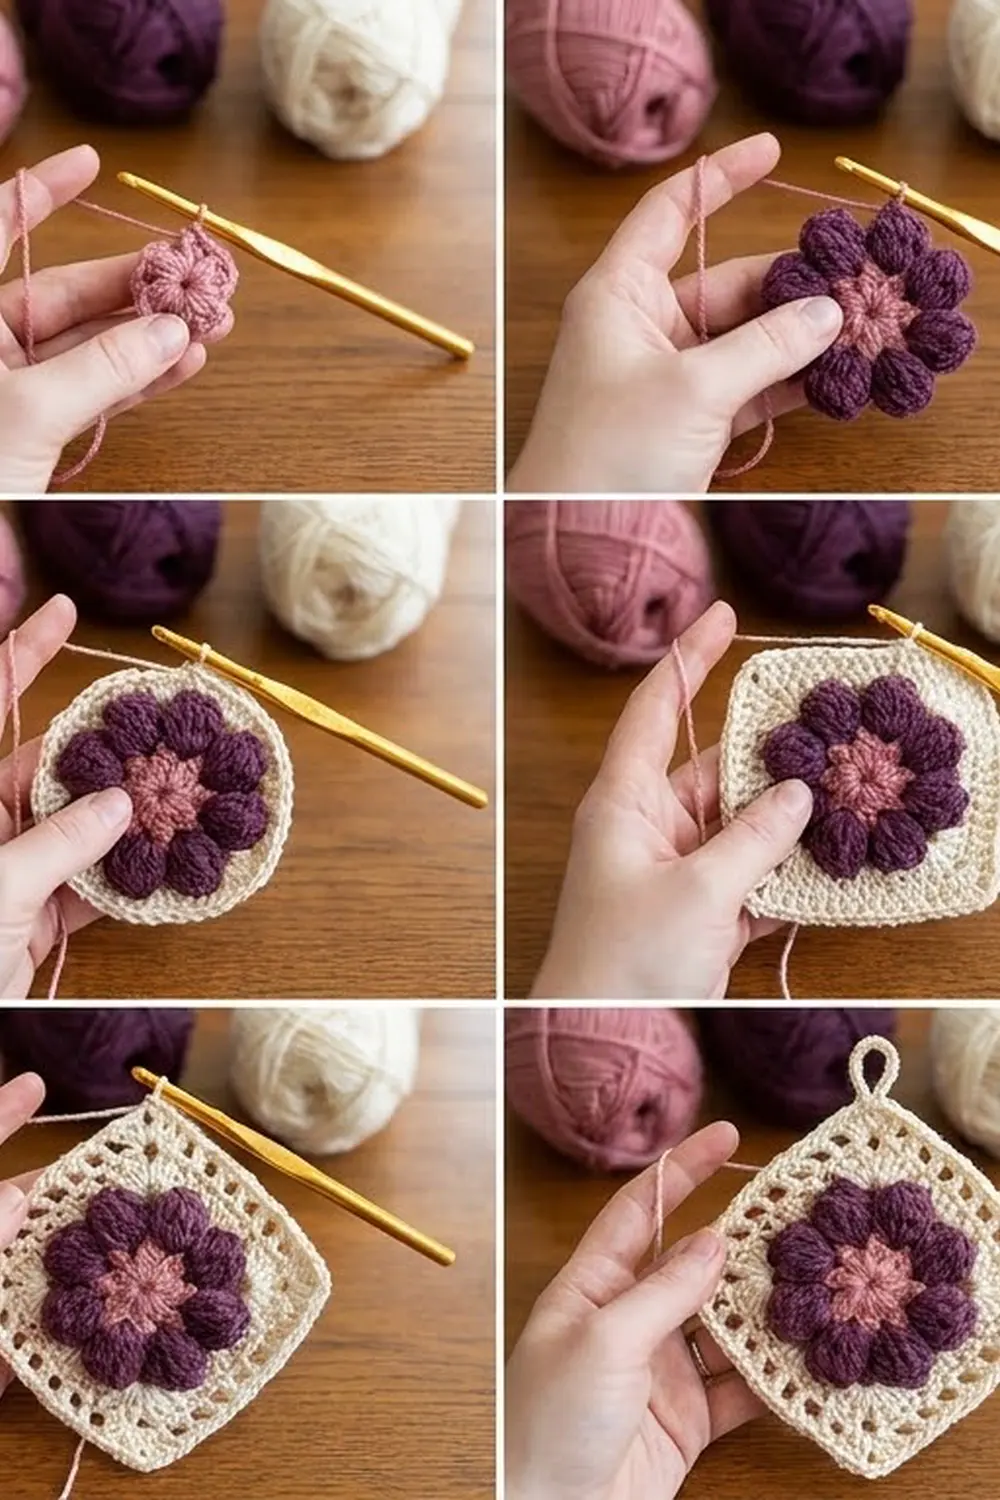
You make it in one piece, working in the round from the center out. First come the pink center and the plum petals. Then the cream rounds lock the petals in place, square off the circle, and add the mesh and the edging. You finish with the hanging loop.
Finished Size and Construction
- Finished size: 3.25 in (8.3 cm) per side; about 4.6 in (11.7 cm) point to point
- Skill level: Easy-Intermediate
- Terminology: US
- Yarn weight: Size 3 cotton crochet thread (light fingering)
- Hook: 2.5 mm (US B/1 or C/2, depending on brand)
- Number of pieces: 1
- Layout: Single square, hung on point as a diamond
- Piece size: 3.25 in (8.3 cm) per side
- Size before border: 2.75 in (7.0 cm) per side after Round 7
- Border depth: 0.25 in (0.6 cm) on each side (Rounds 8–9)
Materials
Use a mercerized cotton thread. It gives clear stitch definition, holds its shape, and blocks crisply. Pick a cream with a warm tone rather than bright white so the plum looks rich instead of harsh.
- Color A – Dusty Rose: 1 g, about 3 m
- Color B – Plum: 4 g, about 12 m
- Color C – Cream: 8 g, about 23 m
These amounts include a margin for joins, weaving in ends, and one practice swatch.
Tools:
– 2.5 mm crochet hook
– Tapestry needle
– Scissors
– Rustproof pins and a foam blocking mat
– Spray bottle with water
– Optional: fabric stiffener or light spray starch
Abbreviations (US Terms)
- ch – chain
- sl st – slip stitch
- sc – single crochet
- hdc – half double crochet
- dc – double crochet
- sk – skip
- sp(s) – space(s)
- st(s) – stitch(es)
- mp – mini puff (see below)
Mini puff (mp): [Yarn over, insert hook in ring, pull up a loop] twice (5 loops on hook). Yarn over and pull through all 5 loops.
Gauge and Checkpoints
Gauge is not critical for an ornament, but it controls whether the square lies flat. Make one test motif first and check it against these points:
- After Round 1: the center is about 0.5 in (1.3 cm) across.
- After Round 3: the flower is about 1.5 in (3.8 cm) across.
- After Round 5: the cream band is about 1.75 in (4.4 cm) across.
- After Round 6: the square is about 2.25 in (5.7 cm) per side.
- After Round 7: the square is about 2.75 in (7.0 cm) per side.
- After Round 9: the square is 3.25 in (8.3 cm) per side.
If your motif is too big: go down to a 2.25 mm hook, or pull the chain spaces a little snugger.
If your motif is too small: go up to a 2.75 mm hook. A tight Round 6 is the usual cause, so loosen your hdc and dc there.
Pattern
Round 1 – Puff Center (Color A)
Make a magic ring. Ch 2 (does not count as a st). Work (mp, ch 1) 8 times in the ring. Pull the ring closed. Sl st to the top of the first mp. Fasten off.
Count: 8 mp and 8 ch-1 sps.
Round 2 – Petal Base (Color B)
Join Color B with a sl st in any ch-1 sp. Ch 1, sc in the same sp, ch 3. Sc in the next ch-1 sp, ch 3. Repeat from * to * 6 more times. Sl st to the first sc.
Count: 8 sc and 8 ch-3 sps.
Round 3 – Petals (Color B)
Sl st into the next ch-3 sp. In that same sp, work (sc, hdc, 3 dc, hdc, sc). In the next ch-3 sp, work (sc, hdc, 3 dc, hdc, sc). Repeat from * to * 6 more times. Sl st to the first sc. Fasten off.
Count: 8 petals of 7 sts each, 56 sts total.
Each petal should curve outward and look rounded. If the petals ruffle, check that you worked 3 dc per petal, not 4.
Round 4 – Petal Tie-In (Color C)
Join Color C with a sc in the center dc (the 2nd of the 3 dc) of any petal. Ch 4. Sc in the center dc of the next petal, ch 4. Repeat from * to * 6 more times. Sl st to the first sc.
Count: 8 sc and 8 ch-4 sps.
The ch-4 lengths sit behind the dips between the petals, so the petals stay raised in front.
Round 5 – Cream Band (Color C)
Ch 1. Sc in the next sc, then 4 sc in the next ch-4 sp. Repeat from * to * 7 more times. Sl st to the first sc.
Count: 40 sc, made up of 8 groups of 5.
This solid band frames the flower. Think of the round as 4 quarters of 10 sts each. The first st of each quarter becomes a corner in the next round.
Round 6 – Square-Up (Color C)
Ch 3 (counts as dc). In the same st as the join, work (dc, ch 2, 2 dc): this is Corner 1.
Side: dc in the next st, hdc in the next 2 sts, sc in the next 3 sts, hdc in the next 2 sts, dc in the next st (9 sts).
In the next st, work (2 dc, ch 2, 2 dc), then work the Side. Repeat from * to * 2 more times. Sl st to the top of the beginning ch-3.
Count: 52 sts and 4 ch-2 corner sps. Each side has 13 sts between corner sps: 2 corner dc, 9 side sts, and 2 corner dc.
The graded heights (sc in the middle, dc next to the corners) turn the circle into a square.
Round 7 – Mesh (Color C)
Sl st in the next dc, then sl st into the corner ch-2 sp. Ch 3 (counts as dc). In the same sp, work (dc, ch 3, 2 dc).
Side: dc in the next st, (ch 2, sk 2 sts, dc in the next st) 4 times. This uses all 13 sts on the side.
In the next corner ch-2 sp, work (2 dc, ch 3, 2 dc), then work the Side. Repeat from * to * 2 more times. Sl st to the top of the beginning ch-3.
Count: 36 dc, 16 ch-2 sps, and 4 ch-3 corner sps. Each side has 9 dc (2 + 5 + 2) and 4 ch-2 sps.
Checkpoint: the square should measure 2.75 in (7.0 cm) per side.
Border
Border gauge: 19 sc = 3 in (7.6 cm) along one side after Round 8.
Round 8 – Single Crochet Base (Color C)
Sl st in the next dc, then sl st into the corner ch-3 sp. Ch 1. In the same sp, work (sc, ch 3, sc).
Side: sc in the next 3 dc, (2 sc in the next ch-2 sp, sc in the next dc) 4 times, sc in the next 2 dc. That is 3 + 12 + 2 = 17 sc.
In the next ch-3 sp, work (sc, ch 3, sc), then work the Side. Repeat from * to * 2 more times. Sl st to the first sc.
Count: 76 sc and 4 ch-3 corner sps. Each side has 19 sc between corner sps: 1 corner sc, 17 side sc, and 1 corner sc.
Round 9 – Arches and Points (Color C)
Sl st into the corner ch-3 sp. Ch 1. In the same sp, work (sc, hdc, dc, ch 3, dc, hdc, sc): this is a corner point.
Side: sc in the next st, (ch 3, sk 2 sts, sc in the next st) 6 times. This uses 1 + 18 = 19 sts.
In the next ch-3 sp, work a corner point, then work the Side. Repeat from * to * 2 more times. Sl st to the first sc. Do not fasten off.
Count per side: 7 sc and 6 ch-3 arches, plus one corner point at each corner.
Why the math works: Round 7 has 9 dc and 4 ch-2 sps per side. Working 1 sc per dc and 2 sc per sp gives 9 + 8 = 17 sc. The corner sc on each end brings it to 19. Round 9 needs 1 + 3n sts per side, and 19 = 1 + (3 × 6), so the 6 arches fit exactly with no gaps or crowding. Each of the 4 sides follows the same chain, so the square stays even.
Hanging Loop (Color C)
Sl st into the ch-3 sp of the nearest corner point. Ch 25. Sl st in the same ch-3 sp. Work 34 sc over the chain loop. Sl st into the corner sp again. Fasten off.
The loop is about 2.75 in (7.0 cm) long. The sc covering makes it look like a firm rope.
Weave in all ends on the back, through stitches of the same color.
Final Blocking
- Wet the ornament lightly, or soak it in diluted fabric stiffener if you want it firm.
- Press out the extra water in a towel. Do not wring it.
- Lay it face up on the blocking mat as a diamond.
- Pin the 4 corner points first, so each side measures 3.25 in (8.3 cm).
- Pin the center of each ch-3 arch outward so the arches open evenly.
- Shape the petals with your fingers so they are raised and rounded. Do not pin through them.
- Lay the hanging loop straight up from the top point.
- Let it dry completely, at least 6 hours, before unpinning.
Final Quality-Control Checklist
- Round 1 has 8 puffs and the ring is closed with no hole.
- There are 8 even petals, and each one is tied in at its center dc.
- The cream band has 40 sc and lies flat.
- The square is 2.75 in (7.0 cm) per side before the border.
- Each side has 19 sc in Round 8 and 6 arches in Round 9.
- All 4 corner points are the same size.
- The finished square is 3.25 in (8.3 cm) per side.
- The hanging loop is firmly anchored and centered on one point.
- No ends show on the front.
Troubleshooting
Petals look flat: Pull Round 4’s ch-4 a little snugger so the petals bow forward.
The square cups: Round 6 is too tight. Redo it with looser dc and hdc, or go up one hook size for that round only.
The edges ruffle: You probably added an extra sc in Round 8. Recount to 17 side sc.
Arches don’t fit: Check that Round 8 has exactly 19 sts per side, counting both corner sc.
The ornament hangs crooked: Re-anchor the loop in the exact center of the corner ch-3 sp.
The center has a hole: Weave the Color A tail around the ring once more and pull it snug.
Care
Hand wash in cool water with mild soap, press it dry in a towel, and reshape it flat. Store it flat or hanging, away from damp and direct sunlight.
Final Notes
The size of this ornament builds in a clear chain. The 0.5 in (1.3 cm) puff center grows to a 1.5 in (3.8 cm) flower. The cream band brings it to 1.75 in (4.4 cm), and the square-up round sets a 2.25 in (5.7 cm) square. The mesh grows it to 2.75 in (7.0 cm). Finally, the 0.25 in (0.6 cm) border finishes it at 3.25 in (8.3 cm) per side and about 4.6 in (11.7 cm) point to point.
As long as each checkpoint matches and each side counts 13, then 19, then 6 arches, your diamond will hang straight and look tidy. Make one in the classic plum and cream, then try other color mixes for a whole set of tree ornaments.
Happy crocheting!