

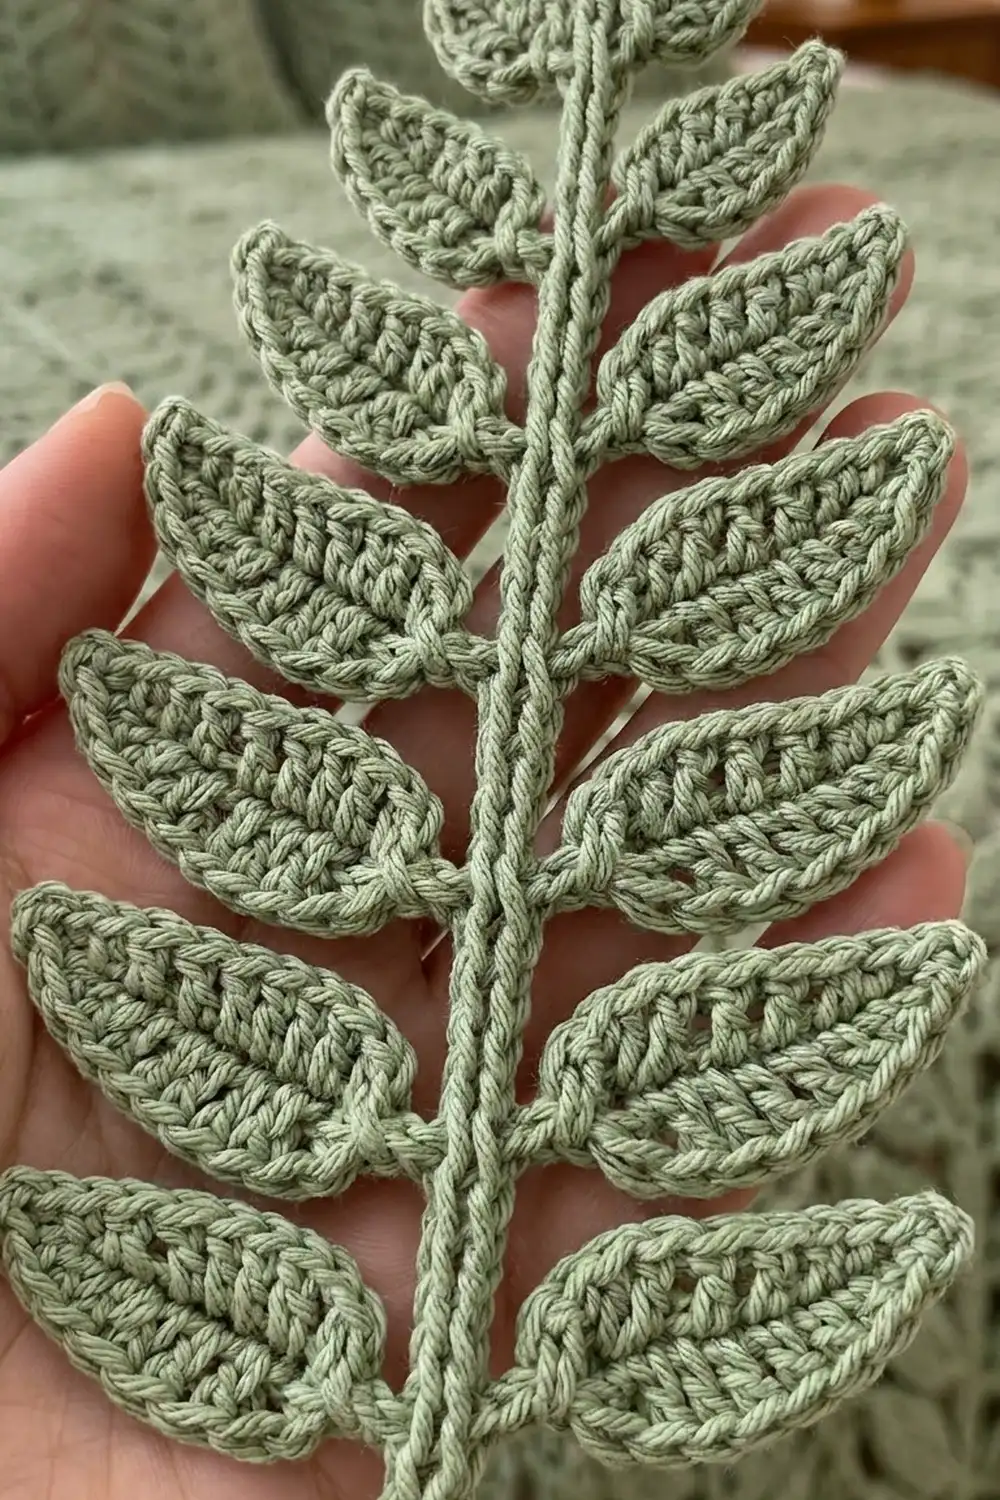
This fern frond is one single crocheted piece: a raised, rope-like center stem with nine opposite pairs of oval leaves and one small leaf at the tip. The leaves get gradually smaller toward the top, so the frond has a natural, tapered silhouette.
The sample is worked in a soft sage green. A matte cotton or cotton-blend yarn gives the crisp stitch definition you see in the photo. Each leaf has a small pointed picot tip and a raised slip-stitch vein down its center.
The pattern uses US crochet terms. The blocked frond measures about 10 in (25.4 cm) long and 4 in (10.2 cm) wide at the widest leaf pair.
The construction is simple. Pass 1 chains the stem from the bottom up, making the left-side leaves and the tip leaf as you go. Pass 2 slip stitches back down the other side of the stem, adds the right-side leaves, and turns the plain chain into a raised, braided stem. You don’t sew anything on and there are no separate pieces.
Finished Size and Construction
- Finished size: 10 in (25.4 cm) long x 4 in (10.2 cm) wide
- Skill level: Easy-Intermediate
- Terminology: US crochet terms
- Yarn weight: DK (#3)
- Hook: 3.5 mm (E-4)
- Number of pieces: 1 (single motif)
- Layout: 1 central stem, 9 opposite leaf pairs, 1 tip leaf (19 leaves total)
- Piece size: 10 in x 4 in (25.4 cm x 10.2 cm)
- Size before border (after Pass 1): 10 in x 2.2 in (25.4 cm x 5.6 cm)
- Border depth (Pass 2, right-side leaves): 1.8 in (4.6 cm)
Materials
Yarn: Choose a smooth DK cotton or cotton-blend with good stitch definition. Fuzzy or very splitty yarn blurs the picot tips and the leaf veins. Pick a yarn with a little body so the leaves hold their shape after blocking.
- Sage green: 15 g, about 35 m (38 yd)
This quantity includes a margin. One frond uses roughly 10 g, so you have enough yarn left over for a gauge leaf and a little frogging.
Tools:
- 3.5 mm (E-4) crochet hook
- Tapestry needle
- Scissors
- Rust-proof pins
- Blocking mat or folded towel
- Spray bottle with water
- Ruler or tape measure
Abbreviations (US Terms)
- ch – chain
- sl st – slip stitch
- sc – single crochet
- hdc – half double crochet
- dc – double crochet
- st(s) – stitch(es)
- FL – free loops (the unworked loops on the underside of a foundation chain)
Special stitches:
- Picot tip: Ch 2, sl st in 2nd ch from hook.
- Surface vein: Sl st on top of the leaf, along the center line where the two halves of the leaf meet. Insert the hook straight through the center of each leaf foundation ch, from front to back. Yarn over and pull through both the fabric and the loop on the hook.
- Stem back bump: The raised bar on the back of each stem chain. Pass 2 is worked into these.
Gauge and Checkpoints
Gauge: 22 sc x 24 rows = 4 in (10.2 cm) in sc. On the stem, 5 ch = 1 in (2.5 cm).
Before you start the frond, test one piece: make a single Large Leaf (instructions below) from a ch-11 that isn’t attached to anything.
Checkpoint 1 – test Large Leaf: 2 in (5.1 cm) from base to picot tip and 0.9 in (2.3 cm) across the widest point, after a light steam or pin.
Checkpoint 2 – stem tail: The first 8 ch should measure 1.6 in (4.1 cm).
Checkpoint 3 – after Pass 1: The stem is 44 ch, or 8.8 in (22.4 cm). Including the tip leaf, the piece is 10 in (25.4 cm) long and 2.2 in (5.6 cm) wide measured from the stem to the tips of the lowest leaves.
Checkpoint 4 – after Pass 2: The frond is 10 in x 4 in (25.4 cm x 10.2 cm) after blocking.
If your leaf is too big: Go down to a 3.25 mm or 3 mm hook. Also make sure your dc aren’t being pulled too tall.
If your leaf is too small: Go up to a 3.75 mm or 4 mm hook. Stems chained too tightly also make the frond curl, so chain the stem loosely and evenly.
Leaf Instructions
Every leaf is worked the same way, both on the stem and as a test leaf. You chain out from the stem and work down one side of the chain. Then you work 3 sc around the base, work back up the other side in the FL, add the picot tip, and slip stitch down the center vein to return to the stem.
Small Leaf (S) – 13 sts + picot
Ch 7.
- Side A: Working in the back bumps, start in the 2nd ch from hook: sc, hdc, dc, hdc, sc (5 sts over chains 2–6).
- Base: 3 sc in the 7th ch from hook (the ch next to the stem).
- Side B: Working in the FL of chains 6–2: sc, hdc, dc, hdc, sc (5 sts).
- Tip: Picot tip, then sl st in the skipped 1st ch at the leaf tip.
- Vein: Work 5 surface vein sl sts down the center, then sl st into the stem ch where the leaf began.
Stitch count: 5 + 3 + 5 = 13 sts. Small Leaf length: 1.2 in (3.0 cm). Width: 0.6 in (1.5 cm).
Medium Leaf (M) – 17 sts + picot
Ch 9.
- Side A: Starting in the 2nd ch from hook: sc, hdc, 3 dc, hdc, sc (7 sts over chains 2–8).
- Base: 3 sc in the 9th ch from hook.
- Side B: In the FL of chains 8–2: sc, hdc, 3 dc, hdc, sc (7 sts).
- Tip: Picot tip, then sl st in the skipped 1st ch.
- Vein: 7 surface vein sl sts, then sl st into the stem ch.
Stitch count: 7 + 3 + 7 = 17 sts. Medium Leaf length: 1.6 in (4.1 cm). Width: 0.75 in (1.9 cm).
Large Leaf (L) – 21 sts + picot
Ch 11.
- Side A: Starting in the 2nd ch from hook: sc, hdc, 5 dc, hdc, sc (9 sts over chains 2–10).
- Base: 3 sc in the 11th ch from hook.
- Side B: In the FL of chains 10–2: sc, hdc, 5 dc, hdc, sc (9 sts).
- Tip: Picot tip, then sl st in the skipped 1st ch.
- Vein: 9 surface vein sl sts, then sl st into the stem ch.
Stitch count: 9 + 3 + 9 = 21 sts. Large Leaf length: 2 in (5.1 cm). Width: 0.9 in (2.3 cm).
Pass 1: Stem, Left Leaves, and Tip Leaf
Number the stem chains 1–44 from the bottom up. Leaves attach to stem ch 8, 12, 16, 20, 24, 28, 32, 36, and 40. The tip leaf sits on ch 44.
- Ch 8 for the stem tail (stem ch 1–8). Pair 1 left: make a Large Leaf off ch 8.
- Ch 4 (stem ch 9–12). Pair 2 left: Large Leaf.
- Ch 4 (stem ch 13–16). Pair 3 left: Large Leaf.
- Ch 4 (stem ch 17–20). Pair 4 left: Medium Leaf.
- Ch 4 (stem ch 21–24). Pair 5 left: Medium Leaf.
- Ch 4 (stem ch 25–28). Pair 6 left: Medium Leaf.
- Ch 4 (stem ch 29–32). Pair 7 left: Small Leaf.
- Ch 4 (stem ch 33–36). Pair 8 left: Small Leaf.
- Ch 4 (stem ch 37–40). Pair 9 left: Small Leaf.
- Ch 4 (stem ch 41–44). Tip leaf: make a Small Leaf off ch 44 and point it straight up, in line with the stem.
Stem count after Pass 1: 8 + (8 x 4) + 4 = 44 ch.
Leaf count after Pass 1: 3 L + 3 M + 3 S + 1 tip S = 10 leaves.
Don’t fasten off. Lay the piece flat with all leaves to the left and check Checkpoint 3: 10 in x 2.2 in (25.4 cm x 5.6 cm).
Border: Pass 2 – Stem Edge and Right Leaves
Because this frond is a single motif, its border is the second pass along the stem. This pass edges the bare right side of the chain with slip stitches and adds the matching right-hand leaves. The leaf edges themselves need no extra round, since the sc–hdc–dc shaping and picot already give them a finished edge.
Border gauge: 5 sl st = 1 in (2.5 cm), matching the 5 ch per inch stem gauge. Keep the slip stitches the same size as the chains. If they’re tighter, the stem will bow toward the right.
Rotate the work so the hook is at the top of the stem and the back bumps of the stem chain face you. Work into the back bump of each stem ch, going downward:
- Sl st in stem ch 43, 42, 41, 40 (4 sl sts). Pair 9 right: Small Leaf off ch 40.
- Sl st in ch 39–36 (4 sl sts). Pair 8 right: Small Leaf.
- Sl st in ch 35–32 (4 sl sts). Pair 7 right: Small Leaf.
- Sl st in ch 31–28 (4 sl sts). Pair 6 right: Medium Leaf.
- Sl st in ch 27–24 (4 sl sts). Pair 5 right: Medium Leaf.
- Sl st in ch 23–20 (4 sl sts). Pair 4 right: Medium Leaf.
- Sl st in ch 19–16 (4 sl sts). Pair 3 right: Large Leaf.
- Sl st in ch 15–12 (4 sl sts). Pair 2 right: Large Leaf.
- Sl st in ch 11–8 (4 sl sts). Pair 1 right: Large Leaf.
- Sl st in ch 7–1 (7 sl sts) to finish the stem tail. Fasten off and weave in the ends along the stem.
Counts per side:
- Left side (Pass 1): 44 ch, 9 leaves, plus the tip leaf.
- Right side (Pass 2): 43 sl sts, 9 leaves.
The sl st total is (9 x 4) + 7 = 43. Ch 44 has no Pass 2 sl st because it holds the tip leaf and is where Pass 2 starts.
Why the math works: Pass 1 places a leaf every 4 chains. Pass 2 places a leaf every 4 slip stitches into those same chains, so each right leaf lands on exactly the stem ch that holds its left partner. Both sides use the same leaf size for each pair (L, L, L, M, M, M, S, S, S from the bottom up), so the frond stays symmetrical.
Each right Large Leaf reaches about 1.8 in (4.6 cm) sideways once it’s angled upward, which is the border depth. Pass 1 width (2.2 in / 5.6 cm) + border depth (1.8 in / 4.6 cm) = 4 in (10.2 cm) total width.
Final Blocking
- Weave in all ends along the stem, through the sl st ridge, so they don’t show.
- Lightly spritz the frond until it’s damp, not soaked. Cotton can also be steamed from 0.5 in (1.3 cm) above the fabric. Don’t touch the iron to the yarn.
- Pin the stem in a straight line, 10 in (25.4 cm) long, from the end of the tail to the tip of the tip leaf.
- Angle each leaf upward at about 45–60 degrees from the stem. Match each left leaf to its right partner.
- Pin each picot tip to a point. For the lowest leaf pair, measure 4 in (10.2 cm) from tip to tip.
- Gently press each leaf’s center vein flat with a fingertip so the sides spread evenly.
- Let it dry completely before removing the pins.
Final Quality-Control Checklist
- Stem has 44 ch with a 43-sl-st ridge down the right side.
- 19 leaves total: 6 Large, 6 Medium, 7 Small.
- Leaves sit in opposite pairs on stem ch 8, 12, 16, 20, 24, 28, 32, 36, 40.
- Every leaf has a picot point and a visible raised center vein.
- Stem tail measures 1.6 in (4.1 cm) below the first pair.
- Finished frond is 10 in x 4 in (25.4 cm x 10.2 cm).
- Ends are woven in invisibly and the stem lies straight.
Troubleshooting
Stem curves to one side. Your Pass 2 sl sts are tighter than the chains. Rework Pass 2 with a hook one size larger, then block with extra pins along the stem.
Leaves cup or ruffle. If they cup, the vein sl sts are too tight. Loosen them, or skip one vein sl st on Large Leaves. If they ruffle, your dc tension is loose, so go down a hook size.
Leaves don’t line up in pairs. Count the sl sts in Pass 2. There must be exactly 4 between leaves. Use a stitch marker on each leaf-bearing stem ch during Pass 1.
Picot tips disappear. Pull the picot sl st snug and pin the tips firmly during blocking.
Frond too short. Check the stem gauge. If your 8-ch tail is shorter than 1.6 in (4.1 cm), chain more loosely or use a larger hook for the stem only.
Care
Hand wash in cool water with mild soap, press out the water in a towel, and dry flat, pinning the leaves back into shape if needed. Don’t tumble dry.

Final Notes
The measurement chain for this frond is short and reliable. A Large Leaf of 2 in (5.1 cm) confirms your gauge. An 8-ch tail of 1.6 in (4.1 cm) confirms the stem gauge, and 44 stem chains give an 8.8 in (22.4 cm) stem. Add the 1.2 in (3.0 cm) tip leaf to get 10 in (25.4 cm) of length. Pass 1 gives a 2.2 in (5.6 cm) half-frond, and the right-side leaves of Pass 2 add 1.8 in (4.6 cm), for 4 in (10.2 cm) of total width.
If each checkpoint matches, the blocked frond will match too. Use it as an appliqué, a bookmark, or a botanical accent.
Happy crocheting!