

The Ember Maple Leaf is a five-lobed autumn leaf in one warm rust color. It has a dense, textured double-crochet body, a lacy eyelet vein up the middle of each lobe, and a small picot-toothed edge that gives it the serrated outline of a real maple leaf. A short slip-stitch stem finishes it off.
Use it as a coaster, a table scatter, a gift-tag topper, or a seasonal appliqué. It is one standalone motif, and this pattern makes one leaf. The pattern uses US crochet terms throughout.
The finished leaf measures about 8 in (20.3 cm) wide × 7.75 in (19.7 cm) tall, stem included, in DK-weight yarn with a 4.0 mm hook.
Construction is simple to follow. You work a small lacy center disc in rounds. Then you work the five lobes one at a time in short rows off that disc. Finally, one edging round goes around the whole leaf and adds the picot teeth and the stem.
Finished Size and Construction
- Finished size: 8 in (20.3 cm) wide × 7.75 in (19.7 cm) tall, including stem
- Skill level: Intermediate
- Terminology: US crochet terms
- Yarn weight: DK (light worsted / #3)
- Hook: 4.0 mm (G-6)
- Number of pieces: 1 (single motif)
- Layout: Center disc + 5 lobes + edging round, all one piece
- Center disc size: 2.25 in (5.7 cm) across after Round 3
- Size before edging: about 7.5 in (19.1 cm) wide × 7 in (17.8 cm) tall, no stem
- Edging depth: about 0.25 in (0.6 cm) on each edge; the stem adds about 1.75 in (4.4 cm)
Materials
Yarn: For crisp stitch definition, choose a smooth DK cotton or cotton blend. Mercerized cotton shows off the eyelet veins best. Avoid fuzzy or very splitty yarns, because they blur the openwork.
- Rust / burnt orange: 20 g, about 45 m (49 yd)
One leaf uses about 15 g. The quantity above includes a margin for your gauge swatch and tails.
Tools:
- 4.0 mm (G-6) crochet hook
- Tapestry needle
- 5 removable stitch markers
- Scissors
- Blocking mat, rust-proof pins, and a spray bottle
Abbreviations (US Terms)
- ch – chain
- sl st – slip stitch
- sc – single crochet
- dc – double crochet
- sp – space
- st(s) – stitch(es)
- tch – turning chain
- RS / WS – right side / wrong side
- sc2tog – (insert hook in next st, yarn over, pull up a loop) twice, yarn over, pull through all 3 loops
- dc2tog – (yarn over, insert hook in next st, yarn over, pull up a loop, yarn over, pull through 2 loops) twice, yarn over, pull through all 3 loops
Special stitches:
- Beg dc2tog – ch 2, dc in next st. Together these count as 1 dc2tog.
- Picot – ch 2, sl st in first ch made.
- Tip picot – ch 3, sl st in 3rd ch from hook.
- Vein dc – the dc on either side of a lobe’s central ch-1 sp. In every lobe row, work the dc into the vein dc, ch 1, skip the ch-1 sp, and work the next dc into the other vein dc. Stacking the ch-1 sps this way makes the eyelet vein.
Side count: In the lobe rows, “4 per side” means 4 dc on each side of the ch-1 vein sp, with the edge stitch (or tch) included.
Gauge and Checkpoints
Gauge: 18 dc × 10 rows = 4 in (10.2 cm) in dc rows.
Make your first leaf as your test piece, and check it at each of these stages:
- After Round 3: The disc measures 2.25 in (5.7 cm) across.
- Center lobe, Row 3: The lobe is about 3 in (7.6 cm) wide at its widest row.
- Center lobe finished: It is about 3.5 in (8.9 cm) from the disc edge to the tip.
- Upper lobes finished: Each is about 3 in (7.6 cm) long. Lower lobes: each is about 2.25 in (5.7 cm) long.
- Before edging: The leaf is about 7.5 in (19.1 cm) wide × 7 in (17.8 cm) tall.
If your disc is too big: go down a hook size, to 3.75 mm. If it is too small: go up to 4.5 mm. If the disc ruffles, your Round 1 stitches are too loose for the ring. Pull the ring tighter and recheck before you go on.
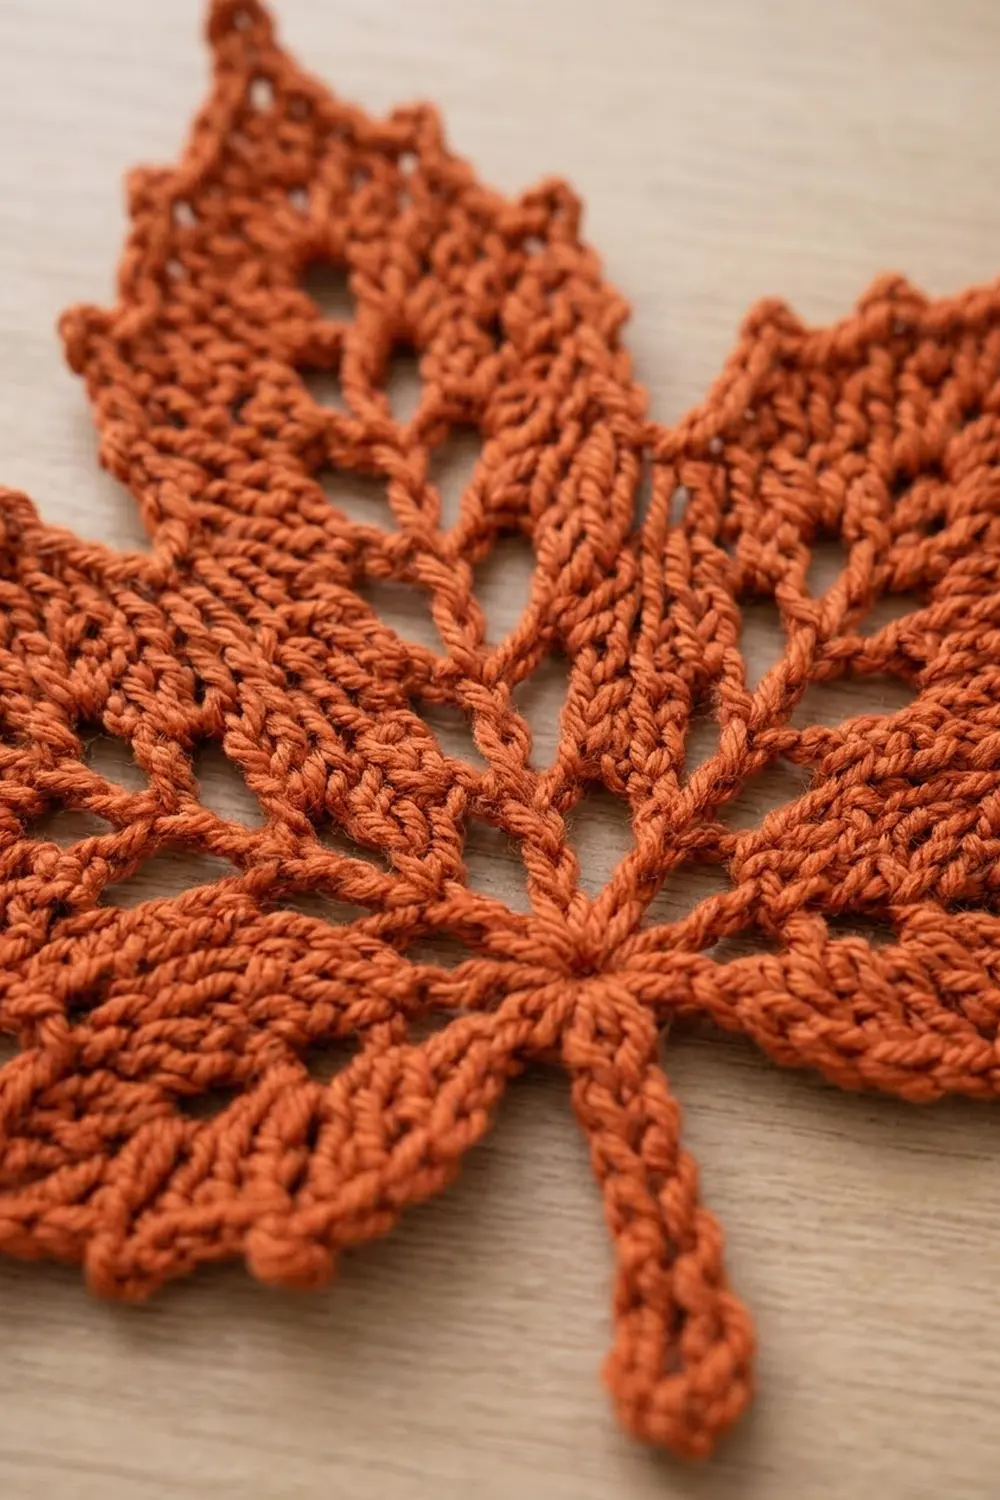
Center Disc
Round 1 (RS): Make an adjustable ring. Ch 3 (counts as dc), work 15 dc in the ring, and pull the ring closed. Join with a sl st to the top of ch-3. (16 dc)
Round 2: Ch 4 (counts as dc + ch 1). Dc in next dc, ch 1; repeat from * 14 more times. Join with a sl st to the 3rd ch of the beginning ch-4. (16 dc, 16 ch-1 sps)
This round makes the small ring of eyelets around the center of the leaf.
Round 3: Ch 3 (counts as dc, worked in the same st as the join), dc in next ch-1 sp. Dc in next dc, dc in next ch-1 sp; repeat from * 14 more times. Join with a sl st to the top of ch-3. Fasten off. (32 dc: 16 worked into dc + 16 worked into ch-1 sps)
Treat the beginning ch-3 as stitch 1. Number the stitches 1–32 in the direction you worked, then mark the stitch groups:
- St 1: stem stitch (bottom center)
- Sts 2 and 32: bottom stitches
- Sts 3–7: Lower Lobe A
- St 8: notch
- Sts 9–13: Upper Lobe A
- St 14: notch
- Sts 15–19: Center Lobe (st 17 is directly opposite st 1)
- St 20: notch
- Sts 21–25: Upper Lobe B
- St 26: notch
- Sts 27–31: Lower Lobe B
Check: 5 lobes × 5 sts = 25, plus 4 notch sts and 3 bottom sts = 32.
Lobes
All five lobes start with the same Row 1, worked across their 5-stitch group.
Row 1 (RS): Join yarn with a sl st in the first st of the group. Ch 3 (counts as dc), dc in the same st, dc in next st, (dc, ch 1, dc) in next st (the middle st), dc in next st, 2 dc in last st. Turn. (8 dc: 4 per side)
After Row 1, each lobe uses these rows:
- Increase row: Ch 3 (counts as dc), dc in the first st. Dc in each st to the ch-1 sp, ch 1, skip the ch-1 sp. Dc in each st to the tch, then 2 dc in the top of the tch. Turn. (Adds 1 st per side.)
- Even row: Ch 3 (counts as dc). Dc in each st to the ch-1 sp, ch 1, skip the ch-1 sp. Dc in each st across, ending in the top of the tch. Turn. (Side count stays the same.)
- Decrease row: Beg dc2tog. Dc in each st to the ch-1 sp, ch 1, skip the ch-1 sp. Dc in each st to the last 2 sts, then dc2tog. Turn. (Removes 1 st per side.)
- Tip row: Ch 1. Sc2tog, (sc, ch 3, sc) in the ch-1 sp, sc2tog. Fasten off, leaving a 4 in (10.2 cm) tail. (4 sc + ch-3 tip sp)
Center Lobe (sts 15–19)
- Row 1: 8 dc (4 per side)
- Row 2: Increase row. (10 dc)
- Row 3: Increase row. (12 dc)
- Row 4: Even row. (12 dc)
- Row 5: Decrease row. (10 dc)
- Row 6: Decrease row. (8 dc)
- Row 7: Decrease row. (6 dc)
- Row 8: Decrease row. (4 dc)
- Row 9: Tip row. (4 sc)
That gives 8 dc rows plus 1 sc tip row.
Upper Lobes A and B (sts 9–13 and sts 21–25)
- Row 1: 8 dc
- Row 2: Increase row. (10 dc)
- Row 3: Increase row. (12 dc)
- Row 4: Decrease row. (10 dc)
- Row 5: Decrease row. (8 dc)
- Row 6: Decrease row. (6 dc)
- Row 7: Decrease row. (4 dc)
- Row 8: Tip row. (4 sc)
That gives 7 dc rows plus 1 sc tip row.
Lower Lobes A and B (sts 3–7 and sts 27–31)
- Row 1: 8 dc
- Row 2: Increase row. (10 dc)
- Row 3: Decrease row. (8 dc)
- Row 4: Decrease row. (6 dc)
- Row 5: Decrease row. (4 dc)
- Row 6: Tip row. (4 sc)
That gives 5 dc rows plus 1 sc tip row.
Leave the notch stitches (8, 14, 20, 26) and the bottom stitches (1, 2, 32) unworked. Next to each other, the lobes will crowd slightly at their bases. That is normal, and blocking fixes it.
Border (Picot Edging and Stem)
Border gauge: 5 sc per 1 in (2.5 cm) along the lobe edges. That works out to 2 sc in each dc row-end and 1 sc in each sc tip-row end.
Lay the tails from the lobes along the edge and crochet over them as you go.
Edging round (RS): Join yarn with a standing sc in st 2. Then work around the leaf as follows.
Lower Lobe A (28 sc, 5 picots):
- Up the side: 2 sc in each of the next 2 dc row-ends, picot; repeat from * once more. Then 2 sc in the Row 5 row-end and 1 sc in the tip-row end. (11 sc)
- Tip: Sc in the sc2tog, sc in the next sc, (sc, tip picot, sc) in the ch-3 sp, sc in the next sc, sc in the sc2tog. (6 sc)
- Down the side: 1 sc in the tip-row end, then 2 sc in the Row 5 row-end. Picot, 2 sc in each of the next 2 dc row-ends; repeat from * once more. (11 sc)
Notch: Sl st in st 8.
Upper Lobe A (36 sc, 7 picots): Use the same method as Lower Lobe A, but repeat each … section 3 times instead of 2, and use the Row 7 row-end where the lower lobe used Row 5. That gives 15 sc up the side, 6 sc across the tip, and 15 sc down the side.
Notch: Sl st in st 14.
Center Lobe (40 sc, 9 picots):
- Up the side: 2 sc in each of the next 2 dc row-ends, picot; repeat from * 3 more times. Then 1 sc in the tip-row end. (17 sc)
- Tip: Work it the same as above. (6 sc)
- Down the side: 1 sc in the tip-row end. Then picot, 2 sc in each of the next 2 dc row-ends; repeat from * 3 more times. (17 sc)
Notch: Sl st in st 20.
Upper Lobe B: Work the same as Upper Lobe A. (36 sc, 7 picots)
Notch: Sl st in st 26.
Lower Lobe B: Work the same as Lower Lobe A. (28 sc, 5 picots)
Bottom and stem: Sc in st 32. Then work (sc, ch 10, sl st in the 2nd ch from hook and in each of the next 8 ch, sc) all in st 1. Join with a sl st to the first sc. Fasten off.
Round totals: 172 sc (28 + 36 + 40 + 36 + 28 for the lobes, plus 4 sc in sts 2, 32, and 1), 4 notch sl sts, 33 picots, and a 9-sl-st stem.
Why the math works: At the gauge, each dc row is 0.4 in (1.0 cm) tall, and 2 sc at 5 sc per inch also cover 0.4 in (1.0 cm). The edge therefore lies flat without ruffling or pulling.
Every picot sits on a row boundary at the same height on both sides of its lobe, which keeps the teeth symmetrical. The sl st in each notch adds almost no height, so the deep cut between the lobes stays crisp.
The edging adds about 0.25 in (0.6 cm) on every edge. That takes the width from 7.5 in (19.1 cm) to 8 in (20.3 cm). The 9-chain stem adds about 1.75 in (4.4 cm), bringing the total height to 7.75 in (19.7 cm).
Final Blocking
- Weave in any tails you did not crochet over.
- Soak the leaf in cool water for 10 minutes, then press out the water in a towel. Do not wring it.
- Lay it RS up on the blocking mat.
- Pin the center lobe tip about 4.75 in (12.1 cm) above the center of the disc.
- Pin the upper lobe tips so they are 8 in (20.3 cm) apart, and angle them up evenly on both sides.
- Pin the lower lobe tips down and outward. Make sure they are level with each other.
- Pin a single pin into each notch to set the V shape.
- Pin each tip picot to a sharp point, and gently open the eyelet veins with your fingertips.
- Straighten the stem, then let the leaf dry completely before unpinning.
Final Quality-Control Checklist
- Disc measures 2.25 in (5.7 cm) across with 32 dc
- Each lobe has one straight, unbroken column of eyelets
- Center lobe has 8 dc rows, upper lobes 7, and lower lobes 5
- Edging totals 172 sc and 33 picots
- Picots line up at the same heights on both sides of each lobe
- Four clean notches, each with one sl st
- Leaf measures 8 in (20.3 cm) wide × 7.75 in (19.7 cm) tall including the stem
- Matching lobes are the same size as each other
- No visible tails on the RS
Troubleshooting
Vein zigzags instead of running straight: You worked into the ch-1 sp instead of skipping it, or you missed a vein dc. Always place the dc directly into each vein dc.
Lobe tip is lopsided: Your side counts don’t match. Count the dc on each side of the ch-1 sp after every row.
Edge ruffles: You are working more than 2 sc per dc row-end. Keep to the counts, or go down 0.5 mm for the edging only.
Edge pulls and cups the lobes: Your sc are too tight. Go up 0.5 mm for the edging.
Lobes overlap at the base: This is normal before blocking. Pin the notches firmly while the leaf is damp.
Stem curls: Work the sl sts a little looser, then pin the stem straight while blocking.
Care
Hand wash cool and lay flat to dry. If the leaf relaxes over time, re-block it with light steam.

Final Notes
The measurement chain runs like this:
- Gauge of 18 dc × 10 rows = 4 in (10.2 cm)
- A 2.25 in (5.7 cm) disc of 32 dc
- Lobes of 3.5 in (8.9 cm), 3 in (7.6 cm), and 2.25 in (5.7 cm)
- 7.5 in (19.1 cm) across before edging
- 172-sc picot edging that adds 0.25 in (0.6 cm) per edge
- Finished leaf of 8 in (20.3 cm) × 7.75 in (19.7 cm) with its stem
If each checkpoint matches, the next stage will too. Make one leaf, block it well, and enjoy your little piece of autumn.
Happy crocheting!