

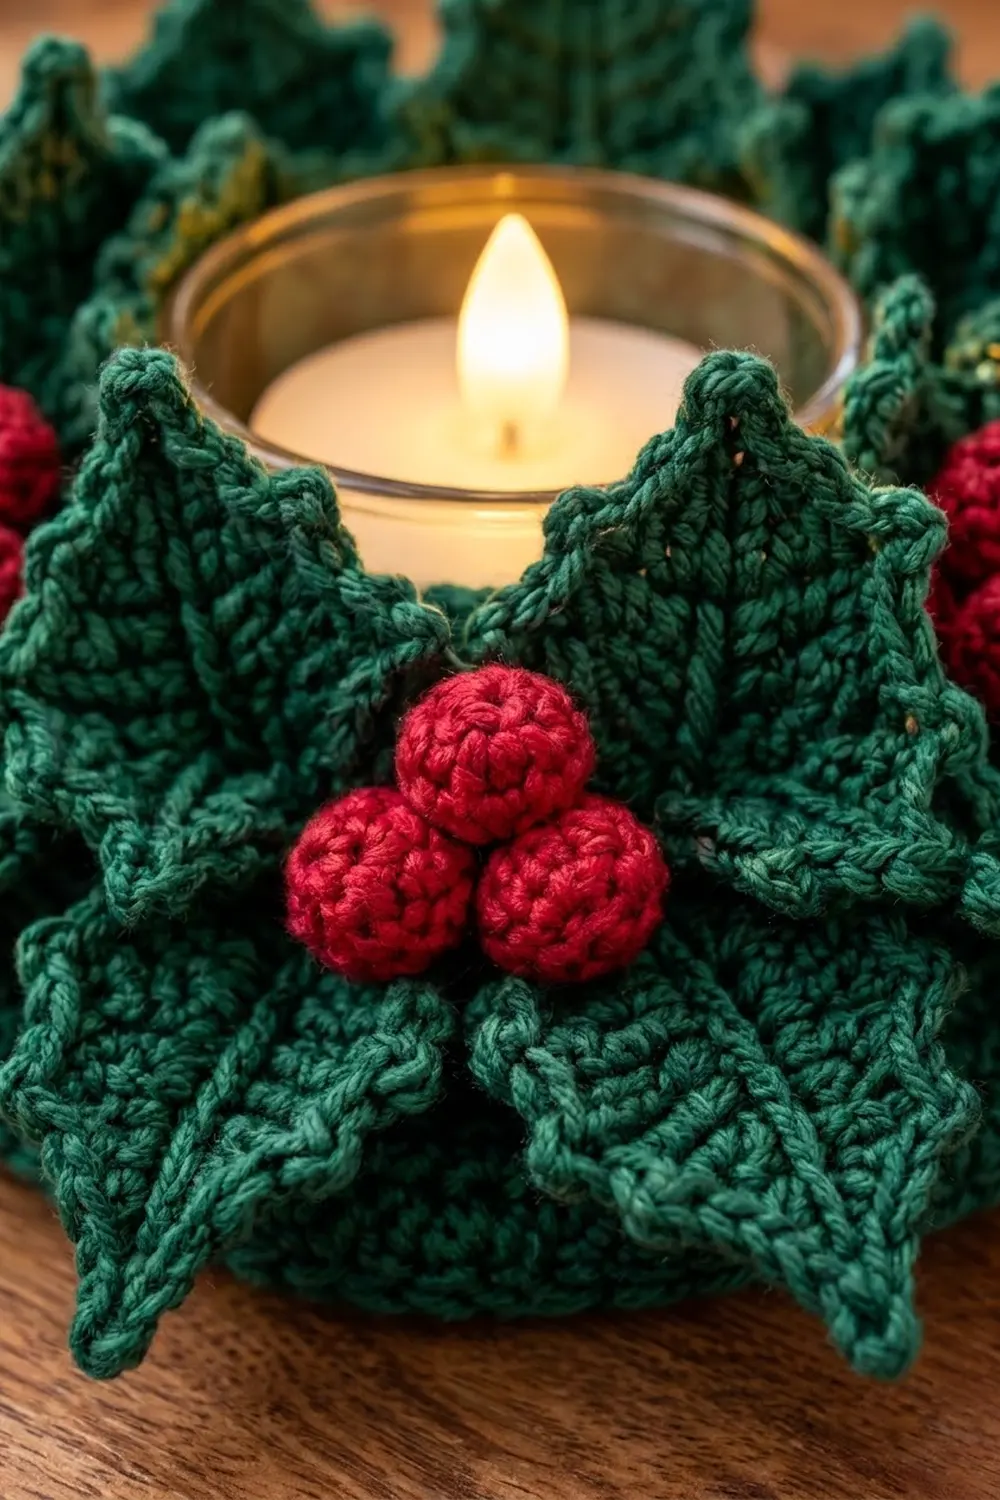
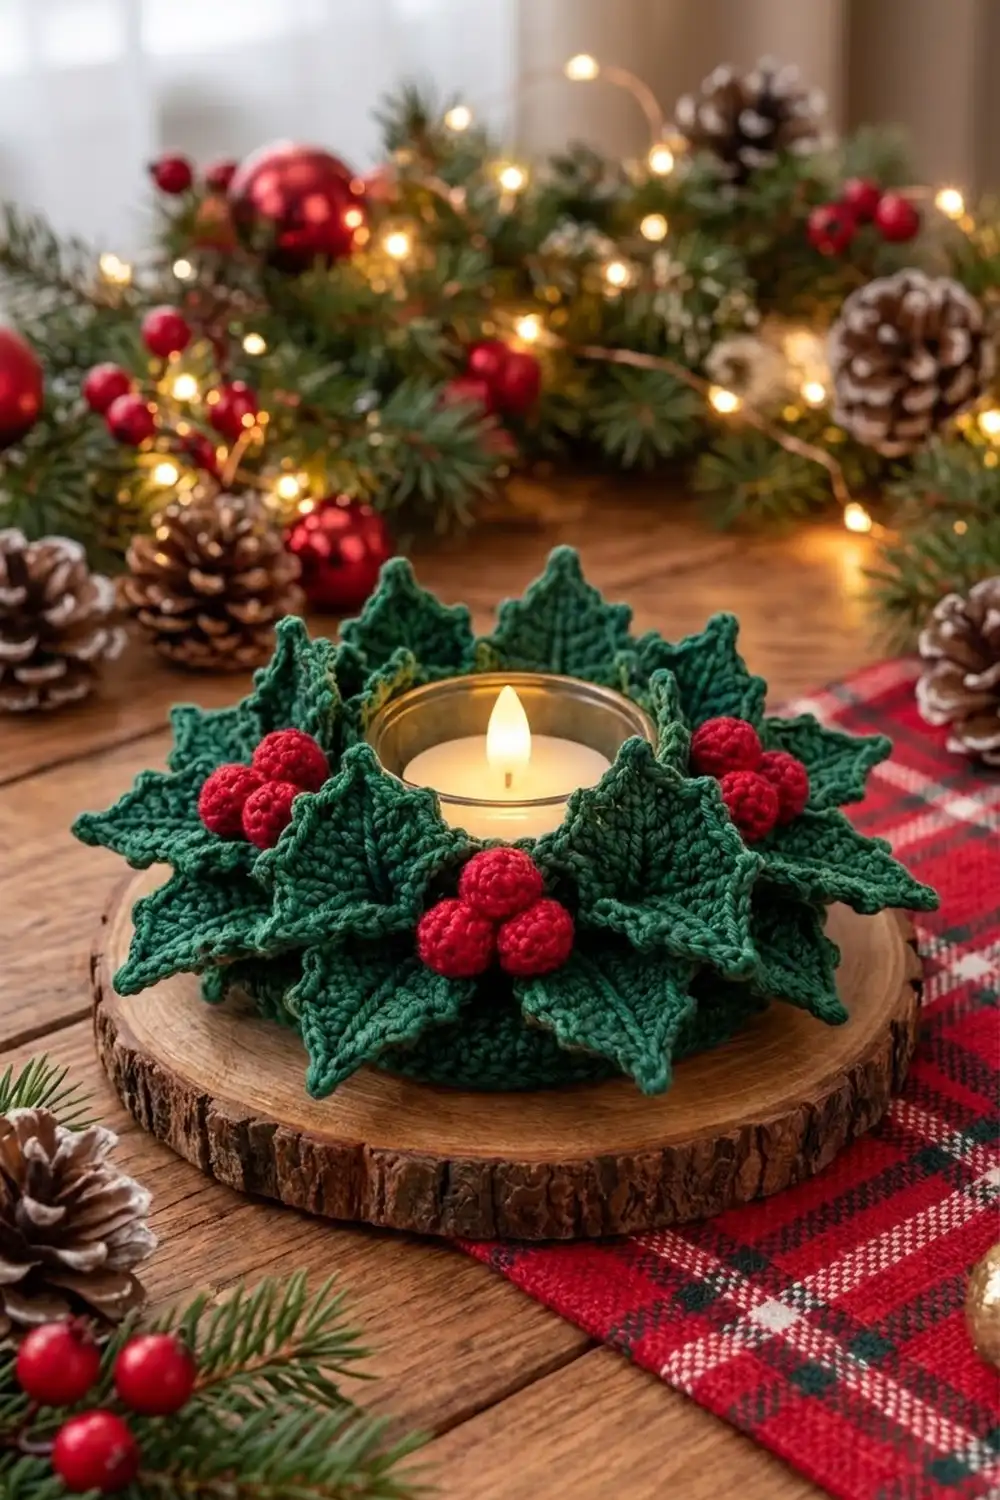
The Hollyglow Wreath Candle Holder is a small holly ring that sits around a glass votive. Deep forest-green leaves circle the glass in two layers, and plump red berries sit in four clusters. With a battery tea light glowing inside, the holly looks soft and cozy.
Only two colors are used: a dark forest green for the base and leaves, and a bright cranberry red for the berries. The style is traditional and a little rustic. It looks lovely on a mantel, on a dinner table, or on a wood slice with a few pine cones.
This pattern uses US crochet terms. The finished holder is about 8 in (20.3 cm) across and 3 in (7.6 cm) tall. The base disk is 5.8 in (14.7 cm) across, including its scalloped edge.
Here is how it’s made. You crochet a flat base circle in joined rounds and finish it with a scalloped edge. Then you make 8 large leaves, 8 small leaves, and 12 stuffed berries. Last, you sew the leaves around the center in two tiers and add the berries in groups of three.
Finished Size and Construction
- Finished size: about 8 in (20.3 cm) wide x 3 in (7.6 cm) tall
- Skill level: Easy-intermediate
- Terminology: US crochet terms
- Yarn weight: Worsted (#4)
- Hook: 3.75 mm (F-5)
- Number of pieces: 1 finished holder, made from 1 base, 16 leaves, and 12 berries sewn together
- Layout: Round base. 8 large leaves (lower tier) and 8 small leaves (upper tier) are all sewn on Round 8. There are 4 berry clusters.
- Base size before edge: 4.8 in (12.2 cm) across after Round 12
- Edge depth: about 0.5 in (1.3 cm)
- Base size with edge: 5.8 in (14.7 cm) across
- Large leaf: 3 in (7.6 cm) long x 1.75 in (4.4 cm) wide
- Small leaf: 2.25 in (5.7 cm) long x 1.5 in (3.8 cm) wide
- Berry: 0.75 in (1.9 cm) across
- Fits: a glass votive up to 2.75 in (7.0 cm) across
Materials
Use a smooth worsted-weight yarn so the stitches show clearly. Cotton or a cotton blend gives crisp leaf points. Soft acrylic also works and comes in many deep holiday greens. Avoid fuzzy yarns, because they blur the vein and the teeth.
- Forest green: 55 g / 100 m (109 yd)
- Cranberry red: 10 g / 18 m (20 yd)
These amounts include about 15 percent extra for your gauge swatch and sewing tails.
Tools:
- 3.75 mm (F-5) crochet hook
- Tapestry needle
- 8 locking stitch markers
- A small amount of polyester fiberfill
- Scissors and a tape measure
- Blocking mat, rust-proof pins, and a spray bottle
- Glass votive, 2.5 to 2.75 in (6.4 to 7.0 cm) across
- Battery-operated tea light (never use a real flame with yarn)
Abbreviations (US Terms)
- ch – chain
- sl st – slip stitch
- sc – single crochet
- hdc – half double crochet
- dc – double crochet
- inc – 2 sc in the same stitch
- sc2tog – single crochet 2 stitches together
- MR – magic ring
- st(s) – stitch(es)
- rep – repeat
Special stitches:
- Picot: Ch 3, then sl st in the 3rd ch from the hook.
- Point: Work (hdc, picot, hdc) all in the same stitch. Each point uses 1 stitch and makes 2 hdc plus 1 picot.
Gauge and Checkpoints
Gauge: 18 sc and 20 rounds = 4 in (10.2 cm) in single crochet.
Gauge matters here because the center has to fit your votive. Make the base first and check it before you start the leaves.
Checkpoints:
- After Round 4 (24 sts): 1.6 in (4.1 cm) across.
- After Round 8 (48 sts): 3.2 in (8.1 cm) across. Set your votive on the base. Its bottom should sit just inside Round 8.
- After Round 12 (72 sts): 4.8 in (12.2 cm) across, lying flat.
- After Round 14: 5.8 in (14.7 cm) across, measured from scallop tip to scallop tip.
If your circle is too big, use a hook 0.25 mm smaller. If it’s too small, use a hook 0.25 mm larger.
Part 1: Base
Use forest green and work in joined rounds. Start each round with ch 1 (it doesn’t count as a stitch). End each round by joining with a sl st to the first sc. From Round 4 on, the increases are staggered so the circle stays round instead of turning into a hexagon.
Rnd 1: MR, 6 sc in ring, join. (6 sts)
Rnd 2: Inc in each st around. (12 sts)
Rnd 3: (Sc in next st, inc) 6 times. (18 sts)
Rnd 4: Sc in next st, inc, (sc in next 2 sts, inc) 5 times, sc in next st. (24 sts)
Rnd 5: (Sc in next 3 sts, inc) 6 times. (30 sts)
Rnd 6: Sc in next 2 sts, inc, (sc in next 4 sts, inc) 5 times, sc in next 2 sts. (36 sts)
Rnd 7: (Sc in next 5 sts, inc) 6 times. (42 sts)
Rnd 8: Sc in next 3 sts, inc, (sc in next 6 sts, inc) 5 times, sc in next 3 sts. (48 sts)
Check the 3.2 in (8.1 cm) checkpoint now.
Rnd 9: (Sc in next 7 sts, inc) 6 times. (54 sts)
Rnd 10: Sc in next 4 sts, inc, (sc in next 8 sts, inc) 5 times, sc in next 4 sts. (60 sts)
Rnd 11: (Sc in next 9 sts, inc) 6 times. (66 sts)
Rnd 12: Sc in next 5 sts, inc, (sc in next 10 sts, inc) 5 times, sc in next 5 sts. (72 sts)
The base should now measure 4.8 in (12.2 cm). Don’t fasten off. Go straight on to the Scalloped Edge section below, then come back for the leaves.
Part 2: Large Leaves (make 8)
With forest green, ch 13. You work the leaf around both sides of this chain.
Rnd 1: Working in the back bumps, sl st in the 2nd ch from hook, sc in next ch, hdc in next 2 ch, dc in next 4 ch, hdc in next 2 ch, sc in next ch, then (sc, ch 2, sc) in the last ch. Rotate the work to crochet along the free loops on the other side of the chain: sc in next ch, hdc in next 2 ch, dc in next 4 ch, hdc in next 2 ch, sc in next ch, then sl st in the last ch (the same ch as the first sl st). Don’t join.
Count: 11 sts on side one, (sc, ch-2 sp, sc) at the tip, and 11 sts on side two. That’s 24 sts plus 1 ch-2 sp. The dc in the middle make the leaf wide, and the short stitches at each end make it pointed.
Rnd 2: Ch 1.
– Side one: sl st in first st, sc in next 2 sts, point in next st, sc in next 2 sts, point in next st, sc in next 2 sts, point in next st, sc in next st.
– Tip: sc in next sc, (sc, picot, sc) in the ch-2 sp, sc in next sc.
– Side two: sc in next st, point in next st, sc in next 2 sts, point in next st, sc in next 2 sts, point in next st, sc in next 2 sts, sl st in last st.
Count: each side uses 11 sts and makes 14 sts plus 3 picots (8 sts worked one into each stitch, plus 3 points of 2 hdc each). The tip makes 4 sc plus 1 picot. The round totals 32 sts and 7 picots.
Vein: Ch 4 for a short stem, then sl st back down the 3 chains. Without cutting the yarn, work surface sl sts up the center of the leaf, along the foundation chain, to the tip. Fasten off and weave in that end. Use the starting tail at the stem end for sewing; if it’s short, join a new 12 in (30.5 cm) length there.
Part 3: Small Leaves (make 8)
With forest green, ch 11.
Rnd 1: Working in the back bumps, sl st in the 2nd ch from hook, sc in next ch, hdc in next ch, dc in next 4 ch, hdc in next ch, sc in next ch, then (sc, ch 2, sc) in the last ch. Working along the free loops: sc in next ch, hdc in next ch, dc in next 4 ch, hdc in next ch, sc in next ch, sl st in last ch.
Count: 9 sts on each side plus the tip (sc, ch-2 sp, sc). That’s 20 sts plus 1 ch-2 sp.
Rnd 2: Ch 1.
– Side one: sl st in first st, sc in next 2 sts, point in next st, sc in next 2 sts, point in next st, sc in next 2 sts.
– Tip: sc in next sc, (sc, picot, sc) in the ch-2 sp, sc in next sc.
– Side two: sc in next 2 sts, point in next st, sc in next 2 sts, point in next st, sc in next 2 sts, sl st in last st.
Count: each side uses 9 sts and makes 11 sts plus 2 picots. The tip makes 4 sc plus 1 picot. The round totals 26 sts and 5 picots.
Vein: Work the stem and vein the same way as for the large leaf.
Part 4: Berries (make 12)
With red:
Rnd 1: MR, 6 sc in ring. (6 sts) From here on, work in a continuous spiral.
Rnd 2: Inc in each st. (12 sts)
Rnd 3: Sc in each st. (12 sts)
Rnd 4: Sc2tog 6 times. (6 sts)
Stuff firmly with a small pinch of fiberfill. Fasten off and leave an 8 in (20.3 cm) tail. Thread the tail through the front loops of the last 6 sts and pull it tight to close. Each berry is 0.75 in (1.9 cm) across.
Part 5: Assembly
- Lay the base flat, right side up. It should already have its edge and be blocked.
- On Round 8, put a marker in st 1 and then in every 6th st after it (sts 1, 7, 13, 19, 25, 31, 37, and 43). These are the 8 large-leaf positions.
- Sew the stem end of one large leaf to each marked stitch, with the tip pointing outward. Tack down only the bottom 0.75 in (1.9 cm) of the vein so the rest of the leaf tilts up.
- Sew the stem end of one small leaf halfway between each pair of large leaves, on Round 8 sts 4, 10, 16, 22, 28, 34, 40, and 46. Tack one side of each small leaf to the large leaf next to it at the middle, so the small leaf stands upright.
- Sew a cluster of 3 berries at the base of large leaves 1, 3, 5, and 7. Sew the berries to each other as well as to the leaves so each cluster stays a tight triangle.
- Set the votive in the center and check the fit.
Scalloped Edge
This edge is the border of the base. Work it straight after Round 12, before any assembly.
Edge gauge: Round 12 has 72 sts around a circumference of about 15 in (38.1 cm). Each scallop uses 6 sts, so each one is about 1.25 in (3.2 cm) wide.
Rnd 13 (scallop round): Ch 1, *sc in next st, hdc in next st, 2 dc in next st, 2 dc in next st, hdc in next st, sc in next st; rep from * 11 more times, join. (96 sts = 72 sts worked one into each existing stitch + 24 extra sts)
For each scallop, you use 6 sts and make 8 (sc, hdc, 4 dc, hdc, sc).
Rnd 14 (picot round): Ch 1, *sl st in each of next 4 sts, picot, sl st in each of next 4 sts; rep from * 11 more times, join. Fasten off and weave in the end. (96 sl sts + 12 picots)
Each scallop gets 8 sl sts and 1 picot. The picot sits at the peak, between the two pairs of dc.
Why the math works: 72 divides evenly by 6, so you get exactly 12 scallops with no leftover stitches. The 2 extra dc in each scallop let it flare into a point without ruffling. Round 14 adds no stitches. It just firms up the edge and sharpens the peaks. The dc height adds about 0.5 in (1.3 cm) on every side, so the 4.8 in (12.2 cm) circle grows to 5.8 in (14.7 cm).
Final Blocking
- Before assembly, lightly mist the base and all 16 leaves with water.
- Pin the base flat as a 5.8 in (14.7 cm) circle, with one pin at each of the 12 scallop peaks.
- Pin each large leaf to 3 in (7.6 cm) x 1.75 in (4.4 cm), with pins at the tip and at all 6 teeth.
- Pin each small leaf to 2.25 in (5.7 cm) x 1.5 in (3.8 cm).
- Let everything dry completely.
- For stiffer leaves, mist them with light fabric starch before they dry.
- Unpin and assemble. Then shape the leaves with your fingers so the lower tier tilts up and the upper tier stands tall.
Final Quality-Control Checklist
- The base lies flat and measures 5.8 in (14.7 cm) across.
- There are 12 even scallops, each with a picot at the peak.
- All 16 leaves have a clear center vein and sharp teeth.
- The large leaves are 6 sts apart on Round 8, and the small leaves sit exactly between them.
- There are 4 clusters of 3 firm, closed berries.
- No yarn tails show on the front.
- The votive sits in the center without pushing the leaves out of shape.
Troubleshooting
- The base cups upward: Your tension is tight. Go up one hook size.
- The base ruffles: Your tension is loose. Go down one hook size.
- The circle looks like a hexagon: Stagger the increases exactly as written.
- The leaves curl: This is normal before blocking. Wet-block them and pin them flat.
- The teeth look soft: Pull each picot snug, and starch the leaves lightly.
- Stuffing shows through the berries: Use a 3.25 mm hook for the berries only.
- The votive is too wide: Make the base with a hook 0.25 mm larger so Round 8 grows.
- The leaves flop over: Add a second tack stitch higher up the vein.
Care
Spot clean with mild soap and cool water, then reshape and dry flat. Only use battery-operated candles in the holder.
Final Notes
Here’s the full measurement chain. Gauge is 18 sc to 4 in (10.2 cm). The base reaches 3.2 in (8.1 cm) at Round 8, which fits the votive, and 4.8 in (12.2 cm) at Round 12. The 12-scallop edge takes it to 5.8 in (14.7 cm). The 3 in (7.6 cm) leaves are sewn on Round 8 and spread the finished holder to about 8 in (20.3 cm) wide and 3 in (7.6 cm) tall.
Make the base first and check that your votive fits. Then enjoy making the leaves and berries. Happy crocheting!