

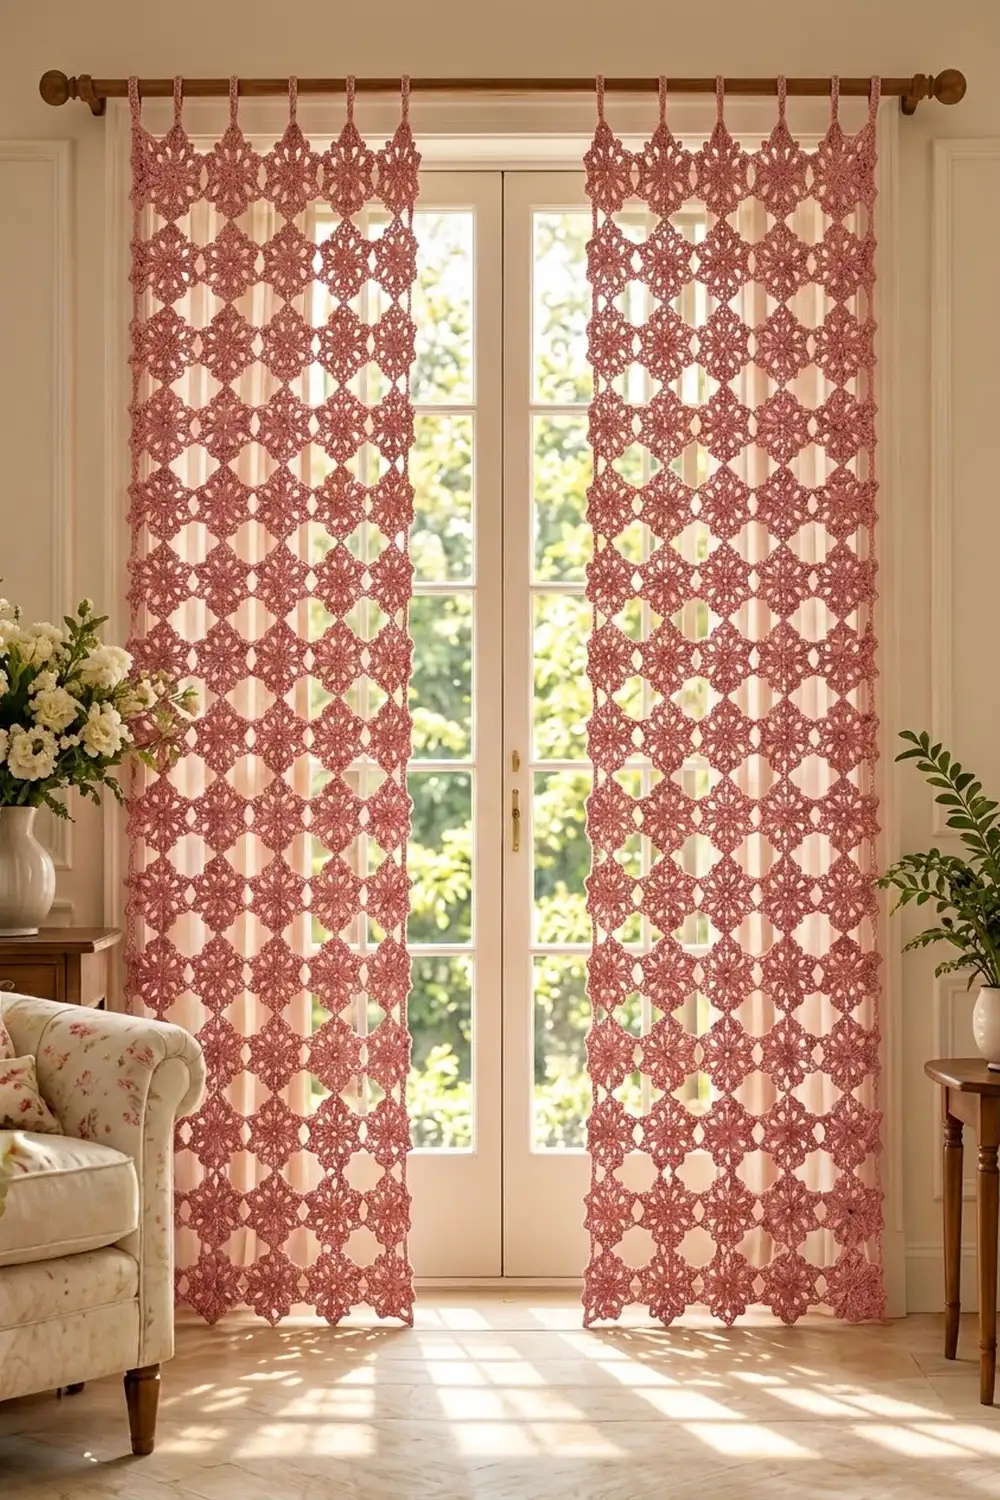
These airy curtain panels are made entirely from six-point star motifs in a soft dusty rose. Each star has a small open center, twelve short spokes and six pointed arms. Every arm has an eyelet at its tip and a picot edge along its sides.
When the stars are joined tip to tip, they form an open lattice that filters daylight and still gives a window some privacy. The look is romantic and vintage, but the construction is simple and repetitive. The pattern uses one color and US crochet terms.
Each finished panel measures 34.4 in (87.4 cm) wide and 83.75 in (212.7 cm) long, measured from the top of the tabs to the lowest star points. You make two panels, which is 256 motifs in total.
Construction overview: Work one full motif in 5 rounds. Every other motif uses the same 5 rounds and joins to its neighbors on Round 5 (join-as-you-go). Each panel is a grid of 8 columns by 16 rows. At the end, you work a short heading band across the top star tips and add seven tabs for the rod.
Finished Size and Construction
- Finished panel size: 34.4 in (87.4 cm) x 83.75 in (212.7 cm), including tabs
- Skill level: Intermediate
- Terminology: US crochet terms
- Yarn weight: DK (#3) cotton
- Hook: 3.5 mm (E-4)
- Number of pieces: 256 star motifs (128 per panel), joined into 2 panels
- Layout: 8 columns x 16 rows per panel
- Motif size: 5 in (12.7 cm) tip to tip and 4.3 in (10.9 cm) across the side tips
- Size before border: 34.4 in (87.4 cm) x 80 in (203.2 cm) per panel
- Border depth: 0.75 in (1.9 cm) heading band above the tips, plus 3 in (7.6 cm) tab loops
Materials
Choose a smooth, mercerized or combed DK cotton. Cotton keeps the points crisp, resists stretching when the panels hang and shows the stitches clearly. Avoid fuzzy or stretchy yarns, because a heavy hanging piece grows lengthwise if the fiber has too much give.
- Dusty Rose: 1,500 g / about 3,600 m (thirty 50 g / 120 m balls)
These quantities include a margin of about 10% for swatching, joining and weaving in ends. Buy all the yarn from one dye lot. A color shift is very visible when light shines through a sheer panel.
Tools:
- 3.5 mm (E-4) crochet hook
- Tapestry needle
- Scissors
- Stitch markers
- Measuring tape
- Blocking mats and rust-proof pins
- Spray bottle
Abbreviations (US Terms)
- ch: chain
- sl st: slip stitch
- sc: single crochet
- dc: double crochet
- trtr: triple treble crochet. Yarn over 4 times, insert hook, yarn over and pull up a loop, then (yarn over, pull through 2 loops) 5 times.
- sp(s): space(s)
- MR: magic ring
- RS / WS: right side / wrong side
- st(s): stitch(es)
Special stitches:
- p (picot): ch 3, sl st in 3rd ch from hook.
- Joined tip: use this in place of a normal tip on Round 5. Work 3 dc, ch 2, sl st in the neighbor’s ch-5 tip loop, ch 2, 3 dc. The ch 2 + sl st + ch 2 replaces the ch 5, so the tip stays the same length.
Gauge and Checkpoints
Make and block one complete motif before you join anything. With 256 motifs, small errors add up fast. A motif that is just 0.25 in (0.6 cm) too tall makes each panel 4 in (10.2 cm) too long.
Motif gauge: one blocked motif measures 5 in (12.7 cm) tip to tip and 4.3 in (10.9 cm) across the side tips.
Checkpoints (measured flat):
- After Round 1: about 1.25 in (3.2 cm) across
- After Round 2: about 2 in (5.1 cm) across
- After Round 3: about 3 in (7.6 cm) from one shell to the opposite shell
- After Round 4: about 4 in (10.2 cm) tip to tip
- After Round 5 and blocking: 5 in (12.7 cm) tip to tip
If the motif is too big, use a 3.25 mm hook. If it is too small, use a 3.75 mm hook. If Round 1 is already off by more than 0.2 in (0.5 cm), change hooks right away.
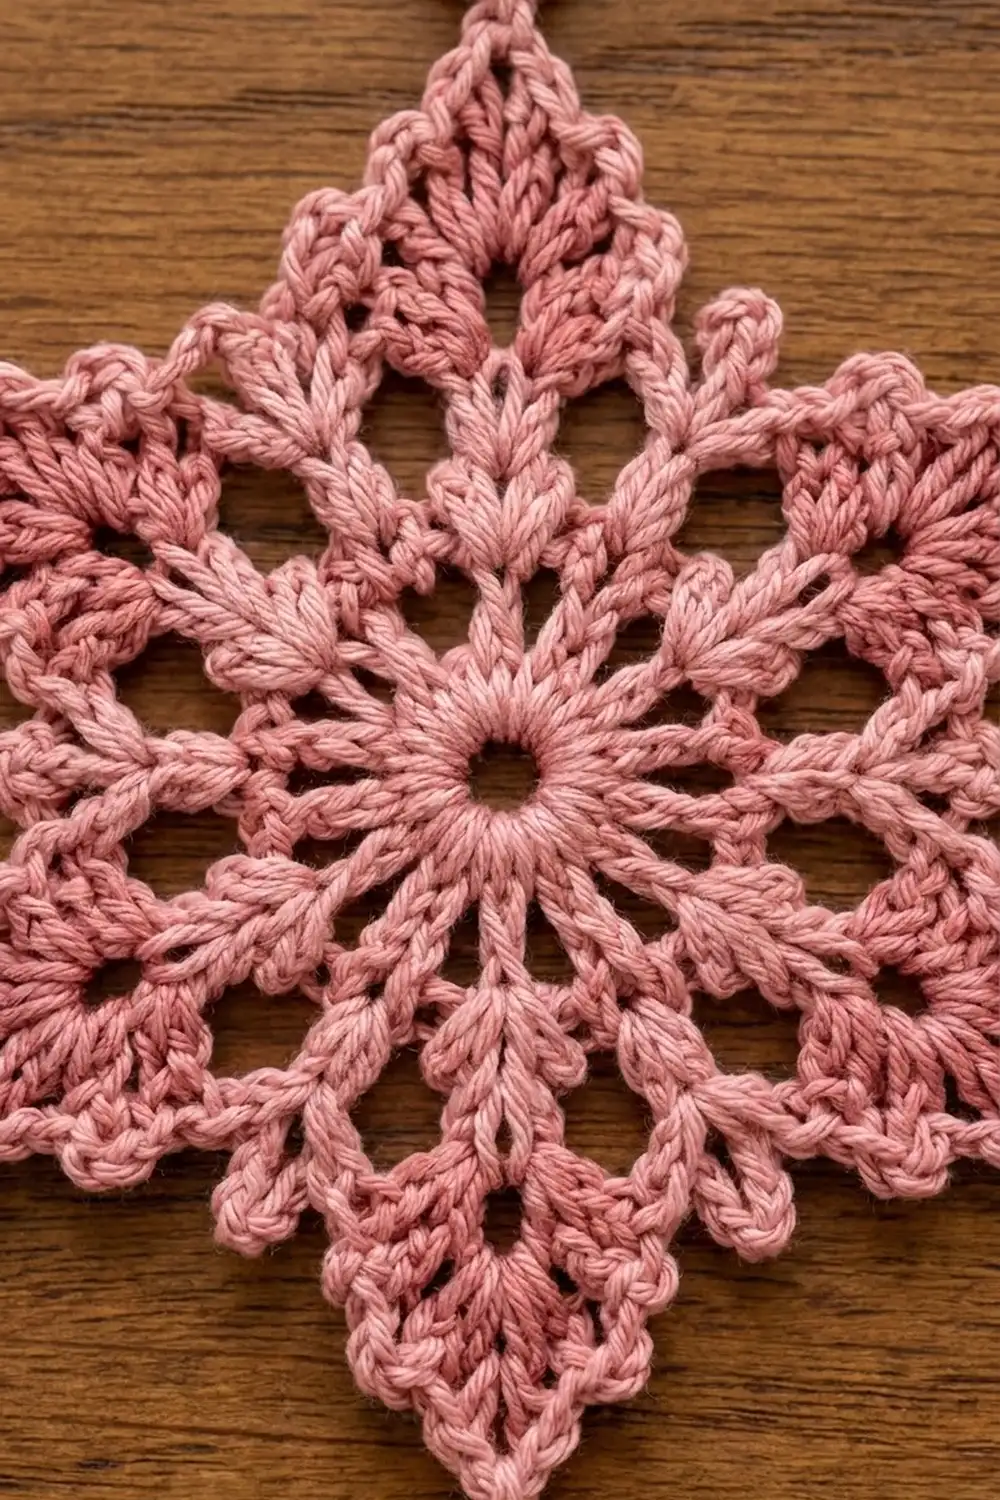
Star Motif
Make 1 to start. Every other motif is joined on Round 5 (see Joining).
Round 1: MR, ch 3 (counts as dc), 11 dc in ring. Pull the ring nearly closed so a small center hole remains. Sl st to top of ch-3. (12 dc)
Round 2: Ch 3 (counts as dc), dc in same st, ch 2, 2 dc in next st, ch 2; repeat from * 10 more times. Sl st to top of ch-3. (24 dc, 12 ch-2 sps)
These 12 pairs of dc are the spokes around the center.
Round 3: Sl st in next dc and into first ch-2 sp. Ch 3 (counts as dc), (dc, ch 2, 2 dc) in same sp, ch 3, sc in next ch-2 sp, ch 3; (2 dc, ch 2, 2 dc) in next ch-2 sp, ch 3, sc in next ch-2 sp, ch 3; repeat from * 4 more times. Sl st to top of ch-3. (24 dc in 6 shells, 6 ch-2 shell sps, 6 sc, 12 ch-3 sps)
The 6 shells set the six arms. The 6 sc are the valleys between the arms.
Round 4: Sl st in next dc and into ch-2 shell sp. Ch 3 (counts as dc), (2 dc, ch 3, 3 dc) in same sp, ch 2, sc in next ch-3 sp, ch 3, sc in next ch-3 sp, ch 2; (3 dc, ch 3, 3 dc) in next ch-2 shell sp, ch 2, sc in next ch-3 sp, ch 3, sc in next ch-3 sp, ch 2; repeat from * 4 more times. Sl st to top of ch-3. (36 dc, 6 ch-3 tip sps, 12 sc, 12 ch-2 sps, 6 ch-3 valley sps)
Round 5: Sl st in next 2 dc and into ch-3 tip sp. Ch 3 (counts as dc), (2 dc, ch 5, 3 dc) in same sp, ch 1, sc in next ch-2 sp, p, ch 2, sc in next ch-3 valley sp, ch 2, p, sc in next ch-2 sp, ch 1; (3 dc, ch 5, 3 dc) in next ch-3 tip sp, ch 1, sc in next ch-2 sp, p, ch 2, sc in next ch-3 valley sp, ch 2, p, sc in next ch-2 sp, ch 1; repeat from * 4 more times. Sl st to top of ch-3. Fasten off. (36 dc, 6 ch-5 tip loops, 18 sc, 12 picots)
The ch-5 loop leaves an eyelet at each tip. The dc groups stacked from Rounds 3 to 5 make each arm a solid, pointed triangle, and the picots give the sides their beaded texture.
Naming the tips: Hold the motif with one tip pointing straight up. Going clockwise, the tips are T (top), UR (upper right), LR (lower right), B (bottom), LL (lower left) and UL (upper left).
Make All Pieces
- Dusty Rose: 256 motifs in total, 128 per panel
Only the first motif in each panel is made on its own. Every other motif is joined as you go on its Round 5.
Layout per panel (S = one star):
Row 1:  S S S S S S S S
Row 2:  S S S S S S S S
Row 3:  S S S S S S S S
...
Row 16: S S S S S S S S
All 16 rows are identical, and the columns line up straight with no offset.
Joining
Method: Join as you go on Round 5. At every tip that touches a neighbor, work a Joined tip instead of the ch-5 tip.
Stitch-to-stitch logic:
- Joins to the left neighbor (2 points): the new motif’s UL tip joins the left neighbor’s UR tip, and its LL tip joins the left neighbor’s LR tip.
- Join to the motif above (1 point): the new motif’s T tip joins the B tip of the motif above.
- Number of joins: the first motif has none. The other motifs in Row 1 and Column 1 have 2 or 1 joins. Every other motif has 3 joins (T, UL and LL).
Work each panel row by row, from left to right, starting at the top left. Because the star is symmetrical, columns sit 4.3 in (10.9 cm) apart and rows sit 5 in (12.7 cm) apart. Each joined tip lands exactly on its partner.
Tension advice: Keep the ch 2 on each side of the joining sl st as relaxed as a normal ch 5. Tight joins gather the tips and make the panel narrower. After each join, lay the work flat and check that both stars lie flat with no pull at the join.
Size checkpoints:
- After Row 1: 34.4 in (87.4 cm) from the outer tips of Column 1 to the outer tips of Column 8 (8 x 4.3 in)
- After 4 rows: 20 in (50.8 cm) tall
- After all 16 rows: 80 in (203.2 cm) tall
Border (Heading Band and Tabs)
The only border is a heading band across the top. The side and bottom edges keep their free star points.
Border gauge: 14 sc and 16 rows = 3 in (7.6 cm).
Row 1 (RS): With the top edge facing, join yarn in the UL tip loop of the first motif (Row 1, Column 1). Ch 6 (counts as trtr). Ch 7, 5 sc in the T tip loop of the same motif, ch 7, trtr in the next junction, catching both tip loops. The junction is the sl st that joins this motif’s UR tip to the next motif’s UL tip. Repeat from * across. On the last repeat, work the trtr in the UR tip loop of the Column 8 motif. (9 trtr, 40 sc, 16 ch-7 sps)
The trtr reaches down into each valley, so the top edge becomes straight.
Row 2 (WS): Ch 1, turn. Sc in first trtr, 7 sc in next ch-7 sp, sc in each of next 5 sc, 7 sc in next ch-7 sp, sc in next trtr; repeat from * across. Work the final sc in the top of the turning ch. (161 sc = 1 + 8 x 20)
Rows 3–5: Ch 1, turn, sc in each st across. (161 sc)
Why the math works: Each column gives exactly 20 sts (7 + 5 + 7, plus 1 at the trtr), and the band starts with 1 extra st, so 8 x 20 + 1 = 161. At 14 sc = 3 in, 161 sc measures 34.5 in (87.6 cm). That is within 0.1 in (0.3 cm) of the 34.4 in (87.4 cm) panel width, so the band neither ruffles nor gathers the stars. Rows 2 to 5 add 0.75 in (1.9 cm) above the star tips.
Tabs: With RS facing, work each tab over 11 sts of Row 5. Place tabs on sts 1–11, 26–36, 51–61, 76–86, 101–111, 126–136 and 151–161. That gives 7 tabs with 14 sts between them.
For each tab: Join yarn in the first st, ch 1, sc in the same st and the next 10 sts. (11 sc) Ch 1, turn, sc in each st across. Repeat until the tab has 32 rows and measures 6 in (15.2 cm). Fasten off, leaving a 12 in (30.5 cm) tail. Fold the tab to the WS and whipstitch its last row to the base of Row 3.
Each tab is 2.4 in (6.1 cm) wide and forms a 3 in (7.6 cm) loop, which fits a rod up to 1.5 in (3.8 cm) in diameter.
Final Blocking
- Weave in the ends through the dc groups, never across the open chain spaces.
- Soak the panel in cool water for 15 minutes. Press out the water and roll the panel in towels. Do not wring it.
- Lay the panel flat on blocking mats. If you are short on space, block it in sections.
- Pin the heading band straight at 34.4 in (87.4 cm).
- Pin the T and B tips of each column in a straight vertical line, 5 in (12.7 cm) apart.
- Pin the outer side tips so both long edges are straight.
- Open each tip eyelet and straighten the picots with your fingers.
- Let the panel dry completely before you unpin it. Repeat for the second panel.
Final Quality-Control Checklist
- Each panel has 128 motifs in 8 columns x 16 rows.
- Every motif has 36 dc, 6 tip loops, 18 sc and 12 picots.
- Every interior motif has 3 relaxed joins (T, UL and LL).
- Rows 2–5 of the heading band have 161 sc.
- There are 7 tabs, each 11 sts wide and 14 sts apart.
- Each panel measures 34.4 in (87.4 cm) x 83.75 in (212.7 cm).
- The two panels match in length within 0.5 in (1.3 cm).
Troubleshooting
Star ruffles or cups: Recount Rounds 2 and 4. Ruffling usually means extra dc, and cupping usually means a skipped chain space.
Points look rounded: Pin each tip loop out sharply during blocking.
Panel is narrower than 34.4 in (87.4 cm): Your joins are too tight. Loosen the ch 2 on each side of the joining sl st.
Heading band waves: Your sc gauge is too loose. Use a 3.25 mm hook for the band only.
Tabs twist: Make sure every tab has exactly 32 rows, and sew each fold straight.
Care
Hand wash in cool water, or machine wash on a gentle cycle in a mesh bag. Lay the panels flat to dry and re-pin the tips if needed. Do not tumble dry.
Final Notes
The whole curtain depends on one chain of measurements. One motif measures 5 in (12.7 cm) by 4.3 in (10.9 cm). Eight columns and sixteen rows of motifs give a panel of 34.4 in (87.4 cm) by 80 in (203.2 cm). The 161-stitch heading band matches that width and adds 0.75 in (1.9 cm) of height. The tabs add 3 in (7.6 cm), for a total length of 83.75 in (212.7 cm). Check your first motif carefully and keep your joins relaxed, and the stars will line up across both panels.
Happy crocheting!