

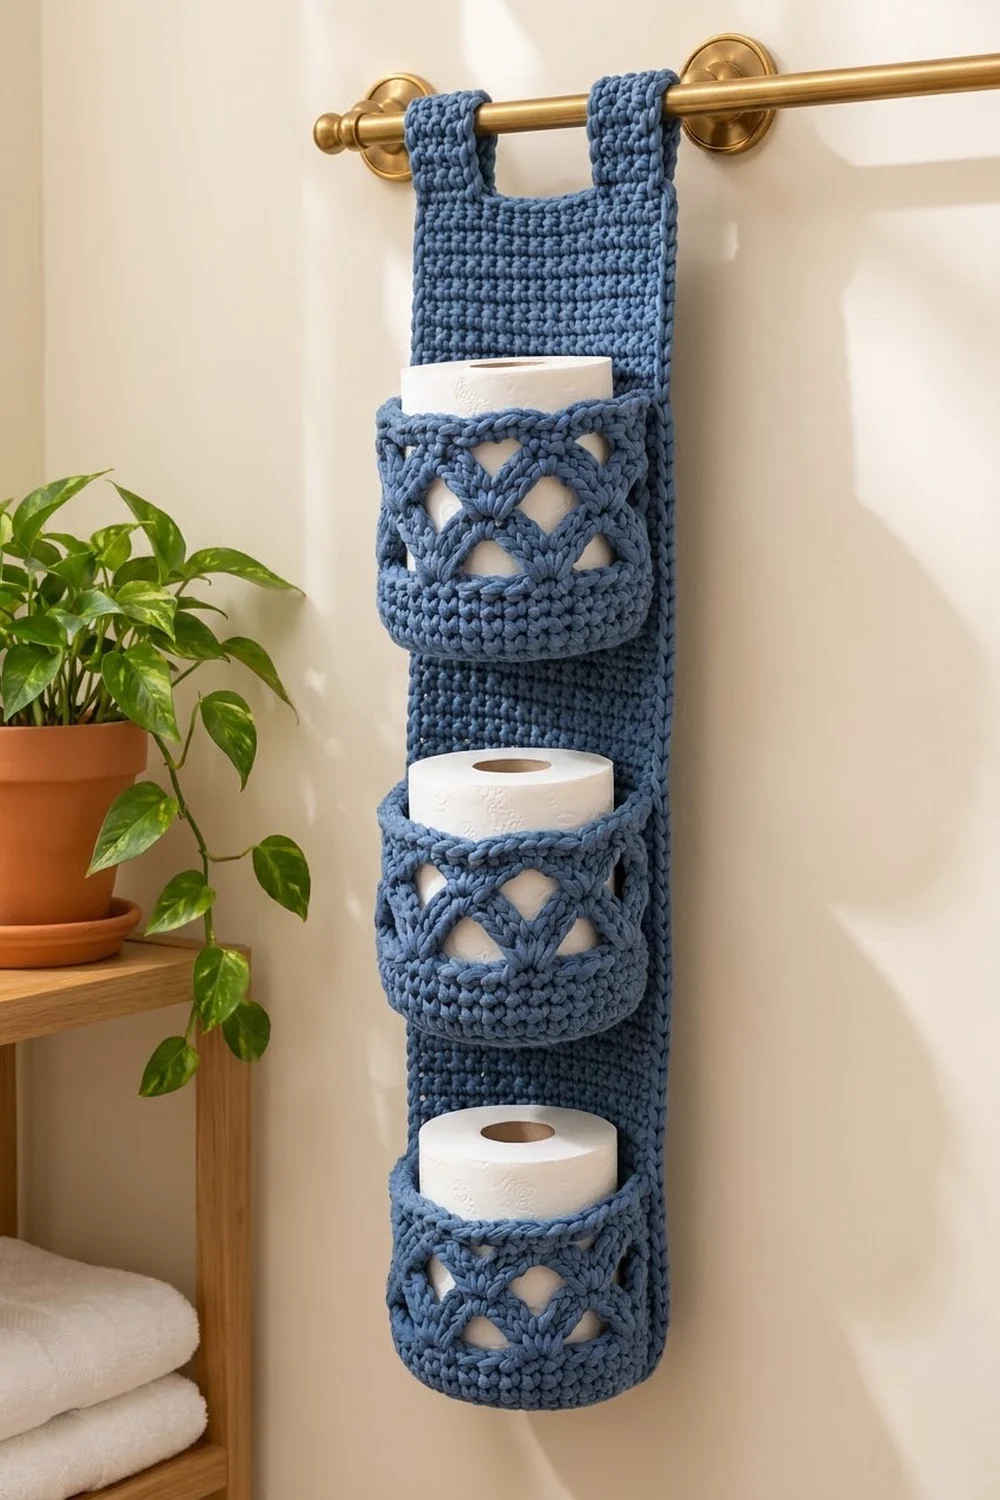
This hanging toilet paper holder has a solid single crochet backing panel, two loops that fold over a towel bar, and three oval pocket baskets stacked down the front. Each pocket has a firm solid base, a band of open V-shell lattice that forms crossing diamonds, and a solid rim that holds the roll upright.
The sample uses one color, a soft denim blue, in a chunky cotton-style yarn. The plain panel lets the textured pockets stand out.
The pattern uses US crochet terms. The finished panel measures 7 in wide x 27 in tall (17.8 x 68.6 cm) with its border. Each pocket is 6.5 in wide x 4.5 in deep x 3.75 in tall (16.5 x 11.4 x 9.5 cm). A standard roll about 4.25 in (10.8 cm) tall sits slightly above the rim.
You work the panel flat in rows, add a two-round border, then work the hanging tabs off the top edge. Each pocket starts with an oval base and is worked up in joined rounds. To finish, you sew the three pockets to the panel.
Finished Size and Construction
- Finished size: 7 x 27 in (17.8 x 68.6 cm), plus loops; hanging length about 29 in (73.7 cm)
- Skill level: Intermediate
- Terminology: US
- Yarn weight: Bulky (#5)
- Hook: 6 mm (J-10)
- Number of pieces: 4 (1 panel with built-in tabs, 3 pockets)
- Layout: 3 pockets stacked vertically, centered on the panel
- Pocket size: 6.5 x 4.5 x 3.75 in (16.5 x 11.4 x 9.5 cm)
- Panel size before border: 6 x 26 in (15.2 x 66.0 cm)
- Border depth: 0.5 in (1.3 cm) per edge
Materials
Use a smooth bulky cotton or cotton blend. Cotton holds its shape under the weight of the rolls and stands up to a humid bathroom. Fuzzy or very stretchy yarns blur the lattice and let the pockets sag.
- Denim blue: about 300 g, 275 yd (251 m)
Tools:
- 6 mm (J-10) crochet hook
- Yarn needle
- 6-8 locking stitch markers
- Tape measure
- Scissors
- Pins and a blocking surface
The yarn amount includes about 25 percent extra for your gauge swatch and for differences in tension.
Abbreviations (US Terms)
- ch: chain
- sl st: slip stitch
- sc: single crochet
- hdc: half double crochet
- dc: double crochet
- sk: skip
- sp: space
- st(s): stitch(es)
- BLO: back loop only
- rnd: round
Special stitch – V-shell: (2 dc, ch 2, 2 dc) all in the same st or sp. The ch-2 at its center is called the shell sp.
Gauge and Checkpoints
Gauge: 12 sc and 14 rows = 4 in (10.2 cm) in sc worked in rows.
Make one pocket first. It tells you more than a flat swatch because it tests the base shaping, the lattice, and the rim all at once.
Checkpoints:
- Pocket base after Rnd 7: 6.5 x 4.5 in (16.5 x 11.4 cm), 54 sts
- Pocket circumference: 18 in (45.7 cm)
- Pocket height after Rnd 16: 3.75 in (9.5 cm)
- Panel width: 6 in (15.2 cm) across 18 sts
- Panel length: 10 in (25.4 cm) at Row 35, 20 in (50.8 cm) at Row 70, 26 in (66.0 cm) at Row 91
If your piece is too big, go down 0.5 mm. If it is too small, go up 0.5 mm. If your rolls are extra large, add one more base round in the same pattern (sc 6 before each increase) for 60 sts. The lattice then has 10 repeats.
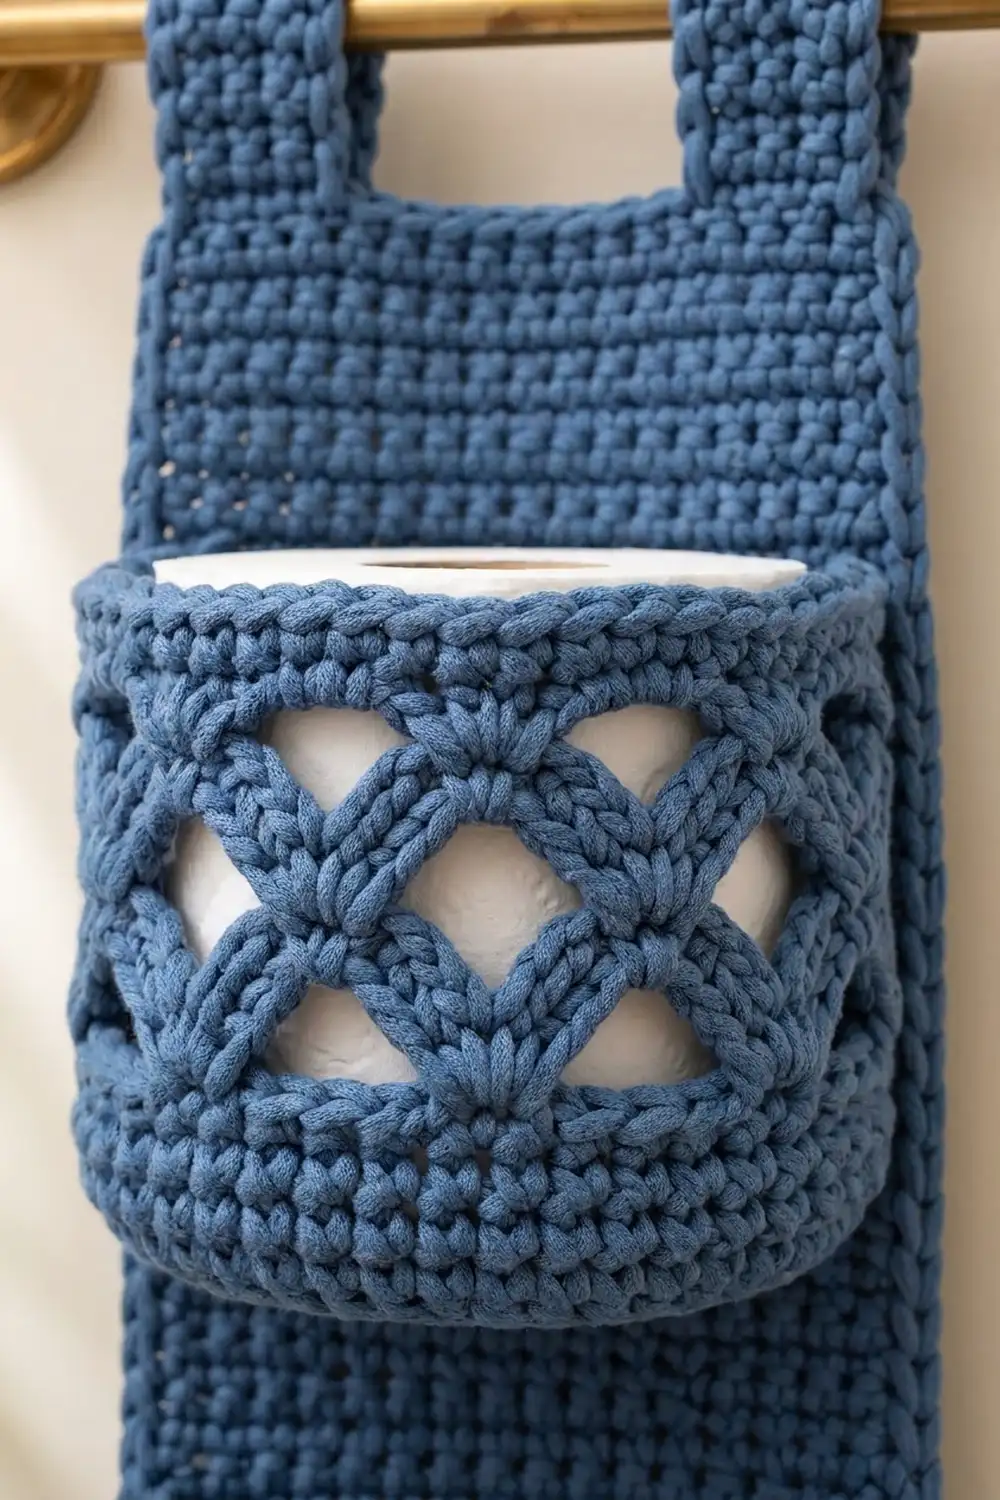
Pocket (Make 3)
Base
Ch 9.
Rnd 1: Sc in 2nd ch from hook, sc in next 6 ch, 3 sc in last ch. Working along the other side of the chain, sc in next 6 ch, 2 sc in same ch as first sc. Join with sl st to first sc. (18 sts)
For Rnds 2-16, ch 1 at the start of each round and work the first st into the same st as the join. Join each round with a sl st to the first st.
Rnd 2: 2 sc in next st, sc in next 6 sts, 2 sc in each of next 3 sts, sc in next 6 sts, 2 sc in each of next 2 sts. (24 sts)
Rnd 3: Sc in next st, 2 sc in next st, sc in next 6 sts, (sc in next st, 2 sc in next st) 3 times, sc in next 6 sts, (sc in next st, 2 sc in next st) 2 times. (30 sts)
Rnd 4: Sc in next 2 sts, 2 sc in next st, sc in next 6 sts, (sc in next 2 sts, 2 sc in next st) 3 times, sc in next 6 sts, (sc in next 2 sts, 2 sc in next st) 2 times. (36 sts)
Rnd 5: Sc in next 3 sts, 2 sc in next st, sc in next 6 sts, (sc in next 3 sts, 2 sc in next st) 3 times, sc in next 6 sts, (sc in next 3 sts, 2 sc in next st) 2 times. (42 sts)
Rnd 6: Sc in next 4 sts, 2 sc in next st, sc in next 6 sts, (sc in next 4 sts, 2 sc in next st) 3 times, sc in next 6 sts, (sc in next 4 sts, 2 sc in next st) 2 times. (48 sts)
Rnd 7: Sc in next 5 sts, 2 sc in next st, sc in next 6 sts, (sc in next 5 sts, 2 sc in next st) 3 times, sc in next 6 sts, (sc in next 5 sts, 2 sc in next st) 2 times. (54 sts)
Every round adds 6 increases, all at the two curved ends. Each straight side stays at 6 sts, which keeps the base oval. Check it now: 6.5 x 4.5 in (16.5 x 11.4 cm).
Solid Lower Wall
Rnd 8: Sc in BLO of each st around. (54 sts) This turns the edge up and leaves a ridge of unused front loops.
Rnds 9-10: Sc in each st around. (54 sts)
The solid band should measure about 0.9 in (2.3 cm) tall.
Lattice Band
Rnd 11: Ch 1, sc in first st, ch 2, sk 2 sts, V-shell in next st, ch 2, sk 2 sts, sc in next st; repeat from * 7 more times, then ch 2, sk 2 sts, V-shell in next st, ch 2, sk last 2 sts. Join to first sc. (9 V-shells, 9 sc)
Each repeat uses 6 sts. Since 9 x 6 = 54, the pattern closes evenly.
Rnd 12: Sl st in next ch-2 sp, sl st in next 2 dc, sl st in shell sp. Ch 1, sc in same shell sp, ch 2, V-shell in next sc, ch 2, sc in next shell sp; repeat from * 7 more times, then ch 2, V-shell in next sc, ch 2. Join to first sc. (9 V-shells, 9 sc)
Rnd 13: Repeat Rnd 12. (9 V-shells, 9 sc)
Each new shell sits over the sc between two shells in the round below. This makes the shells lean together into crossing V shapes with diamond openings between them. The lattice band should measure about 2 in (5.1 cm) tall.
Rim
Rnd 14 (leveling round): Sl st in next ch-2 sp, sl st in next 2 dc, sl st in shell sp. Ch 1, sc in shell sp, sc in next dc, sk next dc, hdc in next ch-2 sp, dc in next sc, hdc in next ch-2 sp, sk next dc, sc in next dc; repeat from * around. Join to first sc. (54 sts)
Count check: 27 sts are worked 1-per-existing-stitch (9 sc + 18 dc), and 27 sts are added in spaces (9 shell sps + 18 side ch-2 sps). 27 + 27 = 54. The taller dc and hdc fill the low points, so the rim sits level.
Rnds 15-16: Sc in each st around. (54 sts)
Fasten off and weave in the ends. The pocket should stand 3.75 in (9.5 cm) tall.
Backing Panel
Ch 19.
Row 1: Sc in 2nd ch from hook and in each ch across. Turn. (18 sts)
Rows 2-91: Ch 1 (does not count as a st), sc in each st across. Turn. (18 sts)
Check the length at Row 35, 10 in (25.4 cm), and at Row 70, 20 in (50.8 cm). At Row 91 the panel measures 6 x 26 in (15.2 x 66.0 cm). Do not fasten off.
Make All Pieces
All 4 pieces use denim blue.
- Pockets: 3, about 55 g (50 yd / 45.7 m) each
- Panel with border and tabs: 1, about 90 g (83 yd / 75.9 m)
Layout (front view, top to bottom):
[ tab ]          [ tab ]
[       PANEL TOP       ]
[       POCKET 3        ]   seams at rows 63 and 76
[        panel          ]
[       POCKET 2        ]   seams at rows 33 and 46
[        panel          ]
[       POCKET 1        ]   seams at rows 3 and 16
[     PANEL BOTTOM      ]
Border
Border gauge: same as the panel, 12 sc and 14 rnds = 4 in (10.2 cm). The two rounds add about 0.5 in (1.3 cm) to each edge.
Rnd 1: Ch 1. Working across the top of Row 91, 3 sc in first st, sc in next 16 sts, 3 sc in last st. Working down the row ends, sc in next 6 row ends, sk 1 row end; repeat 12 more times (78 sc). Working into the foundation chain, 3 sc in first ch, sc in next 16 ch, 3 sc in last ch. Working up the other row ends, sc in next 6 row ends, sk 1 row end; repeat 12 more times (78 sc). Join to first sc.
- Top and bottom: 16 sc each between corner groups
- Sides: 78 sc each between corner groups
- Corners: 4 x 3 = 12 sc
- Total: 16 + 16 + 78 + 78 + 12 = 200 sts
Rnd 2: Ch 1, sc in each st around, working 3 sc in the center st of each corner. Join. (200 + 8 = 208 sts)
Counting from corner center to corner center, with both centers included, the top and bottom have 22 sts each and the sides have 84 sts each. Each corner center belongs to two sides, so the total is 2 x 21 + 2 x 83 = 208.
Why the math works: at 12 sts and 14 rows per 4 in, 7 rows are as tall as 6 sts are wide. Working 6 sc for every 7 row ends (91 ÷ 7 = 13 groups x 6 = 78 sc) keeps the long sides flat. The 3-sc corners add exactly 2 sts per corner per round, so the corners stay square. Fasten off.
Hanging Tabs
On Rnd 2, find the 20 sts across the top between the two corner centers. They divide as 1 skipped + 5 tab + 8 gap + 5 tab + 1 skipped = 20.
Row 1: Join yarn in the 2nd st after the top-right corner center. Ch 1, sc in same st and next 4 sts. Turn. (5 sts)
Rows 2-21: Ch 1, sc across. Turn. (5 sts)
Fasten off, leaving a 12 in (30.5 cm) tail. Leave the next 8 sts unworked, then work the second tab the same way over the next 5 sts. Each tab is about 1.7 in (4.3 cm) wide and 6 in (15.2 cm) long.
Fold each tab to the back so its last row lies 2 in (5.1 cm) below the top edge, and whipstitch it down. Each loop has about 2 in (5.1 cm) of inside height, which fits a standard towel bar.
Joining
Method: whipstitch with a yarn needle and a 30 in (76.2 cm) length of yarn.
- Flatten one pocket so its straight sides line up. Choose one long side as the back.
- On the back, mark the center 16 sts in two places: on the front-loop ridge left by Rnd 8, and on Rnd 16.
- Center the pocket on the panel. Line up the base ridge with Row 3 and the rim with Row 16, both across panel sts 2-17.
- Whipstitch 1 pocket loop to 1 panel st, 16 times per seam. Each seam is about 5 1/3 in (13.5 cm) long.
- Tack the lattice band to the panel at 2 points between the seams, stitching through dc posts.
Repeat for Pocket 2 (Rows 33 and 46) and Pocket 3 (Rows 63 and 76). The pockets sit 30 rows apart, about 8.5 in (21.6 cm) from base to base.
Tension: keep the stitches snug but not tight. Seams that are too tight pucker the panel. Seams that are too loose let the pocket tip forward under the weight of the roll.
Size checkpoint: the panel should still lie flat at 7 x 27 in (17.8 x 68.6 cm). Each pocket should be centered, with about 0.25 in (0.6 cm) of panel showing on each side.
Final Blocking
- Mist the holder lightly, or steam it from 1 in (2.5 cm) above without touching the yarn.
- Pin the panel flat to 7 x 27 in (17.8 x 68.6 cm), with straight edges and square corners.
- Stuff each pocket with a rolled towel or a spare roll so it takes its full oval shape.
- Ease the V-shells open so the diamonds are even.
- Let it dry completely before you remove the pins.
Final Quality-Control Checklist
- The panel measures 7 x 27 in (17.8 x 68.6 cm).
- The long sides are straight, with no ripples.
- Each pocket has 54 sts and 9 even lattice repeats.
- The rims are level, with no dips over the sc points.
- The pockets are centered, evenly spaced, and level.
- Both tabs are the same length and firmly secured.
- All ends are woven in at least 2 in (5.1 cm).
- A roll slides in and out easily.
Troubleshooting
- Pocket base cups: your tension is tight. Go up a hook size.
- Pocket base ripples: check that each round adds only 6 sts.
- Lattice does not close: recount Rnd 10. You need exactly 54 sts for 9 repeats.
- Rim dips between shells: make sure Rnd 14 places a dc in each sc point.
- Panel sides wave: check that you skipped every 7th row end in the border.
- Pocket sags forward: add tacking points along the lattice band, or tighten the rim seam.
- Roll does not fit: add the extra 60-st base round described under Gauge.
Care
Hand wash in cool water, or machine wash on a gentle cycle in a mesh bag. Reshape and dry flat, with the pockets stuffed so they keep their shape.
Final Notes
Here is the measurement chain. A gauge of 12 sts and 14 rows per 4 in (10.2 cm) gives an 18-st x 91-row panel of 6 x 26 in (15.2 x 66.0 cm). The two-round border brings it to 7 x 27 in (17.8 x 68.6 cm). Each 54-st pocket base measures 6.5 x 4.5 in (16.5 x 11.4 cm), and the pocket rises to 3.75 in (9.5 cm). Three pockets set 30 rows apart fill the panel evenly, with room above each roll to lift it out.
Check your first pocket carefully, and the rest will follow. Happy crocheting!