

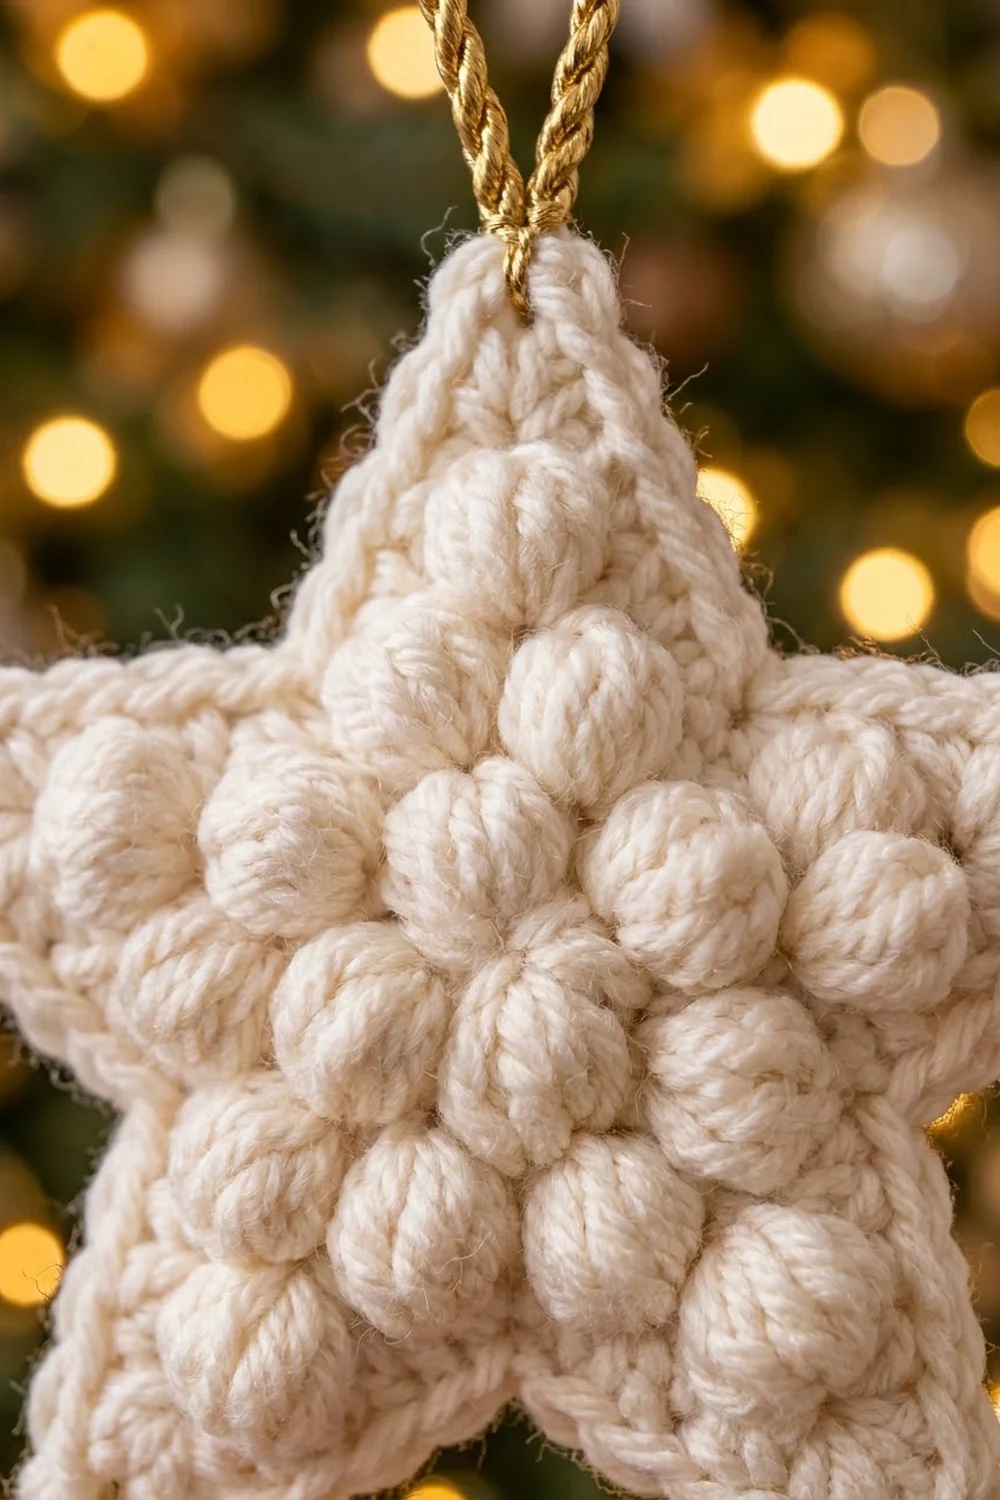
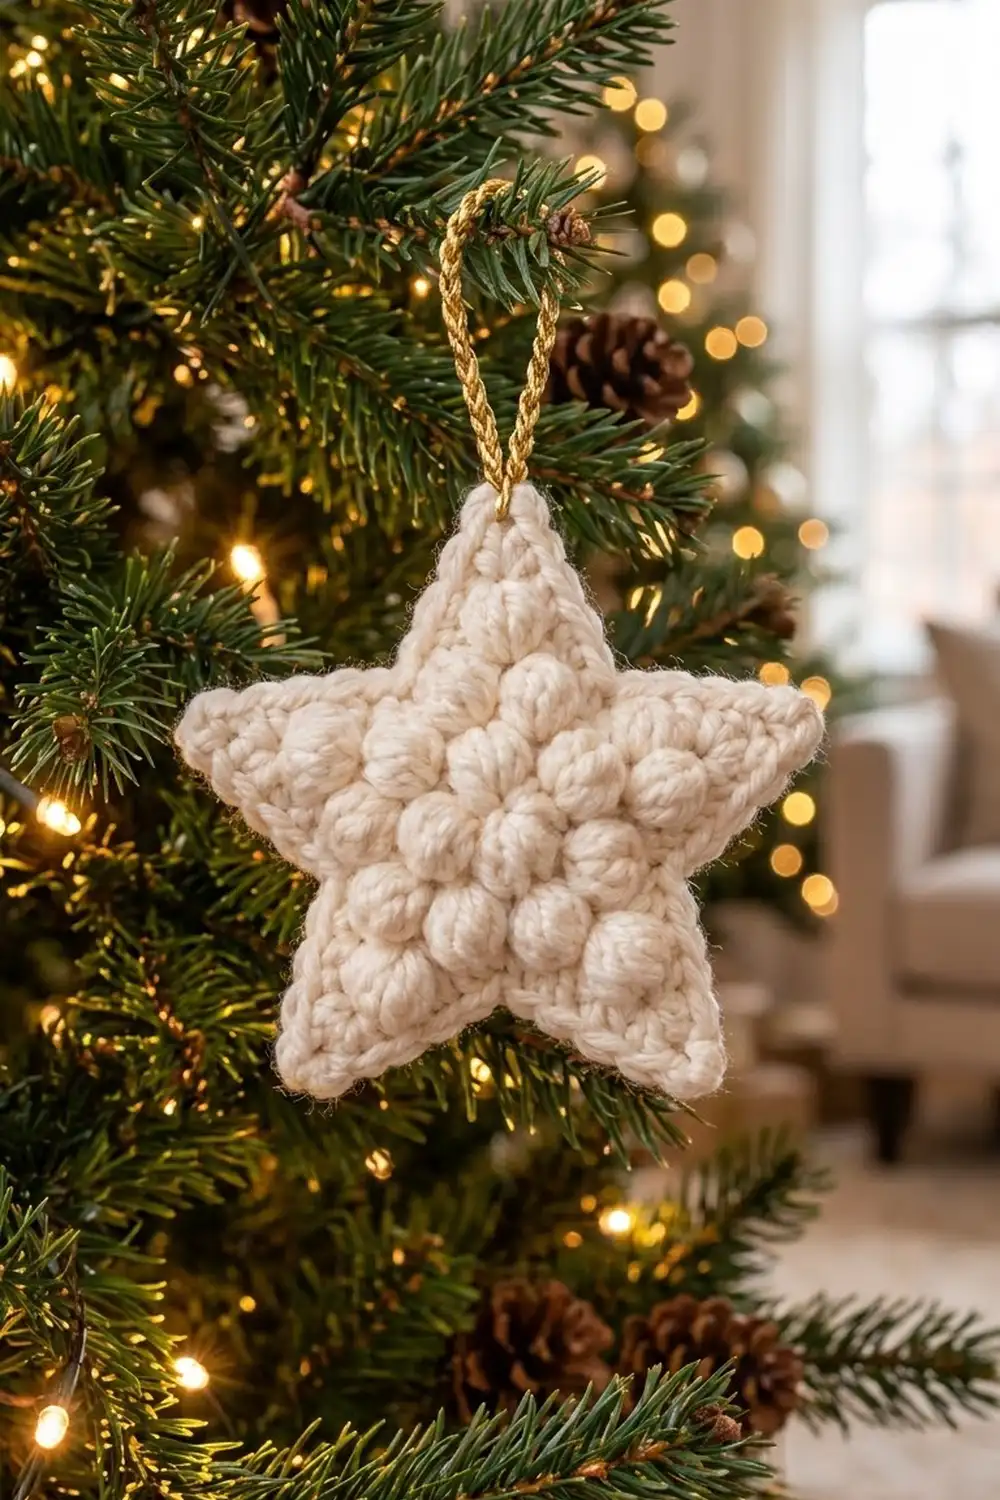
This little star is made for the tree. It is one solid piece with five plump points and a center packed with raised bobbles. A smooth single-crochet rim keeps every point crisp, and a gold twisted cord at the top lets it hang.
The sample is worked in a soft cream yarn, so the bobbles cast small shadows that look like fresh snow. The gold loop gives just enough shine to catch the tree lights. Make one as a gift tag or a dozen for a matching set. Each star is still a single finished ornament.
The pattern uses US crochet terms. The finished star measures about 4.5 in (11.4 cm) from point to point and about 4.25 in (10.8 cm) tall.
Construction is simple. You work a small round center first, with one ring of bobbles. Each of the five points is then worked in short rows straight off the center. Two border rounds go all the way around, and the hanging loop goes on last.
Finished Size and Construction
- Finished size: about 4.5 in (11.4 cm) point to point, 4.25 in (10.8 cm) tall
- Skill level: Easy / advanced beginner
- Terminology: US crochet terms
- Yarn weight: Worsted (#4)
- Hook: 4.0 mm (US G-6)
- Number of pieces: 1
- Layout: Single five-pointed star
- Center size: 2 in (5.1 cm) across after Round 4
- Size before border: about 4 in (10.2 cm) point to point
- Border depth: about 0.25 in (0.6 cm), 2 rounds of single crochet
Materials
Yarn: Choose a smooth worsted-weight cotton or a cotton blend in cream or off-white. Cotton gives the best bobble definition and holds the points stiff. Soft acrylic also works, but the star will be a little floppier. Avoid fuzzy or loosely plied yarns, because they blur the bobbles.
- Main color (cream): 12 g, about 24 m (26 yd) per star
- Hanging loop (gold): 10 in (25.4 cm) of gold metallic twisted cord, about 0.125 in (0.3 cm) thick, per star
These quantities include a margin of about 30% for your gauge swatch, tails, and any frogging.
Tools:
- 4.0 mm (US G-6) crochet hook
- Tapestry needle
- Scissors
- Stitch marker
- Ruler or tape measure
- Blocking mat and rust-proof pins
- Spray bottle with water
- Optional: a small dab of clear fabric glue for the cord knot
Abbreviations (US Terms)
- ch – chain
- sc – single crochet
- sl st – slip stitch
- st(s) – stitch(es)
- sp – space
- MR – magic ring
- sc2tog – single crochet 2 together (1 st made from 2)
- sc3tog – single crochet 3 together (1 st made from 3)
- RS / WS – right side / wrong side
- bo – bobble (see below)
Special stitch – Bobble (bo): Yarn over, insert hook in stitch, yarn over and pull up a loop, yarn over and draw through 2 loops. Repeat from * to * 3 more times in the same stitch (5 loops on hook). Yarn over and draw through all 5 loops. A bobble counts as 1 stitch.
A bobble pops toward the side of the fabric facing away from you. That is why every bobble round and row in this pattern is worked with the WS facing, so the bobbles push out to the RS.
Gauge and Checkpoints
Gauge: 18 sc and 20 rows = 4 in (10.2 cm) in plain single crochet.
Since the star is small, the star itself is your swatch. Make one, measure it at each checkpoint below, and adjust before you make a set.
- After Round 2: center circle about 1.25 in (3.2 cm) across
- After Round 4: center circle about 2 in (5.1 cm) across
- After each point: base about 1.4 in (3.6 cm) wide, point about 1.1 in (2.8 cm) tall from the center edge
- Before border: about 4 in (10.2 cm) point to point
- After border: about 4.5 in (11.4 cm) point to point
If your star is too big: Go down to a 3.75 mm (US F-5) hook.
If your star is too small: Go up to a 4.5 mm (US 7) hook.
Keep your tension firm. A slightly tight fabric makes rounder bobbles and stiffer points.
Star Center
The center is worked in joined rounds. You turn before Rounds 3 and 4 so that the bobble round is worked with the WS facing.
Round 1 (RS): Make a MR. Ch 1, work 10 sc into the ring. Pull the ring closed and sl st to the first sc to join. (10 sc)
Round 2 (RS): Ch 1 (does not count as a stitch here or later), 2 sc in each st around. Sl st to the first sc to join. Do not turn. (20 sc)
Checkpoint: about 1.25 in (3.2 cm) across.
Round 3 (WS, bobble round): Ch 1, turn. Sc in next st, bo in next st, sc in next st, 2 sc in next st. Repeat from * to * 4 more times. Sl st to the first sc to join. (25 sts: 5 bo + 20 sc)
Each repeat covers 4 stitches of Round 2 and makes 5 stitches, so the round grows from 20 to 25. Check that all 5 bobbles bulge out on the RS.
Round 4 (RS): Ch 1, turn. 2 sc in next st, sc in next 4 sts. Repeat from * to * 4 more times. Work into the top of each bobble just like any other stitch. Sl st to the first sc to join. (30 sc)
Checkpoint: about 2 in (5.1 cm) across, lying flat with no ruffling.
Place a stitch marker in the joining stitch. You now have 30 stitches, which divide evenly into 5 groups of 6, one group per point.
Star Points
Each point is worked in rows over 6 stitches of Round 4. Bobbles go on WS rows and decreases go on RS rows. All 30 stitches of Round 4 are used, so the points meet with no gaps between them.
First Point
Row 1 (RS): Ch 1, sc in the same st as the join and in the next 5 sts. (6 sc)
Row 2 (WS): Ch 1, turn. Sc in first st, bo in next st, sc2tog over the next 2 sts, bo in next st, sc in last st. (5 sts: 2 bo + 3 sc)
Row 3 (RS): Ch 1, turn. Sc2tog, sc in next st, sc2tog. (3 sc)
Row 4 (WS): Ch 1, turn. Sc in first st, bo in next st, sc in last st. (3 sts: 1 bo + 2 sc)
Row 5 (RS): Ch 1, turn. Sc3tog. (1 st)
Fasten off and leave a 4 in (10.2 cm) tail.
Points 2 to 5
With the RS facing, join cream with a sl st in the next unworked stitch of Round 4, right beside the base of the point you just finished.
Repeat Rows 1 to 5, starting Row 1 with ch 1 and sc in the same stitch as your join and the next 5 stitches. Fasten off after each point.
Checkpoint per point: base about 1.4 in (3.6 cm), height about 1.1 in (2.8 cm) above Round 4.
Checkpoint, whole star: about 4 in (10.2 cm) from point to point, with 5 points and 20 bobbles in total (5 in the center, 3 on each point).
Weave in all point tails on the WS before the border. The border will cover the edges, so you can hide the ends along them.
Border
Border gauge: Work the border at the same firm tension as the body. Each row end of a point takes 1 sc. Two border rounds add about 0.25 in (0.6 cm) all around, so the star grows from about 4 in (10.2 cm) to about 4.5 in (11.4 cm) point to point.
Each point has 5 rows. Row 5 is the single tip stitch. That leaves the row ends of Rows 2, 3, and 4 on each side, plus the Row 1 row end at each valley.
Border Round 1 (RS): With the RS facing, join cream with a sl st in the tip stitch (Row 5) of the top point.
In the tip stitch work (sc, ch 2, sc). Work 1 sc in each row end of Rows 4, 3, and 2 going down the side (3 sc). Sc2tog over the Row 1 row end of this point and the Row 1 row end of the next point (this is the valley stitch). Work 1 sc in each row end of Rows 2, 3, and 4 going up the next point (3 sc). Repeat from * to * 4 more times. Sl st to the first sc to join.
Count per point repeat: 2 tip sc + 3 side sc + 1 valley st + 3 side sc = 9 sc, plus 1 ch-2 tip space.
Round total: 45 sc + 5 ch-2 spaces.
Border Round 2 (RS): Sl st into the first ch-2 space.
In the ch-2 space work (sc, ch 2, sc). Sc in the next 3 sts. Sc3tog over the next 3 sts (the last side sc, the valley stitch, and the first side sc of the next point). Sc in the next 3 sts. Repeat from * to * 4 more times. Sl st to the first sc to join.
Count per point repeat: 2 tip sc + 3 sc + 1 sc3tog + 3 sc = 9 sc, plus 1 ch-2 tip space.
Round total: 45 sc + 5 ch-2 spaces.
Per-edge count after Round 2: Each straight edge of a point runs from the tip space to the valley: 1 sc worked in the tip space + 3 sc = 4 sc, ending at the shared valley sc3tog.
Fasten off and weave in the tail.
Why the math works: A star edge needs extra stitches at the tips, where the edge turns outward, and fewer stitches at the valleys, where it turns inward. In Round 2, each tip gains 2 stitches (sc, ch 2, sc into the space). Each valley loses 2, because sc3tog turns 3 stitches into 1. The gains and losses cancel, so the count stays at 45 sc + 5 spaces. That keeps the points sharp and the valleys crisp, and the edge doesn’t cup or ruffle.
Hanging Loop
- Cut 10 in (25.4 cm) of gold twisted cord. Tie a tight overhand knot near each end to stop fraying.
- Fold the cord in half. From front to back, pass both ends through the ch-2 tip space of the top point.
- Tie both ends together in a firm double knot on the WS, snug against the tip. The finished loop should stand about 3 in (7.6 cm) above the point.
- Trim the ends to about 0.25 in (0.6 cm). If you like, add a tiny dab of clear fabric glue to the knot.
- For a neat look, thread a 6 in (15.2 cm) length of cream yarn on the tapestry needle. Wrap it 3 or 4 times around both strands of cord at the base, right above the tip. Then stitch it through the tip and weave in the end.
Final Blocking
- Lightly mist the star with water until it’s damp but not soaking.
- Lay it RS up on the blocking mat.
- Pin each of the 5 tips out to an even 4.5 in (11.4 cm) point-to-point measurement. Check with your ruler that the star looks even all around.
- Pin each valley lightly inward so the edge has a crisp star shape.
- Don’t flatten the bobbles. Pin only the border, and gently pinch each bobble back into a round shape with your fingers.
- Let the star dry completely, usually 6 to 12 hours, before you remove the pins.
- For extra stiffness, you can mist it with a light spray starch before drying.
Final Quality-Control Checklist
- Star has exactly 5 points of matching size.
- Point to point measures about 4.5 in (11.4 cm).
- Center has 5 bobbles and each point has 3, for 20 bobbles in total.
- All bobbles pop out on the RS.
- Border Round 2 counts 45 sc + 5 ch-2 spaces.
- Each point edge has 4 sc from tip space to valley.
- No gaps where the points meet Round 4.
- Valleys are sharp and tips are pointed.
- Gold loop is centered on the top point and knotted securely.
- All tails are woven in and invisible from the RS.
Troubleshooting
Bobbles pop out on the back. You worked a bobble round or row with the RS facing. Make sure Round 3 and point Rows 2 and 4 are worked with the WS facing.
Center ruffles after Round 4. Your tension is loose, or you added extra increases. Recount to 30 sc and try a smaller hook.
Center cups after Round 4. Tension is too tight. Relax your grip or go up a hook size.
Points lean or twist. Check that each point uses exactly 6 stitches and that the decreases sit at both ends of Row 3.
Gaps between points. Join each new point right beside the last one, and work the valley sc2tog in Border Round 1 through both Row 1 row ends.
Border edge ruffles. You probably worked more than 1 sc per row end. Stick to 3 side sc per edge in Round 1.
Tips look rounded. Make sure the ch 2 at each tip is worked. Then pin the tips firmly while blocking.
Cord frays. Knot both ends before you thread the cord, and seal the knot with a little glue.
Care
Hand wash in cool water with mild soap, press out the water in a towel, and dry flat with the tips gently pinned. Store flat or hanging so the points don’t get crushed.
Final Notes
The measurement chain is short and easy to check. The center grows to 1.25 in (3.2 cm) after Round 2 and to 2 in (5.1 cm) after Round 4. Each point adds about 1.1 in (2.8 cm), which brings the star to about 4 in (10.2 cm) point to point. Two border rounds of 45 sc + 5 ch-2 spaces add 0.25 in (0.6 cm) all around, for a finished size of 4.5 in (11.4 cm). If your star matches at each checkpoint, every star you make will match the first. That makes it easy to fill a whole tree with a matching snowy set.
Happy crocheting!