

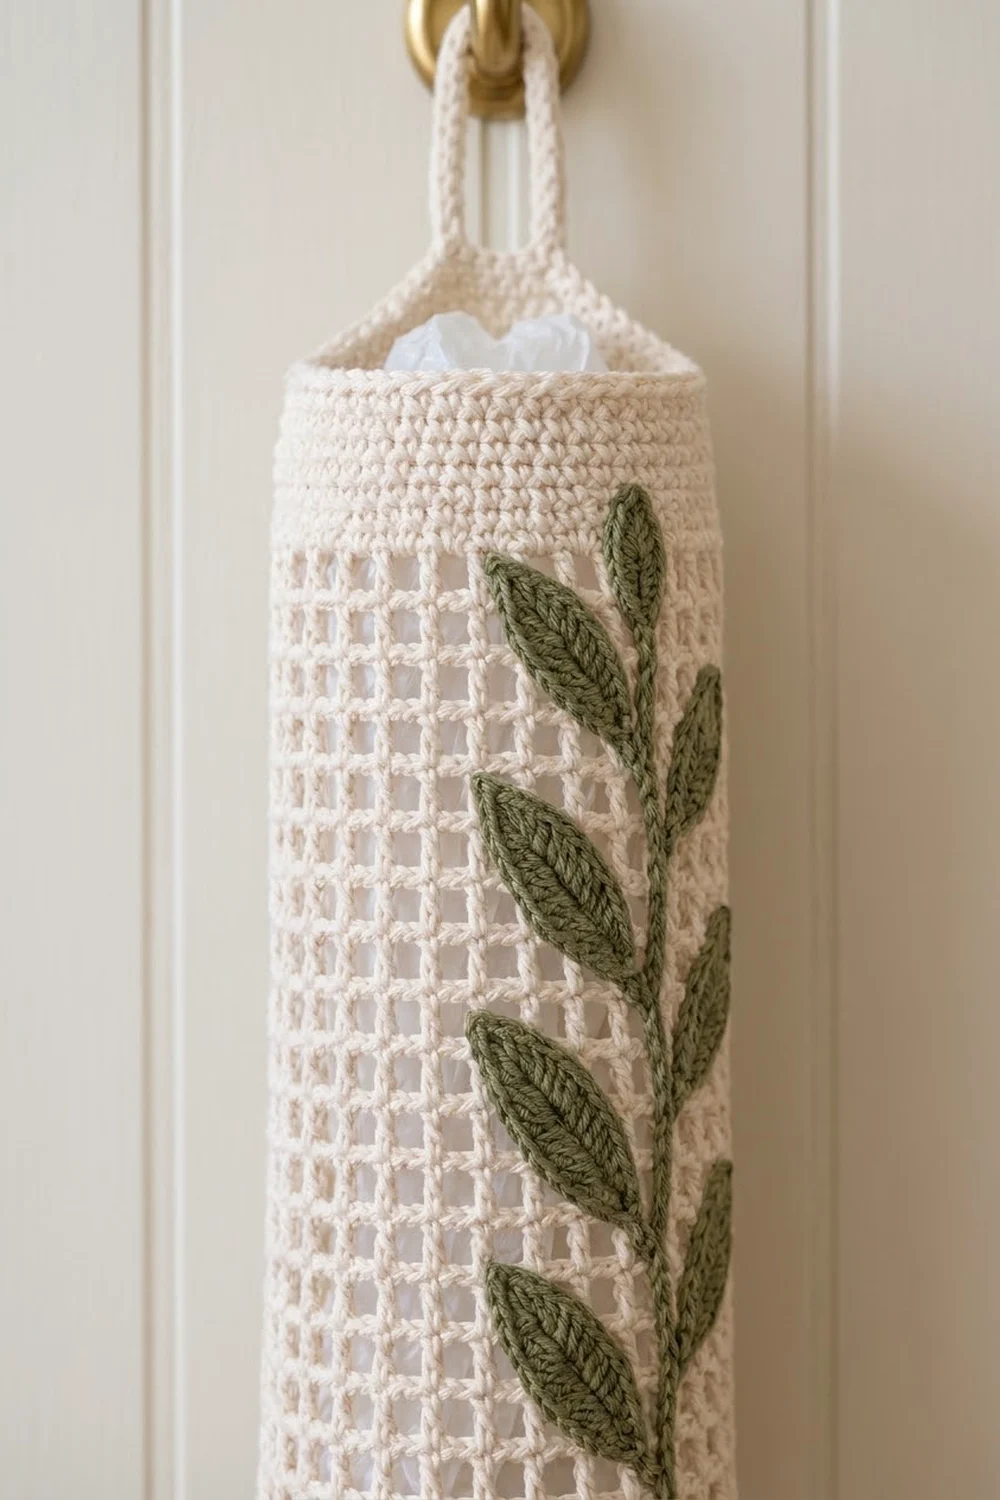
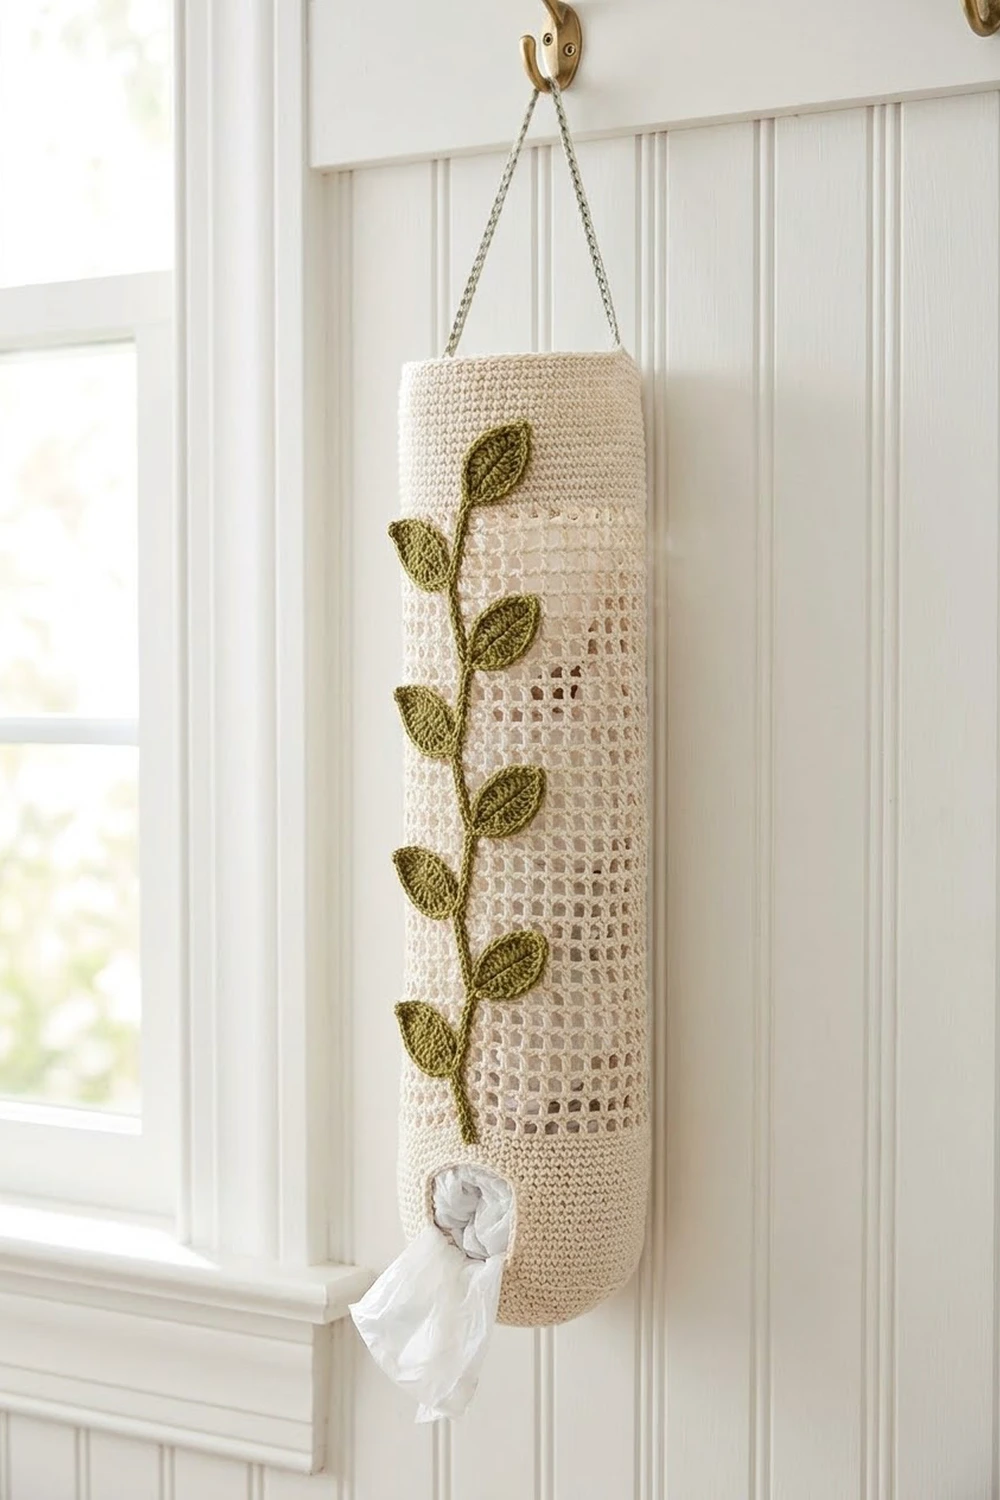
This grocery bag holder is a slim, hanging tube with a clean filet mesh body and an olive-green leafy vine climbing up the front. Push plastic bags in through the wide top. Pull them out one at a time through the small, rounded opening at the bottom.
The body is all cream cotton. The vine is one olive-green stem with twelve alternating leaves and a tip leaf, sewn onto the mesh. The look is calm farmhouse kitchen: neutral, textured and practical.
The pattern uses US crochet terms. The finished holder measures 19 in (48.3 cm) tall and 12 in (30.5 cm) around, which is about 3.8 in (9.7 cm) in diameter and 6 in (15.2 cm) wide when lying flat. The hanging loop adds about 3 in (7.6 cm) at the top.
Construction is simple. You work from the bottom up in joined rounds. First comes a solid sc base that increases from a small opening to full width. Then you work a long open-mesh section, and finish with a solid sc top band and a covered-chain hanging loop. The stem and leaves are made separately and stitched on at the end.
Finished Size and Construction
- Finished size: 19 in (48.3 cm) tall x 12 in (30.5 cm) circumference, plus a 3 in (7.6 cm) loop
- Flat width: 6 in (15.2 cm)
- Bottom opening: about 1.9 in (4.8 cm) across
- Skill level: Easy to intermediate
- Terminology: US
- Yarn weight: Worsted (#4), cotton
- Hook: 5.0 mm (US H-8)
- Number of pieces: 1 body (with integrated loop) + 1 vine stem + 13 leaves sewn on as appliqué
- Layout: Single tube; the vine is centered on the front, opposite the round seam
- Size before border: 17 in (43.2 cm) tall (bottom base + mesh)
- Border depth: 2 in (5.1 cm) solid sc top band
Materials
Use a smooth, mercerized or combed worsted-weight cotton. Cotton holds the tube’s shape, stands up to washing and does not stretch much under the weight of the bags. The quantities below are based on a yarn with about 85 yd (78 m) per 50 g.
- Cream (body): 90 g, about 153 yd (140 m)
- Olive green (vine): 20 g, about 34 yd (31 m)
Both amounts include a margin of roughly 15 percent for gauge swatches and differences in tension.
Tools:
- 5.0 mm (US H-8) crochet hook
- Tapestry needle
- 4 stitch markers
- Rustproof pins for placing the appliqué
- Measuring tape
- Spray bottle and a rolled towel or cardboard tube for blocking
Abbreviations (US Terms)
- ch – chain
- sl st – slip stitch
- sc – single crochet
- hdc – half double crochet
- dc – double crochet
- inc – 2 sc in the same stitch
- st(s) – stitch(es)
- sp – space
- rnd(s) – round(s)
- beg – beginning
Special stitch – Filet mesh: In this pattern, one mesh is (dc, ch 1), worked over 2 stitches of the round before. Each mesh is 2 stitches wide, so 24 meshes equal 48 stitches.
Gauge and Checkpoints
Gauge:
- Sc: 16 sts x 18 rnds = 4 in (10.2 cm)
- Mesh: 8 meshes = 4 in (10.2 cm) wide; 5 mesh rnds = 3 in (7.6 cm) tall
- Chain (for the vine): 4 ch = 1 in (2.5 cm)
Test first by working the bottom base (Rnds 1–9). It is quick to make and gives you real gauge in the round.
Checkpoints:
- After Rnd 9: Flat width should be 6 in (15.2 cm), and the base should be 2 in (5.1 cm) tall.
- After Rnd 19 (10 mesh rnds): The mesh section should be 6 in (15.2 cm) tall.
- After Rnd 34: The total height should be 17 in (43.2 cm).
- After Rnd 43: The total height should be 19 in (48.3 cm), with a flat width of 6 in (15.2 cm).
If your piece is too big, go down one hook size (4.5 mm / US 7). If it is too small, go up one size (5.5 mm / US I-9). If only the mesh rounds are too tall or too short, keep your hook and add or remove mesh rounds. Each mesh round adds or removes 0.6 in (1.5 cm).
Body
Work in joined rounds with the right side always facing you. Do not turn. The joins line up into a faint seam. That seam is the back of the holder.
Bottom Base (Rnds 1–9)
With cream, ch 24. Join with a sl st to the first ch to form a ring, taking care not to twist the chain.
Rnd 1: Ch 1, sc in each ch around, sl st to first sc to join. (24 sts)
Rnd 2: Ch 1, sc in each st around, join. (24 sts)
Rnd 3: Ch 1, *sc in next 2 sts, inc in next st; rep from * 8 times total, join. (32 sts)
Rnd 4: Ch 1, sc in each st around, join. (32 sts)
Rnd 5: Ch 1, *sc in next 3 sts, inc in next st; rep from * 8 times total, join. (40 sts)
Rnd 6: Ch 1, sc in each st around, join. (40 sts)
Rnd 7: Ch 1, *sc in next 4 sts, inc in next st; rep from * 8 times total, join. (48 sts)
Rnds 8–9: Ch 1, sc in each st around, join. (48 sts)
The 24-stitch starting ring makes the bag opening about 6 in (15.2 cm) around. The three increase rounds give the bottom its rounded, tapered shape. Increasing every other round spreads the shaping evenly, so the base curves instead of ruffling.
Checkpoint: The base is 2 in (5.1 cm) tall and 6 in (15.2 cm) wide when flat.
Mesh Section (Rnds 10–34)
Rnd 10 (set-up mesh round): Ch 4 (counts as dc + ch 1), skip next st, *dc in next st, ch 1, skip next st; rep from * 23 more times, sl st in 3rd ch of beg ch-4 to join. (24 dc + 24 ch-1 sps = 24 meshes, 48 sts)
On this round, every dc lands on an odd-numbered stitch and every ch 1 skips an even-numbered stitch. The 48 stitches turn into exactly 24 meshes.
Rnds 11–34: Ch 4 (counts as dc + ch 1), skip ch-1 sp, *dc in next dc, ch 1, skip ch-1 sp; rep from * 22 more times, sl st in 3rd ch of beg ch-4 to join. (24 meshes, 48 sts)
Stacking each dc on top of the dc below gives you straight vertical bars and square holes, like the holder in the photo. Keep the ch 1 snug. Loose chains make the squares look like rectangles.
You will work 25 mesh rounds in total.
Checkpoint: The mesh section is 15 in (38.1 cm) tall, and the total height is 17 in (43.2 cm).
Border (Top Band, Rim and Hanging Loop)
On this tube, the “border” is the solid top band that keeps the opening firm, plus a slip-stitch rim and the hanging loop.
Border gauge: 16 sc = 4 in (10.2 cm), and 18 rnds = 4 in (10.2 cm). When you flatten the tube, each side has 24 sts.
Rnd 35 (conversion round): Ch 1, sc in same st as join, sc in next ch-1 sp, *sc in next dc, sc in next ch-1 sp; rep from * 22 more times, join. (24 sc in dc + 24 sc in ch-1 sps = 48 sts)
Rnds 36–43: Ch 1, sc in each st around, join. (48 sts; 24 per flattened side)
Rnd 44 (rim): Sl st loosely in each st around. (48 sl sts) Do not fasten off.
Why the math works: The mesh round has 24 dc and 24 spaces. Placing one sc in each gives back exactly 48 sts, the same count as the bottom base. The tube stays straight, with no flare or pull-in where the mesh meets the solid band.
Checkpoint: The top band is 2 in (5.1 cm) deep, and the total height is 19 in (48.3 cm).
Hanging loop: You are now at the back seam. Ch 25 (about 6 in / 15.2 cm), then sl st into the same st to close the loop. Work 36 sc around the chain, inserting the hook into the loop opening rather than into the chains, so the chain is fully covered. Push the stitches together as you go. Sl st into the next rim st and fasten off. The finished loop stands about 3 in (7.6 cm) tall.
Bottom rim: Join cream at the back seam on the foundation chain. Sl st in each of the 24 foundation loops (12 per flattened side) and join. Fasten off. This keeps the bag opening from stretching.
Vine Appliqué
Stem (make 1)
With olive green, ch 57. Sl st in the back bump of the 2nd ch from the hook and in each remaining ch. (56 sl sts) Fasten off, leaving a 20 in (50.8 cm) tail.
Checkpoint: The stem is 14 in (35.6 cm) long. If yours is longer, pull out a few chains instead of stretching the vine to fit.
Leaves (make 13)
With olive green, ch 9.
Side 1: Working in the back bumps, starting in the 2nd ch from the hook: sl st, sc, hdc, dc, dc, hdc, sc, sl st. (8 sts)
Tip: Ch 1, then rotate to work along the other side of the foundation chain.
Side 2: In the free loops, sl st, sc, hdc, dc, dc, hdc, sc, sl st. (8 sts) Sl st into the ch-1 tip to join. (16 sts + ch-1 tip)
Fasten off, leaving a 10 in (25.4 cm) tail.
The foundation chain stays in the middle and forms the raised center vein. The tall dc in the middle of each side shape the leaf, and the sl sts at each end give it pointed tips. Each leaf is 2 in (5.1 cm) long and 1 in (2.5 cm) wide.
Placement and Sewing
- Flatten the holder with the back seam centered on the back. Mark the front center column of the mesh.
- Pin the stem straight up that column, starting 0.5 in (1.3 cm) above the bottom base and ending 0.5 in (1.3 cm) below the top band.
- Whipstitch the stem down through the dc bars it crosses, catching only the back of each sl st.
- Starting 1 in (2.5 cm) above the stem’s base, pin 12 leaves 1.1 in (2.8 cm) apart, alternating left and right. Angle each one upward at about 45 degrees, with its base touching the stem.
- Pin the 13th leaf straight up at the top of the stem as the tip leaf.
- Sew each leaf around its outer edge with small stitches into the mesh bars, plus 2–3 stitches at the base. Leave the leaf tips loose enough that they lie flat without puckering.
- Weave all tails in on the wrong side. Never tie knots across the open squares.
Final Blocking
- Weave in all remaining cream tails along the dc bars.
- Roll up a towel, or use a long cardboard tube, about 3.8 in (9.7 cm) across, and slide it inside the holder.
- Mist the holder evenly until it is damp, not soaked.
- Use your fingers to straighten the mesh so the dc bars run vertically and the squares are square.
- Smooth the vine and leaves flat against the mesh.
- Check the measurements: 19 in (48.3 cm) tall and 12 in (30.5 cm) around.
- Let it dry completely on the form, then remove the form.
Final Quality-Control Checklist
- Total height is 19 in (48.3 cm), and the loop is about 3 in (7.6 cm) tall.
- Circumference is 12 in (30.5 cm) at the top band, the mesh and the base.
- Every mesh round has 24 meshes, and the dc columns run straight.
- The top band has 48 sts in every round.
- The bottom opening is about 1.9 in (4.8 cm) across and finished with a sl st rim.
- The loop sits exactly at the back seam.
- The vine is centered on the front with 12 alternating leaves and 1 tip leaf.
- No tails or knots show through the mesh.
Troubleshooting
The mesh is slanting or spiraling. Join into the 3rd ch of the beg ch-4 every time. Then start the next round by skipping the ch-1 sp, not the dc.
The mesh is wider than the bands. Your ch 1 is too loose. Tighten it, or work the mesh with a hook 0.5 mm smaller.
The bottom is ruffled. You may have worked extra increases. Count to 32, 40 and 48 on Rnds 3, 5 and 7.
Bags fall out of the bottom. Work the bottom rim snugly, or start with ch 22 and adjust Rnd 3 to reach 32 sts.
The loop is stretching. Pack more sc onto it (up to 40) so the chain is fully covered.
Leaves are curling. Steam-block them flat before sewing, and sew around the full outline instead of just the base.
Care
Hand wash or machine wash on a gentle cycle in cool water. Reshape the holder while damp and lay it flat or hang it to dry. Do not use high heat, which can shrink cotton.
Final Notes
Everything in this pattern builds on the same measurements. At 16 sts per 4 in (10.2 cm), 48 sts give a 12 in (30.5 cm) circumference. The 2 in (5.1 cm) base and 15 in (38.1 cm) of mesh make 17 in (43.2 cm) before the border. The 2 in (5.1 cm) top band brings the holder to 19 in (48.3 cm). The 14 in (35.6 cm) vine fits neatly between the solid bands. If you check gauge on the base and count 48 sts at every stage, the holder will hang straight and dispense bags smoothly for years.
Happy crocheting!