

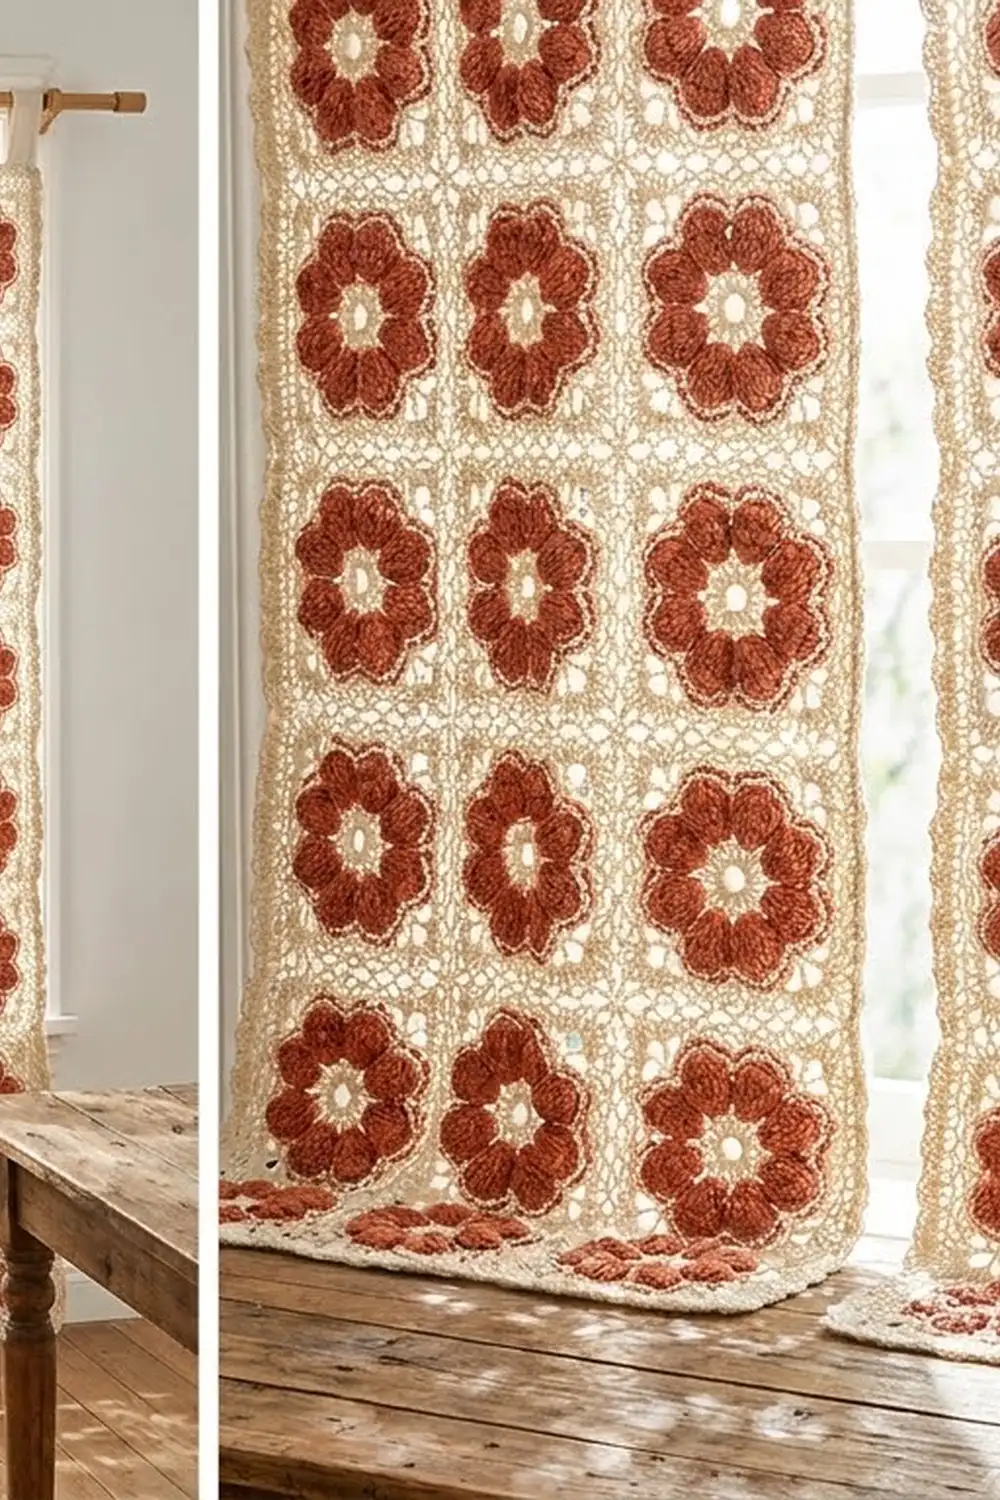
These curtains are built from small flower motifs. Each one has eight raised terracotta petals around a cream center, set inside a lacy cream square. Joined in a grid, the motifs make a soft, see-through panel that filters sunlight and still gives some privacy.
There are only two colors: warm cream for the lace and a dusty terracotta for the petals. The look is relaxed and a little vintage, like a farmhouse. The petals are tall puff stitches, so they stand out against the flat lace around them.
This pattern uses US crochet terms. One finished panel measures 22.5 in (57.2 cm) wide by 80.25 in (203.8 cm) long before the tabs. The tab loops add about 2.75 in (7.0 cm) above the top edge. The instructions are for one panel, so make two for a pair.
Construction is simple and repeats. You crochet 60 square motifs per panel in the round, join them with slip-stitch seams in a grid 4 motifs wide and 15 motifs tall, then work a 3-round border and add 5 tabs across the top.
Finished Size and Construction
- Finished panel size: 22.5 in × 80.25 in (57.2 cm × 203.8 cm), plus 2.75 in (7.0 cm) tab loops
- Skill level: Intermediate
- Terminology: US crochet terms
- Yarn weight: Worsted (#4) cotton or cotton blend
- Hook: 4.5 mm (US 7)
- Number of pieces: 60 motifs per panel, 120 for a pair
- Layout: 4 motifs wide × 15 motifs tall per panel
- Motif size: 5.25 in (13.3 cm) square
- Size before border: 21 in × 78.75 in (53.3 cm × 200.0 cm)
- Border depth: 0.75 in (1.9 cm) on each side
Materials
Pick a smooth mercerized or combed cotton with good stitch definition, at about 190 m per 100 g. Cotton drapes well, takes blocking well, and doesn’t stretch out of shape on a curtain rod the way acrylic can. Stay away from fuzzy or very splitty yarns, because they blur the petals.
Yarn for a pair of panels:
- Color A, Cream: 1,000 g (1,900 m). Each panel uses about 500 g (950 m).
- Color B, Terracotta: 400 g (760 m). Each panel uses about 200 g (380 m).
These amounts include roughly a 10% margin for gauge differences and swatching. Buy all of each color from one dye lot if you can.
Tools:
- 4.5 mm (US 7) crochet hook
- Tapestry needle
- Locking stitch markers
- Rust-proof pins and blocking mats
- Spray bottle
- Measuring tape
- Scissors
Abbreviations (US Terms)
- ch: chain
- sl st: slip stitch
- sc: single crochet
- hdc: half double crochet
- dc: double crochet
- tr: treble crochet
- sp(s): space(s)
- st(s): stitch(es)
- BLO: back loop only
- RS / WS: right side / wrong side
Special stitch: Tall Puff Petal (TP). Yarn over, insert the hook in the stated space, and pull up a loop to 0.5 in (1.3 cm) tall. Do this 5 times in the same space, so you have 11 loops on the hook. Yarn over and draw through all 11 loops, then ch 1 firmly to close. The closing ch is the top of the petal and does not count as a separate stitch.
Gauge and Checkpoints
Gauge: 16 sc and 18 sc rows = 4 in (10.2 cm) with a 4.5 mm hook. More importantly, one finished, blocked motif should measure 5.25 in (13.3 cm) square.
Make one complete motif, block it, and measure it before you start the full set. Every later measurement depends on this one.
Checkpoints for each round, unblocked and laid flat:
- After Rnd 1: about 1.25 in (3.2 cm) across
- After Rnd 2: about 2.25 in (5.7 cm) across
- After Rnd 3: about 3.75 in (9.5 cm) across, tip to tip
- After Rnd 4: about 4.25 in (10.8 cm) across
- After Rnd 5: about 4.75 in (12.1 cm) across, loop to loop
- After Rnd 6: about 5 in (12.7 cm) square
- After Rnd 7 and blocking: 5.25 in (13.3 cm) square
If your motif is too big, go down a hook size (4.0 mm), or keep the puff loops at exactly 0.5 in (1.3 cm) instead of letting them grow. If it’s too small, go up a hook size (5.0 mm). Small errors multiply: being 0.25 in (0.6 cm) off per motif adds 3.75 in (9.5 cm) over the 15 motifs of one panel’s length.
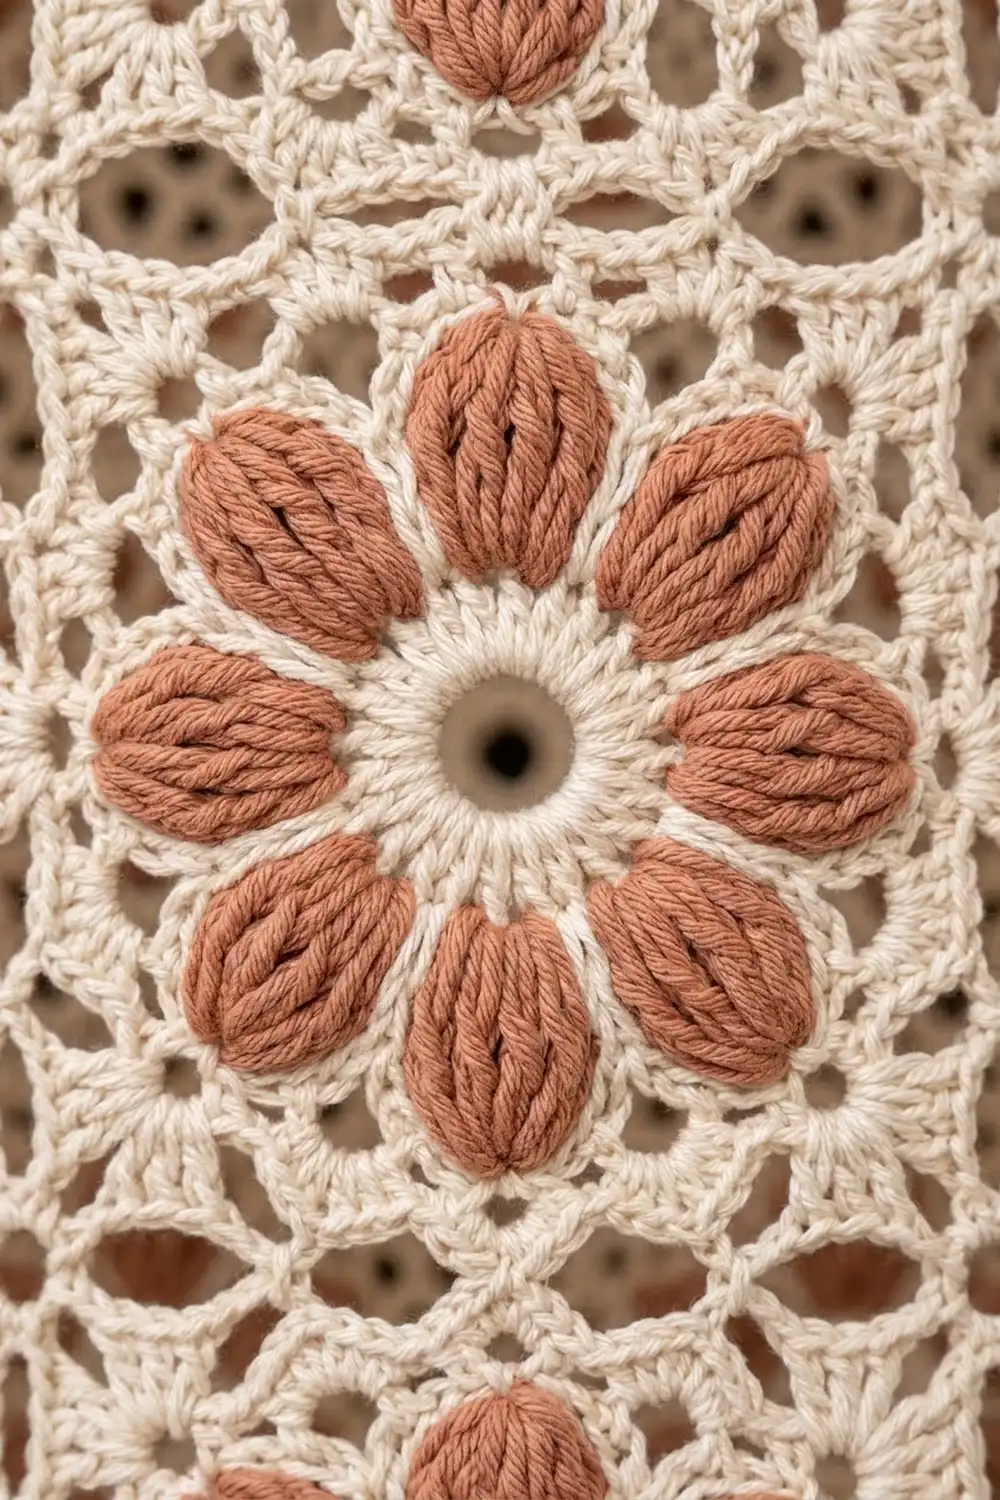
Motif (Make 60 per Panel)
Rnd 1 (Color A)
Make a magic ring, ch 1, and work 16 sc into the ring. Pull the ring snug but leave a small open hole in the center. Join with a sl st to the first sc. (16 sc)
Rnd 2 (Color A): Spokes
Ch 6 (counts as dc + ch 3). Skip the next sc, then dc in the next sc, ch 3, skip the next sc. Repeat from * 6 more times. Join with a sl st to the 3rd ch of the beginning ch-6. (8 dc, 8 ch-3 sps)
Fasten off Color A.
Rnd 3 (Color B): Petals
Join Color B with a sl st in any ch-3 sp. Ch 2, then work the first TP in the same sp (the ch-2 helps it stand up). Ch 5. TP in the next ch-3 sp, ch 5. Repeat from * 6 more times. Join with a sl st to the closing ch of the first TP. (8 TP, 8 ch-5 sps)
The ch-5 sits over each Rnd 2 spoke and gives the petals room to fan out. Fasten off Color B.
Rnd 4 (Color A): Petal Outline
Join Color A with a sl st in the closing ch of any TP. Ch 1, then sc in the closing ch of the TP, 5 dc in the next ch-5 sp. Repeat from * 7 more times. Join with a sl st to the first sc. (8 sc + 40 dc = 48 sts)
The dc groups curve around the sides of each petal and frame it in cream.
Rnd 5 (Color A): Scalloped Loops
Ch 1. Sc in the next sc, ch 5, skip 2 dc, sc in the center dc of the group, ch 5, skip the last 2 dc. Repeat from * 7 more times. Join with a sl st to the first sc. (16 sc, 16 ch-5 loops)
This round makes the scalloped lacy edge around the flower.
Rnd 6 (Color A): Squaring Round
Sl st into the first ch-5 loop. The loops are worked in this order: corner, side, side, side. That gives 4 corners and 12 side loops.
Start the corner: ch 4 (counts as tr), then 2 tr, ch 3, 3 tr in the same loop. Then work ch 1, 3 dc in the next loop, ch 1, 3 hdc in the next loop, ch 1, 3 dc in the next loop, ch 1, (3 tr, ch 3, 3 tr) in the next loop. Repeat from * 2 more times. To end, work ch 1, 3 dc in the next loop, ch 1, 3 hdc in the next loop, ch 1, 3 dc in the next loop, ch 1, and join with a sl st to the top of the beginning ch-4.
Per side, between the corner ch-3 sps: 3 tr + 3 dc + 3 hdc + 3 dc + 3 tr = 15 sts, plus 4 ch-1 sps.
Total: 60 sts, 16 ch-1 sps, 4 corner ch-3 sps.
The taller stitches at the corners and shorter ones in the middle turn the circle into a square.
Rnd 7 (Color A): Edge Round
Ch 1. Work 1 sc in each st and 1 sc in each ch-1 sp all the way around, and work (sc, ch 2, sc) in each corner ch-3 sp. Join with a sl st to the first sc and fasten off. Weave in the ends.
Count per side: 15 sts + 4 ch-1 sps = 19 sc worked 1-per-existing-stitch-or-space, plus 2 added corner sc = 21 sc per side, including both corner sc.
Total: 84 sc and 4 corner ch-2 sps.
Block the motif to 5.25 in (13.3 cm) square and check gauge before you go on.
Make All Pieces
For one panel: 60 motifs. Each motif uses about 3 g of Color B (for the petals) and 6.5 g of Color A.
For a pair: 120 motifs.
Block all motifs to the same size before you join them. Matching sizes make the seams much neater.
Layout grid for one panel (4 wide × 15 tall):
Row 1:   M  M  M  M   (top edge, tabs go here)
Row 2:   M  M  M  M
Row 3:   M  M  M  M
Row 4:   M  M  M  M
Row 5:   M  M  M  M
Row 6:   M  M  M  M
Row 7:   M  M  M  M
Row 8:   M  M  M  M
Row 9:   M  M  M  M
Row 10:  M  M  M  M
Row 11:  M  M  M  M
Row 12:  M  M  M  M
Row 13:  M  M  M  M
Row 14:  M  M  M  M
Row 15:  M  M  M  M   (bottom edge)
Every motif faces the same way, RS up.
Joining
Method: Slip-stitch seam through the back loops only, worked from the WS. This leaves a thin, flat ridge on the back and a clean line on the front.
Stitch-to-stitch logic: Hold two motifs with their RS together. Start in the matching corner ch-2 sps and sl st through both. Then sl st through the BLO of each pair of matching sts, 21 pairs in all. This includes both corner sc on each side. Finish with a sl st through the next pair of corner ch-2 sps. You join exactly 21 sts to 21 sts and add no extra stitches at any seam.
Order:
- Join the motifs into 15 horizontal rows of 4.
- Join the rows to each other with long seams, working the same way across all 4 motifs in a row.
- Where four corners meet, sl st through all of the corner ch-2 sps together so the intersection lies flat.
Tension: Keep each sl st as loose as the sc it goes into. Tight seams pucker and pull the panel narrower. If you tend to crochet tightly, use a 5.0 mm hook for the seams only.
Size checkpoint: Two joined motifs should measure 10.5 in (26.7 cm). One row of 4 should measure 21 in (53.3 cm) wide. The joined panel should measure 21 in × 78.75 in (53.3 cm × 200.0 cm).
Border
Border gauge: 4 sc per inch (2.5 cm), which matches the motif’s edge gauge.
Starting counts:
- Short sides (top and bottom): 4 motifs × 21 sts = 84 sts
- Long sides: 15 motifs × 21 sts = 315 sts
The joined corner ch-2 sps at the seams are not worked into, because each motif’s 21 sts already include its corner sc.
Border Rnd 1 (Color A)
Join Color A in the corner ch-2 sp at the top right. Work 1 sc in each st along every side, skipping the joined seam sps, and work (sc, ch 2, sc) in each of the 4 panel corner ch-2 sps. Join with a sl st.
- Short sides: 84 sts worked 1-per-stitch + 2 added corner sc = 86 sc
- Long sides: 315 + 2 = 317 sc
Border Rnd 2
Ch 2. Work 1 hdc in each st, and (hdc, ch 2, hdc) in each corner ch-2 sp. Join with a sl st.
- Short sides: 86 + 2 = 88 hdc
- Long sides: 317 + 2 = 319 hdc
Border Rnd 3
Ch 1. Work 1 sc in each st, and (sc, ch 2, sc) in each corner ch-2 sp. Join with a sl st.
- Short sides: 88 + 2 = 90 sc
- Long sides: 319 + 2 = 321 sc
The border measures 0.75 in (1.9 cm) deep. Don’t fasten off yet if you are left-handed and the top edge is closer. Otherwise, fasten off.
Tabs
The 90 top-edge sts split into 5 tabs of 10 sts with 4 gaps of 10 sts between them: 10 + 10 + 10 + 10 + 10 + 10 + 10 + 10 + 10 = 90.
Join Color A in the first top-edge st after the top-right corner.
- Row 1: Ch 1, sc in the next 10 sts, turn. (10 sc)
- Rows 2–27: Ch 1, sc in each st across, turn. (10 sc)
The tab should be about 6 in (15.2 cm) long and about 2.5 in (6.4 cm) wide. Fasten off, leaving a 12 in (30.5 cm) tail. Fold the tab to the WS and whipstitch its last row along Border Rnd 1. This makes a loop about 2.75 in (7.0 cm) tall that fits rods up to 1.5 in (3.8 cm) in diameter.
Skip 10 sts, then work the next tab. Repeat until all 5 tabs are done. The first and last tabs sit right at the panel’s outer edges.
Why the math works: The motifs have 4 sc per inch at their edges, and the border keeps that same gauge. So 84 sts across 21 in (53.3 cm) and 315 sts down 78.75 in (200.0 cm) lie flat without ruffling or cupping. The only stitches added are the 2 corner sc per side per round, which turn the corners.
Final Blocking
- Soak the panel in cool water with a little wool wash for 15 minutes.
- Press the water out gently. Don’t wring it. Roll the panel in towels to remove more moisture.
- Lay it flat RS up on mats, working in sections if you need to.
- Pin the outer edges to 22.5 in × 80.25 in (57.2 cm × 203.8 cm).
- Pin each motif corner so the grid lines run straight.
- Pinch each petal upward so it stands proud of the lace.
- Pin the tabs flat and straight.
- Let it dry completely, usually 24–48 hours. Then block the second panel to match.
Final Quality-Control Checklist
- Every motif has 8 petals and 21 sts per side
- All seams run straight and match corner to corner
- The panel measures 22.5 in × 80.25 in (57.2 cm × 203.8 cm)
- Border corners are square and the sides lie flat
- The 5 tabs are evenly spaced and equal in length
- Both panels match within 0.25 in (0.6 cm)
- All ends are woven securely in matching colors
Troubleshooting
- Petals look flat or lean over: Pull every puff loop to the same height and close each puff with a firm ch 1.
- Motif cups: Rnd 4 is too tight. Loosen your dc, or go up a hook size for Rnds 4–5.
- Motif ruffles: The Rnd 5 chains are too long or loose. Make sure each loop is exactly ch 5.
- Corners are rounded: Use full tr in the corner loops of Rnd 6, and block the corners to sharp points.
- Border waves: Check your counts. There should be exactly 86, 88, and 90 sts on the short sides and 317, 319, and 321 on the long sides.
- Tabs twist: Sew the folded tab down straight, matching each st to the one below it.
Care
Hand wash cool or machine wash on a delicate cycle inside a mesh bag. Lay flat to dry and reshape while damp. Don’t hang the panels wet, because the weight of the water stretches the lace.
Final Notes
Each measurement in this pattern depends on the one before it. One motif at 5.25 in (13.3 cm) with 21 sts per side makes a joined panel of 21 in × 78.75 in (53.3 cm × 200.0 cm). The 3-round border, 0.75 in (1.9 cm) deep, brings it to 22.5 in × 80.25 in (57.2 cm × 203.8 cm), and the 5 tabs finish the top. Check gauge at the first motif and the rest follows.
Happy crocheting!