

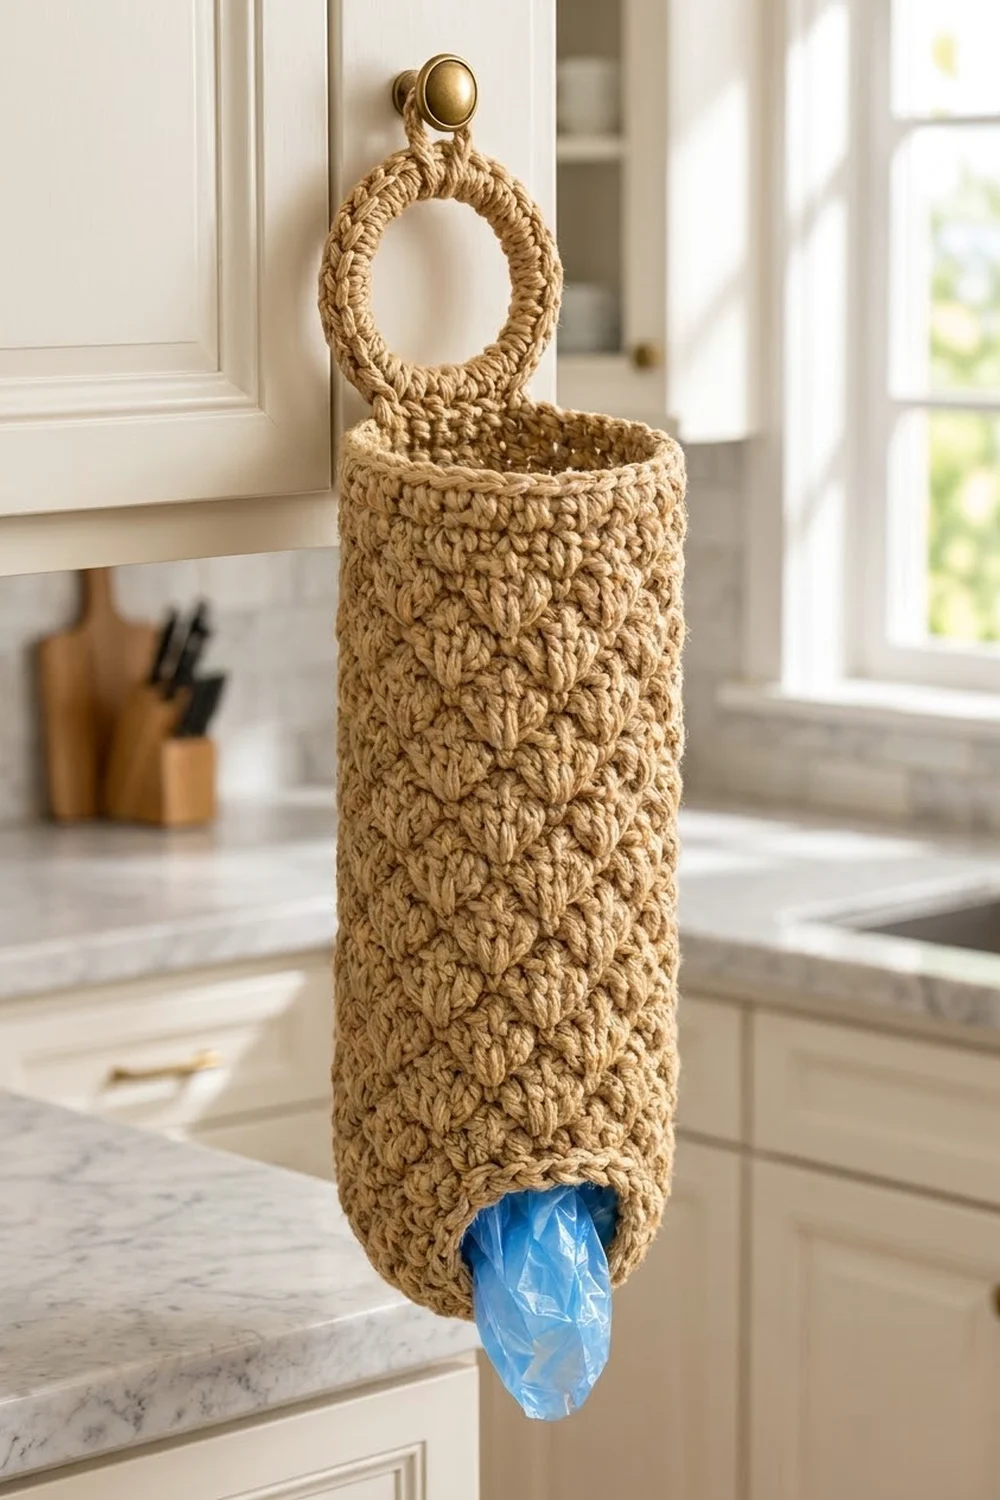
This hanging bag holder has a textured surface of small overlapping shells, like rows of scales stacked in a brick pattern. It hangs from a cabinet knob by a solid crocheted ring. You push plastic bags in through the open top and pull them out one at a time through a small hole in the base.
The sample is worked in one warm tan shade, a camel or natural-jute color that suits farmhouse, neutral, and modern kitchens. A plain single-color holder lets the texture stand out, and tan hides everyday marks well.
The pattern uses US crochet terms. The finished body is 6.75 in (17.1 cm) wide laid flat, which is about 4.3 in (10.9 cm) across as a round tube, and 13.25 in (33.7 cm) tall. Including the hanging ring, the holder is about 16.3 in (41.4 cm) long.
Construction is simple. You crochet a flat donut-shaped base around a chain ring, which leaves the dispensing hole. Then you turn the wall up through the back loops and work the shell texture in joined rounds, finishing with a firm single crochet rim. A separate solid ring is crocheted and sewn inside the back of the rim.
Finished Size and Construction
- Finished size: 6.75 in (17.1 cm) flat width × 13.25 in (33.7 cm) body height; 16.3 in (41.4 cm) total length with ring
- Tube diameter: about 4.3 in (10.9 cm)
- Skill level: Easy+ (advanced beginner)
- Terminology: US crochet terms
- Yarn weight: Worsted (#4)
- Hook: 5 mm (H-8)
- Number of pieces: 2 (1 body, 1 hanging ring)
- Layout: ring sewn to the inside back of the body’s top rim, overlapping by 0.75 in (1.9 cm)
- Piece sizes: body 6.75 × 13.25 in (17.1 × 33.7 cm); ring 3.8 in (9.7 cm) across with a 1.75 in (4.4 cm) opening
- Size before border: 12.5 in (31.8 cm) tall, from the base fold to the top of the last shell round
- Border depth: 0.75 in (1.9 cm), 3 rim rounds
Materials
Pick a sturdy worsted-weight cotton or cotton blend. Cotton holds its shape, doesn’t stretch much under the weight of the bags, and handles kitchen washing. A jute-look or tweedy cotton gives the rustic look of the sample. Avoid very soft acrylic, because the tube may sag lengthwise.
- Tan / camel (one color): 150 g, about 285 m (312 yd)
This amount includes a margin of roughly 15% for your gauge swatch and for differences in tension. The holder alone uses about 130 g.
Tools
- 5 mm (H-8) crochet hook
- Yarn needle
- 2 stitch markers
- Scissors and measuring tape
- Rust-proof pins and a blocking mat or folded towel
- An empty paper-towel tube or rolled towel, for shaping
Abbreviations (US Terms)
- ch – chain
- sl st – slip stitch
- sc – single crochet
- dc – double crochet
- BLO – back loop only
- sk – skip
- st(s) – stitch(es)
- rnd(s) – round(s)
Special stitch – Shell: work 5 dc in the same stitch. The 3rd dc is the center dc, and it’s the stitch you’ll work into on the next round.
Gauge and Checkpoints
Single crochet gauge: 14 sc and 16 rnds = 4 in (10.2 cm).
Shell gauge: 4 shell repeats (16 sts of the base round) = 4.5 in (11.4 cm) wide; 4 pattern rnds = 2 in (5.1 cm) tall.
The body is one continuous tube, so work the base first and use it as your gauge test. Once Rnd 3 is done, lay it flat and measure it.
Checkpoints
- Base after Rnd 3: 4.3 in (10.9 cm) across, with a center hole of about 1.5 in (3.8 cm).
- Ring after Rnd 3: 3.8 in (9.7 cm) across, with a 1.75 in (4.4 cm) opening.
- Body after 8 shell rnds: 4.5 in (11.4 cm) from the base fold; flat width 6.75 in (17.1 cm).
- Body after 24 shell rnds: 12.5 in (31.8 cm) from the base fold.
- Finished body after rim: 13.25 in (33.7 cm).
If your piece is too big, go down to a 4.5 mm hook. If it’s too small, go up to a 5.5 mm hook. Don’t change the stitch counts. The 48-stitch base is what makes 12 shell repeats fit evenly, so adjust the hook size and leave the numbers alone.
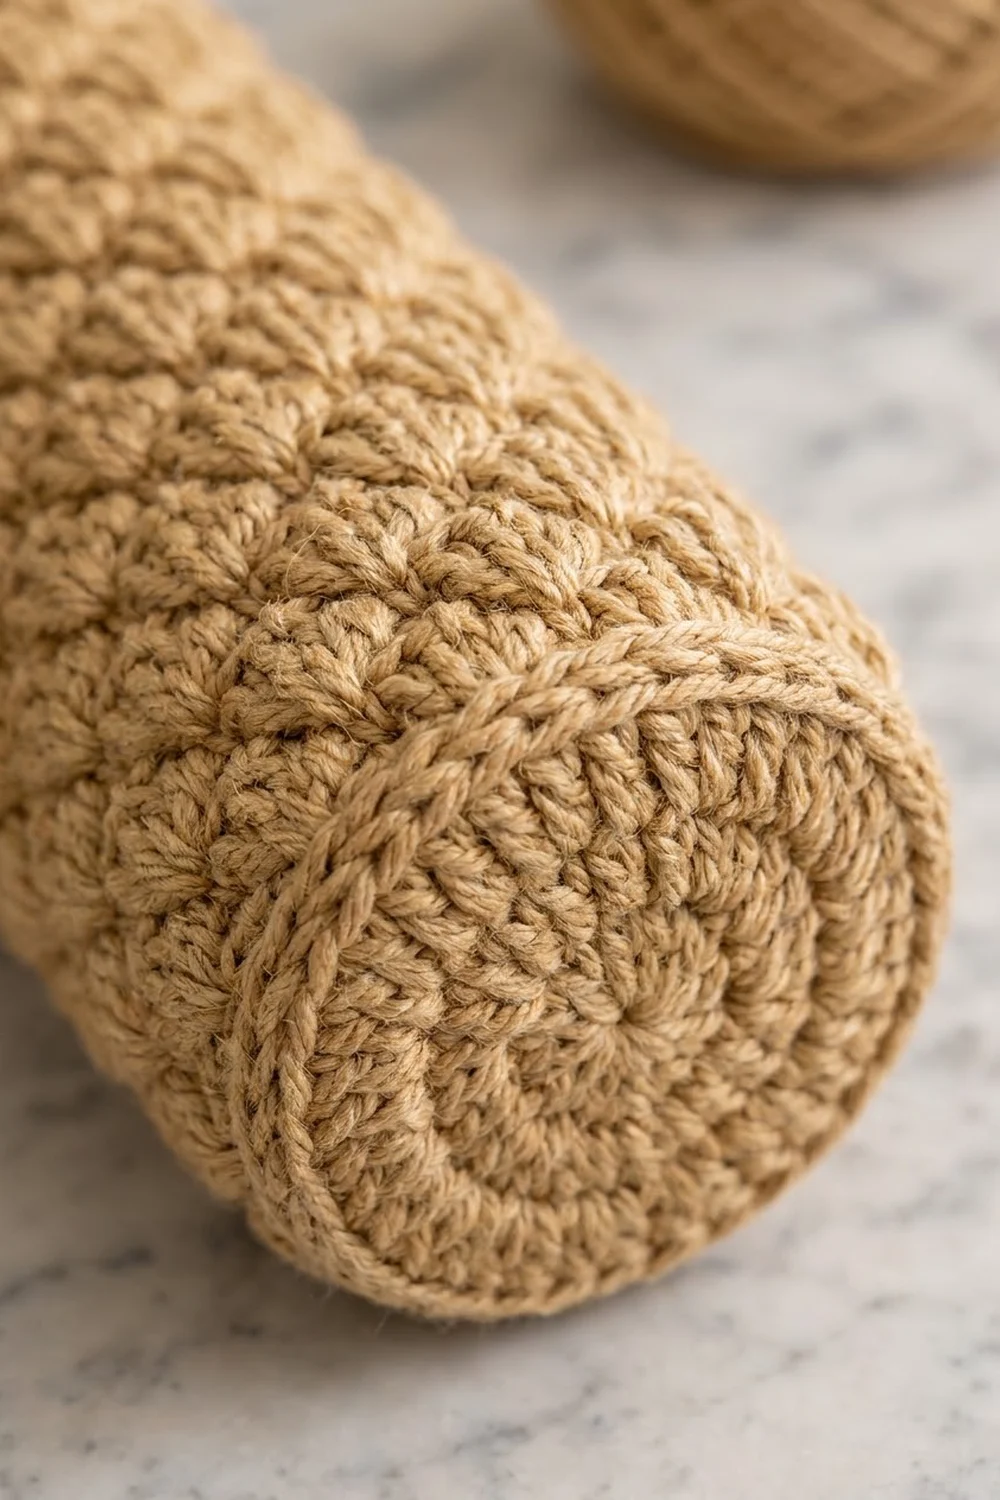
Body
The body is worked in joined rounds with the right side facing you throughout. Do not turn.
Base
Ch 16 and join with a sl st to the first ch to form a ring.
Rnd 1: Ch 1, work 24 sc into the ring, covering the chain. Join with a sl st to the first sc. (24 sts)
Rnd 2: Ch 1, sc in next st, 2 sc in next st; repeat from * 12 times. Join. (36 sts)
Rnd 3: Ch 1, sc in next 2 sts, 2 sc in next st; repeat from * 12 times. Join. (48 sts)
Checkpoint 1: the base should lie flat, measure 4.3 in (10.9 cm) across, and have a round opening of about 1.5 in (3.8 cm). If the edge ruffles, your stitches are too loose. If it cups, they’re too tight.
Wall Turn
Rnd 4: Ch 1, sc in BLO of each st around. Join. (48 sts)
The unworked front loops form a neat ridge, and the work starts to rise into a tube.
Rnd 5: Ch 1, sc in each st around. Join. (48 sts)
Shell Texture
Rnd 6 (setup): Ch 1, sc in first st, sk 1 st, shell in next st, sk 1 st, sc in next st; repeat from * 10 more times, sk 1 st, shell in next st, sk 1 st, sl st to the first sc. (12 shells + 12 sc = 72 sts)
Check: each repeat uses 4 sts of Rnd 5, and 12 × 4 = 48. All 48 base stitches are used.
Rnd 7: Sl st in the next 2 dc, ch 1, sc in the next dc (the center dc of the shell). Shell in the next sc, sc in the center dc of the next shell; repeat from * 10 more times. Shell in the next sc (the first sc of the previous round), sl st to the first sc. (12 shells + 12 sc = 72 sts)
Each new shell sits on top of a sc, between two shells of the round below. Each sc sits at the peak of a shell. That brick offset is what makes the overlapping scales.
Rnds 8–29: Repeat Rnd 7. (72 sts each rnd)
The joins move half a repeat each round. That’s normal. Put a marker in the first sc of each round so you can count.
Checkpoint 3 comes after Rnd 13 (8 shell rounds), and Checkpoint 4 comes after Rnd 29 (24 shell rounds). If you’re short on height at Checkpoint 4, add Rnd 7 repeats in pairs. Each pair adds about 1 in (2.5 cm) and about 9 g of yarn.
Don’t fasten off. Go straight on to the rim (see Border).
Hanging Ring
Ch 18 and join with a sl st to the first ch to form a ring.
Rnd 1: Ch 1, work 30 sc into the ring, packing them firmly. Join. (30 sts)
Rnd 2: Ch 1, sc in next 4 sts, 2 sc in next st; repeat from * 6 times. Join. (36 sts)
Rnd 3: Ch 1, sc in next 5 sts, 2 sc in next st; repeat from * 6 times. Join. (42 sts)
Fasten off and leave a 12 in (30.5 cm) tail for sewing. Checkpoint 2: the ring is 3.8 in (9.7 cm) across with a 1.75 in (4.4 cm) opening. Packing 30 sc onto 18 ch makes the inner edge thick and firm, so it won’t stretch on a knob.
Make All Pieces
You need 2 pieces, both in tan:
- Body: 1 (about 120 g)
- Hanging ring: 1 (about 10 g)
Layout, side view:
      (  O  )      <- hanging ring, 3.8 in (9.7 cm)
   |===(===)===|   <- rim; ring overlaps inside back 0.75 in (1.9 cm)
   | ^ ^ ^ ^ ^ |
   |^ ^ ^ ^ ^ ^|   <- 24 shell rounds, 12 repeats around
   | ^ ^ ^ ^ ^ |
   |___________|   <- BLO fold
       ( o )       <- base hole, 1.5 in (3.8 cm)
Joining
Sew the ring on after the rim is done (see Border) and the body is blocked.
- Flatten the body so the joins of the rounds run down the center back.
- Find the 7 center stitches of the back half of the rim. Mark the outer two.
- Slide the lower edge of the ring inside the tube, so that it overlaps the rim by 0.75 in (1.9 cm). That’s the full rim depth.
- With the ring’s tail, whipstitch 7 stitches of the ring’s Rnd 3 to the 7 marked rim stitches, 1 stitch to 1 stitch, going through both loops of each.
- Make a second pass of whipstitching along the ring’s Rnd 2, catching the rim’s Rnd 1 stitches behind it. Two rows of stitching spread the weight of the bags.
Tension: pull each stitch snug but not tight. The rim should stay round and not pucker. Work only through the inside layer of the rim, so that no sewing shows on the front.
Checkpoint: from the top of the ring to the base, the holder measures 16.3 in (41.4 cm).
Border
The border is the firm rim at the top opening. It’s worked straight off the last shell round.
Border gauge: 14 sc = 4 in (10.2 cm), the same as the base.
Rim Rnd 1 (Rnd 30, leveling): Ch 2 (does not count as a stitch), dc in the same sc as the join, then sc in the 2nd, 3rd and 4th dc of the next shell (skip the 1st and 5th dc). Dc in the next sc, sc in the 2nd, 3rd and 4th dc of the next shell; repeat from * 11 more times. Join to the first dc. (12 dc + 36 sc = 48 sts)
When the tube is flattened, that’s 24 sts across the front and 24 across the back. The dc fills each low dip between shell peaks, so the edge comes out level.
Rim Rnd 2 (Rnd 31): Ch 1, sc in each st around. Join. (48 sts: 24 front, 24 back)
Rim Rnd 3 (Rnd 32): Ch 1, sc in each st around. Join. (48 sts: 24 front, 24 back)
Fasten off and weave in the ends.
Why the math works: the base has 48 sts, which makes 12 shell repeats of 4 sts each. The rim pulls the 72 sts back down to 48: 1 stitch goes into each of the 12 sc, and 3 go into each of the 12 shells, for 36. The top opening has the same count as the base, so the tube stays straight instead of flaring or narrowing. At 14 sc per 4 in, 48 sts makes a circumference of about 13.7 in (34.8 cm). That’s close enough to the 13.5 in (34.3 cm) width of 12 shell repeats for the rim to sit smooth.
Final Blocking
- Weave in all ends before blocking. Leave the ring’s sewing tail free.
- Mist the body and ring with water until they are evenly damp. Don’t soak them.
- Put a paper-towel tube or a rolled towel inside the body, so it holds a round 4.3 in (10.9 cm) shape.
- Ease the shell rounds lengthwise to 13.25 in (33.7 cm), and check that the scales line up in neat offset columns.
- Pin the ring flat to a circle 3.8 in (9.7 cm) across, with the opening centered.
- Press the base flat and roll the BLO ridge outward so the fold is crisp.
- Let everything dry completely, then sew on the ring as described in Joining.
Final Quality-Control Checklist
- Base is flat, 4.3 in (10.9 cm) across, with a 1.5 in (3.8 cm) hole
- 12 shells in every round, all offset over the sc below
- Body is 6.75 in (17.1 cm) flat and 13.25 in (33.7 cm) tall
- Rim has 48 sts and is level, with no gaps above the sc dips
- Ring is 3.8 in (9.7 cm) across, firm, and flat
- Ring is centered on the back, overlapping 0.75 in (1.9 cm), with no sewing visible on the front
- Total length is 16.3 in (41.4 cm)
- All ends are secured and trimmed
Troubleshooting
The base cups or ruffles. If it cups, go up a hook size for Rnds 1–3. If it ruffles, go down a hook size. Keep the counts at 24, 36, and 48.
The scales stack in straight vertical columns. You worked shells into shells. The shells always go into the sc, and the sc always goes into the center dc.
The stitch count drifts away from 72. You probably missed the 2 sl sts at the start of the round, or you worked a shell into the joining sl st. Count 12 shells after every round.
The tube is twisting. Joined rounds can lean slightly. Block it on a tube, and keep each join tight.
The rim is wavy. Use dc only in the sc dips. If it’s still wavy, work Rim Rnd 2 with a hook one size smaller.
The bags won’t come out. Stretch the base hole gently with your fingers. If the hole is still smaller than 1.5 in (3.8 cm), remake the base starting with ch 18, and still work 24 sc into the ring.
The ring stretches out of shape. Pack Rnd 1 more tightly, or add a sl st round on the outer edge of the ring.
Care
Hand wash in cool water with mild soap, press out the water in a towel, and dry flat over a tube to keep the round shape. Don’t tumble dry, or the cotton may shrink unevenly.
Final Notes
The measurement chain is short and easy to check. A 4.3 in (10.9 cm) base of 48 sts gives you 12 shell repeats that are 6.75 in (17.1 cm) wide flat. 24 shell rounds bring the body to 12.5 in (31.8 cm). The 3-round rim levels the top back to 48 sts and finishes the body at 13.25 in (33.7 cm). A 3.8 in (9.7 cm) ring, sewn on with a 0.75 in (1.9 cm) overlap, makes the holder 16.3 in (41.4 cm) long. If your base and first 8 shell rounds match the checkpoints, the rest of the holder will come out to the right size.
Happy crocheting!