

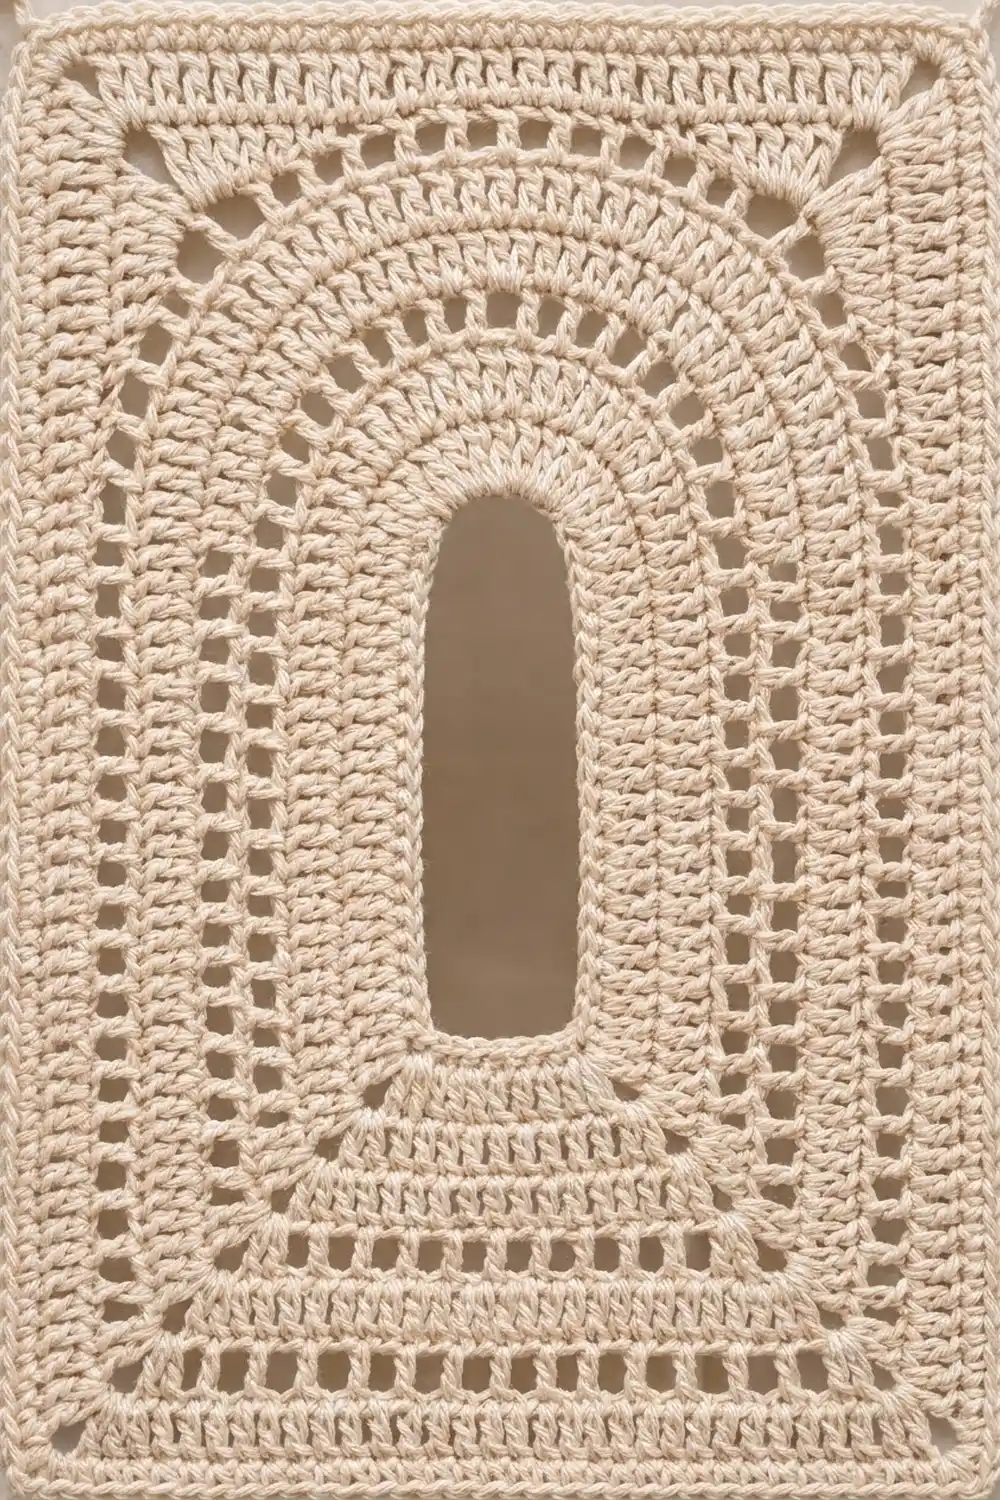
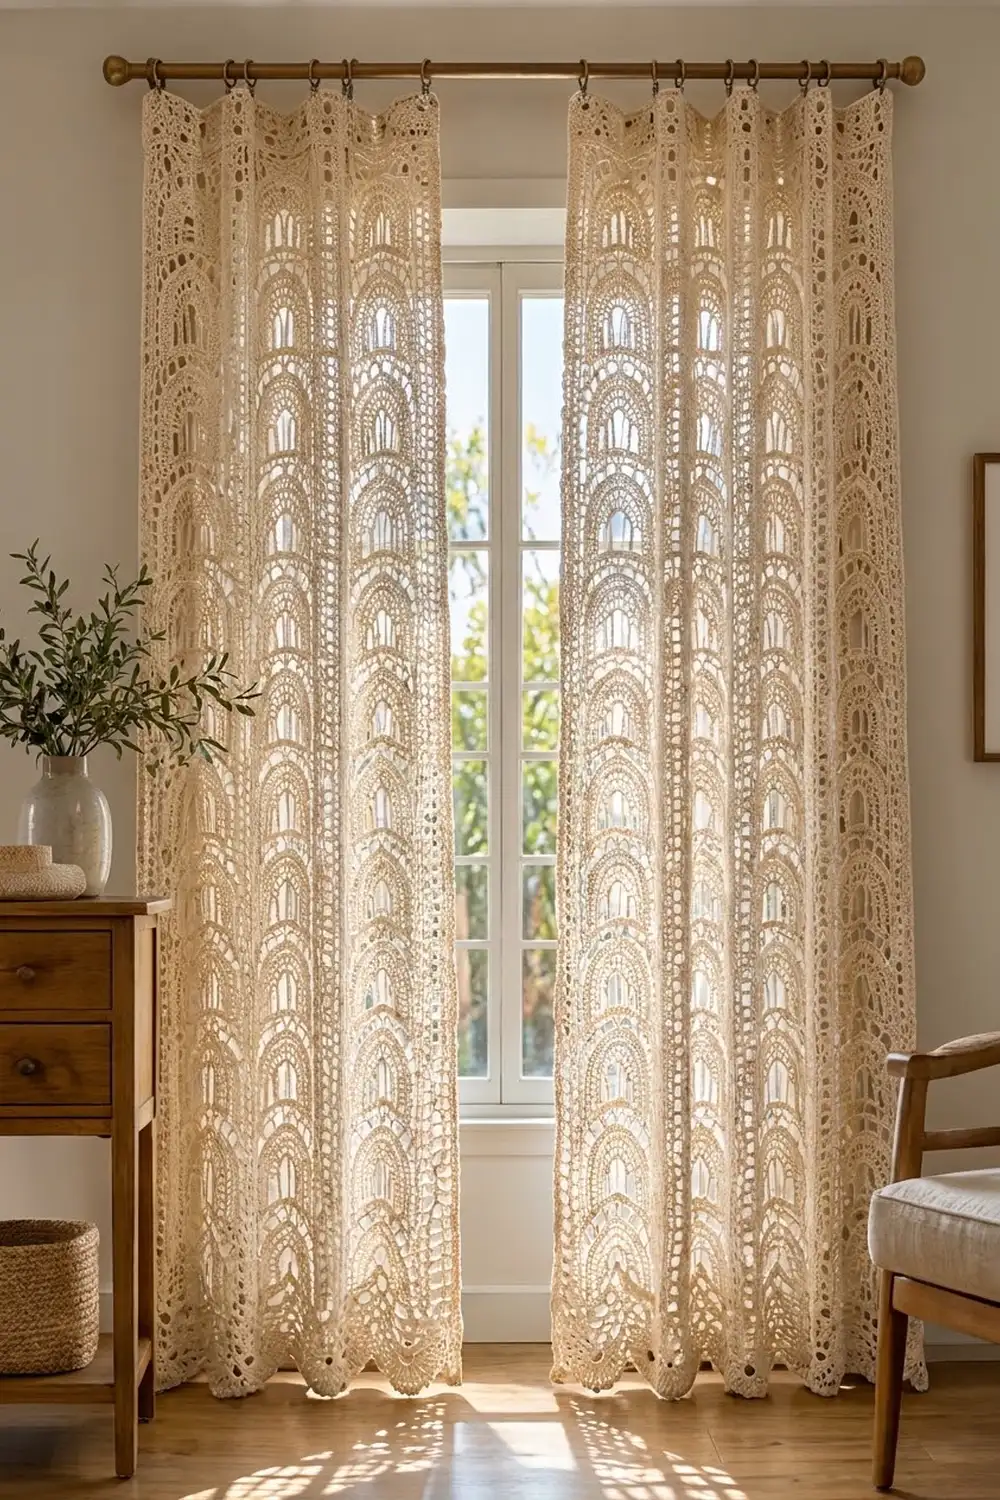
These lace curtains are built from one repeating motif: a tall arched window framed by bands of double crochet. When the motifs are joined in a grid, the arches stack into columns. In a sunny window they cast soft arched shadows on the floor.
The pattern uses one color, a natural cream cotton. That keeps the look calm and lets the openwork do the decorating. The style sits somewhere between vintage filet lace and modern boho. All instructions use US crochet terms.
Each finished panel measures 32 in (81.3 cm) wide and 90.5 in (229.9 cm) long, including the border. The pattern makes a pair, so you will make two identical panels.
Here is how each panel is built. You work 55 rectangular arch motifs in U-shaped rows around a chain, add a short bar under the window, then square off the top corners. Next you join the motifs into a 5 × 11 grid. A three-round border finishes the panel, and its last round puts scallops along the bottom edge.
Finished Size and Construction
- Finished size (each panel): 32 in × 90.5 in (81.3 cm × 229.9 cm)
- Skill level: Intermediate
- Terminology: US crochet terms
- Yarn weight: #4 worsted cotton
- Hook: 5.0 mm (H-8)
- Number of pieces: 110 motifs total (55 per panel), 2 panels
- Layout (per panel): 5 motifs wide × 11 motifs tall
- Motif size: 6 in × 8 in (15.2 cm × 20.3 cm)
- Panel size before border: 30 in × 88 in (76.2 cm × 223.5 cm)
- Border depth: 1 in (2.5 cm) on the top and sides; 1.5 in (3.8 cm) on the bottom, including scallops
Materials
Yarn: Use a smooth, mercerized or combed worsted-weight cotton or cotton blend. Cotton holds the arch shapes crisply and hangs well. Avoid fuzzy yarns, because they blur the lace.
- Natural Cream: 1,800 g (approx. 3,420 m / 3,740 yd), based on 100 g skeins of about 190 m each. One motif uses roughly 12 g (23 m).
These quantities include a margin of about 15% for gauge swatches, joining, and the border. Buy all the yarn from the same dye lot.
Tools:
– 5.0 mm (H-8) crochet hook
– Tapestry needle
– 4 stitch markers
– Scissors and tape measure
– Blocking mats or a large padded surface, rust-proof pins, and a spray bottle
– 24 curtain clip rings (12 per panel)
Abbreviations (US Terms)
- ch – chain
- sl st – slip stitch
- sc – single crochet
- hdc – half double crochet
- dc – double crochet
- tr – treble crochet (yarn over twice)
- dtr – double treble crochet (yarn over 3 times)
- sk – skip
- sp – space
- st(s) – stitch(es)
- RS / WS – right side / wrong side
- Row-end – the side edge of a row; work stitches around the post of the end stitch
Special stitch, the Corner Group: (sc, ch 2, sc) in the same stitch or space.
Counting rule: Every ch-1 inside a row counts as 1 stitch.
Gauge and Checkpoints
Gauge: 16 dc and 8 rows = 4 in (10.2 cm). 16 sc and 16 rows = 4 in (10.2 cm).
Make one complete motif before anything else. It is your gauge swatch, and it tells you more than a plain square would.
Checkpoints:
– After Row 4: the arch measures 5.5 in (14.0 cm) across the outer edges of the legs. The window is about 1.5 in (3.8 cm) wide and 4 in (10.2 cm) tall.
– After Row 8: the piece is a rectangle 5.5 in (14.0 cm) wide. It is 0.25 in (0.6 cm) smaller on every side than the finished motif.
– After the Edging Round: 6 in × 8 in (15.2 cm × 20.3 cm) after light blocking.
If the motif is too big, go down 0.5 mm in hook size. If it is too small, go up 0.5 mm. A motif that is off by 0.25 in (0.6 cm) adds up to about 2.75 in (7.0 cm) over 11 motifs, so fix gauge now.
Arch Motif (make 110)
The rows wrap around the window in a U shape. Place a marker in the first and last arch stitch of every row. The arch is always the middle section between the two straight legs.
Foundation: Ch 38.
Row 1 (RS): Dc in 4th ch from hook (the skipped ch count as the first dc), then dc in next 11 ch. That makes 13 sts for the leg. For the arch, work [2 dc in next ch, dc in next 4 ch] twice, which makes 12 sts from 10 ch. Dc in the last 13 ch for the second leg. Turn. (38 sts: 13 + 12 + 13)
Row 2 (WS):
– Leg: Ch 4 (counts as dc + ch 1), sk next st, dc in next st, [ch 1, sk next st, dc in next st] 5 times. (13 sts)
– Arch: [Dc in next st, ch 1, dc in next st] 6 times. (18 sts)
– Leg: Dc in next st, [ch 1, sk next st, dc in next st] 6 times. Work the last dc in the top of the turning ch. (13 sts)
– Turn. (44 sts)
Row 3 (RS):
– Leg: Ch 3 (counts as dc), dc in each of next 12 sts and ch-1 sps. (13 sts)
– Arch: [Dc in next dc, (dc, ch 1) in next ch-1 sp, dc in next dc] 6 times. (24 sts)
– Leg: Dc in each of next 13 sts. (13 sts)
– Turn. (50 sts)
Row 4 (WS):
– Leg: Work as for Row 2, first leg. (13 sts)
– Arch: [Dc in next dc, ch 1, dc in next ch-1 sp, dc in next 2 dc] 6 times. (30 sts)
– Leg: Work as for Row 2, second leg. (13 sts)
– (56 sts) Do not turn.
The legs stay straight because they never increase. The arch grows by 6 stitches per row, so it curves into a smooth half circle. Solid rows alternate with mesh and spoke rows to make the banded texture.
Bottom Bar
Rotate the piece so you can work along the bottom ends of the legs. This closes the window.
Row 5 (WS): Ch 3 (counts as dc) and dc in the row-end of Row 4. Work 2 dc in each of the next 3 row-ends (Rows 3, 2, 1), for 8 sts. Ch 6 across the window opening. Work 2 dc in each of the 4 row-ends of the other leg (Rows 1–4). Turn. (22 sts: 8 + 6 ch + 8)
Row 6 (RS): Ch 4 (counts as dc + ch 1), sk next st, dc in next st, [ch 1, sk next st, dc in next st] 9 times, dc in the top of the turning ch. Turn. (22 sts)
Row 7 (WS): Ch 3 (counts as dc), dc in each st and ch-1 sp across. (22 sts) Fasten off.
Row 8: Squaring the Top Corners
With the RS facing, join yarn with a sl st in the first arch st of Row 4, next to a leg. Count that sl st as position 1. Work across the 30 arch sts as follows:
- Sc in next st, hdc in next st, dc in next st, tr in next 2 sts, dtr in next st.
- (Dtr, ch 2, dtr) in next st for the corner.
- Tr in next 2 sts, dc in next st, hdc in next st, sc in next 2 sts, sl st in next 2 sts (the top center).
- Sc in next 2 sts, hdc in next st, dc in next st, tr in next 2 sts.
- (Dtr, ch 2, dtr) in next st for the corner.
- Dtr in next st, tr in next 2 sts, dc in next st, hdc in next st, sc in next st, sl st in last arch st.
(32 sts + 2 ch-2 corner sps) That is 30 positions plus 2 extra sts from the corners. Do not fasten off.
The stitches grow tallest at the diagonals, where the gap between the arch and the corner is deepest. They drop back to sl sts at the top center and at the leg tops, where the arch already touches the edge of the rectangle.
Edging Round
Ch 1. Then work around the motif in this order:
- Sc in each of the 13 sts along the leg. (13)
- 3 sc in each of the next 2 row-ends (Rows 5 and 6). (6)
- Corner Group in the Row 7 row-end.
- Sc in each of the 22 sts of Row 7. (22)
- Corner Group in the Row 7 row-end at the other side.
- 3 sc in each of the next 2 row-ends (Rows 6 and 5). (6)
- Sc in each of the 13 sts along the other leg. (13)
- Sc in next 5 sts, then 2 sc in each of next 3 sts: tr, dtr, and the first dtr of the corner. (11)
- Corner Group in the ch-2 sp.
- Top edge: 2 sc in next dtr, 2 sc in each of next 2 tr, sc in next 10 sts, 2 sc in each of next 2 tr, 2 sc in next dtr. (22)
- Corner Group in the ch-2 sp.
- 2 sc in each of next 3 sts, then sc in next 5 sts. (11)
- Sl st to the first sc. Fasten off and weave in the ends.
Count: Each long side has 11 + 13 + 6 = 30 sc between corners. With its 2 corner sc, that makes 32 sts per long side. Each short side has 22 + 2 = 24 sts per short side. The round totals 112 sc plus 4 ch-2 corner sps.
In this pattern, a side’s stitch count includes its 2 corner sc. The ch-2 corner spaces are not counted.
Make All Pieces
Make 110 motifs, all in Natural Cream: 55 for each panel. Lightly steam or wet-block every motif to 6 in × 8 in (15.2 cm × 20.3 cm) before joining. Keep every arch pointing toward the top of the panel.
Layout (per panel, A = arch motif, arches pointing up):
TOP (rod edge)
A A A A A
A A A A A
A A A A A
A A A A A
A A A A A
A A A A A
A A A A A
A A A A A
A A A A A
A A A A A
A A A A A
BOTTOM (scalloped edge)
Joining
Method: Use a flat slip-stitch join. Hold two motifs with their RS together, or side by side with the RS up, and work through the back loops of both.
Step 1, columns: Join the top edge of one motif to the bottom edge of the next. Sl st through both corner ch-2 sps, then through each of the 24 matching sc pairs, then through the next corner sps. Build 5 columns of 11 motifs each.
Step 2, panel: Join the columns along their long edges. Each column side has 11 × 32 = 352 sc, and you match them stitch for stitch. Where 4 motif corners meet, sl st through all of the corner sps together.
Tension: Keep the slip stitches as loose as the motif stitches. Tight seams pucker the lace and shorten the panel.
Size checkpoint: After joining, the panel measures 30 in × 88 in (76.2 cm × 223.5 cm).
Border
Border gauge: 16 sc = 4 in (10.2 cm); 16 dc = 4 in (10.2 cm).
Starting counts: The top and bottom edges each have 5 × 24 = 120 sts. Each long side has 11 × 32 = 352 sts. No stitches are added at the seams.
Round 1 (sc): Join yarn in the top-right corner sp. Sc in each sc along every edge. Skip the joined corner sps at the seams. Work a Corner Group in each of the 4 outer corner sps.
– Top and bottom: 120 sts worked 1-per-stitch + 2 corner sc = 122 sts.
– Long sides: 352 + 2 = 354 sts.
– Sl st to the first sc.
Round 2 (dc): Sl st into the corner sp. Ch 3 (counts as dc), (ch 2, dc) in the same sp. Dc in each st around, and work (dc, ch 2, dc) in each corner sp.
– Top and bottom: 122 + 2 = 124 sts.
– Long sides: 354 + 2 = 356 sts.
– Sl st to the top of the ch-3.
Round 3 (finishing and scallops):
– Top and long sides: Sc in each st, with a Corner Group in each corner sp. Top: 124 + 2 = 126 sts. Sides: 356 + 2 = 358 sts.
– Bottom edge: Corner Group in the corner sp. Work [sk 1, 3 tr in each of next 2 sts, sk 1, sc in next st] 24 times. Then sk 1, 3 tr in each of next 2 sts, sk 1, and work a Corner Group in the corner sp. (25 scallops)
– Sl st to the first sc and fasten off.
Why the math works: Each scallop repeat uses 5 positions. The bottom edge has 124 dc plus the closing corner sp, which gives 125 positions, and 125 = 5 × 25. So the scallops start and end exactly in the corner spaces, symmetric from both sides.
On the top and sides, the border adds 0.25 + 0.5 + 0.25 = 1 in (2.5 cm). On the bottom, it adds 0.25 + 0.5 + 0.75 = 1.5 in (3.8 cm).
Final Blocking
- Soak the panel in cool water for 15 minutes, then gently press out the water. Do not wring it.
- Roll it in towels to remove more moisture.
- Lay it flat and pin it to 32 in × 90.5 in (81.3 cm × 229.9 cm). If your blocking surface is smaller, block it in sections.
- Pin the top of every arch, the corners of every window, and every scallop point.
- Check that the columns run straight and the edges stay parallel.
- Let it dry completely before unpinning.
- Clip 12 rings along the top edge: one at each corner and the rest spaced about every 2.9 in (7.4 cm).
Final Quality-Control Checklist
- Every motif measures 6 in × 8 in (15.2 cm × 20.3 cm).
- Every arch points toward the top edge.
- Each motif has 24 sts on the short sides and 32 sts on the long sides.
- The seams lie flat and have no puckers.
- The border counts are right: Round 1 has 122 / 354 sts, and Round 2 has 124 / 356 sts.
- The bottom edge has 25 even scallops.
- All ends are woven in securely along solid dc sections.
- Both panels match in length to within 0.5 in (1.3 cm).
Troubleshooting
- The arch ripples: You probably added too many stitches. Recount the arch section (12, 18, 24, 30).
- The arch cups: Your gauge is tight, or you missed an increase. Go up 0.5 mm in hook size.
- The window is lopsided: The leg counts don’t match. Each leg must have 13 sts in every row.
- The top corners won’t sit flat: Check the stitch heights in Row 8 and keep the dtr loose.
- The panel is too long: Your seams are too loose. Work a firmer sl st.
- The scallops are crowded: Recount Round 2 on the bottom edge. It must be exactly 124 sts.
Care
Hand wash in cool water with mild soap and dry flat, reshaping the arches while damp. Avoid hanging the panels wet, because the weight will stretch them.
Final Notes
The measurement chain is straightforward:
– Each motif is 6 in × 8 in (15.2 cm × 20.3 cm), with 24 × 32 sts per side.
– Five motifs across make 120 sts and 30 in (76.2 cm).
– Eleven motifs down make 352 sts and 88 in (223.5 cm).
– The border adds 1 in (2.5 cm) on the top and sides and 1.5 in (3.8 cm) on the bottom.
– The finished panel is 32 in × 90.5 in (81.3 cm × 229.9 cm).
Check your gauge on the first motif and the whole pair will come out the right size. Happy crocheting!