

These lace curtain panels are a pair of airy curtains made from yellow butterfly motifs. Light comes through the open wing centers and the gaps between the motifs, so the window looks like it is full of butterflies.
Each butterfly has two big rounded upper wings, two smaller teardrop lower wings, a raised segmented body and two antennae with bobble tips. The whole curtain uses one buttery yellow, which keeps it bright and simple. The pattern uses US crochet terms throughout.
Each finished panel is 10 in (25.4 cm) wide and 38.25 in (97.2 cm) tall, including the hanging tabs. One panel uses 16 motifs set in a grid 2 wide and 8 tall, and you make two panels.
Construction overview: Work the wing frames and wing rounds in one continuous piece. Make the body and antennae separately and sew them on. Join the motifs as you go at their wing-tip picots. Finally, work a heading band and tabs across the top of each panel.
Finished Size and Construction
- Finished panel size: 10 in × 38.25 in (25.4 cm × 97.2 cm) including tabs
- Skill level: Intermediate
- Terminology: US
- Yarn weight: #4 worsted/aran cotton or cotton blend
- Hooks: 4.5 mm (US 7) for the wings and band; 3.5 mm (US E-4) for the bodies
- Number of pieces: 32 butterfly motifs (16 per panel)
- Layout: 2 motifs wide × 8 motifs tall per panel
- Motif size: 5 in (12.7 cm) wide × 4.5 in (11.4 cm) tall, measured from wing tip to wing tip
- Panel size before border: 10 in × 36 in (25.4 cm × 91.4 cm)
- Border depth: the heading band is 1 in (2.5 cm) and the tab loops add 1.25 in (3.2 cm)
Materials
Choose a smooth, mercerized or matte cotton with good stitch definition. Cotton holds its shape in sunlight and blocks crisply, which matters for open lace. Avoid fuzzy yarns because they blur the wing openings.
- Buttercup Yellow: 350 g / 595 m (about 85 m per 50 g ball, so 7 balls)
Tools:
– 4.5 mm (US 7) and 3.5 mm (US E-4) crochet hooks
– Tapestry needle
– Stitch markers
– Rust-proof pins and a blocking mat
– Small scraps of the same yarn for stuffing the bodies
– Measuring tape
Note: The quantities include a margin of about 30% for gauge swatches, tails and differences in tension.
Abbreviations (US Terms)
- ch – chain
- sl st – slip stitch
- sc – single crochet
- hdc – half double crochet
- dc – double crochet
- sc2tog – single crochet 2 together
- BLO – back loop only
- MR – magic ring
- sp – space
- st(s) – stitch(es)
- RS – right side
Special stitches:
– 3-dc bobble: [Yarn over, insert hook in the st, pull up a loop, yarn over, pull through 2 loops] 3 times in the same st. Then yarn over and pull through all 4 loops on the hook.
– Picot join (PJ): Ch 2, sl st in the ch-4 picot of the neighboring motif, ch 2. This replaces the ch 4 of a tip picot.
Gauge and Checkpoints
Make one complete motif before you start the panels.
Motif checkpoints (4.5 mm hook):
– After Rnd 3: about 3.75 in (9.5 cm) wide × 3.25 in (8.3 cm) tall
– After Rnd 4: about 4.5 in (11.4 cm) wide × 4 in (10.2 cm) tall
– After Rnd 5, lightly blocked: 5 in (12.7 cm) wide × 4.5 in (11.4 cm) tall, picot tip to picot tip
Band gauge: 16 sc and 16 rows = 4 in (10.2 cm).
If your motif is more than 0.25 in (0.6 cm) too big, go down a hook size (0.5 mm). If it is too small, go up a size. A small error adds up quickly: 8 motifs that are each 0.25 in (0.6 cm) too tall make the panel 2 in (5.1 cm) too long.
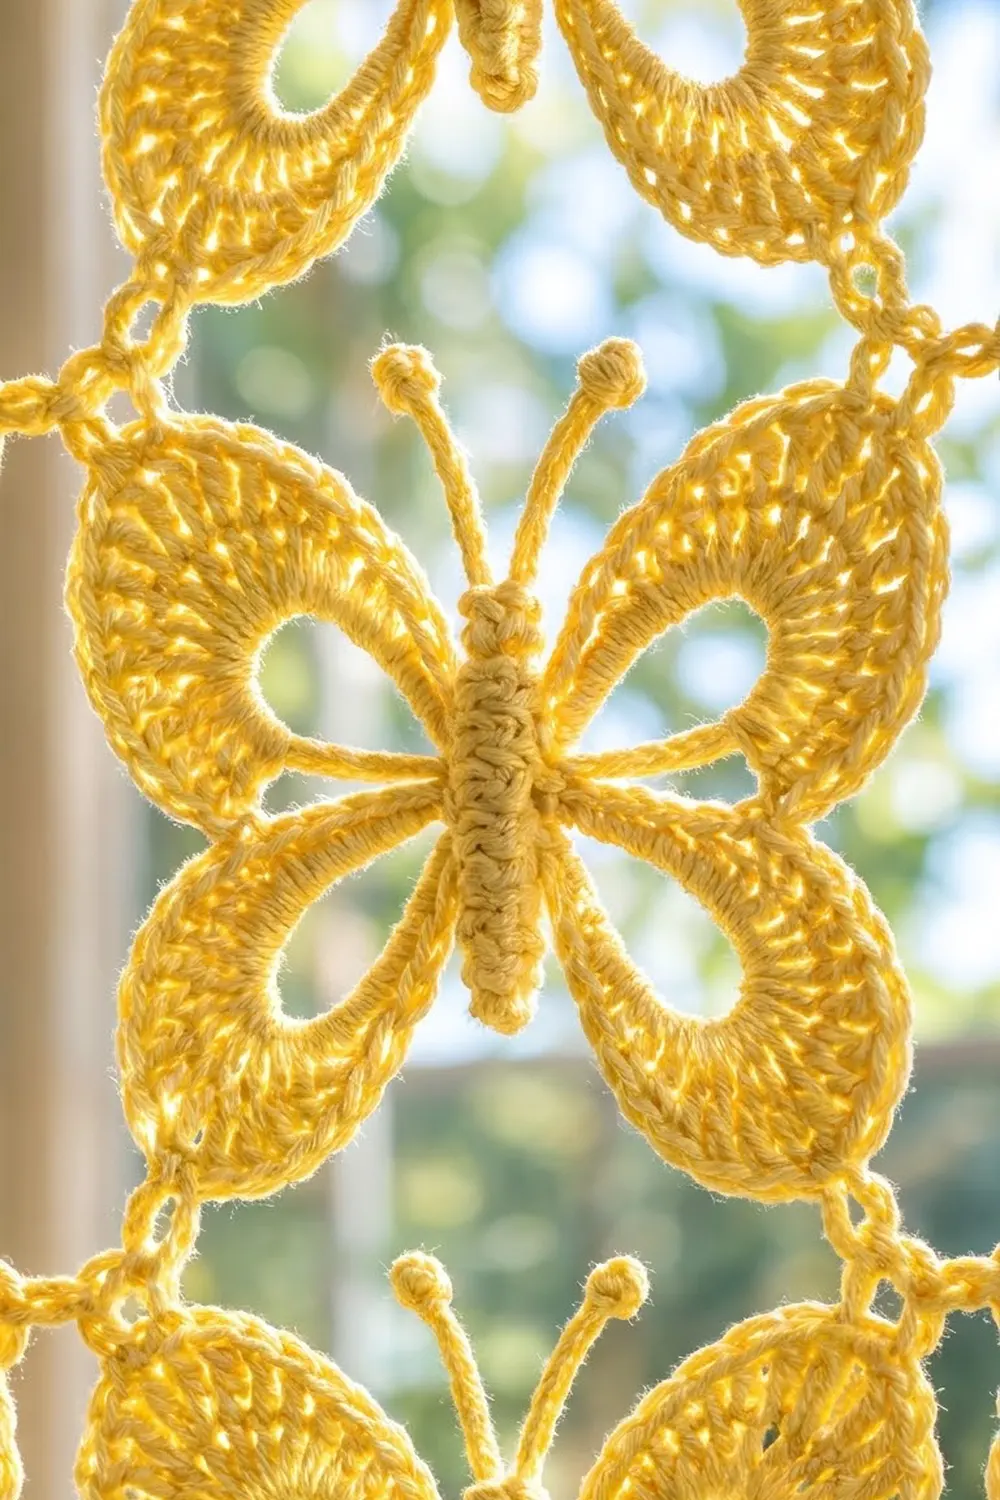
Butterfly Motif (make 32)
Use the 4.5 mm hook.
Rnd 1 (center ring): Ch 8, sl st in first ch to form a ring. Ch 1, work 12 sc in the ring, sl st in first sc. (12 sc)
Rnd 2 (wing frames):
– Ch 16, skip next 2 sc, sl st in next sc (upper-left loop).
– Ch 12, skip 2 sc, sl st in next sc (lower-left loop).
– Ch 12, skip 2 sc, sl st in next sc (lower-right loop).
– Ch 16, skip 2 sc, sl st in the same sc as the Rnd 1 join (upper-right loop).
(4 loops: 2 ch-16 and 2 ch-12, anchored by 4 sl sts)
The sl sts become the anchor points between the wings. The chains will form the open centers of the wings.
Rnd 3 (wing fill): Work every stitch into the loop space, around the chain.
– Upper-left loop: 2 sc, 2 hdc, 21 dc, 2 hdc, 2 sc (29 sts). Sl st in the next anchor.
– Lower-left loop: 2 sc, 2 hdc, 13 dc, 2 hdc, 2 sc (21 sts). Sl st in the next anchor.
– Lower-right loop: repeat the lower-left loop (21 sts). Sl st in the next anchor.
– Upper-right loop: repeat the upper-left loop (29 sts). Sl st in the first anchor.
Total: 29 + 21 + 21 + 29 = 100 sts.
The dc fan out from the chain, and the chain stays open as a teardrop window.
Rnd 4 (shaping and tip loops):
– Upper wing (29 sts):* Sc in next 4, hdc in next 4, [2 dc in next st, dc in next st] 3 times, (dc, ch 5, dc) in next st, [dc in next st, 2 dc in next st] 3 times, hdc in next 4, sc in next 4. This gives 36 sts plus a ch-5 tip loop.
– Lower wing (21 sts):** Sc in next 3, hdc in next 3, [2 dc in next, dc in next] 2 times, (dc, ch 5, dc) in next st, [dc in next, 2 dc in next] 2 times, hdc in next 3, sc in next 3. This gives 26 sts plus a ch-5 tip loop.
Work the wings in order: upper-left, lower-left, lower-right, upper-right. Sl st in the sl st between each pair of wings, and end with a sl st in the first sl st.
Total: 36 + 26 + 26 + 36 = 124 sts + 4 ch-5 tip loops.
The middle (dc, ch 5, dc) of each wing points outward on the diagonal, so the 4 tip loops land at the 4 corners of the butterfly.
Rnd 5 (raised edge and picots):
– Upper wing: Sc in each st to the tip loop, (2 sc, ch 4, 2 sc) in the ch-5 loop, then sc in each remaining st. This gives 36 + 4 = 40 sc.
– Lower wing: Work the same way: 26 + 4 = 30 sc.
– Sl st in the sl st between wings, as in Rnd 4.
Total: 140 sc + 4 ch-4 picots. Fasten off and weave in the ends.
For join-as-you-go motifs, replace the ch 4 with a PJ. The sc count stays at 140.
Body and Antennae (make 32)
Use the 3.5 mm hook.
- Rnd 1: 6 sc in MR. (6)
- Rnd 2: [2 sc in next st, sc in next st] 3 times. (9)
- Rnds 3–12: Sc around. (9) Work Rnds 4, 7 and 10 in BLO. The unused front loops form the segment ridges.
- Rnd 13: [Sc2tog, sc in next st] 3 times. (6)
Stuff the body lightly with scraps and close the opening. The body is about 2.25 in (5.7 cm) long.
Antennae: Join yarn at Rnd 2 (the head). Ch 10, work a 3-dc bobble in the 4th ch from the hook, sl st in each of the next 6 ch, and sl st in the head. Repeat for the second antenna right beside the first. Each antenna is about 1.25 in (3.2 cm) long.
Attach: Sew the body over the center ring with the head between the upper wings. Make sure it covers all 4 anchors.
Make All Pieces
- Buttercup Yellow: 32 motifs and 32 bodies (16 of each per panel)
Layout for each panel (M = motif; numbers show the joining order):
[ band and tabs ]
 M1   M2
 M3   M4
 M5   M6
 M7   M8
 M9   M10
 M11  M12
 M13  M14
 M15  M16
Make both panels separately. They are not joined to each other.
Joining
Join the motifs as you go during Rnd 5, at the wing-tip picots.
Stitch-to-stitch logic:
– Work M1 completely.
– On M2, when you reach its upper-left tip, work (2 sc, PJ into M1’s upper-right picot, 2 sc). Do the same at M2’s lower-left tip, joining it to M1’s lower-right picot.
– M3 joins its upper-left and upper-right tips to M1’s lower-left and lower-right picots.
– M4 joins three tips:
– its upper-left tip to the 4-way point
– its upper-right tip to M2’s lower-right picot
– its lower-left tip, later, to M6
Four-way points: Every PJ at a shared point goes into the ch-4 picot of the first motif made at that point. All the joins gather in one loop and make a neat cluster.
Tension: Keep the ch 2s of each PJ the same size as a ch 2 in a normal picot. Pulling them tight puckers the corners. Leaving them loose creates gaps between motifs.
Size checkpoint: Lay a finished panel flat before you add the band. It should measure 10 in (25.4 cm) wide and 36 in (91.4 cm) tall. That is 2 motifs × 5 in (12.7 cm) wide and 8 motifs × 4.5 in (11.4 cm) tall.
The antennae of each lower motif lie loosely in the gap between the lower wings of the motif above it. Do not sew them down.
Border: Top Heading Band and Tabs
Border gauge: 16 sc and 16 rows = 4 in (10.2 cm), using the 4.5 mm hook.
Row 1 (foundation): With the RS facing, join yarn in the upper-right tip loop of the top-right motif. Work across that motif as follows:
– sc in the tip loop
– ch 6
– sc around the right antenna stem, just below the bobble
– ch 4
– sc around the left antenna stem
– ch 6
– sc in the upper-left tip loop
That is 1 + 6 + 1 + 4 + 1 + 6 + 1 = 20 sts for one motif.
Repeat across the second motif, starting with an sc in its own upper-right tip loop. Where the two motifs meet, each one has its own loop: one motif has a ch-4 picot and the other has a PJ arc. Work 1 sc into each, so the 2 sc sit side by side. (2 motifs × 20 = 40 sts)
Row 2: Ch 1, turn. Sc in each sc and each ch across. (40 sc)
Rows 3–4: Ch 1, turn. Sc across. (40 sc)
The band is now 4 rows = 1 in (2.5 cm) deep.
Why the math works: Each motif is 5 in (12.7 cm) wide. At 4 sts per inch, that needs 20 sts, and the foundation gives exactly 20 sts per motif. No seam stitches are added, so the 40 sts lie flat across 10 in (25.4 cm).
Tabs (Rows 5–14): The 40 sts are split into 5 tabs of 4 sts with 4 gaps of 5 sts (5 × 4 + 4 × 5 = 40). Use these stitch positions:
| Part | Stitches |
|---|---|
| Tab 1 | 1–4 |
| Gap | 5–9 |
| Tab 2 | 10–13 |
| Gap | 14–18 |
| Tab 3 | 19–22 |
| Gap | 23–27 |
| Tab 4 | 28–31 |
| Gap | 32–36 |
| Tab 5 | 37–40 |
For each tab, join yarn and work 4 sc on that tab’s stitches for 10 rows: 2.5 in (6.4 cm). Fasten off and leave a 10 in (25.4 cm) tail. Fold the tab to the back and sew its last row to the back of the tab’s base. This makes a loop 1.25 in (3.2 cm) tall that fits a rod up to 0.75 in (1.9 cm) in diameter.
Final Blocking
- Soak each panel in cool water for 15 minutes, then press out the water in a towel. Do not wring it.
- Pin the panel to 10 in (25.4 cm) wide. The band should measure 37 in (94.0 cm) from its top edge to the bottom wing tips.
- Pin every wing-tip picot. Use 2 more pins on each upper wing to round the curve.
- Push each wing’s open center into a clear teardrop with your fingertip.
- Straighten the bodies and antennae, and puff the bobble knobs.
- Let the panel dry completely, then unpin it. Hang it to check that it falls straight.
Final Quality-Control Checklist
- Every motif has 140 sc in Rnd 5 and 4 tip picots.
- All wing centers are open and the same size.
- Every 4-way point has its joins gathered in one picot.
- Each body covers its center ring and sits straight.
- Band Rows 1–4 each have 40 sts.
- All 5 tabs are 4 sts wide and evenly spaced.
- Each panel measures 10 in × 38.25 in (25.4 cm × 97.2 cm).
- The ends are woven in securely, with no visible tails.
Troubleshooting
- Wings cup: Your Rnd 4 is too tight. Go up 0.5 mm for Rnds 4–5 only.
- Wings ruffle: You have too many sts in Rnd 3. Recount to 29 or 21 per wing.
- Wing center closes up: Your Rnd 2 chains are too tight. Chain more loosely, or use a hook 0.5 mm larger for the chains only.
- Band puckers: The Row 1 chains are too short. Check that there are 20 sts per motif.
- Band ripples: The chains are too loose. Go down a hook size for Row 1.
- Corners twist: One PJ was worked into the wrong picot. Undo it and rejoin it to the first motif’s picot.
- Floppy body: Use the smaller hook, or add a little more stuffing.
Care
Hand wash in cool water with a mild detergent and dry flat. Reshape and pin the picots while the panel is damp.
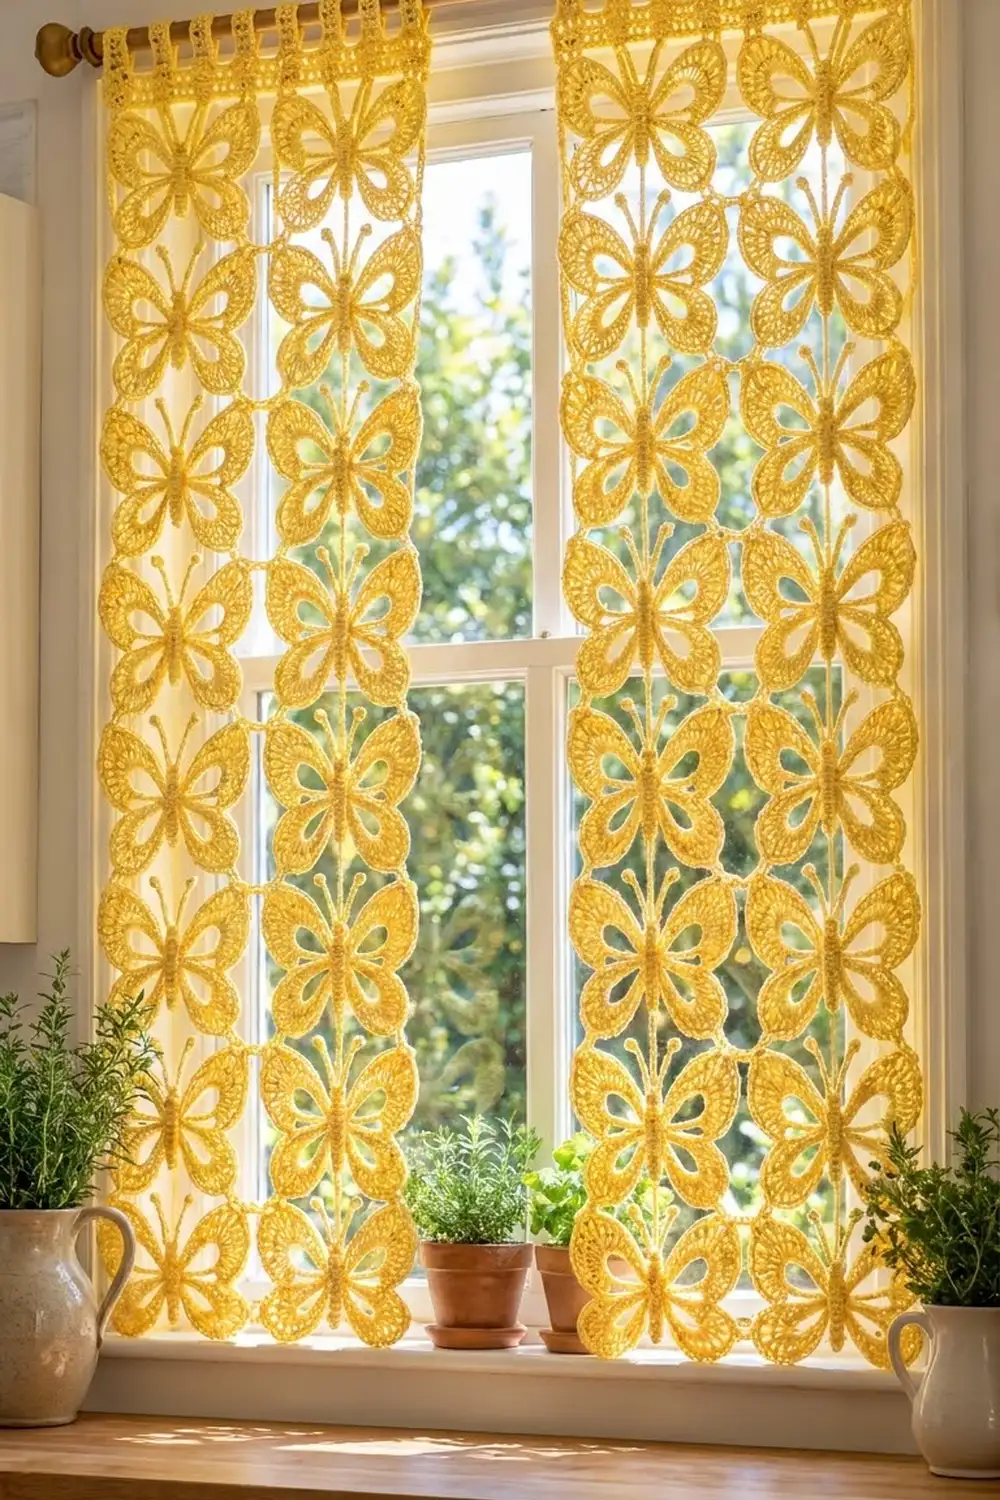
Final Notes
The measurements build on each other:
– Each motif is 5 in × 4.5 in (12.7 cm × 11.4 cm).
– Joined, the motifs make a 10 in × 36 in (25.4 cm × 91.4 cm) panel.
– The 1 in (2.5 cm) band brings the panel to 37 in (94.0 cm).
– The tab loops bring it to 38.25 in (97.2 cm).
Check your measurements at each stage and the finished panels will hang straight and match each other. Happy crocheting!