

The Rosewood Pines curtain is a lacy, light-filtering panel built from small, tiered Christmas trees in one soft dusty rose. When the panel hangs in a window, the open gaps between the trees glow with daylight. Up close, each tree shows three stepped tiers, two delicate eyelet bands, and a neat little trunk.
The look is modern and gentle rather than loud: it’s festive without red and green, and it suits a bedroom, a reading nook, or a glass door all winter long. Because it’s a single color, the texture of the stitches does all the work.
This pattern uses US crochet terms. One finished panel measures 37.3 in (94.7 cm) wide × 85.2 in (216.4 cm) tall. The photographed pair is two identical panels.
Construction is simple and has few ends to weave in. Each vertical column of 12 trees is crocheted as one continuous strip, with each trunk chaining straight into the tip of the next tree. Each new column is joined to the previous one as you go, with a short chain link at the bottom tier corners. A four-row heading across the top catches every column and takes curtain clip rings.
Finished Size and Construction
- Finished panel size: 37.3 in (94.7 cm) wide × 85.2 in (216.4 cm) tall
- Skill level: Intermediate (simple stitches, careful counting)
- Terminology: US
- Yarn weight: DK (#3), cotton or cotton blend
- Hook: 4.0 mm (G-6)
- Number of pieces: 96 tree motifs per panel (192 for a pair)
- Layout: 8 columns × 12 trees
- Single tree size: 3.8 in (9.7 cm) wide × 6 in (15.2 cm) tall
- Size before border: 36.7 in (93.2 cm) wide × 84 in (213.4 cm) tall
- Border (top heading) depth: 1.2 in (3.0 cm)
Materials
Choose a smooth, mercerized or matte DK cotton. Cotton holds the tree shapes crisply and doesn’t stretch as much as acrylic over a long drop. Avoid fuzzy yarns, because they blur the eyelets.
- Dusty rose DK cotton: 350 g / 805 m (880 yd) per panel; 700 g / 1610 m (1760 yd) for a pair
Tools:
- 4.0 mm (G-6) crochet hook
- Tapestry needle
- Stitch markers
- Rust-proof pins and a blocking board or foam mats
- Spray bottle
- Measuring tape
- 9 curtain clip rings per panel
Each tree uses about 3 g / 7 m including its links. The quantities above include a margin of roughly 15% for swatching and tails.
Abbreviations (US Terms)
- ch – chain
- sl st – slip stitch
- sc – single crochet
- dc – double crochet
- st(s) – stitch(es)
- sk – skip
- sp – space
- tch – turning chain
- RS – right side
Special stitch – Link Join: Ch 2, sl st in the top of the beginning ch-3 of Row 12 on the neighboring tree, ch 2, sl st in the top of the last dc you made.
Counting note: The ch-3 at the start of a row counts as 1 dc. In eyelet rows, each ch-1 counts as 1 st.
Gauge and Checkpoints
Gauge: 18 dc × 10 rows = 4 in (10.2 cm) in a dc swatch.
Make one complete tree before committing to the whole panel, and measure it at each stage:
- After Row 4: 9 sts, 2 in (5.1 cm) wide, 1.6 in (4.1 cm) tall
- After Row 8: 13 sts, 2.9 in (7.4 cm) wide, 3.2 in (8.1 cm) tall
- After Row 12: 17 sts, 3.8 in (9.7 cm) wide, 4.8 in (12.2 cm) tall
- Trunk: 1.1 in (2.8 cm) wide × 1.2 in (3.0 cm) tall
- Full tree: 6 in (15.2 cm) tall
A tolerance of ±0.1 in (0.3 cm) on the tree width is fine. If your tree is wider than 3.9 in (9.9 cm), go down half a hook size. If it’s narrower than 3.7 in (9.4 cm), go up half a size. If only the height is off, adjust how far you pull up each dc loop rather than changing hooks.
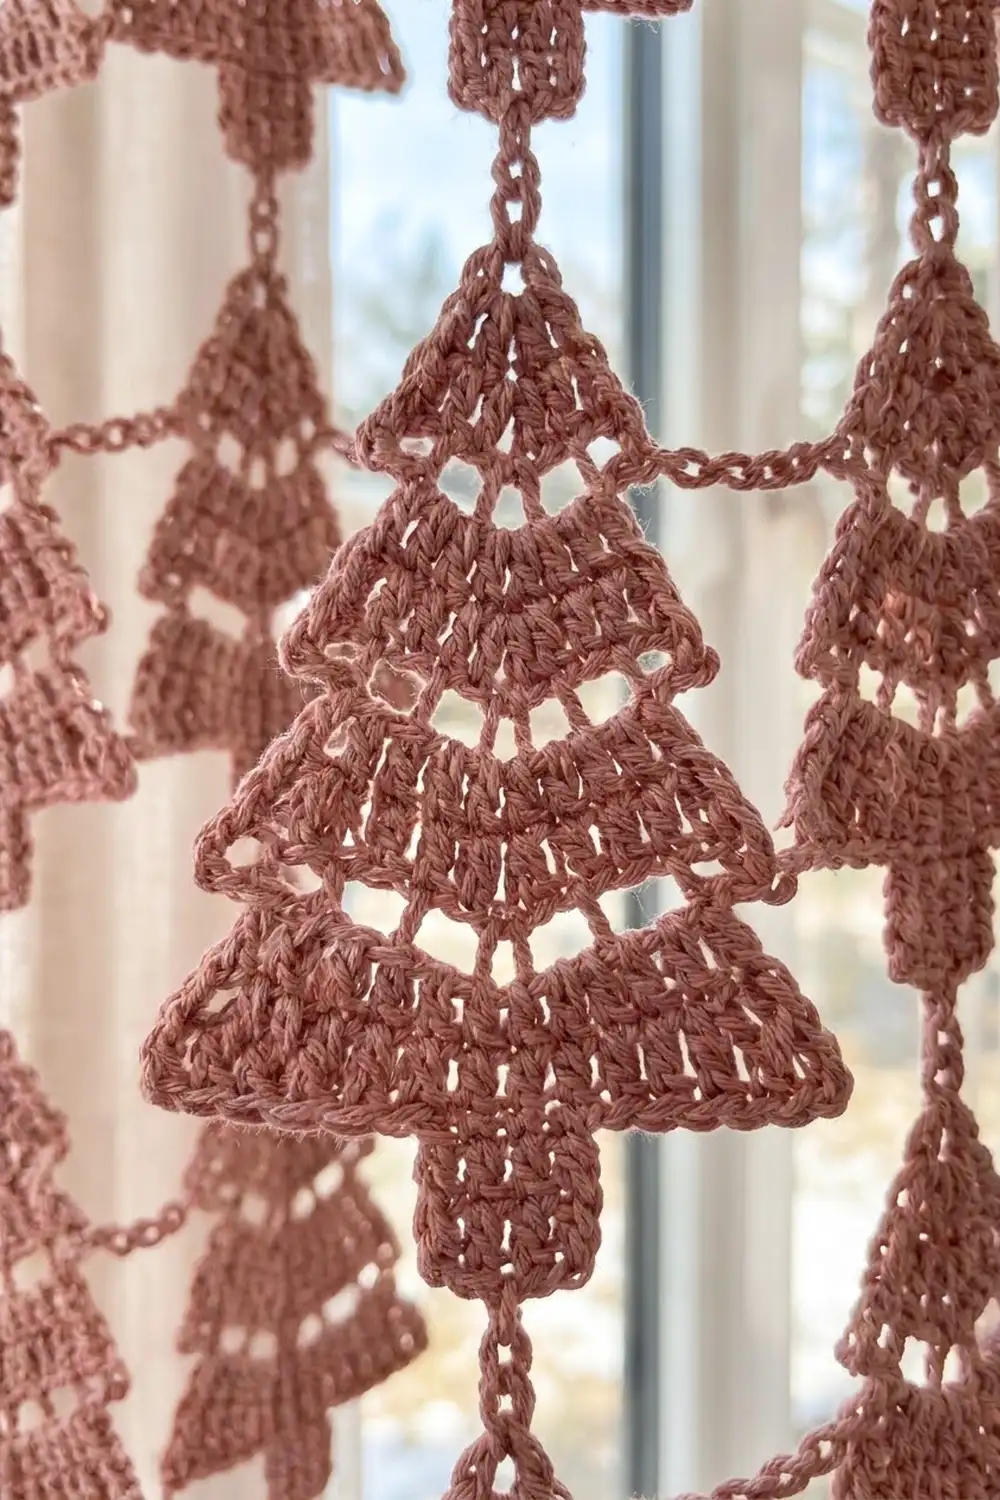
Tree Motif (Worked as a Continuous Column)
Each column is one strip: a top link, then 12 trees, with a 5-ch link between each trunk and the next tip.
Start of column: Leaving a 6 in (15.2 cm) tail, ch 9. Chs 1–5 form the top link to the heading; chs 6–9 begin the first tree.
Tier 1
Row 1: 2 dc in 4th ch from hook. Turn. (3 sts)
Row 2: Ch 3, dc in first st, dc in next st, 2 dc in top of tch. Turn. (5 sts)
Row 3: Ch 3, dc in first st, dc in each st to tch, 2 dc in top of tch. Turn. (7 sts)
Row 4: Repeat Row 3. Turn. (9 sts)
Tier 2
Row 5 (step + eyelet row): Sl st in each of first 3 sts. Ch 3 (counts as dc in 3rd st) and dc in the same st. [Ch 1, sk next st, dc in next st] 2 times. Dc again in the same st. Leave the last 2 sts unworked. Turn. (7 sts: 5 dc + 2 ch-1 sps)*
The 2 sts left unworked at each end form the overhang of Tier 1. The 2 ch-1 sps form the first eyelet band.
Row 6: Ch 3, dc in first st, dc in each dc and each ch-1 sp across to tch, 2 dc in top of tch. Turn. (9 sts)
Row 7: Repeat Row 3. (11 sts)
Row 8: Repeat Row 3. (13 sts)
Tier 3
Row 9 (step + eyelet row): Sl st in each of first 3 sts. Ch 3 (counts as dc in 3rd st) and dc in the same st. [Ch 1, sk next st, dc in next st] 4 times. Dc again in the same st. Leave the last 2 sts unworked. Turn. (11 sts: 7 dc + 4 ch-1 sps)*
Row 10: Work as Row 6. (13 sts)
Row 11: Repeat Row 3. (15 sts)
Row 12: Repeat Row 3. (17 sts) From the second column onward, finish this row with a Link Join (see Joining).
Trunk
Row 13: Sl st in each of first 7 sts. Ch 3 (counts as dc in 7th st), dc in each of next 4 sts. Leave the remaining 6 sts unworked. Turn. (5 sts)
This leaves 6 free sts on each side of the trunk (6 + 5 + 6 = 17), so the trunk sits exactly in the center.
Rows 14–15: Ch 3, dc in each st across. Turn. (5 sts)
Link to the Next Tree
Sl st in each of first 3 sts, which puts you at the trunk’s center st. Ch 9, then work Row 1 of the next tree in the 4th ch from hook. Chs 1–5 form the 1 in (2.5 cm) vertical link.
Repeat until the column has 12 trees. After Row 15 of the 12th tree, fasten off. The bottom of the curtain is left as free trunks.
Column checkpoint: The first 3 trees plus their 2 links measure 20 in (50.8 cm).
Make All Pieces
All pieces are in dusty rose:
- 8 columns of 12 trees = 96 trees per panel
- 192 trees for the pair shown
Layout for one panel (T = tree; ↕ = vertical 5-ch link; – = Link Join):
Heading (168 sts)
 ↕  ↕  ↕  ↕  ↕  ↕  ↕  ↕
 T– T– T– T– T– T– T– T     Row 1 of trees
 ↕  ↕  ↕  ↕  ↕  ↕  ↕  ↕
 T– T– T– T– T– T– T– T     Row 2
 ...                         (repeat)
 T– T– T– T– T– T– T– T     Row 12 (trunks free)
Joining
Method: Join-as-you-go with the Link Join at the bottom corners of Tier 3.
Make the first column completely, with no joins. Lay it RS up with the tips pointing toward the top. Each new column is placed to the left of the finished work. Row 12 always ends at the tree’s right corner, so the new tree’s right corner sits right next to the left corner of its neighbor’s Row 12. Left-handed crocheters work the mirror image, adding columns to the right.
Stitch-to-stitch logic:
- Finish Row 12 as normal, ending with 2 dc in top of tch.
- Ch 2.
- Sl st into the top of the beginning ch-3 of Row 12 on the neighboring tree in the same tree row.
- Ch 2, then sl st in the top of the last dc you made.
- Turn and continue with Row 13 as written.
The link adds no stitches to either tree, so Row 13 still starts on 17 sts.
Tension: Keep the link chains the same size as your vertical link chains. Tight links pucker the trees together; loose links let the columns sag. Before each join, check that the new tree’s Row 12 lines up level with its neighbor’s Row 12. If it doesn’t, the vertical links in the new column are drifting.
Size checkpoints:
- After 2 columns, the width across the trees is 8.5 in (21.6 cm): 3.8 + 0.9 + 3.8 in.
- After all 8 columns, the width is 36.7 in (93.2 cm): 8 × 3.8 in + 7 × 0.9 in gaps.
- The height from the top link to the bottom trunks is 84 in (213.4 cm): 1 in top link + 12 trees × 6 in + 11 links × 1 in.
Border: Top Heading
Only the top edge gets a border. The sides and bottom are left as the stepped tree silhouettes and free trunks you see in the photo.
Border gauge: Same as the motif gauge, 18 dc = 4 in (10.2 cm). Each column gets 21 heading sts = 4.7 in (11.9 cm). That is one tree width (3.8 in) plus one gap (0.9 in), so 8 × 21 = 168 sts sets the heading width at 37.3 in (94.7 cm).
Row 1: Ch 170, dc in 4th ch from hook and in each ch across. Turn. (167 dc + 1 skipped ch-3 = 168 sts)
Row 2: Ch 3, dc in each st across. Turn. (168 sts)
Row 3 (joining row): Ch 1, sc in each st across. Hold the panel with the tree tips below the heading. When you reach sts 11, 32, 53, 74, 95, 116, 137 and 158, insert the hook through the heading st and through ch 1 of that column’s top link, then complete the sc. Turn. (168 sc)
Each join is the center st of its 21-st section, with 10 sts on each side (10 + 1 + 10). The first join falls at st 11 and the last at st 158, leaving 10 sts after it. That keeps both edges symmetrical.
Row 4: Ch 1, sc in each st across. Fasten off. (168 sc)
Why the math works: The heading’s starting count equals the number of columns × the per-column count (8 × 21 = 168). No extra stitches are added at the joins. The heading is 0.6 in (1.5 cm) wider than the net of trees (36.7 in), which gives a half-gap margin of about 0.3 in (0.8 cm) at each edge.
The heading depth is 1.2 in (3.0 cm): two dc rows at 0.4 in (1.0 cm) each and two sc rows at 0.2 in (0.5 cm) each.
Final Blocking
- Weave in all ends along stitch posts, not across the eyelets.
- Lay the panel flat on foam mats in sections. A long panel can be blocked a third at a time.
- Pin the heading straight to 37.3 in (94.7 cm).
- Pin each tree tip and both bottom corners of Tier 3. Check that every tree is 3.8 in (9.7 cm) wide.
- Ease each vertical link to 1 in (2.5 cm) and each horizontal link to 0.9 in (2.3 cm). Don’t stretch them.
- Pin open the step corners at the bottom of Tiers 1 and 2 so the overhangs read clearly.
- Mist until damp and let dry completely before unpinning.
- Hang the panel for 24 hours before hemming any curtain behind it. Cotton nets can drop 1–2 in (2.5–5.1 cm) under their own weight.
Final Quality-Control Checklist
- Every tree has 17 sts in Row 12 and a centered 5-st trunk.
- Both eyelet bands are visible, with 2 and 4 eyelets.
- Each tier overhangs the one above by 2 sts on both sides.
- All 96 trees sit in level rows across the panel.
- The heading has 168 sts, with all 8 top links caught at the correct sts.
- The panel measures 37.3 in (94.7 cm) × 85.2 in (216.4 cm).
- No ends are poking through the eyelets.
Troubleshooting
- Tree leans to one side: You probably skipped or doubled a sl st in Row 5, 9 or 13. Recount the unworked sts on each side (2, 2 and 6).
- Wavy tier edges: Your increases are tighter than your body stitches. Work the 2-dc increases a little looser.
- Columns don’t line up: Your vertical link chains vary. Count exactly ch 9 every time and keep the chain tension even.
- Heading ripples: Your Rows 1–2 are looser than gauge. Rework them half a hook size smaller.
- Panel sags too much when hung: Re-block it, and add clip rings closer together (every 4.7 in / 11.9 cm).
Care
Hand wash in cool water with mild soap and press out the water in a towel. Don’t wring it. Dry flat, re-pinning the trees if needed, and don’t hang the panel while it’s wet.
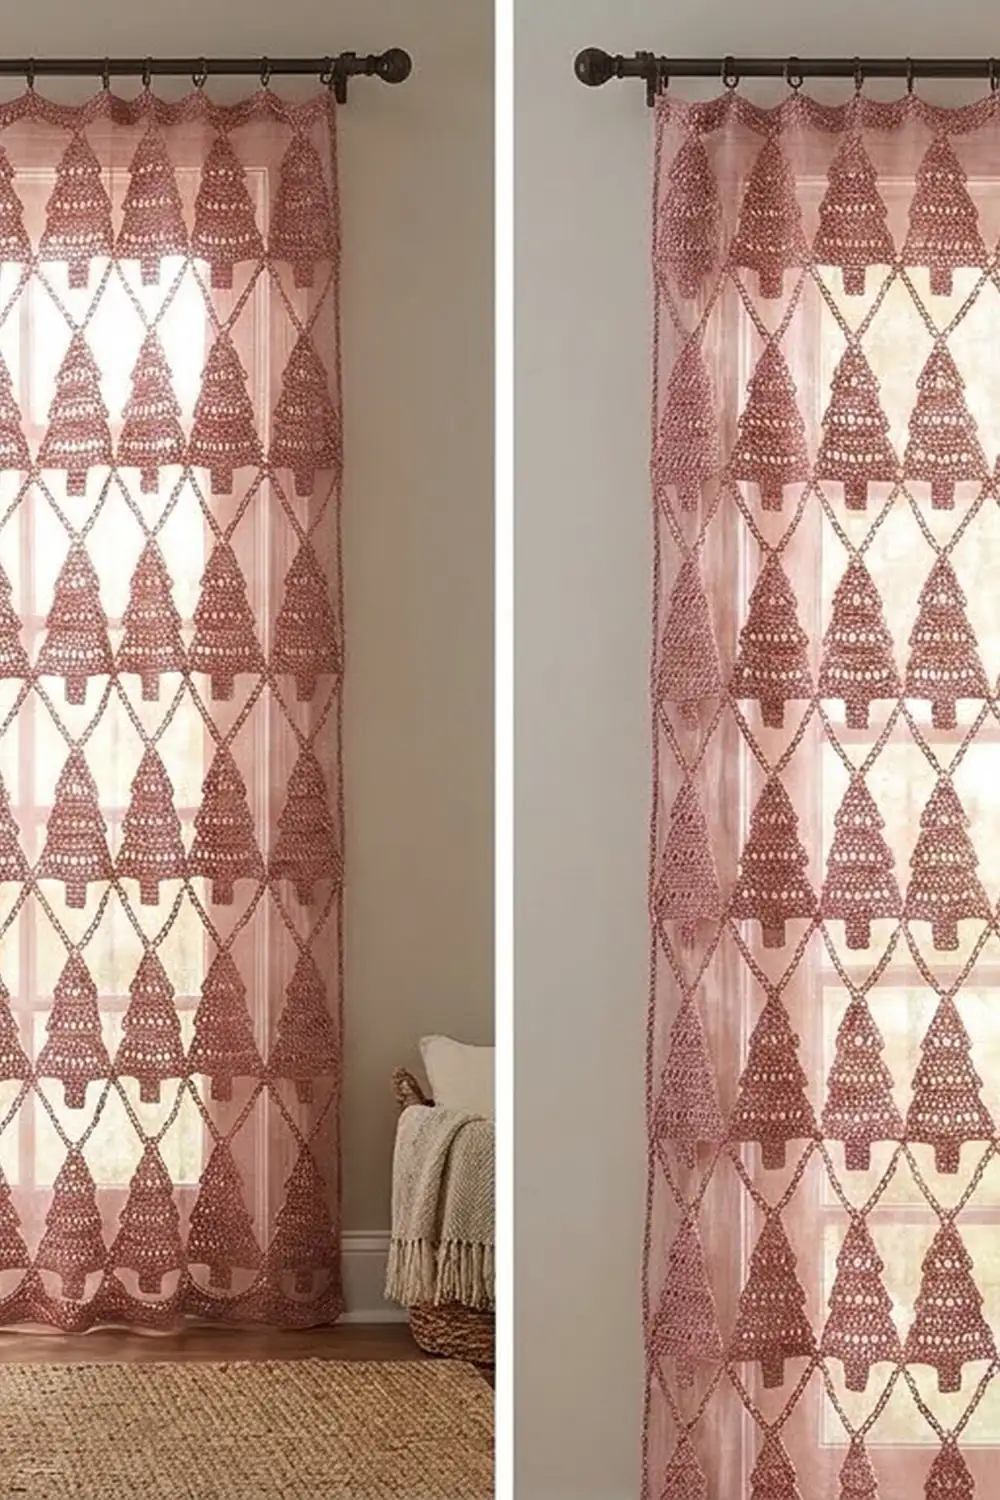
Final Notes
The whole curtain follows one measurement chain:
- 18 dc = 4 in (10.2 cm), which gives a 17-st tree 3.8 in (9.7 cm) wide and 15 rows 6 in (15.2 cm) tall.
- 8 trees with 0.9 in (2.3 cm) links make a net 36.7 in (93.2 cm) wide.
- 12 trees with 1 in (2.5 cm) links, plus the top link, make a net 84 in (213.4 cm) tall.
- 8 columns × 21 sts gives a 168-st heading, so the finished panel is 37.3 in × 85.2 in (94.7 cm × 216.4 cm).
If you get one tree right, the rest of the panel follows. Happy crocheting!