

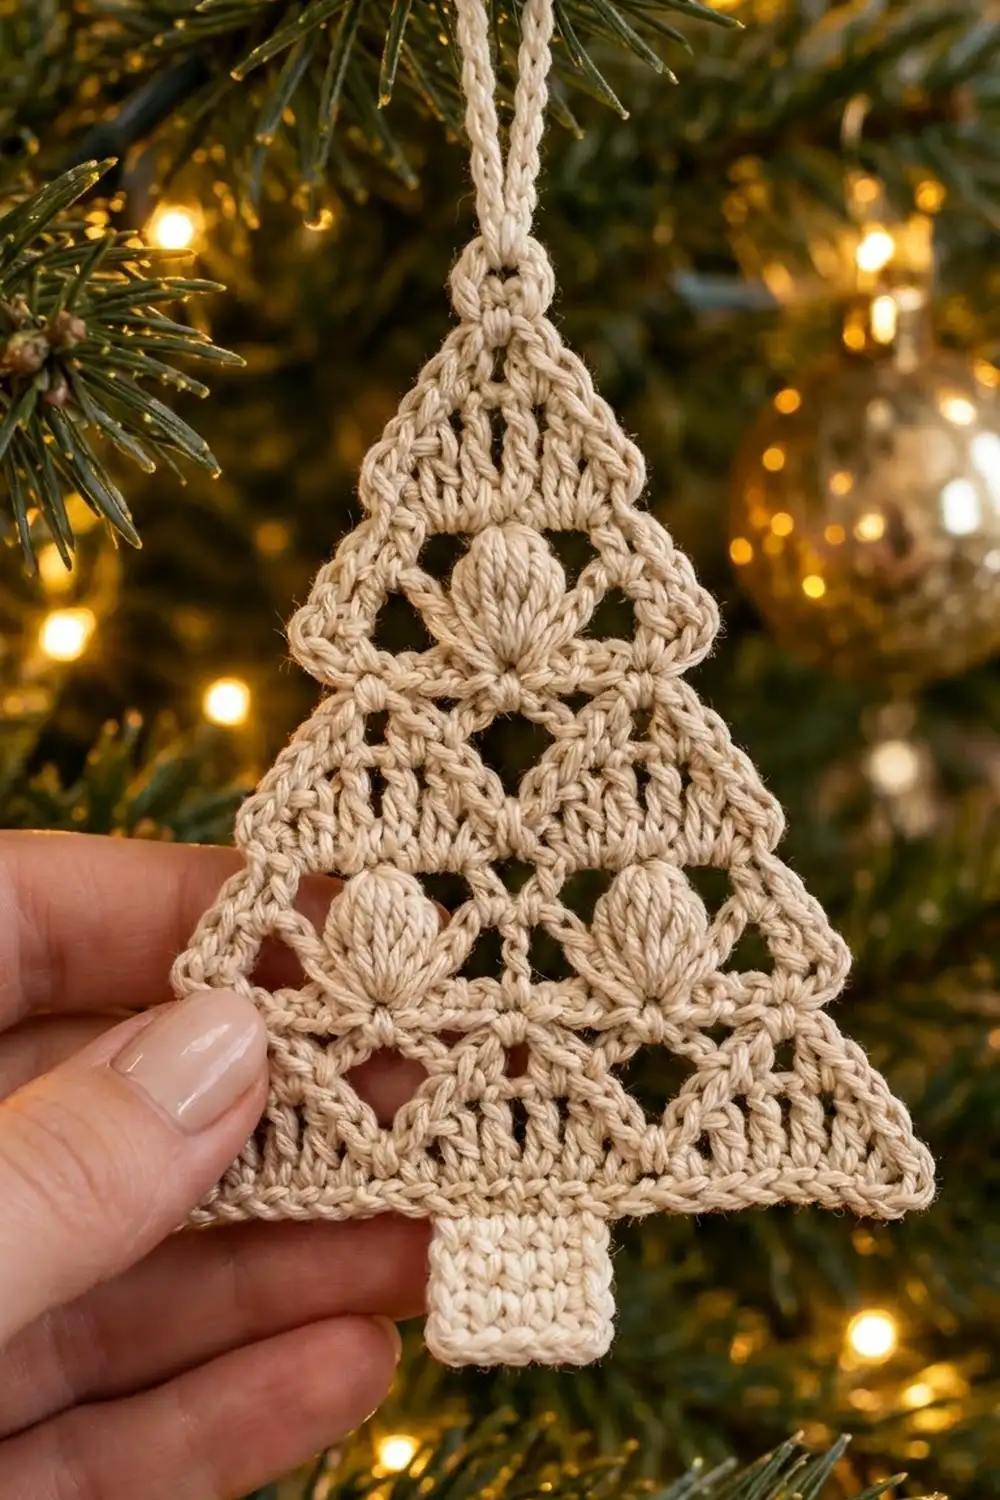
The Frosted Lace Christmas Tree is a flat, airy ornament made in a single soft cream thread. It catches the tree lights through its open spaces, and three plump puff stitches give it a little bit of dimension. A solid trunk and a covered hanging loop finish it neatly, so it hangs straight on the branch.
The look is quiet and classic: one neutral color, three lace tiers, and a crisp single-crochet outline. It fits rustic, Scandinavian, or vintage decorating, and a stack of them makes a lovely gift tag or package topper.
This pattern uses US crochet terms. The finished ornament measures about 4.1 in (10.4 cm) wide and 5.25 in (13.3 cm) tall including the trunk, plus a 1.25 in (3.2 cm) hanging loop.
Construction is simple. You work the tree in rows from the top point down, increasing at both ends of every row. Next comes a two-round single-crochet border around the triangle. Then you crochet the trunk from the center of the base, and finally the hanging loop at the tip.
Finished Size and Construction
- Finished size: 4.1 in (10.4 cm) wide × 5.25 in (13.3 cm) tall, excluding the loop
- Skill level: Easy-intermediate
- Terminology: US crochet terms
- Yarn weight: Fingering / #1 super fine mercerized cotton
- Hook: 2.25 mm (US B-1)
- Number of pieces: 1 (worked in one piece; trunk and loop are added directly)
- Layout: Single standalone ornament
- Tree size before border: 3.6 in (9.1 cm) wide × 4 in (10.2 cm) tall
- Border depth: about 0.25 in (0.6 cm) on each edge
- Trunk: 0.75 in (1.9 cm) wide × 0.75 in (1.9 cm) tall
Materials
Yarn: Choose a smooth, mercerized cotton in fingering weight. Cotton holds its shape after blocking, and mercerized thread shows off the puff stitches and lace openings. Avoid fuzzy or very stretchy fibers, which blur the lace.
- Cream / ecru: 12 g (about 41 m / 45 yd)
That quantity includes a margin for your gauge swatch and weaving in ends. One ornament uses about 8 g.
Tools:
– 2.25 mm (US B-1) crochet hook
– Tapestry needle
– Scissors
– Rust-proof pins and a blocking mat or folded towel
– Spray bottle with water
– Optional: fabric stiffener or starch
Abbreviations (US Terms)
- ch – chain
- sl st – slip stitch
- sc – single crochet
- dc – double crochet
- sk – skip
- st(s) – stitch(es)
- sp – space
- RS / WS – right side / wrong side
- yo – yarn over
Special stitch – Puff: (Yo, insert hook in the indicated st, yo and pull up a loop to dc height) 4 times; you now have 9 loops on the hook. Yo and pull through all 9 loops, then ch 1 to close. The closing ch-1 does not count as a stitch. Each puff counts as 1 st.
Counting note: In every row of the tree, each ch counts as 1 st and each puff counts as 1 st. The beginning ch-3 counts as 1 dc.
Gauge and Checkpoints
Gauge: 7 dc and 3 dc rows = 1 in (2.5 cm). Equivalently, 14 dc × 6 rows = 2 in (5.1 cm).
Before committing, work Rows 1–4 of the tree as a test. This tier is small and fast, and it tells you everything you need about gauge.
Measurement checkpoints:
– After Row 4: 9 sts wide = about 1.3 in (3.3 cm) wide and 1.3 in (3.3 cm) tall
– After Row 8: 17 sts wide = about 2.4 in (6.1 cm) wide and 2.7 in (6.9 cm) tall
– After Row 12: 25 sts wide = 3.6 in (9.1 cm) wide and 4 in (10.2 cm) tall
– After border: 4.1 in (10.4 cm) wide and 4.5 in (11.4 cm) tall
– After trunk: 5.25 in (13.3 cm) total height
Too big? Go down to a 2 mm hook, or check whether your dc are getting tall loops. Too small? Go up to a 2.5 mm hook. The tree’s proportions come from the stitch counts, so a small gauge change only scales the ornament. It will not distort the shape.
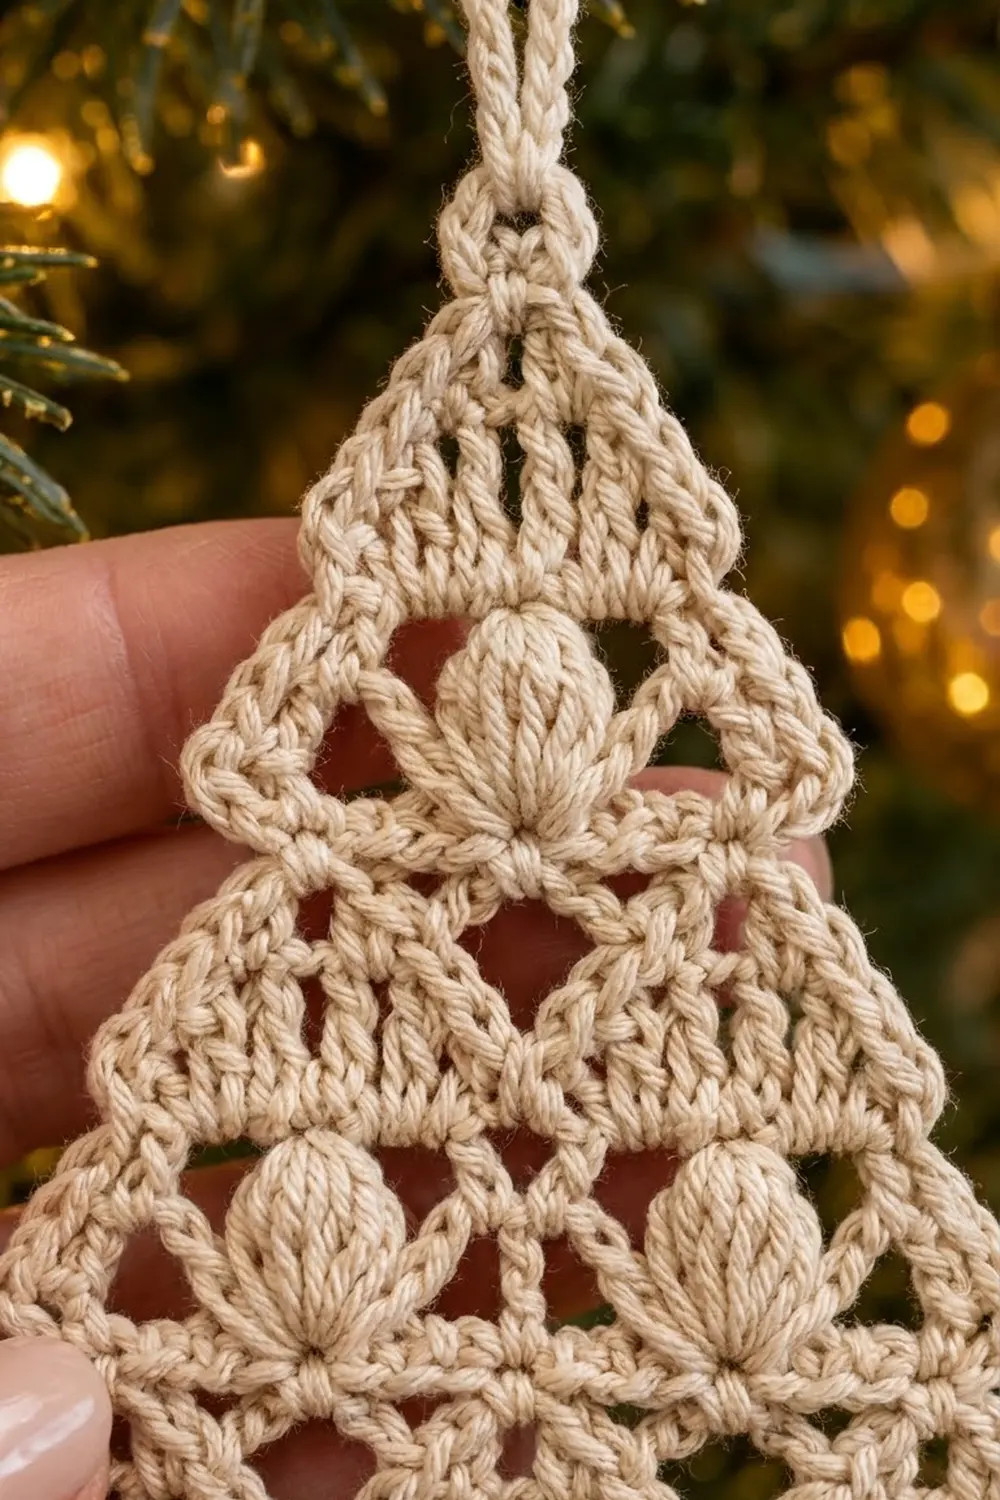
Tree Body
The tree is worked flat, in rows, from the top point down. Every row begins with ch 3, which counts as the first dc, and then works 1 dc into the same st. Every row ends with 2 dc in the top of the turning ch. That adds 2 sts per row, 1 at each end.
Every interior section is worked across all sts except the first and last st of the previous row. In other words, the interior always covers (previous count − 2) sts.
Tier 1 (Rows 1–4)
Row 1: Ch 4. Work 2 dc in the 4th ch from hook. The skipped ch-3 counts as a dc. (3 sts)
The base of this ch is the top point of the tree.
Row 2: Ch 3, turn. Dc in the same st, dc in the next st, 2 dc in the top of the turning ch. (5 sts)
Row 3: Ch 3, turn. Dc in the same st, dc in the next st, puff in the next st, dc in the next st, 2 dc in the top of the turning ch. (7 sts)
This places the single top puff exactly at the center of the tier.
Row 4: Ch 3, turn. Dc in the same st, ch 2, sk 2 sts, dc in the puff, ch 2, sk 2 sts, 2 dc in the top of the turning ch. (9 sts: 4 dc + 4 ch + 1 dc at center)
This chain-space row makes the first band of openings below the top puff.
Checkpoint: 1.3 in (3.3 cm) wide.
Tier 2 (Rows 5–8)
Row 5: Ch 3, turn. Dc in the same st, then work 1 dc in each st and in each ch across the 7 interior sts, 2 dc in the top of the turning ch. (11 sts)
Row 6: Ch 3, turn. Dc in the same st. Then: dc in the next 2 sts, puff in the next st, ch 1, sk 1 st, dc in the next st (center), ch 1, sk 1 st, puff in the next st, dc in the next 2 sts. Finish with 2 dc in the top of the turning ch. (13 sts)
The interior is 9 sts, with the two puffs set symmetrically on either side of the center dc.
Row 7: Ch 3, turn. Dc in the same st, dc in each of the next 11 sts and chs, 2 dc in the top of the turning ch. (15 sts)
Row 8: Ch 3, turn. Dc in the same st, dc in the next st, then (ch 2, sk 2 sts, dc in the next st) 4 times, 2 dc in the top of the turning ch. (17 sts)
The interior is 1 dc + 4 × 3 sts = 13 sts.
Checkpoint: 2.4 in (6.1 cm) wide, 2.7 in (6.9 cm) tall.
Tier 3 (Rows 9–12)
Row 9: Ch 3, turn. Dc in the same st, dc in each of the next 15 sts and chs, 2 dc in the top of the turning ch. (19 sts)
Row 10: Ch 3, turn. Dc in the same st, dc in the next st, then (ch 1, sk 1 st, dc in the next st) 8 times, 2 dc in the top of the turning ch. (21 sts)
The interior is 1 dc + 8 × 2 sts = 17 sts.
Row 11: Ch 3, turn. Dc in the same st, dc in the next st (the edge dc), then (ch 1, sk the next dc, dc in the next ch-1 sp) 8 times. Then ch 1, sk the next dc, dc in the next st (the edge dc), and 2 dc in the top of the turning ch. (23 sts)
The interior is 1 dc + 9 × 2 sts = 19 sts. Because the dc land in the ch-1 sps of Row 10, the openings are offset and form the small diamond grid.
Row 12: Ch 3, turn. Dc in the same st, dc in each of the next 21 sts and chs, 2 dc in the top of the turning ch. (25 sts)
Do not fasten off.
Checkpoint: 3.6 in (9.1 cm) wide × 4 in (10.2 cm) tall.
Border
Border gauge: Along the base, 1 sc per st. Along the slanted sides, 2 sc per dc row-end. Each slanted row-end is about 0.36 in (0.9 cm) long, so 2 sc fill it without ruffling or pulling.
The counts below are given between corner groups. Each corner group is 3 sc. The center sc of each group is the corner stitch.
Rnd 1: Ch 1, do not turn. Work 3 sc in the last st of Row 12 (base corner).
Rotate to work down the row-ends of the slanted side toward the tip: work 2 sc in each row-end of Rows 11 through 1 (22 sc). Then work 3 sc in the foundation ch at the tip (apex corner).
Work down the other slanted side: 2 sc in each row-end of Rows 1 through 11 (22 sc).
Work 3 sc in the first st of Row 12 (the top of its turning ch; base corner). Then sc in each of the next 23 sts across the base (23 sc). Join with a sl st to the first sc.
Total: 22 + 22 + 23 + (3 corners × 3) = 76 sc
Rnd 2: Ch 1. Sc in each sc around, working 3 sc in each corner center sc. Join with a sl st to the first sc.
Total: (76 sc worked 1 per st) + (6 extra sc, 2 at each corner) = 82 sc
Per side between corner groups: 24 sc on each slant and 25 sc on the base. Check: 24 + 24 + 25 + 9 = 82.
Fasten off.
Why the math works: Rnd 1 skips nothing and adds sts only at the 3 corners. Rnd 2 moves each corner outward by 1 st on each side, so every side grows by exactly 2 sc. The base count stays odd (25), which keeps a true center stitch for the trunk.
Checkpoint: 4.1 in (10.4 cm) wide × 4.5 in (11.4 cm) tall.
Trunk
With RS facing and the base edge at the top, count the 25 sc between the two base corner groups of Rnd 2.
Row 1: Skip the first 10 sc. Join the yarn with a sl st in the 11th sc, ch 1, sc in the same sc and in the next 4 sc (5 sc). This leaves 10 sc unworked; 10 + 5 + 10 = 25.
Rows 2–6: Ch 1, turn, sc in each sc across. (5 sc)
Fasten off.
Checkpoint: 0.75 in (1.9 cm) wide × 0.75 in (1.9 cm) tall. Total ornament height: 4.5 + 0.75 = 5.25 in (13.3 cm).
Hanging Loop
Join the yarn with a sl st in the center sc of the apex corner group. Ch 24, then sl st in the same sc to form a loop.
Work 30 sc over the chain loop, covering it completely, and sl st in the apex sc. Fasten off.
This covered loop is firmer and rounder than a bare chain. It measures about 1.25 in (3.2 cm) from the tip, so the full hanging height is about 6.5 in (16.5 cm).
Final Blocking
- Weave in all ends along the border, never through the lace openings.
- Soak the ornament in cool water for 5 minutes. If you want a stiffer finish, use diluted stiffener instead.
- Gently press out the water in a towel without wringing.
- Lay it flat on the mat with RS up.
- Pin the 3 corners first: apex and both base corners. The base should be 4.1 in (10.4 cm) wide, and the apex should be 4.5 in (11.4 cm) above the base.
- Pin each slanted side straight between corners, with a pin every 0.5 in (1.3 cm).
- Pin the trunk square at 0.75 in (1.9 cm).
- Open each chain space and diamond with a pin tip, and fluff the puffs upward.
- Pin the hanging loop straight up so it dries without a twist.
- Let it dry completely, usually 6–12 hours.
Final Quality-Control Checklist
- Row 12 has exactly 25 sts.
- Puffs: 1 in Tier 1 and 2 in Tier 2, centered and symmetrical.
- Row 11 diamonds are offset from Row 10, not stacked.
- Border Rnd 2 has 82 sc, with 24 / 24 / 25 between corner groups.
- The trunk sits on the center 5 sts, with 10 unworked sts on each side.
- Slanted edges are straight, not wavy or cupped.
- The loop is centered at the apex and fully covered.
- The finished size is 4.1 in (10.4 cm) × 5.25 in (13.3 cm).
Troubleshooting
Tree curls or cups: Your increases are too tight. Make sure every row starts and ends with 2 dc, and loosen your turning chains slightly.
Edges ruffle after the border: You are working more than 2 sc per row-end. Recount Rnd 1 at 22 sc per side.
Edges pull in: Your sc are too tight. Go up a hook size for the border only.
Puffs look flat: Pull each loop up to full dc height before closing, and don’t skip the closing ch 1.
Trunk is off-center: Recount the base. It must have exactly 25 sc between corner groups in Rnd 2.
Diamonds don’t appear in Row 11: Make sure each dc goes into a ch-1 sp, not into a dc.
Loop twists: Block it pinned straight, or add a little stiffener to the loop only.
Care
Hand wash in cool water with mild soap, press dry in a towel, and reshape flat. Store flat in tissue paper between seasons so the lace and points stay crisp.
Final Notes
The measurement chain is simple and repeatable. Gauge of 7 dc and 3 rows per 1 in (2.5 cm) gives a Tier 1 of 1.3 in (3.3 cm), then Tier 2 at 2.4 in (6.1 cm) wide. Row 12 reaches 3.6 in (9.1 cm) × 4 in (10.2 cm). The border brings the tree to 4.1 in (10.4 cm) × 4.5 in (11.4 cm), and the trunk finishes it at 5.25 in (13.3 cm) tall. Check each stage and your ornament will come out the same size every time.
Happy crocheting!