

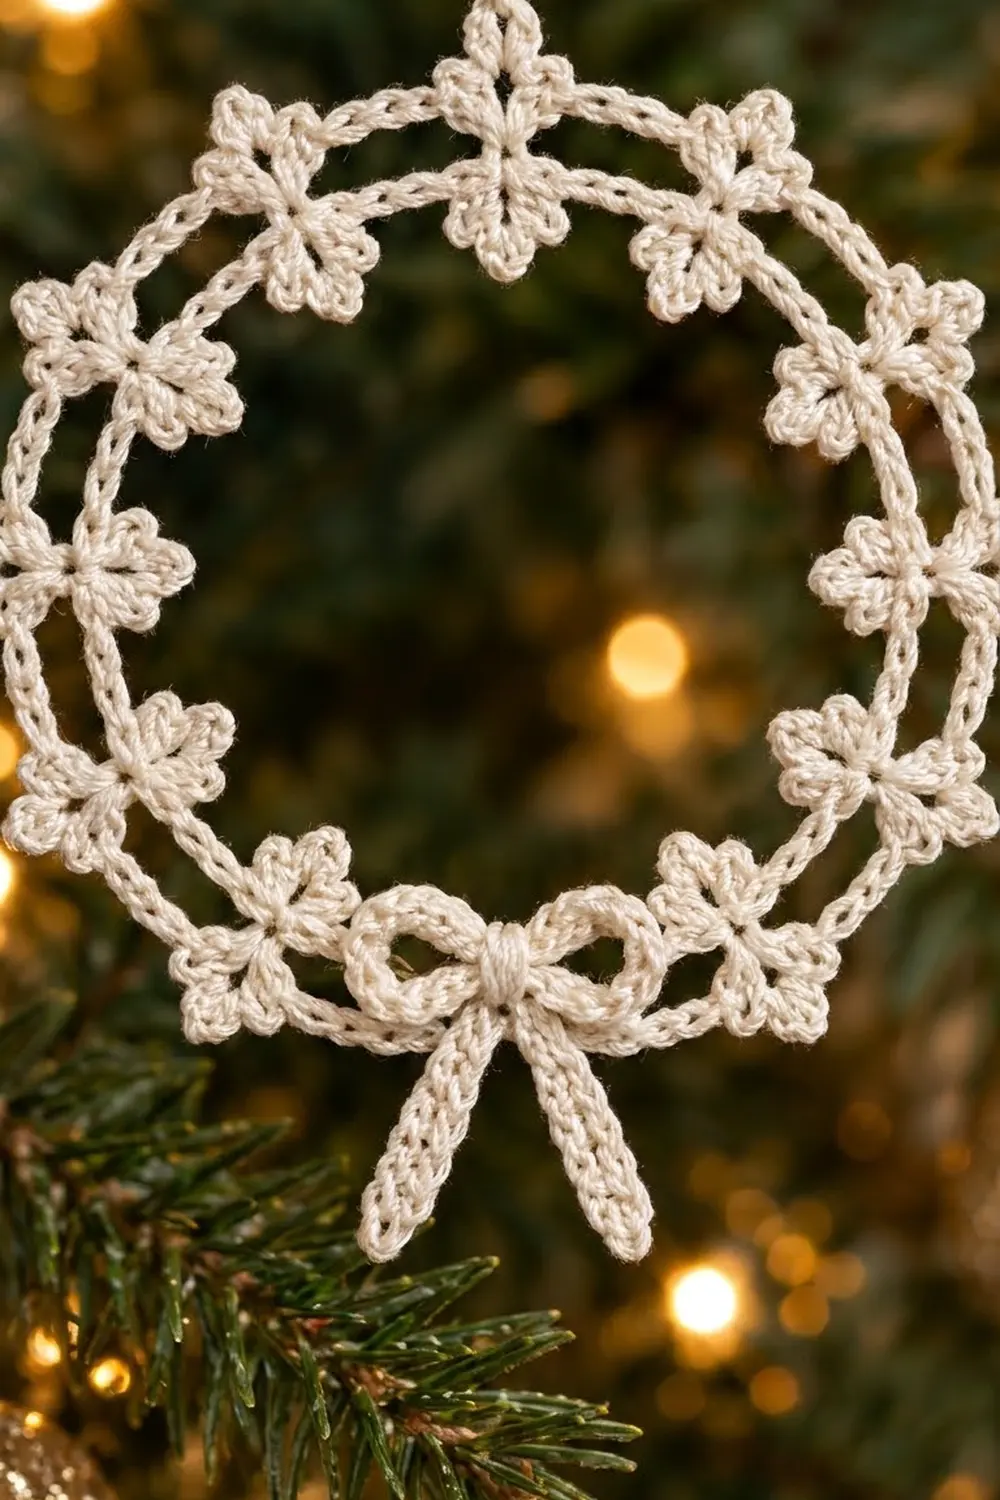
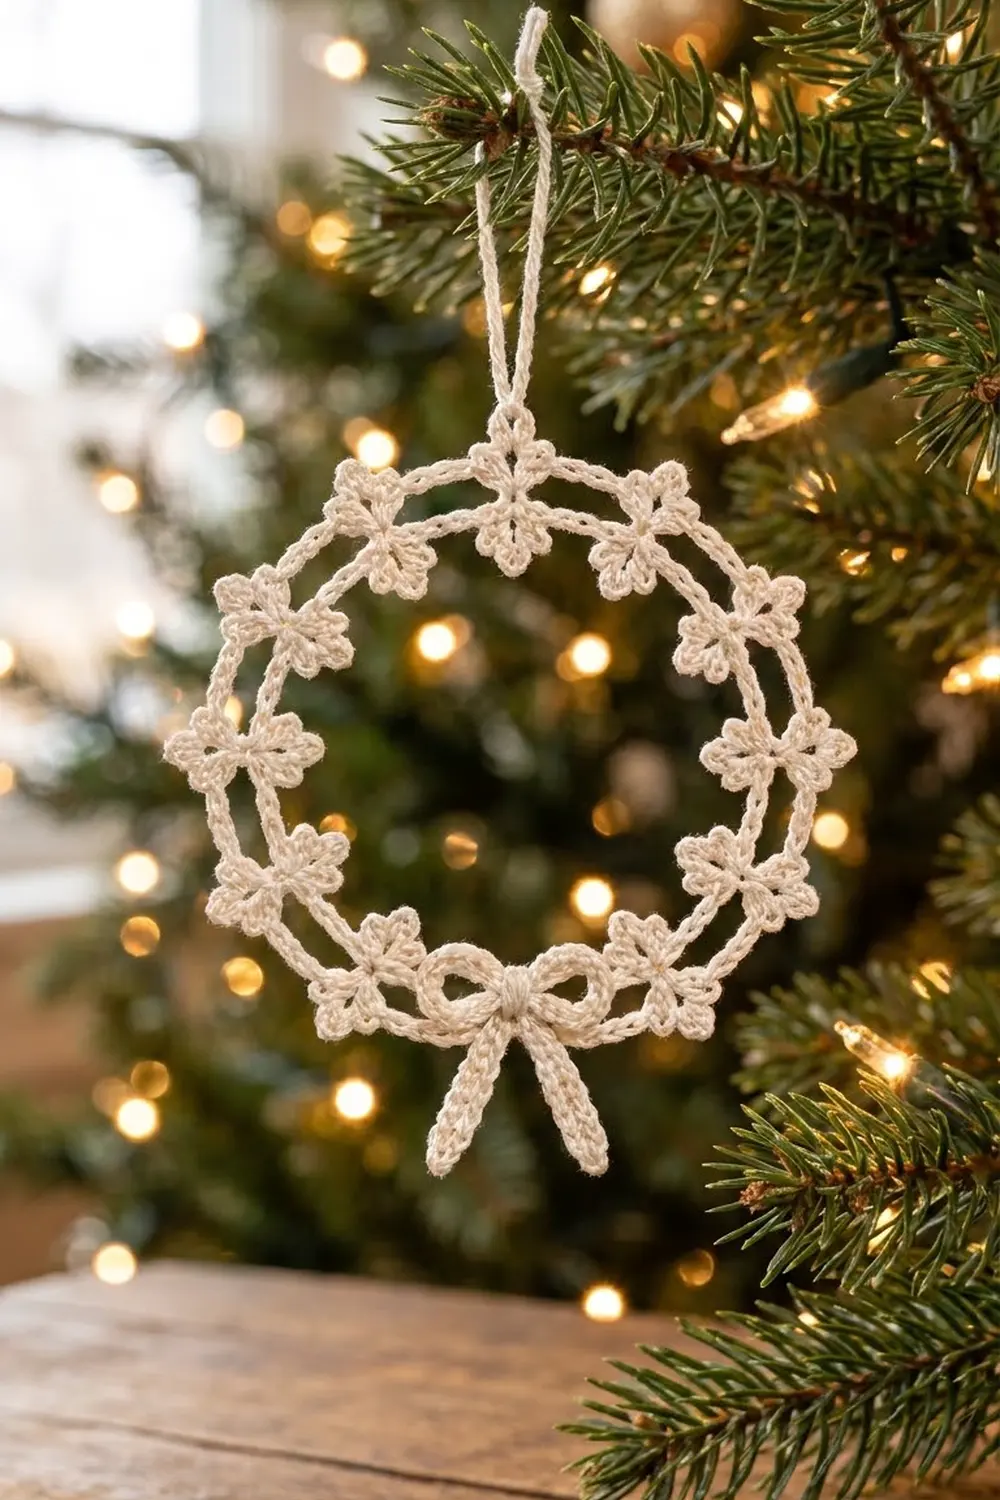
This little wreath ornament is worked in fine ivory cotton thread. It has two corded rings joined by short spokes, a ring of tiny three-petal clovers around the outside, and a small corded bow at the bottom. It looks delicate and old-fashioned, like lace, and it shows up well against dark evergreen branches and warm string lights.
The design uses one color. The cream thread keeps it simple and lets the stitches show. A set of five or six hung together looks like a matched collection, and a single one works well as a gift topper.
The pattern uses US crochet terms. The finished wreath measures about 3.5 in (8.9 cm) across. Counting the bow tails, it is about 4.25 in (10.8 cm) tall, and the hanging loop adds about 1.25 in (3.2 cm) more.
Construction is simple. You chain a ring and cover it with single crochet to make the inner ring. A round of double crochet spokes and chain spaces builds the outer ring, and a single crochet round covers it. A slip stitch border adds the clovers and the hanging loop. Last, you make a short corded strip, shape it into a bow, and sew it on at the bottom.
Finished Size and Construction
- Finished size: about 3.5 in (8.9 cm) across; about 4.25 in (10.8 cm) tall including the bow tails
- Skill level: Intermediate (you need to be comfortable working with fine thread)
- Terminology: US crochet terms
- Yarn weight: Lace (0), size 10 cotton crochet thread
- Hook: 1.5 mm steel hook (US steel 8)
- Number of pieces: 1 wreath plus 1 small bow sewn on, making one ornament
- Layout: one ring of 12 spokes, with clovers at 11 spokes and the bow at the 12th
- Size of the wreath before the border: about 2.9 in (7.4 cm) across the outer ring
- Border depth: about 0.3 in (0.8 cm) of clover petals beyond the outer ring
Materials
Thread: Use mercerized cotton crochet thread in size 10. Mercerized cotton has a slight sheen, gives clear stitch definition, and holds starch well. Avoid fuzzy or very soft thread, because the petals and rings lose their shape.
- Ivory/cream: 5 g, about 18 m (20 yd) per ornament
These amounts include a margin for a gauge swatch and weaving in ends. One ornament uses less than this.
Tools:
– 1.5 mm (US steel 8) steel crochet hook
– Fine tapestry needle or sharp embroidery needle
– 1 locking stitch marker
– Small sharp scissors
– Fabric starch or a 1:1 mix of white glue and water
– Foam board, plastic wrap, and rust-proof pins
– Ruler or tape measure
Abbreviations (US Terms)
- ch – chain
- sl st – slip stitch
- sc – single crochet
- dc – double crochet
- st(s) – stitch(es)
- sp – space
- rnd – round
- beg – beginning
- rep – repeat
Special stitches
- 2-dc cluster (2-dc cl): *Yarn over, insert the hook in the stitch named, yarn over and pull up a loop, yarn over and pull through 2 loops. Repeat from * once more in the same stitch. Yarn over and pull through all 3 loops on the hook.
- Petal: Ch 3, 2-dc cl in the same stitch you just slip-stitched into, ch 3, sl st in that same stitch. This makes one solid, pointed petal.
- Clover: Work 3 Petals in the same stitch. The petals fan out to the left, straight out, and to the right.
Gauge and Checkpoints
Gauge: 12 sc = 1 in (2.5 cm) with size 10 thread and a 1.5 mm hook.
The whole pattern is one ornament, so the first ornament is your test piece. Stop after each stage below and measure flat, without stretching.
- Checkpoint 1 (after Rnd 2): 96 sc. The inner ring should be about 8 in (20.3 cm) around and about 2.5 in (6.4 cm) across.
- Checkpoint 2 (after Rnd 4): 108 sc. The outer ring should be about 9 in (22.9 cm) around and about 2.9 in (7.4 cm) across. The gap between the rings should be about 0.2 in (0.5 cm).
- Checkpoint 3 (after Rnd 5): The wreath should measure about 3.5 in (8.9 cm) across, measured from the tip of one clover to the tip of the opposite clover.
If the ring is too big: Change to a 1.25 mm (US steel 10) hook. Or keep your hook and work the beginning chain more tightly.
If the ring is too small or cups up: Change to a 1.65 mm (US steel 7) hook.
If the outer ring ruffles or cups: Your dc spokes are probably too short or too tall for your tension. Check that each ch-8 space lies flat before you work Rnd 4.
Do not change the stitch counts. The 12-spoke layout depends on them.
Wreath Pattern
Inner Ring
Rnd 1: Ch 96. Sl st in the first ch to form a ring, making sure the chain is not twisted. (96 ch)
Rnd 2: Ch 1 (does not count as a stitch). Sc in each ch around. Sl st in the first sc to join. (96 sc)
This round gives the inner ring its corded look. Lay it flat and check Checkpoint 1.
Spokes and Outer Ring
Rnd 3: Ch 3 (counts as the first dc; this is Spoke 1, the top of the wreath). Ch 8, skip next 7 sc, dc in next sc. Rep from * 10 more times. Ch 8, skip the last 7 sc, and sl st in the 3rd ch of the beg ch-3 to join. (12 dc spokes and 12 ch-8 sps)*
Check the math: each repeat uses 1 sc for the spoke and skips 7 sc, so 8 sc × 12 = 96 sc. Every sc from Rnd 2 is accounted for.
Number the spokes 1 to 12, going in the direction you worked. Spoke 7 sits directly opposite Spoke 1, at the bottom of the wreath.
Rnd 4: Ch 1. Sc in the top of Spoke 1 and place a marker in this sc. Work 8 sc in the next ch-8 sp, then sc in the top of the next dc. Rep from * 10 more times. Work 8 sc in the last ch-8 sp, and sl st in the first sc to join. (108 sc: 12 spoke sc + 96 sc in spaces)*
This round covers the outer chain and gives it the same corded look as the inner ring. Check Checkpoint 2. The outer ring needs 108 sc against the inner ring’s 96 sc because it has a larger radius. At 12 sc per inch, 108 sc makes a 9 in (22.9 cm) circumference, which keeps it flat.
Border: Clover Edging
Border gauge: Work the slip stitches loosely, at about the same 12 sts per 1 in (2.5 cm). If they are tight, the outer ring will draw in and start to cup.
You work the border into the 108 sc of Rnd 4. Each of the 12 sections has 9 stitches: 1 spoke sc and 8 sc between spokes.
Rnd 5:
– Top (Spoke 1): Sl st in the marked sc and work a Clover in it. Then ch 30 and sl st in the same sc. This makes the hanging loop, which rises from the center of the top clover.
– Spokes 2–6: Sl st in each of the next 8 sc. In the next spoke sc, work a sl st and then a Clover. Rep from * 4 more times. (5 clovers)
– Spoke 7 (bottom): Sl st in each of the next 8 sc, then sl st in the spoke sc. Do not work a clover here, because the bow will go in this spot.
– Spokes 8–12: Rep from * as for Spokes 2–6 five more times. (5 clovers)
– Finish:* Sl st in each of the last 8 sc. Join with a sl st in the first sl st. Fasten off and leave a 4 in (10.2 cm) tail.
Count check for Rnd 5:
– Slip stitches: 12 spoke sts + (12 × 8) = 108 sl sts, one in every sc.
– Clovers: 1 + 5 + 5 = 11 clovers.
– Hanging loop: 1.
Why the math works: Rnd 5 adds no stitches to the ring itself. It works one sl st into each existing sc (108 + 0). The clovers are worked on top of spoke stitches and do not add to the ring count. Each clover sits directly above a dc spoke, so it lines up with the spoke and the spoke looks like its stem. The 30 chains of the hanging loop make a loop about 2.5 in (6.4 cm) around that hangs about 1.25 in (3.2 cm) tall.
Bow
Row 1: Ch 61. Sc in the 2nd ch from the hook and in each ch across. (60 sc) Fasten off and leave a 10 in (25.4 cm) tail.
The strip should measure about 5 in (12.7 cm) long.
Shaping:
1. Lay the strip flat. Measure 12 sc (1 in / 2.5 cm) from one end for the first tail.
2. Fold the next 18 sc (1.5 in / 3.8 cm) into a loop and bring it back to the end of the first tail.
3. Fold the next 18 sc into a second loop on the other side, so the loops point left and right.
4. The last 12 sc make the second tail. Angle the two tails downward in an inverted V.
5. Pinch the center where the loops and tails meet. Wrap the long tail tightly around the center 6–8 times to make the knot. Secure it with 2 stitches through the back.
The finished bow is about 1.25 in (3.2 cm) wide. Each loop is about 0.75 in (1.9 cm) long.
Attaching: Center the bow knot over Spoke 7, so it covers both rings and the spoke between them. Use the remaining tail to sew through the back of the knot and into the inner ring, the spoke, and the outer ring. Tack each loop once to the outer ring so it stays flat. The tails should hang freely about 1 in (2.5 cm) below the outer ring.
Weave in all ends on the wrong side, following the corded rings.
Final Blocking
- Mix the starch, or the glue-and-water solution, in a small bowl.
- Soak the ornament completely, then press out the extra liquid in a towel. Do not wring it.
- Cover foam board with plastic wrap. Draw a 2.9 in (7.4 cm) circle on the plastic as a guide for the outer ring.
- Pin the outer ring to the circle. Push a pin through the center of each ch-8 section.
- Open the gap between the rings evenly to about 0.2 in (0.5 cm), and pin the inner ring at 12 points.
- Pin each clover. Spread the side petals evenly and point the middle petal straight out from the center.
- Shape the bow loops into rounded ovals and pin the tails straight, in an inverted V.
- Pin the hanging loop straight up.
- Let it dry completely, which takes 12–24 hours. Then unpin it and check that it measures about 3.5 in (8.9 cm) across.
Final Quality-Control Checklist
- Rnd 2 has 96 sc, and Rnd 4 has 108 sc.
- There are 12 spokes, evenly spaced, and the rings do not touch anywhere.
- There are 11 clovers, each with 3 solid petals, sitting directly over a spoke.
- There is no clover at the bottom spoke, and the bow covers it neatly.
- The hanging loop rises from the center of the top clover, opposite the bow.
- The ornament lies flat, with no cupping or ruffling.
- All ends are woven in and none show on the front.
- It measures about 3.5 in (8.9 cm) across and 4.25 in (10.8 cm) tall without the loop.
Troubleshooting
- Inner ring twisted: The Rnd 1 chain was twisted when you joined it. Undo it and rejoin, keeping the chain’s front bumps facing you all the way around.
- Outer ring wavy: Too many sc in a space, or the slip stitches are too loose. Check that each space has 8 sc, and tighten the sl sts a little.
- Wreath cupping like a bowl: The slip stitches are too tight, or the spokes are too short. Work the slip stitches loosely, or use the next hook size up for Rnd 5.
- Clovers flopping: Your clusters need more body. Close each cluster firmly and starch a little more heavily.
- Bow too big for the wreath: Shorten each loop to 15 sc and each tail to 10 sc. That totals 50 sc, so start with ch 51.
- Clovers not over the spokes: You miscounted in Rnd 4. Count the 9-stitch sections again before you start the border.
Care
Spot clean with cool water and mild soap. Reshape and re-starch if needed, and store the ornament flat between sheets of tissue paper.
Final Notes
The measurements build on each other. Gauge is 12 sc per 1 in (2.5 cm). That gives an inner ring of 96 sc, about 2.5 in (6.4 cm) across. Twelve dc spokes support an outer ring of 108 sc, about 2.9 in (7.4 cm) across. A border with 11 clovers brings the wreath to about 3.5 in (8.9 cm), and a 60-sc bow finishes the bottom.
If each checkpoint matches, the finished ornament will match too. Make one, block it well, and then make a set for the tree.
Happy crocheting!