

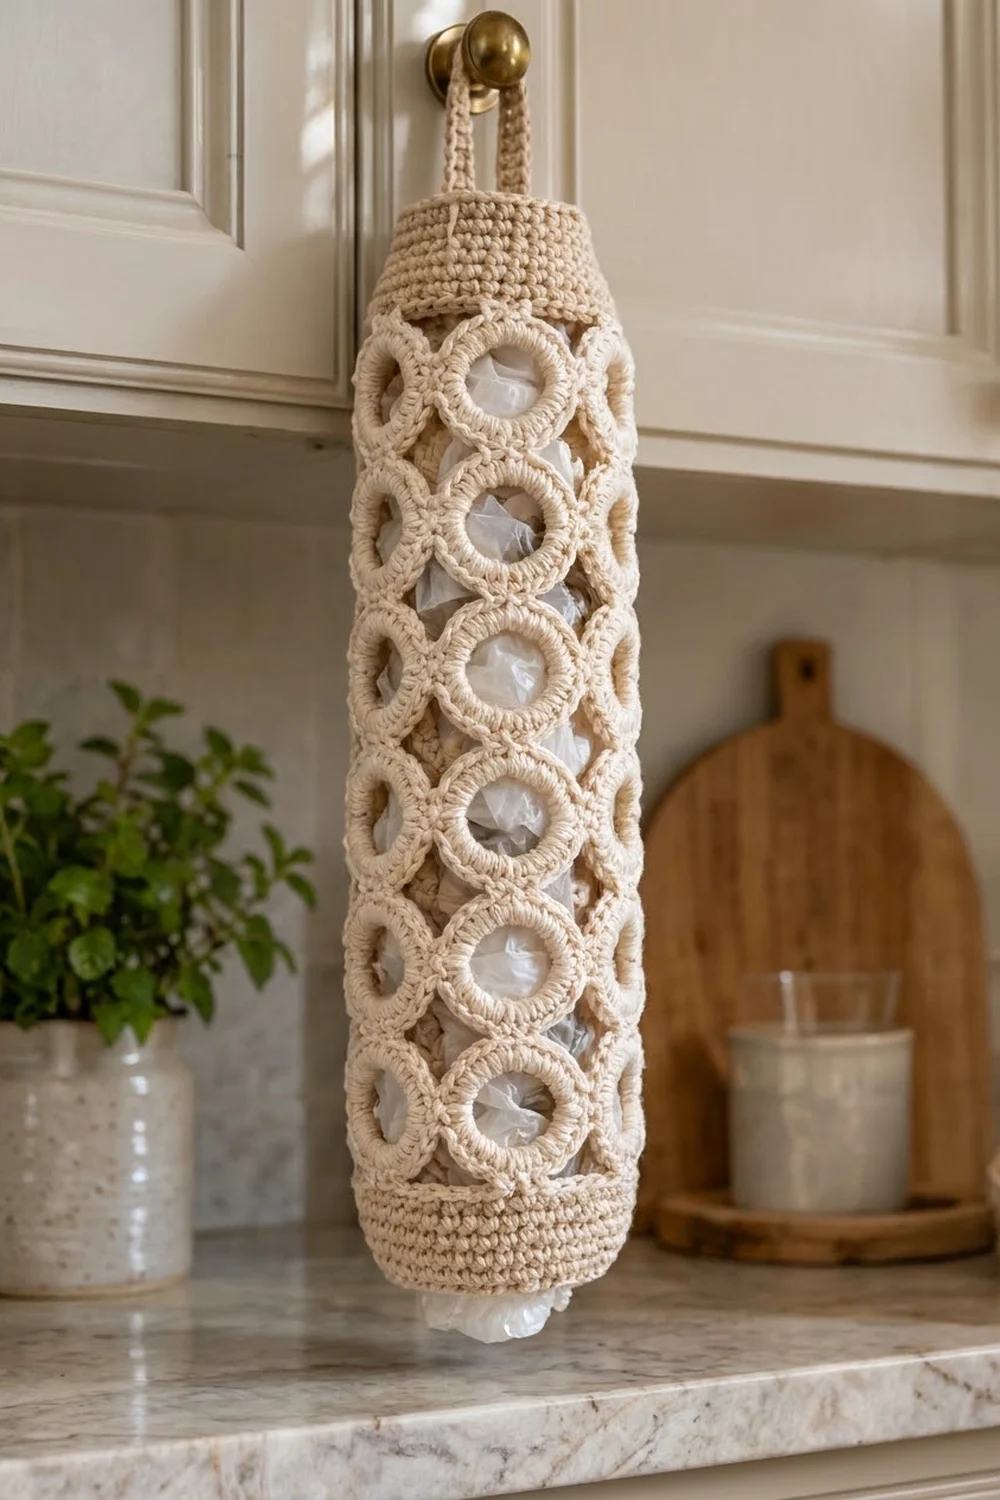
This plastic bag holder is made from rows of round, cushy rings joined into a tall tube. Solid bands at the top and bottom finish it off. You push bags in at the top and pull them out one at a time from the bottom. Through the open centers of the rings, the bags inside become part of the design.
The sample uses a single cream cotton yarn, which suits a neutral kitchen and shows off the stitch texture. Each ring is two rounds of single crochet worked over a chain ring. That makes a firm, slightly raised circle that holds its shape when the tube is full.
This pattern uses US crochet terms. The finished holder is 15¾ in (40.0 cm) tall, not counting the hanging loop. It is 10 in (25.4 cm) around, or 5 in (12.7 cm) wide when flattened.
Here is the construction in brief. You make 30 rings and sew them into a flat grid 5 rings wide and 6 rings tall. Then you close the grid into a tube. Next you work a top band and a bottom band directly onto the ring edges. Last, you add a strap loop to the top for hanging.
Finished Size and Construction
- Finished size: 15¾ in (40.0 cm) tall × 10 in (25.4 cm) around; 5 in (12.7 cm) wide flat
- Skill level: Easy / Advanced Beginner
- Terminology: US crochet terms
- Yarn weight: Worsted (#4), cotton or cotton blend
- Hook: 4.5 mm (US 7)
- Number of pieces: 30 ring motifs, joined into one tube; the bands and strap are worked directly onto it
- Layout: 5 rings around × 6 rings tall, in straight columns and rows
- Piece size: each ring is 2 in (5.1 cm) across, with a center opening of about 1 in (2.5 cm)
- Size before bands: ring tube is 10 in (25.4 cm) around × 12 in (30.5 cm) tall
- Band depth: top band 2¼ in (5.7 cm); bottom band 1½ in (3.8 cm)
Materials
Yarn: Use a smooth worsted-weight cotton or cotton blend. Cotton keeps the rings crisp, doesn’t stretch much under the weight of the bags, and is easy to wash. Avoid fuzzy or very stretchy acrylics, because the rings will lose their round shape.
- Cream: 150 g / 240 m (about 262 yd)
Tools:
– 4.5 mm (US 7) crochet hook
– Yarn needle
– 4 locking stitch markers (at least), plus 1 for marking the start of each round
– Scissors
– Measuring tape
– Rust-proof pins and a blocking surface
The yarn amount includes a margin of about 15–20% for your gauge swatch, seaming and tension differences.
Abbreviations (US Terms)
- ch – chain
- sl st – slip stitch
- sc – single crochet
- sc2tog – single crochet 2 together: (insert hook in next st, yo, pull up a loop) twice, yo, pull through all 3 loops on hook
- st(s) – stitch(es)
- rnd(s) – round(s)
- yo – yarn over
- sp – space
Special note – ring stitch positions: In Rnd 2 of each ring, the first sc counts as st 1. Number the stitches clockwise from there up to st 32. The joining and band instructions use these numbers.
Gauge and Checkpoints
Band gauge: 16 sc × 18 rnds = 4 in (10.2 cm) in sc worked in the round.
Ring gauge: one finished ring = 2 in (5.1 cm) across.
Make one ring before you do anything else. This is your main test piece.
- After ring Rnd 1: the ring should be about 1½ in (3.8 cm) across, with stitches packed snugly around the chain ring.
- After ring Rnd 2: the ring should be 2 in (5.1 cm) across and lie flat, with no ruffling or cupping.
If your ring is too big (more than 2⅛ in / 5.4 cm), change to a 4.0 mm (US G-6) hook.
If your ring is too small (less than 1⅞ in / 4.8 cm), change to a 5.0 mm (US H-8) hook.
Ring size controls everything else. Five rings around must come to 10 in (25.4 cm), so that the 40-stitch bands at 4 sc per inch fit the tube exactly.
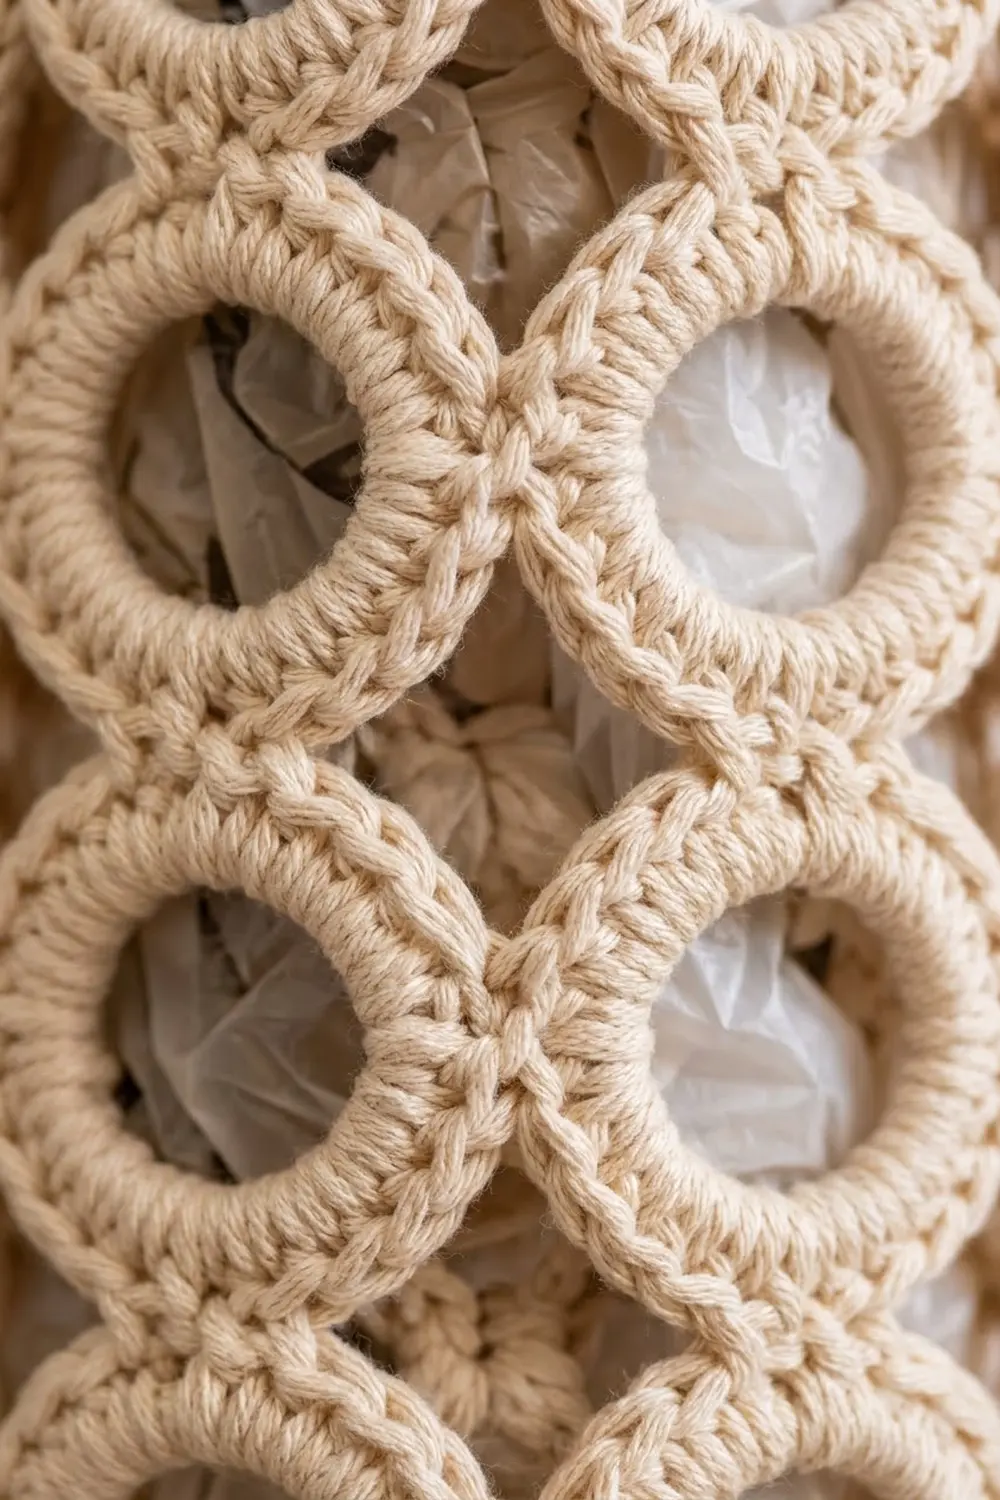
Ring Motif (Make 30)
Foundation: Ch 12, sl st in first ch to form a ring.
Rnd 1: Ch 1 (does not count as a st), work 24 sc into the ring, pushing the stitches together so they all fit. Sl st in first sc to join. (24 sts)
Rnd 2: Ch 1, sc in the same st as the joining sl st and in the next st, 2 sc in next st, sc in next 2 sts, 2 sc in next st; repeat from * 6 more times. Sl st in first sc to join. (32 sts)*
Fasten off, leaving a 12 in (30.5 cm) tail on about half of your rings to use for seaming. Weave in the starting tail.
Mark the join points: Each ring joins its neighbors at four points, each made of 2 stitches spaced 8 stitches apart:
– Top: sts 1–2
– Right: sts 9–10
– Bottom: sts 17–18
– Left: sts 25–26
On your first few rings, mark the top pair with a stitch marker so you don’t lose track of them. After a few rings, you’ll be able to find the points by counting from the joining seam.
Checkpoint: 32 sts, 2 in (5.1 cm) across, center opening about 1 in (2.5 cm).
Make All Pieces
Make 30 rings in Cream.
Lay them out in a grid 5 columns wide and 6 rows tall. Turn every ring so that st 1 (the top) is at the top.
Row 1 (top):    O - O - O - O - O
                |   |   |   |   |
Row 2:          O - O - O - O - O
                |   |   |   |   |
Row 3:          O - O - O - O - O
                |   |   |   |   |
Row 4:          O - O - O - O - O
                |   |   |   |   |
Row 5:          O - O - O - O - O
                |   |   |   |   |
Row 6 (bottom): O - O - O - O - O
(Column 5 is later joined back to Column 1 to close the tube)
Each “–” or “|” is one join point of 2 stitches.
Joining
Method: Whipstitch with a yarn needle, through the outer loops only.
Stitch-to-stitch logic:
– Side joins: Place two rings next to each other. Line up the right point (sts 9–10) of the left ring with the left point (sts 25–26) of the right ring. Whipstitch st 9 to st 26, then st 10 to st 25, going over each pair twice. Secure the yarn and move on.
– Vertical joins: Line up the bottom point (sts 17–18) of the upper ring with the top point (sts 1–2) of the ring below. Whipstitch st 17 to st 2 and st 18 to st 1, going over each pair twice.
Order:
1. Join each row of 5 rings with 4 side joins (24 joins in total).
2. Join the rows together with 5 vertical joins between each pair of rows (25 joins in total).
3. Size checkpoint: the flat panel should measure 10 in (25.4 cm) wide × 12 in (30.5 cm) tall.
4. Fold the panel into a tube, right side out. Join the right point of each Column 5 ring to the left point of the Column 1 ring in the same row (6 closing joins).
That makes 55 joins in all. Each ring is joined only at its 2-stitch points, which leaves the diamond-shaped gaps open.
Tension: Pull each whipstitch just tight enough to close the points together, with no gap. Don’t pull hard enough to bend the rings. Keep the seams small. They are meant to look like the rings are simply touching.
Checkpoint: the tube is 10 in (25.4 cm) around and 12 in (30.5 cm) tall.
Border: Top and Bottom Bands
Band gauge: 16 sc = 4 in (10.2 cm), which is 4 sc per inch.
Why the math works: Each ring is 2 in (5.1 cm) wide. At 4 sc per inch, 2 in calls for 8 band stitches per ring. Rnd 1 uses 6 sc along the ring’s arc plus a ch-2 bridge over the dip between rings, so 6 + 2 = 8 sts per ring. Five rings × 8 sts = 40 sts, and 40 sts ÷ 4 sc per inch = 10 in (25.4 cm), which matches the tube exactly. No extra stitches are added at the seams. The ch-2 bridges are the only fillers, and they are already in the 8-per-ring count.
Top Band
Hold the tube with Row 1 at the top. Each top-row ring has a top arc of sts 31, 32, 1, 2, 3 and 4. That arc is centered on the top join point.
Rnd 1 (leveling round): Join yarn with a sc in st 31 of any top-row ring. Sc in sts 32, 1, 2, 3 and 4 (6 sc on this ring). Ch 2, skip the rest of this ring and the side seam, and sc in st 31 of the next ring. Sc in sts 32, 1, 2, 3, 4, ch 2, sc in st 31 of next ring; repeat from * around, ending with ch 2 after the last ring. Sl st in first sc. (30 sc + 10 ch = 40 sts)*
Rnd 2: Ch 1, sc in each sc and 2 sc in each ch-2 sp around. Sl st to first sc. (30 + 10 = 40 sts)
Rnds 3–5: Ch 1, sc in each st around, sl st to join. (40 sts)
Rnd 6 (decrease): Ch 1, sc in next 3 sts, sc2tog; repeat from * 7 more times. Sl st to join. (32 sts)*
Rnd 7: Ch 1, sc in each st around, sl st to join. (32 sts)
Rnd 8 (decrease): Ch 1, sc in next 2 sts, sc2tog; repeat from * 7 more times. Sl st to join. (24 sts)*
Rnds 9–10: Ch 1, sc in each st around, sl st to join. (24 sts)
Do not fasten off.
Checkpoint: the top band is 10 rnds, about 2¼ in (5.7 cm) deep, and the top opening is 6 in (15.2 cm) around.
Hanging Strap
Row 1: Ch 1, sc in next 4 sts, turn. (4 sts)
Rows 2–24: Ch 1, sc in each st across, turn. (4 sts)
The strap measures about 5¼ in (13.3 cm). Fasten off, leaving a 10 in (25.4 cm) tail. Fold the strap into a loop and sew the end to the 4 sts directly across the opening, which are 12 sts from where the strap starts. The opening stays clear on both sides of the loop, so you can still push bags in.
Bottom Band
Turn the tube over so Row 6 is at the top. Each bottom-row ring has a bottom arc of sts 15, 16, 17, 18, 19 and 20.
Rnd 1 (leveling round): Join yarn with a sc in st 15 of any bottom-row ring. Sc in sts 16, 17, 18, 19 and 20 (6 sc on this ring). Ch 2, sc in st 15 of the next ring. Sc in sts 16–20, ch 2, sc in st 15 of next ring; repeat from * around, ending with ch 2. Sl st to first sc. (30 sc + 10 ch = 40 sts)*
Rnd 2: Ch 1, sc in each sc and 2 sc in each ch-2 sp. Sl st to join. (30 + 10 = 40 sts)
Rnds 3–4: Ch 1, sc in each st around. (40 sts)
Rnd 5 (decrease): Ch 1, sc in next 3 sts, sc2tog; repeat from * 7 more times. (32 sts)*
Rnds 6–7: Ch 1, sc in each st around. (32 sts)
Fasten off and weave in the end.
Checkpoint: the bottom band is 7 rnds, about 1½ in (3.8 cm) deep, and the bottom opening is 8 in (20.3 cm) around. That opening is narrow enough to hold the bags in but easy to reach into.
Total height: 12 in + 2¼ in + 1½ in = 15¾ in (30.5 cm + 5.7 cm + 3.8 cm = 40.0 cm).
Final Blocking
- Weave in all the remaining tails, following each tail along the outer loops of its ring so it can’t be seen.
- Wet the holder in cool water, squeeze it out gently and roll it in a towel to remove extra water.
- Stuff a rolled towel or a 3 in (7.6 cm) cardboard tube wrapped in plastic into the tube to give it a round shape.
- Lay it on its side. With your fingers, push each ring into a true circle and open its center to about 1 in (2.5 cm).
- Pin the bands straight so the leveling rounds sit flat and don’t dip.
- Pin the strap flat. Let everything dry completely before you hang it up.
- Measure again: 15¾ in (40.0 cm) tall and 10 in (25.4 cm) around.
Final Quality-Control Checklist
- All 30 rings measure 2 in (5.1 cm) and have 32 stitches.
- Every ring is turned with st 1 at the top.
- All 55 joins are tight, and no join point has a gap.
- The rows of rings are level and the columns are straight, not twisted.
- Rnd 1 of each band has 40 sts (30 sc + 10 ch).
- The top band ends with 24 sts and the bottom band with 32 sts.
- The strap is sewn on directly across from where it starts.
- All the ends are woven in and none show on the outside.
Troubleshooting
Rings cup or ruffle: Cupping means you worked too few stitches in Rnd 1, so pack in all 24 sc. Ruffling means your tension in Rnd 2 is loose, so change to a smaller hook.
Rings are different sizes: Your tension changed over time. Measure every ring and remake any ring more than ⅛ in (0.3 cm) off.
Tube spirals: Some rings were joined at the wrong points. Count 8 sts between points and check that st 1 is at the top of every ring.
Band puckers above the rings: Your ch-2 bridges are too tight. Chain loosely, or make the chains with a hook one size larger.
Band flares: You’re working the band too loosely. Change to a smaller hook for the bands only.
Bags fall out of the bottom: Repeat Rnd 5 once (sc 2, sc2tog × 8 = 24 sts) to make the opening smaller.
Strap stretches: Work the strap with a hook one size smaller, or sew a line of slip stitches along both edges.
Care
Hand wash or machine wash on a gentle cycle in cool water, then reshape and lay flat to dry. Don’t tumble dry. Heat can shrink cotton unevenly and distort the rings.
Final Notes
Each stage of this holder depends on the one before it. A ring of 32 stitches measures 2 in (5.1 cm). Five rings around make 10 in (25.4 cm). Eight band stitches per ring make 40 stitches, which is exactly 10 in (25.4 cm) at 4 sc per inch. Six rows of rings give 12 in (30.5 cm). With the 2¼ in (5.7 cm) top band and the 1½ in (3.8 cm) bottom band, the finished holder is 15¾ in (40.0 cm) tall. If you check each measurement as you go, the bands will fit the tube without any extra fixing.
Happy crocheting!