

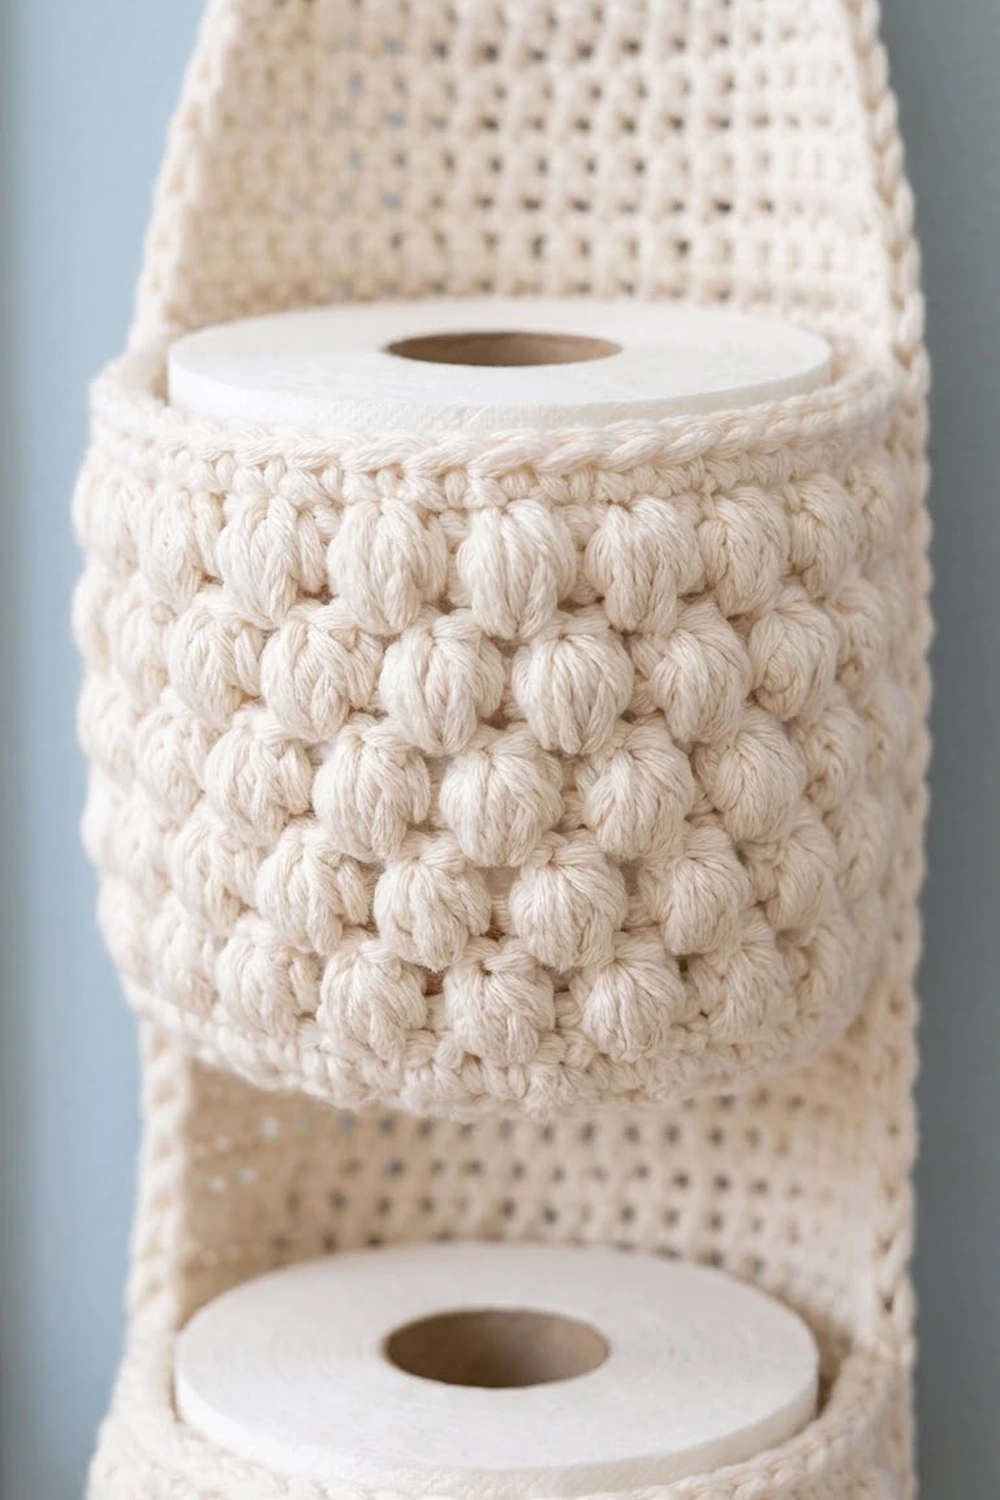
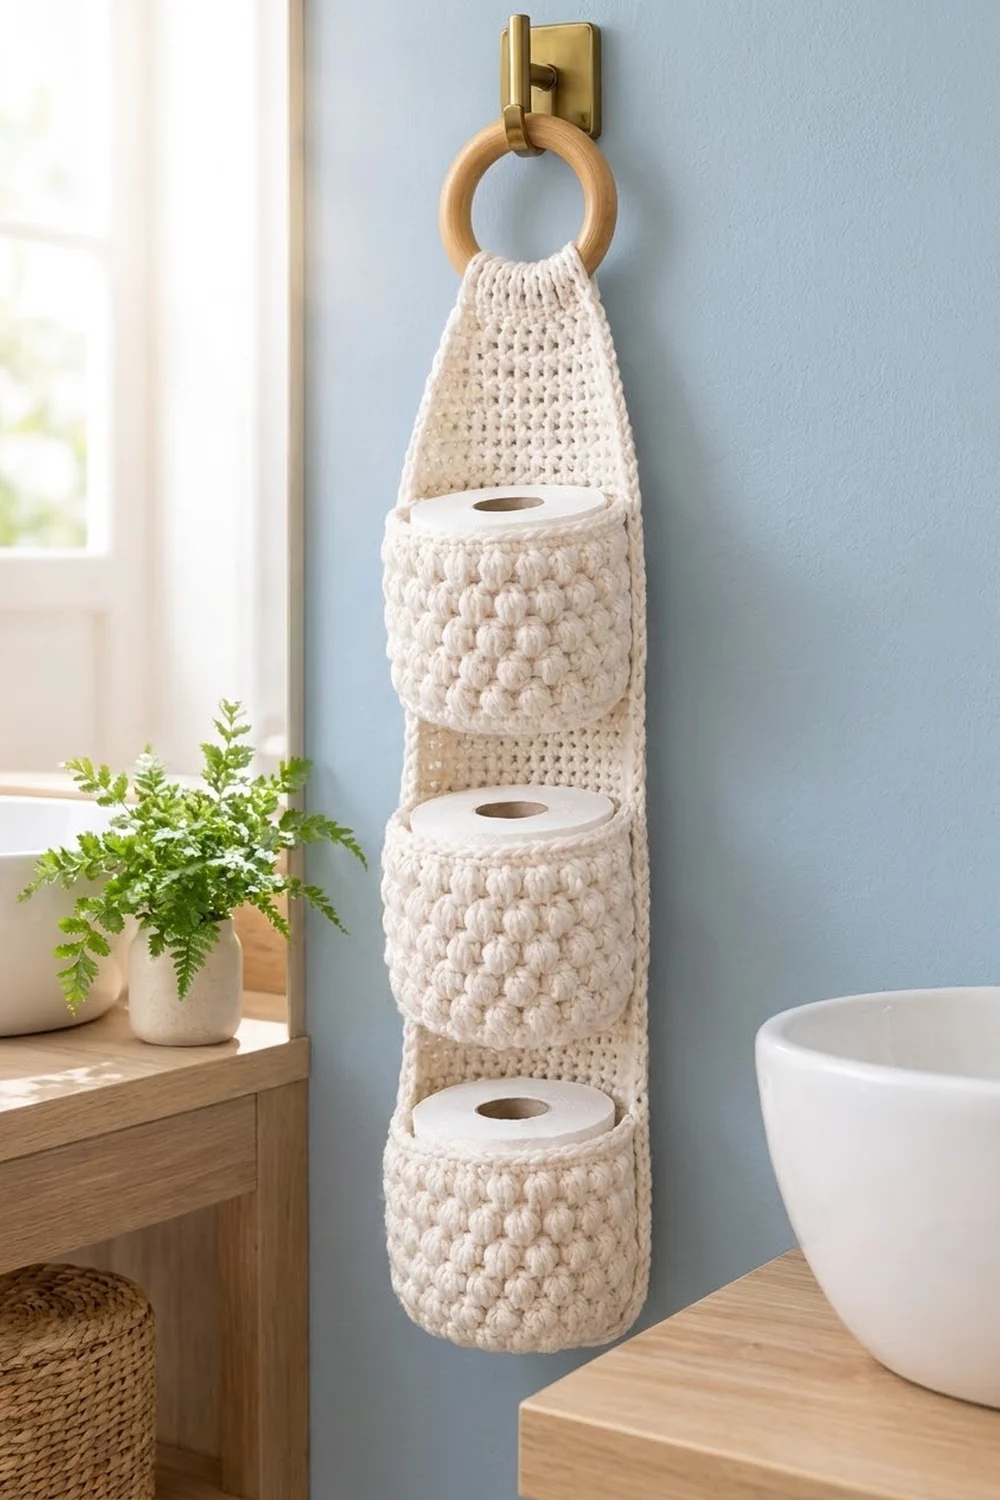
This hanging toilet paper holder keeps three spare rolls tidy and close at hand. A long cream back panel hangs from a wooden ring, and three round puff-stitch pockets are sewn down its front, one above the other. The look is soft, textured and calm, and it suits a coastal, farmhouse or Scandinavian bathroom.
The whole project uses one color: a cream worsted-weight cotton or cotton blend. The back panel is smooth double crochet, which makes it firm enough to hang straight. Raised puff stitches set in an offset brick pattern give the pockets their texture. All instructions use US crochet terms.
Once it’s hung, the holder measures 6 in (15.2 cm) wide and about 26 in (66.0 cm) long from the ring to the bottom edge. Each pocket is 4.5 in (11.4 cm) across and 3.75 in (9.5 cm) tall, which fits a standard roll.
The panel is worked in rows from the bottom up. Increases round off the bottom, and decreases taper the top into a tab. You then add a two-round border. The pockets are worked in continuous joined rounds, starting with a flat circle base, and are then sewn to the panel. Last of all, the tab is gathered around the wooden ring.
Finished Size and Construction
- Finished size (flat): 6 x 28 in (15.2 x 71.1 cm)
- Hanging length: about 26 in (66.0 cm) after the tab is folded over the ring
- Skill level: Intermediate (puff stitches, shaping and seaming)
- Terminology: US
- Yarn weight: Worsted (#4)
- Hook: 5.0 mm (H-8)
- Number of pieces: 4 (1 back panel, 3 pockets)
- Layout: 3 pockets stacked vertically on 1 panel
- Panel size before border: 5 x 27 in (12.7 x 68.6 cm)
- Border depth: 0.5 in (1.3 cm) on every side
- Pocket size: 4.5 in (11.4 cm) base diameter, 3.75 in (9.5 cm) tall
Materials
Choose a smooth worsted-weight cotton or cotton blend. Cotton holds its shape when the pockets are full, and it handles a damp bathroom well. Avoid fuzzy yarns, because they blur the puff texture.
- Cream: 350 g, approx. 610 m (667 yd), based on a yarn with about 87 m per 50 g. Plan on about 110 g for the panel and border and about 70 g for each pocket.
Tools:
- 5.0 mm (H-8) crochet hook
- Wooden ring, 3 in (7.6 cm) outer diameter
- Tapestry needle
- 6 locking stitch markers
- Scissors and a tape measure
- Blocking mat and rust-proof pins
The quantities include a margin of about 10% for your gauge swatch and seaming.
Abbreviations (US Terms)
- ch – chain
- sl st – slip stitch
- sc – single crochet
- dc – double crochet
- dc2tog – double crochet 2 together
- BLO – back loop only
- MR – magic ring
- st(s) – stitch(es)
- RS – right side
Special stitch: puff stitch (puff). [Yarn over, insert hook in the stitch, yarn over, pull up a loop to about 0.25 in (0.6 cm) tall] 4 times; you’ll have 9 loops on the hook. Yarn over and draw through all 9 loops. A puff counts as 1 stitch. Don’t chain to close it.
Gauge and Checkpoints
Double crochet gauge: 16 dc and 8 rows = 4 in (10.2 cm). That works out to 4 stitches and 2 rows per inch.
Single crochet gauge: 16 sc = 4 in (10.2 cm).
Before starting the panel, make one full pocket as your test piece. It shows your puff gauge and the fit with a real roll.
Checkpoints:
- Pocket Rnd 9: the flat base measures 4.5 in (11.4 cm) across.
- Pocket Rnds 11–20: the puff band is 3 in (7.6 cm) tall.
- Finished pocket: 3.75 in (9.5 cm) tall, and a roll slides in without stretching the stitches.
- Panel Row 5: 5 in (12.7 cm) wide.
- Panel Row 20: 10 in (25.4 cm) long.
- Panel Row 54: 27 in (68.6 cm) long.
If your pieces come out too big, go down 0.5 mm in hook size. If they’re too small, go up 0.5 mm. Fix gauge before you go further, because every seam position below depends on 2 rows per inch.
Back Panel
Rows 1–44 and 51–54 start with ch 3, which counts as 1 dc. Rows 45–50 start with ch 2, which does not count as a stitch. Turn at the end of every row.
Row 1 (RS): Ch 14. Dc in the 4th ch from the hook (the skipped ch count as 1 dc), then dc in each remaining ch. (12 sts)
Row 2: Ch 3, dc in the first st, dc in each st to the turning ch, then 2 dc in the top of the turning ch. (14 sts)
Row 3: Repeat Row 2. (16 sts)
Row 4: Repeat Row 2. (18 sts)
Row 5: Repeat Row 2. (20 sts)
These increases make the rounded bottom curve. Checkpoint: the panel is 5 in (12.7 cm) wide.
Rows 6–44: Ch 3, dc in each st across. (20 sts per row)
Checkpoint: the panel is 22 in (55.9 cm) long.
Row 45: Ch 2, dc2tog over the first 2 sts, dc in each st to the last 2 sts, dc2tog. (18 sts)
Row 46: Repeat Row 45. (16 sts)
Row 47: Repeat Row 45. (14 sts)
Row 48: Repeat Row 45. (12 sts)
Row 49: Repeat Row 45. (10 sts)
Row 50: Repeat Row 45. (8 sts)
Rows 51–54 (ring tab): Ch 3, dc in each st across. (8 sts per row)
Leave a 4 in (10.2 cm) tail and fasten off. Checkpoint: the panel is 27 in (68.6 cm) long. Don’t add the border yet; it comes after the pockets are made.
Pocket (Make 3)
Work in joined rounds with the RS facing you the whole time, so the puffs sit on the outside. Join each round with a sl st to the first st and ch 1, which does not count as a stitch.
Base
Rnd 1: 6 sc in the MR. (6 sts)
Rnd 2: 2 sc in each st. (12 sts)
Rnd 3: [Sc in next st, 2 sc in next st] 6 times. (18 sts)
Rnd 4: [Sc in next 2 sts, 2 sc in next st] 6 times. (24 sts)
Rnd 5: [Sc in next 3 sts, 2 sc in next st] 6 times. (30 sts)
Rnd 6: [Sc in next 4 sts, 2 sc in next st] 6 times. (36 sts)
Rnd 7: [Sc in next 5 sts, 2 sc in next st] 6 times. (42 sts)
Rnd 8: [Sc in next 6 sts, 2 sc in next st] 6 times. (48 sts)
Rnd 9: [Sc in next 7 sts, 2 sc in next st] 6 times. (54 sts)
Checkpoint: the base measures 4.5 in (11.4 cm) across.
Wall
Rnd 10: Sc in the BLO of each st. (54 sts)
Working in the back loops turns the wall up and leaves a ridge of front loops around the base. You’ll use that ridge for seaming later.
Rnd 11 (Puff A): [Puff in next st, sc in next st] 27 times. (27 puffs + 27 sc = 54 sts)
Rnd 12: Sc in each st. (54 sts)
Rnd 13 (Puff B): [Sc in next st, puff in next st] 27 times. (27 sc + 27 puffs = 54 sts)
Rnd 14: Sc in each st. (54 sts)
Puff B places each puff above the sc of the round below, which makes the brick pattern.
Rnds 15–18: Repeat Rnds 11–14. (54 sts)
Rnds 19–20: Repeat Rnds 11–12. (54 sts)
That gives 5 puff rounds in total. Checkpoint: the puff band is 3 in (7.6 cm) tall.
Rnds 21–22: Sc in each st. (54 sts)
Rnd 23: Loosely sl st in each st. (54 sts)
Leave a 24 in (61.0 cm) tail for sewing and fasten off. Checkpoint: the pocket is 3.75 in (9.5 cm) tall.
Make All Pieces
All pieces are cream:
- 1 back panel (110 g)
- 3 pockets (70 g each, 210 g total)
Placement layout, read from top to bottom. Pocket rows are the panel rows each pocket’s back covers.
[ wooden ring ]
Rows 51–54   ring tab (8 sts)
Rows 45–50   taper (20 → 8 sts)
Rows 37–44   open panel
Rows 30–36   POCKET 3  (base seam: top of Row 29 / rim seam: top of Row 36)
Rows 25–29   gap
Rows 18–24   POCKET 2  (base seam: top of Row 17 / rim seam: top of Row 24)
Rows 13–17   gap
Rows 6–12    POCKET 1  (base seam: top of Row 5 / rim seam: top of Row 12)
Rows 1–5     rounded bottom
Check the total: 5 + 7 + 5 + 7 + 5 + 7 + 8 + 6 + 4 = 54 rows.
Joining
Method: whipstitch with the pocket’s yarn tail and a tapestry needle.
Back section: Fold each pocket flat and mark the 14 Rnd 23 stitches centered at the back, plus the 14 front loops of the Rnd 9 base ridge directly below them. Those 14 stitches measure 3.5 in (8.9 cm), the same as 14 panel stitches. The other 40 stitches curve forward to form the pocket.
Panel target: Mark stitches 4 through 17 of the panel rows named in the layout. That leaves 3 stitches clear on each side.
Stitch-to-stitch logic:
- Base seam: Sew the 14 base-ridge front loops to the 14 marked stitches on the top of the base row, matching 1 stitch to 1 stitch.
- Rim seam: Sew the 14 marked Rnd 23 stitches to the 14 marked stitches on the top of the rim row, again 1 to 1.
- Side seams: Whipstitch up both edges of the back section to connect the two seams. Take 1 stitch through the panel per panel row (7 stitches), catching about every second pocket round.
The pocket wall is 3.75 in (9.5 cm) tall and the seam span is 3.5 in (8.9 cm). That extra 0.25 in (0.6 cm) of ease lets the pocket cup forward.
Tension: Keep the stitches snug but not tight. The panel should stay flat, with no puckering behind the pocket.
Size checkpoint: After all three pockets are attached, the panel is still 5 in (12.7 cm) wide and 27 in (68.6 cm) long. If it has shortened, the seams are too tight; redo them.
Border
Border gauge: 4 sc per inch along every edge.
The panel has four edges for the border. The side counts below exclude the 4 corner stitches, which are listed separately.
- Top edge: the 8 stitches of Row 54
- Bottom edge: the 12 stitches of Row 1, worked into the foundation chain
- Long sides: 54 dc row ends each
Join the yarn at the top right corner with the RS facing you.
Rnd 1: Work the edges, then add the corners.
- Top: 1 sc in each of 8 sts.
- Corner: 1 extra sc in the last top st.
- Left side: 2 sc in each of 54 row ends (108 sc).
- Corner: 1 extra sc in the first bottom st.
- Bottom: 1 sc in each of 12 sts.
- Corner: 1 extra sc in the last bottom st.
- Right side: 2 sc in each of 54 row ends (108 sc).
- Corner: 1 extra sc in the first top st.
- Join with a sl st.
Total: 236 sc worked into the edges (8 + 108 + 12 + 108) + 4 corner sc = 240 sts.
Rnd 2: Ch 1. Sc in each st, working 3 sc in each of the 4 corner sts. Join.
Total: 236 side stitches worked 1 per existing stitch + 4 corners × 3 sc (12) = 248 sts.
Why the math works: Each dc row is 0.5 in (1.3 cm) tall, so 2 sc per row end gives 4 sc per inch, the same as the sc gauge, and the edges lie flat. On the tapered rows the row ends sit at a slight angle, so the same 2 sc ease around the diagonal without cupping. The two rounds add 0.5 in (1.3 cm) on each side. The panel grows from 5 x 27 in (12.7 x 68.6 cm) to 6 x 28 in (15.2 x 71.1 cm).
Attach the ring:
- Thread yarn through the stitches of Row 51 and draw them up until the tab measures 1.5 in (3.8 cm) across. Secure the yarn.
- Fold the tab over the wooden ring toward the back.
- Whipstitch the top border edge to the back of Row 50.
The fold takes up about 2 in (5.1 cm), so the holder hangs about 26 in (66.0 cm) long.
Final Blocking
- Lightly mist the whole holder with water, or wet-block it if your cotton allows.
- Pin the panel flat to 6 x 28 in (15.2 x 71.1 cm), keeping the long edges straight.
- Set a roll, or a rolled towel of the same size, in each pocket to shape it.
- Ease the pocket rims into a smooth curve and push the puffs outward with your fingertips.
- Let everything dry completely before hanging.
Final Quality-Control Checklist
- [ ] Panel row counts are correct: 20 sts in Rows 5–44 and 8 sts in Rows 50–54.
- [ ] Each pocket has 54 sts in every round, with 5 puff rounds in a brick offset.
- [ ] All pockets are centered, with 3 clear stitches on each side.
- [ ] The gaps between pockets are all 5 rows, or 2.5 in (6.4 cm).
- [ ] Border Rnd 2 has 248 sts and the corners lie flat.
- [ ] The tab is gathered and stitched securely around the ring.
- [ ] All yarn ends are woven in on the back.
Troubleshooting
- Puffs look flat: Pull each loop up taller before closing the puff, and keep the sc between puffs snug.
- Pocket flares at the top: Your rim is too loose. Redo Rnd 23 with a smaller hook.
- Panel edges wave: Your border is too loose. Use 3 sc per 2 row ends on Rnd 1 instead, or go down a hook size.
- Panel curls inward: Use a looser border or block it harder.
- Roll won’t fit: Your base is under 4.5 in (11.4 cm) across. Go up a hook size for the pockets.
- Pocket sags forward: Add an extra tack stitch at the center of the base seam.
Care
Hand wash in cool water, gently press out the water and dry flat. If you need to, reshape the pockets around rolls while they’re damp.
Final Notes
Everything in this pattern hangs on one measurement chain:
- Gauge: 4 sts and 2 rows per inch.
- Panel before border: 5 x 27 in (12.7 x 68.6 cm).
- Pockets: 4.5 in (11.4 cm) bases and 3.75 in (9.5 cm) walls, sewn over 7-row spaces.
- Border: 0.5 in (1.3 cm) on each side, for a 6 x 28 in (15.2 x 71.1 cm) panel.
- Hung on the ring: about 26 in (66.0 cm).
Check each link as you go, and the finished holder will hang straight and hold every roll securely.
Happy crocheting!