

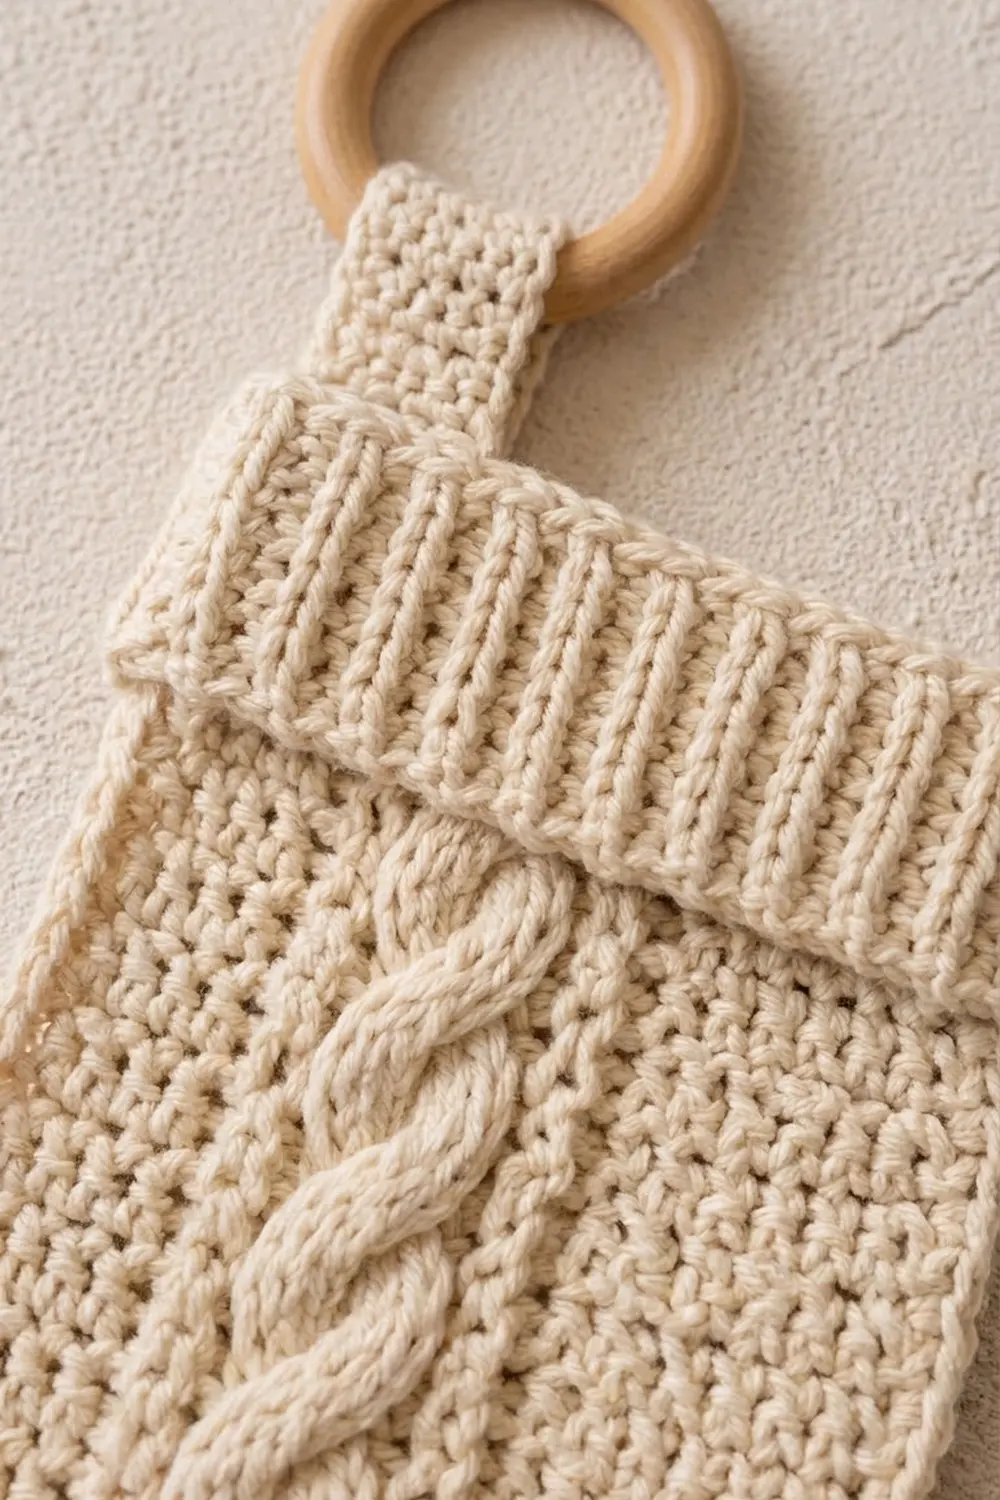
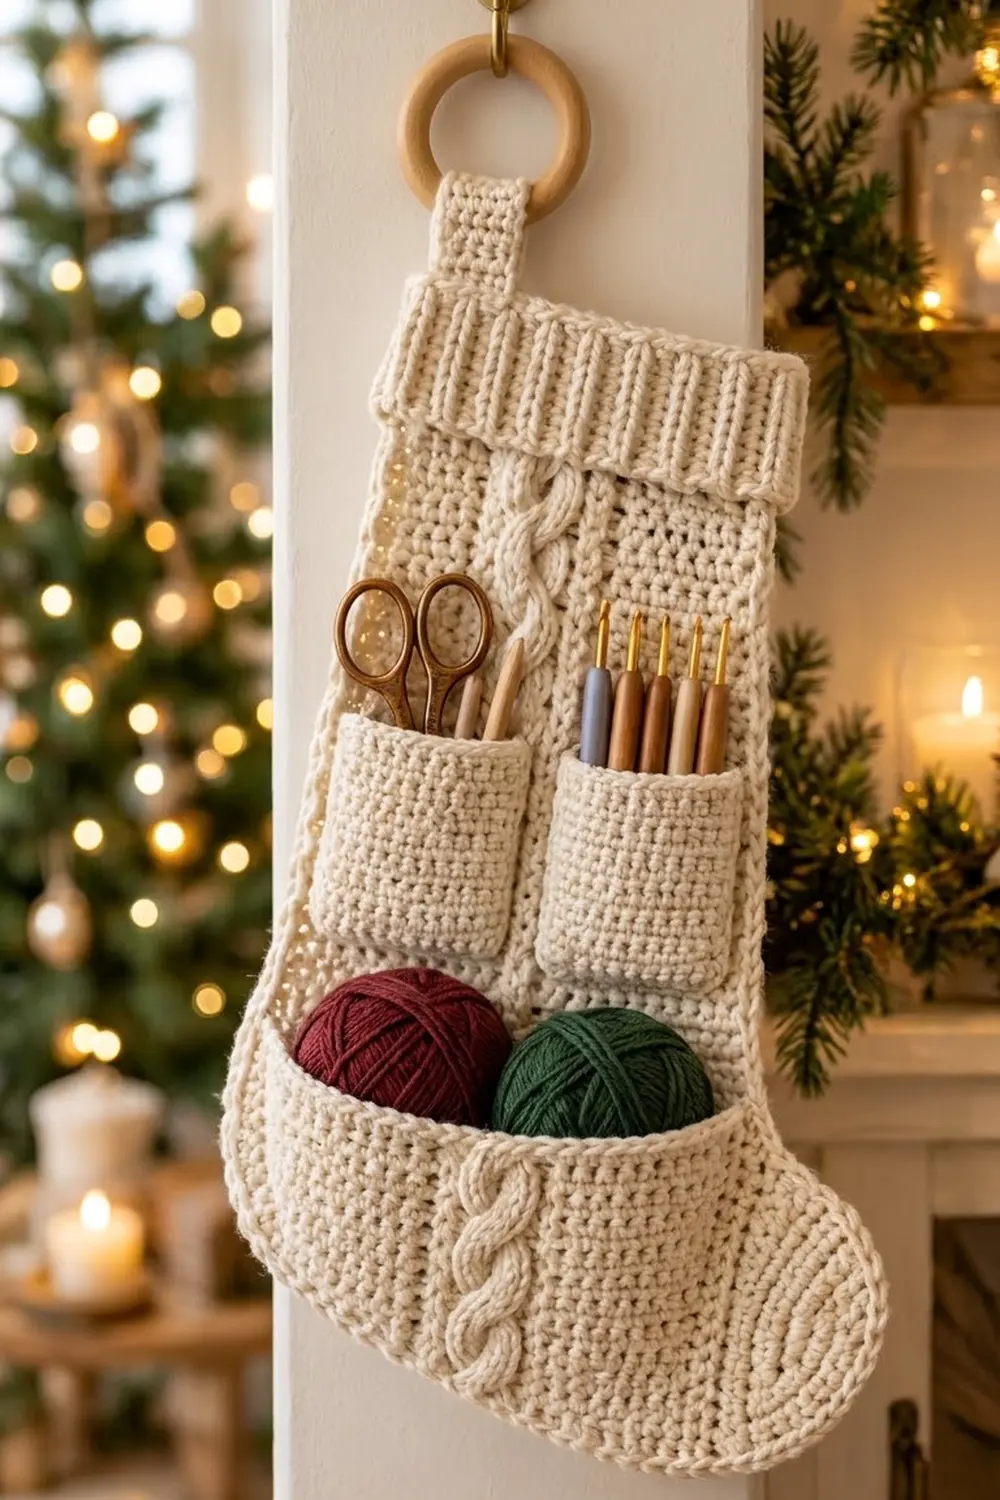
This hanging organizer is a flat cream stocking with places to keep your crochet tools. It has a ribbed cuff, a raised cable down the leg and a corded crab-stitch edge. Two small pockets hold scissors and hooks, and a wide foot pocket holds a couple of yarn balls.
The whole piece is made in one cream yarn, so it looks calm and textured, a bit like a Nordic sweater. It looks good on a door, beside a mantel or near your crafting chair.
The pattern uses US crochet terms. The finished organizer measures about 7.8 in (19.8 cm) wide at the leg, 11.8 in (30.0 cm) long across the foot and 17.8 in (45.2 cm) tall from the bottom border to the top of the cuff. The hanging loop adds about 2 in (5.1 cm).
You’ll work the back panel top-down in rows, shape the foot with simple increases and decreases, and add a two-round border. Then you’ll make the cuff sideways so its ribs stand vertically. Finally, you’ll make the tab and three pockets and sew everything onto the panel.
Finished Size and Construction
- Finished size: 7.8 in (19.8 cm) leg width × 11.8 in (30.0 cm) foot length × 17.8 in (45.2 cm) height. The loop adds 2 in (5.1 cm).
- Skill level: Intermediate (front-post cables, simple shaping)
- Terminology: US
- Yarn weight: Worsted (#4)
- Hook: 5.0 mm (H-8)
- Number of pieces: 6 (1 panel, 1 cuff, 1 tab, 2 small pockets, 1 foot pocket) plus a purchased wooden ring
- Layout: pockets are stacked on the front of the panel, the cuff is seamed to the top edge and the tab is sewn behind the cuff
- Panel size before border: 7 in (17.8 cm) leg width, 11 in (27.9 cm) foot length, 14 in (35.6 cm) height
- Border depth: about 0.4 in (1.0 cm) on every edge
Materials
Yarn: Use a smooth worsted-weight cotton, cotton blend or soft acrylic in cream. Cotton shows the cables clearly and holds the organizer’s shape when the pockets are full. Avoid fuzzy or very splitty yarn, because it hides the post stitches.
- Cream: 150 g, about 270 m (295 yd)
This quantity includes a margin of roughly 25% for swatching and differences between dye lots. Buy all of it from one dye lot.
Tools:
– 5.0 mm (H-8) crochet hook
– Tapestry needle
– 3 in (7.6 cm) wooden ring
– 6–8 locking stitch markers
– Rustproof pins
– Blocking mat and spray bottle
– Measuring tape
– Scissors
Abbreviations (US Terms)
- ch – chain
- sc – single crochet
- sc2tog – single crochet 2 together (1 decrease)
- blo – back loop only
- FPdc – front post double crochet
- FPtr – front post treble crochet
- rev sc – reverse single crochet (crab stitch)
- st(s) – stitch(es)
- RS / WS – right side / wrong side
Special stitch – C6 (6-stitch cable cross): Skip the next 3 post sts two rows below. FPtr around each of the next 3 post sts. Then, working in front of the 3 sts you just made, FPtr around each of the 3 skipped post sts. On the current row, skip the 6 sc behind the cable. The stitch count stays the same.
Post rule: Every time you work a FPdc or FPtr around a stitch two rows below, skip the sc directly behind it on the current row. Doing this keeps every row at its stated count.
Gauge and Checkpoints
Gauge: 16 sc and 18 rows = 4 in (10.2 cm) in single crochet worked in rows.
Test one piece first. Make one small pocket body (below) before anything else. It’s your gauge swatch.
- After Row 1 of the pocket: 12 sts should measure 3 in (7.6 cm).
- After Row 16 of the pocket: the body should be 3 in × 3.6 in (7.6 × 9.1 cm).
Panel checkpoints:
– After Row 41: 28 sts, 7 in (17.8 cm) wide, about 9.1 in (23.1 cm) tall
– After Row 49: 44 sts, 11 in (27.9 cm) at the widest row, about 10.9 in (27.7 cm) tall
– After Row 63: 28 sts on the last row, 14 in (35.6 cm) tall
If your pieces come out too big, switch to a 4.5 mm hook. If they come out too small, switch to a 5.5 mm hook. Matching the stitch width matters most. Row height can be off by a row or two, since the border hides small differences.
Back Panel
The panel is worked top-down. The toe edge is the last st of RS rows and the first st of WS rows. Put a marker there after Row 2. With the RS facing and Row 1 at the top, the toe points right.
Row 1 (WS): Ch 29, sc in 2nd ch from hook and in each ch across, turn. (28 sts)
Row 2 (RS): Ch 1, sc 11, FPdc around each of next 6 sts, sc 11, turn. (28 sts)
Row 3 and all WS rows to Row 41: Ch 1, sc in each st across, turn. (28 sts)
Plain RS rows (Rows 4, 8, 10, 12, 16, and so on): Ch 1, sc 11, FPdc around each of the 6 FPdc two rows below, sc 11, turn. (28 sts)
Cross rows (Rows 6, 14, 22, 30, 38): Ch 1, sc 11, C6, sc 11, turn. (28 sts)
Rows 7–41: Keep going as established. Cross on the rows listed above and work plain RS rows on every other even row. Row 41 is a WS row. (28 sts)
Checkpoint: The leg should be 7 in (17.8 cm) wide and about 9.1 in (23.1 cm) tall.
Instep Increases
On each of these rows, work 3 sc in the toe-edge st. That adds 2 sts per row on the toe side only, so the cable stays 11 sts in from the heel edge.
- Row 42 (RS): Ch 1, sc 11, FPdc 6, sc 10, 3 sc in last st, turn. (30 sts)
- Row 43 (WS): Ch 1, 3 sc in first st, sc across, turn. (32 sts)
- Row 44 (RS): Ch 1, sc 11, FPdc 6, sc to last st, 3 sc in last st, turn. (34 sts)
- Row 45 (WS): As Row 43. (36 sts)
- Row 46 (RS, cross): Ch 1, sc 11, C6, sc to last st, 3 sc in last st, turn. (38 sts)
- Row 47 (WS): As Row 43. (40 sts)
- Row 48 (RS): As Row 44. This is the last cable row. (42 sts)
- Row 49 (WS): As Row 43. (44 sts)
The cable runs from Row 2 to Row 48, about 10.4 in (26.4 cm). From here on, work sc into the tops of the cable sts just like every other stitch.
Foot
Rows 50–55: Ch 1, sc in each st across, turn. (44 sts)
Checkpoint: The foot should be 11 in (27.9 cm) wide.
Heel and Toe Rounding
Every row now decreases 1 st at each end.
Row 56: Ch 1, sc2tog, sc to last 2 sts, sc2tog, turn. (42 sts)
Repeat Row 56 seven more times:
– Row 57: 40 sts
– Row 58: 38 sts
– Row 59: 36 sts
– Row 60: 34 sts
– Row 61: 32 sts
– Row 62: 30 sts
– Row 63: 28 sts
Don’t fasten off. Go straight on to the border.
Cuff
The cuff is worked sideways, so the blo ridges stand vertically once it’s sewn on.
Row 1: Ch 11, sc in 2nd ch from hook and in each ch across, turn. (10 sts)
Rows 2–35: Ch 1, sc blo in each st across, turn. (10 sts)
Edge rows: Ch 1, turn the cuff 90 degrees and work 32 sc evenly along one long edge of row ends. Fasten off. Rejoin at the other long edge and work 32 sc evenly along it. Fasten off and leave a 24 in (61.0 cm) tail for sewing.
Checkpoint: About 7.8 in (19.8 cm) wide × 3 in (7.6 cm) tall.
Hanging Tab
Row 1: Ch 7, sc in 2nd ch from hook and in each ch across, turn. (6 sts)
Rows 2–27: Ch 1, sc in each st across, turn. (6 sts)
Fasten off and leave a long tail.
Checkpoint: 1.5 in (3.8 cm) wide × 6 in (15.2 cm) long.
Small Pockets (Make 2)
Row 1: Ch 13, sc in 2nd ch from hook and in each ch across, turn. (12 sts)
Rows 2–16: Ch 1, sc in each st across, turn. (12 sts)
Edging round: Ch 1. Along the top (Row 16), work 3 sc in first st, sc 10, 3 sc in last st (16). Work 14 sc evenly down the row ends. Along the foundation, work 3 sc in first ch, sc 10, 3 sc in last ch (16). Work 14 sc evenly up the row ends. Sl st to the first sc. (60 sts) Fasten off and leave a long tail.
Checkpoint: About 3.5 in × 4 in (8.9 × 10.2 cm).
Foot Pocket
This pocket is worked top-down, shaped like the panel’s lower foot, with its own cable. RS rows begin at the heel edge.
Row 1 (WS): Ch 45, sc in 2nd ch from hook and in each ch across, turn. (44 sts)
Row 2 (RS): Ch 1, sc 11, FPdc around each of next 6 sts, sc 27, turn. (44 sts)
Row 3 (WS): Ch 1, sc across, turn. (44 sts)
Row 4 (RS): Ch 1, sc 11, C6, sc 27, turn. (44 sts)
Rows 5–10: Work in pattern with plain FPdc on RS rows. (44 sts)
Row 11 (WS): Ch 1, sc2tog, sc to last 2 sts, sc2tog, turn. (42 sts)
Row 12 (RS, cross): Ch 1, sc2tog, sc to cable, C6, sc to last 2 sts, sc2tog, turn. (40 sts)
Rows 13–18: Keep decreasing at both ends of every row. Use plain FPdc on RS rows.
– Row 13: 38 sts
– Row 14: 36 sts
– Row 15: 34 sts
– Row 16: 32 sts
– Row 17: 30 sts
– Row 18: 28 sts
Edging round: Ch 1. Along Row 18, work 28 sc, 1 per st. Work 16 sc evenly up the row ends. Along the foundation, work 3 sc in first ch, sc 42, 3 sc in last ch (48). Work 16 sc evenly down the row ends. Sl st to the first sc. (108 sts) Fasten off and leave a long tail.
Checkpoint: About 11.5 in × 4.5 in (29.2 × 11.4 cm).
Make All Pieces
Everything is in Cream:
- 1 back panel (about 70 g)
- 1 cuff (about 12 g)
- 1 tab (about 4 g)
- 2 small pockets (about 8 g each)
- 1 foot pocket (about 25 g)
Layout (front view, RS facing):
        [ tab + ring ]
[        ribbed cuff         ]
[  leg  |  cable  |  leg     ]
[ small pocket | small pocket]
[ foot pocket ---------------> toe ]
Border (Back Panel)
Border gauge: 4 sc per 1 in (2.5 cm). Along stitch edges, work 1 sc per stitch. Along row ends, work 8 sc for every 9 rows, which matches the 16 sts : 18 rows gauge ratio.
Round 1: With the panel’s last loop still on your hook, ch 1. Work the edges in this order, counterclockwise as you go:
- Bottom (Row 63): 28 sc, 1 per st
- Toe curve (row ends of Rows 63–56): 11 sc
- Toe straight (row ends of Rows 55–50): 5 sc
- Instep slant (Rows 49–42): 18 sc
- Leg, toe side (Rows 41–1): 36 sc
- Top (foundation): 3 sc in first ch, sc 26, 3 sc in last ch (32)
- Heel side straight (Rows 1–55): 49 sc
- Heel curve (Rows 56–63): 11 sc
Sl st to the first sc.
Total: 28 + 11 + 5 + 18 + 36 + 32 + 49 + 11 = 190 sts
Round 2: Ch 1, rev sc in each st around, sl st to the first rev sc. (190 sts) Fasten off.
Why the math works:
– Row 63 and the foundation are counted 1 sc per st.
– 55 straight heel rows × 8/9 rounds to 49.
– 41 leg rows × 8/9 rounds to 36.
– The 3 sc corners on the top edge give the 32 sts needed to seam stitch-for-stitch to the cuff’s 32-sc edge.
– The curves and the slant get a few extra sts because those edges are diagonal, which keeps them from cupping.
Checkpoint: The bordered panel should be 7.8 in (19.8 cm) wide at the leg, 11.8 in (30.0 cm) at the foot and 14.8 in (37.6 cm) tall.
Joining
Method: Whipstitch with the yarn tails, going through both loops of each edging sc and catching one strand of the panel fabric behind it.
- Small pockets: Position them on the lower leg, 0.2 in (0.5 cm) in from each side border, with a 0.4 in (1.0 cm) gap at the center (0.2 + 3.5 + 0.4 + 3.5 + 0.2 = 7.8 in). Their bottom edges should sit 0.5 in (1.3 cm) below where the foot pocket’s top edge will go. Sew down the sides and across the bottom, 1 whipstitch per edging sc. That’s 14 + 16 + 14 = 44 stitches per pocket. Leave the 16-st top open.
- Foot pocket: Center it over the foot just inside the border, with its bottom edge resting on Round 1 of the border. Sew the 16 + 28 + 16 = 60 edging sts on the sides and curved bottom. Leave the 48-st top open.
- Cuff: With RS facing, seam one 32-sc edge of the cuff to the 32 top sts of border Round 2, one stitch to one stitch.
- Tab: Fold the tab through the ring. Sew both ends to the WS of the cuff at the center, overlapping it by 1 in (2.5 cm) each. That leaves a 2 in (5.1 cm) loop above the cuff.
Tension: Keep each whipstitch snug but not tight. If the panel puckers, the stitches are too tight. If the pocket gapes, they’re too loose. Lay the piece flat after every 10 stitches to check.
Size checkpoint: 7.8 in (19.8 cm) wide at the leg and 17.8 in (45.2 cm) tall without the loop, or 19.8 in (50.3 cm) to the top of the loop.
Final Blocking
- Weave in all ends on the WS and run each one back over itself.
- Lay the organizer face up on a blocking mat.
- Mist it until it’s evenly damp, not soaked.
- Pin it to 7.8 in (19.8 cm) × 11.8 in (30.0 cm) × 17.8 in (45.2 cm).
- Pat the cable and cuff ribs gently upward with your fingers so they stay raised. Don’t press them flat.
- Tuck a folded towel into each pocket so the pockets dry slightly open.
- Let it dry completely, at least 24 hours.
Final Quality-Control Checklist
- The panel has 190 border sts, and its corners lie flat.
- The cable crosses on Rows 6, 14, 22, 30, 38 and 46, with 8 rows between crosses.
- The cuff ribs run vertically and the cuff is seamed stitch-for-stitch.
- Both small pockets match in size and line up at the same height.
- All pocket tops are open and the side seams are secure.
- The tab is centered and the ring hangs straight.
- No ends show on the RS.
Troubleshooting
- The cable slants or pulls: Check that you skipped the sc behind every post st. Missing one adds stitches and pushes the cable sideways.
- The foot flares: You may have worked 3 sc into the wrong edge. Increases go only at the toe edge.
- The border ripples: You have too many sc on the row-end edges. Go back to 8 per 9 rows.
- The border cups: Add 1–2 sc on the curves.
- The cuff is shorter than the panel’s top edge: Work the 32 sc edge row more loosely, or add 1 row of blo.
- The pockets sag when filled: Re-sew the bottom edges with smaller stitches, catching more panel fabric.
Care
Hand wash in cool water and press the water out in a towel. Dry flat and re-pin the shape while it’s damp.
Final Notes
The measurements build on each other in this order:
- Gauge: 16 sts × 18 rows = 4 in (10.2 cm).
- The leg: 28 sts = 7 in (17.8 cm).
- The foot: 44 sts = 11 in (27.9 cm).
- The bordered panel: 7.8 in × 11.8 in × 14.8 in (19.8 × 30.0 × 37.6 cm).
- The 3 in (7.6 cm) cuff brings the height to 17.8 in (45.2 cm).
Check each step before you move on, and the pockets and cuff will fit. Happy crocheting!