

The Lilac Bloom Bed Runner is a soft, lacy band of flower squares that runs across the foot of a bed. Each square has a small open center ringed by eight rounded fan petals, and chain lattice rounds turn the flower into a square. When the squares are joined, the corners form an open diamond lattice. A picot-bobble border and chunky tassels finish the edges.
The sample uses one lavender color throughout, which keeps the look calm and romantic and lets the texture do the work. It suits a white or cream bed, but it is just as pretty in sage, blush, or oatmeal.
This pattern uses US crochet terms. The finished runner measures 23″ × 72″ (58.4 × 182.9 cm) after blocking, not counting the tassels. The tassels add 5″ (12.7 cm) at each short end.
Construction is simple. You make 30 identical squares, join them in a 3 × 10 layout with a flat whipstitch, then work a three-round border all the way around. Last, you add 8 tassels to the two short ends.
Finished Size and Construction
- Finished size: 23″ × 72″ (58.4 × 182.9 cm), without tassels
- Skill level: Intermediate
- Terminology: US crochet terms
- Yarn weight: Worsted (#4)
- Hook: 5.0 mm (H-8)
- Number of pieces: 30 squares + 8 tassels
- Layout: 3 squares wide × 10 squares long
- Square size: 7″ × 7″ (17.8 × 17.8 cm), blocked
- Size before border: 21″ × 70″ (53.3 × 177.8 cm)
- Border depth: 1″ (2.5 cm) on every side
Materials
Yarn: Use a smooth worsted-weight yarn that shows stitch detail clearly. A cotton or cotton-acrylic blend gives crisp petals and blocks well. Avoid fuzzy or highly textured yarns, which blur the lattice.
- Lavender: about 700 g / 1,400 m (about 1,530 yd)
- Squares: about 17 g each × 30 = 510 g
- Border: about 70 g
- Tassels: about 6 g each × 8 = 48 g
These quantities include a margin of roughly 10% for gauge differences and swatching.
Tools:
– 5.0 mm (H-8) crochet hook
– Tapestry needle
– Stitch markers (at least 4)
– A piece of stiff card 5″ (12.7 cm) tall, for the tassels
– Scissors
– Blocking mats, rust-proof pins, and a spray bottle or steamer
– Measuring tape
Abbreviations (US Terms)
- ch – chain
- sl st – slip stitch
- sc – single crochet
- hdc – half double crochet
- dc – double crochet
- tr – treble crochet
- st(s) – stitch(es)
- sp – space
- sk – skip
- rep – repeat
Special stitch – Picot-Bobble (PB): Work a 3-dc cluster in the stitch: [yo, insert hook in st, yo and pull up a loop, yo and pull through 2 loops] 3 times, yo and pull through all 4 loops on hook. Then ch 3 and sl st in the 3rd ch from the hook to make a picot on top of the cluster.
Petal: (hdc, dc, 3 tr, dc, hdc) all in the same space. That is 7 sts.
Gauge and Checkpoints
Make one complete square before anything else, then wet-block it. It should measure 7″ × 7″ (17.8 × 17.8 cm), with 30 sts along each side of Round 8, counting both corner stitches.
Checkpoints while you work (lightly stretched, before blocking):
– After Round 3 (flower): about 3.5″ (8.9 cm) across
– After Round 5 (first square round): about 5″ (12.7 cm) per side
– After Round 7: about 6.5″ (16.5 cm) per side
– After Round 8: about 6.75″ (17.1 cm), blocking to 7″ (17.8 cm)
If your square is too big, go down a half size to 4.5 mm. If it is too small, go up to 5.5 mm. Don’t change any stitch counts. The joining and border math depends on exactly 30 sts per side.
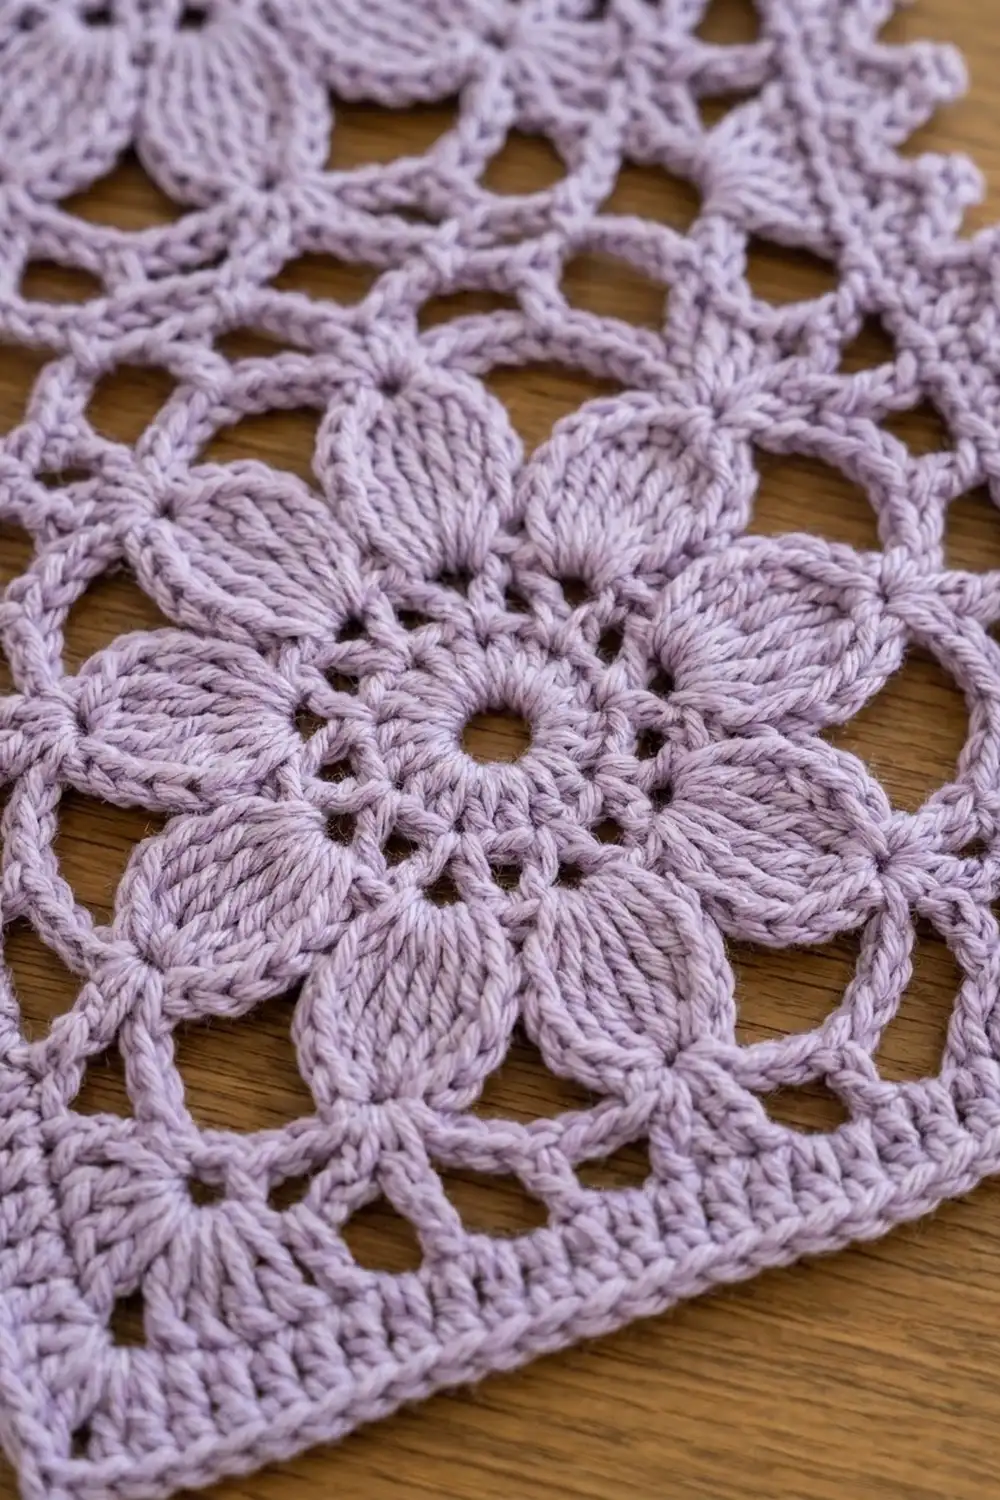
Square Motif (Make 30)
Round 1: Make a magic ring. Ch 3 (counts as dc), 15 dc in ring. Sl st to top of ch-3. Pull the ring snug, but leave a small open center. (16 dc)
Round 2: Ch 1, sc in same st, ch 3, sk next st, sc in next st, ch 3, sk next st; rep from * 6 more times. Sl st to first sc. (8 sc, 8 ch-3 sps)
Round 3 (petals): Sl st into first ch-3 sp. Petal in ch-3 sp, sl st in next sc; rep from * 7 more times, ending with a sl st in the base of the first petal. (8 petals of 7 sts each = 56 petal sts, plus 8 sl sts)
The petals should cup slightly and look like rounded fans with a raised center. That is how they should look.
Round 4 (chain ring): Sl st across the hdc, dc, and first tr of the first petal to reach the center tr. Ch 1, sc in the center tr, ch 7, sc in the center tr of the next petal; rep from * 6 more times, ch 7, sl st to first sc. (8 sc, 8 ch-7 loops)
Round 5 (squaring round): Sl st into the first ch-7 loop. This loop is a corner. Ch 3 (counts as dc), 3 dc, ch 3, 4 dc in the same loop. 7 dc in the next loop (side). (4 dc, ch 3, 4 dc) in the next loop, 7 dc in the next loop; rep from * 2 more times. Sl st to top of ch-3.
(Each side between corner sps: 4 + 7 + 4 = 15 dc. Total: 60 dc, 4 ch-3 corner sps.)
Place a marker in each corner ch-3 sp.
Round 6 (lattice): Sl st in the next 3 dc and into the corner ch-3 sp. Ch 1, (sc, ch 5, sc) in the corner sp. Ch 5, sk 3 dc, sc in next dc, [ch 5, sk 3 dc, sc in next dc] 2 times, ch 5, sk last 3 dc, (sc, ch 5, sc) in next corner sp; rep from * 2 more times, then work the last side the same way and end with ch 5 and a sl st to the first sc.
(Per side: 4 side ch-5 loops. Total: 16 side loops + 4 corner ch-5 loops = 20 loops.)
Check: on each side the sc’s land in dc 4, 8, and 12 of the 15, so there are 3 skipped dc in every gap. The lattice is even and symmetrical.
Round 7 (solid edge): Sl st to the center of the first corner ch-5 loop. Ch 3 (counts as dc), (2 dc, ch 2, 3 dc) in the same corner loop. 5 dc in each of the next 4 side loops, (3 dc, ch 2, 3 dc) in the corner loop; rep from * 2 more times, then 5 dc in each of the last 4 side loops. Sl st to top of ch-3.
(Each side between corner ch-2 sps: 3 + 20 + 3 = 26 dc. Total: 104 dc, 4 ch-2 sps.)
Round 8 (joining edge): Ch 1. Sc in each dc around, and work 3 sc in each corner ch-2 sp. Sl st to first sc. Fasten off, leaving a 24″ (61.0 cm) tail on 10 of the squares for seaming.
(Total: 104 + 12 = 116 sc.)
The center sc of each 3-sc group is the corner stitch. Each side has 30 sts including both corner stitches: 1 corner + 1 + 26 + 1 + 1 corner. Check: 4 × 30 − 4 shared corners = 116 ✓.
Make All Pieces
Make 30 squares in lavender, plus 8 tassels (instructions after the border). Block all squares to 7″ × 7″ (17.8 × 17.8 cm) before joining. Squares that are all the same size make straight seams.
Layout grid (3 wide × 10 long):
[S][S][S]   row 1  (short end, tassels)
[S][S][S]   row 2
[S][S][S]   row 3
[S][S][S]   row 4
[S][S][S]   row 5
[S][S][S]   row 6
[S][S][S]   row 7
[S][S][S]   row 8
[S][S][S]   row 9
[S][S][S]   row 10 (short end, tassels)
Joining
Method: Flat whipstitch through the back loops only, with the right sides facing up.
Stitch-to-stitch logic: Line up two squares side by side. Start in one corner stitch and match it to the facing square’s corner stitch. Whipstitch through the back loop of each pair of sts, working 1 to 1 along all 30 sts, and end corner to corner. Every seam joins exactly 30 sts to 30 sts.
Order:
1. Join the squares into 10 rows of 3 with short seams.
2. Join the rows together along the long seams. At each 4-way intersection, take one extra pass through all four corner stitches to close the gap.
Tension: Pull each stitch only until the edges meet flat. If you pull too hard, the runner puckers and shrinks; if you leave it loose, the seams gape. Lay the work flat every few seams to check.
Size checkpoint: The joined panel should measure 21″ × 70″ (53.3 × 177.8 cm). Each square adds 7″ (17.8 cm), and the seams add no width.
Border
Border gauge: Round 1 is worked at the same rate as the square edges, 30 sts per 7″ (17.8 cm). That keeps the border from rippling or drawing in.
Starting counts: Each square’s side has 30 sts. Along a long edge: 10 squares × 30 = 300 sts. Along a short edge: 3 squares × 30 = 90 sts. Both numbers include the two outer corner sts. At each seam, work into both corner sts (one from each square). No extra stitches are added at the seams.
So between the outer corner sts there are 298 sts on each long edge and 88 on each short edge.
Round 1 (sc): Join yarn in an outer corner st. Ch 1, 3 sc in the corner st. Sc in each of the next 298 sts (long edge), 3 sc in the corner st, sc in each of the next 88 sts (short edge), 3 sc in the corner st; work the second long and short edges the same way, leaving off the last corner. Sl st to first sc.
(Between corner center sts: 300 sts long side, 90 sts short side. Total: 2(298) + 2(88) + 12 = 784 sc.)
Round 2 (dc): Sl st into the next sc (the center of the corner group). Ch 3 (counts as dc), 2 dc in the same st. Dc in each st to the next corner center st, 3 dc in the corner center st; rep around. Sl st to top of ch-3.
(Between corner center sts: 302 long, 92 short. Total: 784 + 8 = 792 dc.)
Round 3 (picot-bobble edge): Sl st into the next dc (the corner center). Ch 1, (sc, PB, sc) in the corner st.
– Long side: sc in next 2 sts, ch 1, sk 1, PB in next st, ch 1, sk 1, sc in next 2 sts; rep from * 59 more times (60 PB).
– (sc, PB, sc) in the corner st.
– Short side: sc in next 2 sts, rep the same 5-st sequence 18 times (18 PB).
– (sc, PB, sc) in the corner st.
Work the remaining long and short sides the same way. Sl st to first sc and fasten off.
Why the math works: Each repeat uses 5 sts (sk, PB, sk, sc, sc). With 2 sc at the start of each side:
– Long side: 2 + (5 × 60) = 302 ✓
– Short side: 2 + (5 × 18) = 92 ✓
Every side starts and ends with 2 sc next to a corner PB, so it is symmetrical. Total PB: 2(60) + 2(18) + 4 = 160.
Finished size: 21″ + 2″ = 23″ wide and 70″ + 2″ = 72″ long, so 23″ × 72″ (58.4 × 182.9 cm).
Tassels (Make 8)
- Wrap yarn 30 times around the 5″ (12.7 cm) card.
- Thread a 12″ (30.5 cm) strand under the wraps at the top and tie it tightly.
- Cut the wraps at the bottom.
- Wrap a second strand around the tassel 1″ (2.5 cm) below the top, 6 times. Knot it and hide the ends inside the tassel.
- Trim the bottom so it is even, 5″ (12.7 cm) long.
Placement: On each short end, attach one tassel at each outer corner PB and one at each point that lines up with the two motif seams. That makes 4 per end, 8 in total. Use the top ties to sew each tassel securely to the border.
Final Blocking
- Weave in all remaining ends along seams or inside the solid rounds.
- Soak the runner in cool water for 15 minutes. Press out the water gently; do not wring.
- Roll it in towels to remove more moisture.
- Lay it flat on mats and pin it to 23″ × 72″ (58.4 × 182.9 cm).
- Pin each corner PB outward, then pin along the edges every few inches.
- Ease the petals into rounded shapes and open the lattice loops with your fingers.
- Let it dry completely before you unpin it. Fluff the tassels with your fingers once dry.
For acrylic blends, steam-block lightly instead. Hold the steam above the work and never press the iron onto it.
Final Quality-Control Checklist
- 30 squares, each 7″ × 7″ (17.8 cm) with 30 sts per side
- All seams worked 1 to 1, with corner sts matched
- Intersections closed with no holes
- Border Round 1: 784 sts; Round 2: 792 sts
- 60 PB on each long side, 18 on each short side, 4 at the corners
- Final size 23″ × 72″ (58.4 × 182.9 cm)
- 8 tassels, all 5″ (12.7 cm) long, evenly spaced
- All ends woven in securely
Troubleshooting
- Petals ruffle: Tension is loose; go down a hook size for Round 3 only.
- Square won’t lie flat after Round 5: The ch-7 loops in Round 4 are too tight. Chain more loosely, or try a slightly larger hook for that round.
- Wrong count on a side: Count Round 7 again. Each side must have 26 dc between the corner ch-2 sps.
- Seams pucker: You are whipstitching too tightly. Loosen up, and re-block if needed.
- Border waves: You added extra sts in Round 1. Count the edge stitches again: 298 and 88 between corners.
- Corners curl: Pin the corner PB firmly while blocking.
- Tassels look thin: Add 5–10 more wraps.
Care
Hand wash in cool water with a mild detergent, then lay flat to dry, reshaping while damp. Do not tumble dry, because heat can shrink the lace and frizz the tassels.
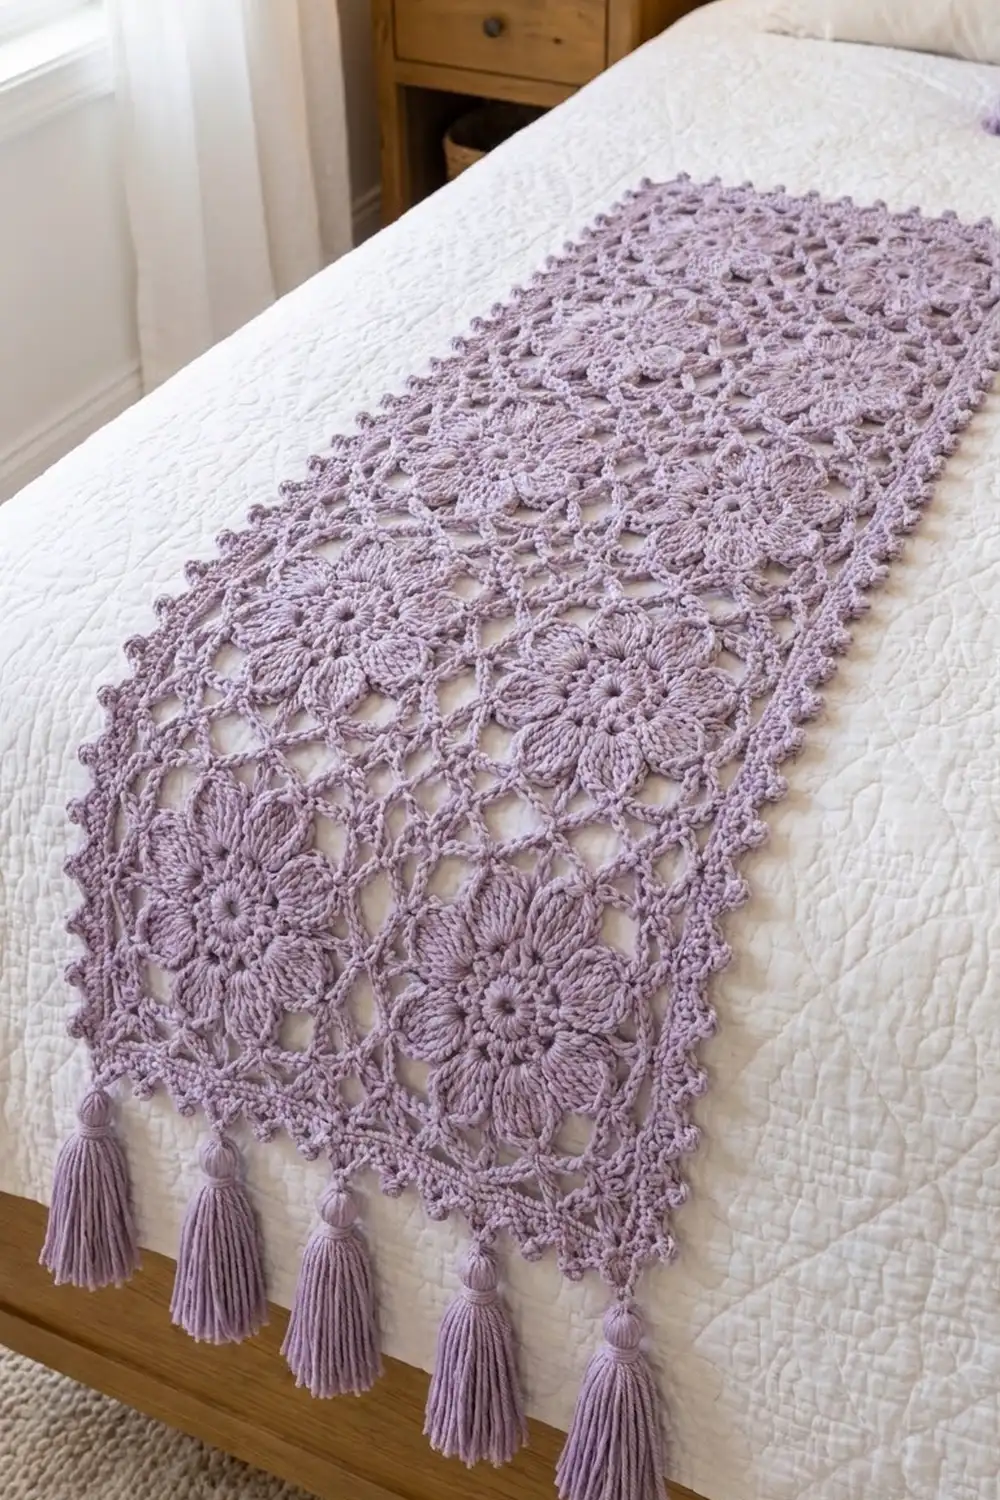
Final Notes
The measurements build on each other:
– Each square has 30 stitches per side and measures 7″ (17.8 cm).
– 3 × 10 squares make a 21″ × 70″ (53.3 × 177.8 cm) panel.
– The 1″ (2.5 cm) border brings the finished runner to 23″ × 72″ (58.4 × 182.9 cm).
– Eight tassels finish the ends.
If your first square hits gauge, everything after it fits. Take your time with blocking, and the lattice will open into a light, airy pattern.
Happy crocheting!